

Pro Visual C++-CLI And The .NET 2.0 Platform (2006) [eng]-1
.pdf688 C H A P T E R 1 6 ■ M U L T I T H R E A D E D P R O G R A M M I N G
Process^ proc = gcnew Process();
Next, you need to populate several properties found in the StartInfo property. These properties will tell the CLR where the process is, what parameters to pass, whether to start the process in its own shell, and whether to redirect standard input. There are several other properties as well, but these are the most important:
proc->StartInfo->FileName = "../debug/SyncByMutex.exe"; proc->StartInfo->Arguments = "1"; proc->StartInfo->UseShellExecute = false; proc->StartInfo->RedirectStandardInput = true;
Finally, once the process is defined, you start it:
proc->Start();
Listing 16-10 shows how to start two copies of the Mutex process that you will build next in this chapter.
Listing 16-10. Creating Subprocesses
using namespace System;
using namespace System::Diagnostics; using namespace System::Threading;
void main()
{
Process^ proc1 = gcnew Process(); proc1->StartInfo->FileName = "../debug/SyncByMutex.exe"; proc1->StartInfo->Arguments = "1"; proc1->StartInfo->UseShellExecute = false; proc1->StartInfo->RedirectStandardInput = true; proc1->Start();
Process^ proc2 = gcnew Process(); proc2->StartInfo->FileName = "../debug/SyncByMutex.exe"; proc2->StartInfo->Arguments = "2"; proc2->StartInfo->UseShellExecute = false; proc2->StartInfo->RedirectStandardInput = true; proc2->Start();
Thread::Sleep(5000); // Added just to clean up console display
}
You don’t need to use MutexSpawn.exe to run the following Mutex example, but it makes things easier when you’re trying to test multiple processes running at the same time.
Okay, let’s move on to actually looking at the Mutex class. In general, you’ll use only three methods on a regular basis within the Mutex class:
•The constructor
•WaitOne()
•ReleaseMutex()

C H A P T E R 1 6 ■ M U L T I T H R E A D E D P R O G R A M M I N G |
689 |
Unlike the Monitor class, in which you use a static member, the Mutex class requires you to create an instance and then access its member methods. Like any other class, to create an instance of Mutex requires you call its constructor. The Mutex constructor provides five overloads:
Mutex();
Mutex(Boolean owner);
Mutex(Boolean owner, String^ name);
Mutex(Boolean owner, String^ name, &Boolean createdNew);
Mutex(Boolean owner, String^ name, &Boolean createdNew,
MutexSecurity^ mutexSecurity);
When you create the Mutex object, you specify whether you want it to have ownership of the Mutex or, in other words, block the other threads trying to enter the region. Be careful, though, that the constructor doesn’t cause a thread to block. This requires the use of the WaitOne() method, which you’ll see later in the chapter.
You can create either a named or unnamed instance of a Mutex object but, to share a Mutex across processes, you need to give it a name. When you provide a Mutex with a name, the Mutex constructor will look for another Mutex with the same name. If it does find one, then they will synchronize blocks of code together.
The third constructor adds an output parameter that will have a value of true if this call was the first constructor to build a Mutex of the specified name; otherwise, the name already exists and will have the value of false.
The last constructor adds access control security to be applied to the named Mutex. This form of the constructor is beyond the scope of this book, but basically it allows the addition of access right rules to the named Mutex.
Once a Mutex object exists, you then must tell it to wait for the region to be unoccupied before entering. You do this using the Mutex class’s WaitOne() member method:
bool WaitOne();
bool WaitOne(int milliseconds, bool exitContext); bool WaitOne(TimeSpan span, bool exitContext);
The WaitOne() method is similar to a combination of the Monitor class’s Enter() and TryEnter() methods, in that the WaitOne() method will wait indefinitely like the Monitor::Enter() method if you pass it no parameters. If you pass it parameters, though, it blocks for the specified time and then passes through like the Monitor::TryEnter() method. Just like the TryEnter() method, you should not, normally, let the thread execute the code within the Mutex region, as that will make the region not thread-safe.
■Note The exitContext parameter you will probably ignore and set to false, as it is an advanced feature of Mutex where the WaitOne() method is called from inside a nondefault managed context. This can happen if your thread is inside a call to an instance of a class derived from ContextBoundObject. (Probably something that you won’t do unless you are performing some rather advanced C++/CLI coding.)
To specify the end of the Mutex region, you use the Mutex class’s ReleaseMutex() member method. Just like Monitor’s Enter() and Exit() method combination, you need to match WaitOne() calls with
ReleaseMutex() calls.
Listing 16-11 shows how to code a multithreaded single process. There is nothing special about it. In fact, I would normally just use a Monitor. Where this example really shines is when it is used in conjunction with MutexSpawn.exe, as it shows the Mutex class’s real power of handling mutually exclusive regions of code across processes.
690 C H A P T E R 1 6 ■ M U L T I T H R E A D E D P R O G R A M M I N G
Listing 16-11. Synchronizing Using the Mutex Class
using namespace System;
using namespace System::Threading;
ref class MyThread
{
static Mutex ^m = gcnew Mutex(false, "SyncByMutex"); public:
static void ThreadFunc();
};
void MyThread::ThreadFunc()
{
Random^ Rand = gcnew Random;
Thread ^thr = Thread::CurrentThread;
for (int i = 0; i < 4; i++)
{
m->WaitOne();
Console::WriteLine("{0} Enter - {1}", thr->Name, i); Thread::Sleep(Rand->Next(20, 100)); // Simulate Work Console::WriteLine("{0} Exit - {1}", thr->Name, i); m->ReleaseMutex();
Thread::Sleep(Rand->Next(20, 100));
}
}
int main(int argc, char *argv[])
{
MyThread ^myThr = gcnew MyThread();
Thread ^thr1 = gcnew Thread(gcnew ThreadStart(&MyThread::ThreadFunc));
Thread ^thr2 = gcnew Thread(gcnew ThreadStart(&MyThread::ThreadFunc));
thr1->Name =
String::Format("Process {0} - Thread 1", gcnew String(argv[1])); thr2->Name =
String::Format("Process {0} - Thread 2", gcnew String(argv[1]));
thr1->Start(); Thread::Sleep(50); thr2->Start();
}
Because you’ve already seen how to use the Monitor, the preceding example should be quite straightforward. The only real difference (other than the names of the methods being different, of course) is that the Mutex uses an instance object and member method calls, and the Monitor uses static method calls.
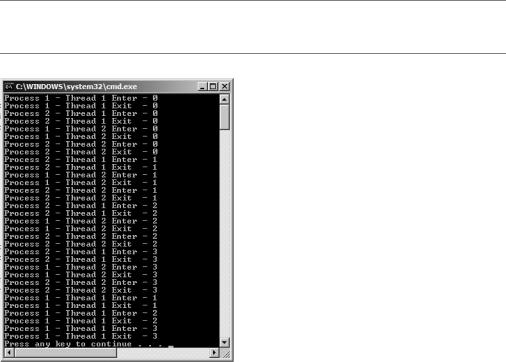
Figure 16-12 shows SyncByMutex.exe in action. Notice that threads in both processes are blocked and get access to the named Mutex region. Also notice that every enter line has a corresponding exit line printed before a new thread takes over the Mutex region.
C H A P T E R 1 6 ■ M U L T I T H R E A D E D P R O G R A M M I N G |
691 |
■Unsafe Code Passing arguments to the main() function is unsafe code as it uses pointers to pass the values. You need to use the /clr compiler option.
Figure 16-12. A pair of SyncByMutex programs in action
The ReaderWriterLock Class
The System::Threading::ReaderWriterLock class is a little different from the previous two types of synchronization in that it uses a multiple-reader/single-writer mechanism instead of the all-or- nothing approach. What this means is that the ReaderWriterLock class allows any number of threads to be in a block of synchronized code so long as they are only reading the shared resource within it. On the other hand, if a thread needs to change the shared resource, then all threads must vacate the region and give the updating thread exclusive access to it.
This type of synchronization makes sense because if a thread isn’t changing anything, then it can’t affect other threads. So, why not give the thread access to the shared resource?
The ReaderWriterLock class is very similar to both the Monitor class and the Mutex class. You specify a region to be synchronized and then have the threads block or pass into this area based on whether an update is happening in the region.
Like the Mutex class, you create an instance of the ReaderWriterLock class and work with its member method. To create an instance of the ReaderWriterLock object, you call its default constructor:
ReaderWriterLock();
Once you have a ReaderWriterLock object, you need to determine whether the region of code you want to block will do only reading of the shared resource or if it will change the shared resource.
If the region will only read the shared resource, then use the following code to set the region as read-only:
void AcquireReaderLock(int milliseconds); void AcquireReaderLock(TimeSpan span);
692 C H A P T E R 1 6 ■ M U L T I T H R E A D E D P R O G R A M M I N G
You pass both of these overloaded methods a parameter, so specify the length of time you’re willing to wait before entering the region. Due to the nature of this synchronization method, you can be sure of one thing: If you’re blocked by this method call, then some other thread is currently updating the shared resource within. The reason you know some other thread is writing to the region is because the thread doesn’t block if other threads in the region are only reading the shared resource.
Because you know that some thread is writing in the region, you should make the time you wait longer than the time needed to complete the write process. Unlike any of the other synchronization methods you’ve seen in this chapter, when this method times out, it throws an ApplicationException exception. So if you specify anything other than an infinite wait, you should catch the exception. The reason these methods throw an exception is that the only reason the wait time should expire is due to a thread deadlock condition. Deadlock is when two threads wait forever for each other to complete.
To specify the end of a synchronized read-only region, you need to release the region:
void ReleaseReaderLock();
If the region will require updating of the shared resource within the region, then you need to acquire a different lock:
void AcquireWriterLock(int milliseconds); void AcquireWriterLock(TimeSpan span);
Like the reader, these methods pass parameters to avoid the deadlock situation. Unlike the reader lock, though, these methods block no matter what type of thread falls within the region, because they allow only one thread to have access. If you were to use only writer locks, then you would, in effect, be coding a Monitor or a Mutex.
As you would expect, once you’re finished with the writer region, you need to release it:
void ReleaseWriterLock();
Listing 16-12 shows how to implement a multithread application using ReaderWriterLock. Also, just for grins and giggles, I added an Interlocked::Decrement() method to show you how that works as well.
Listing 16-12. Synchronizing Using the ReaderWriterLock Class
using namespace System;
using namespace System::Threading;
ref class MyThread
{
static ReaderWriterLock ^RWLock = gcnew ReaderWriterLock(); static int iVal = 4;
public:
static void ReaderThread(); static void WriterThread();
};
void MyThread::ReaderThread()
{
String ^thrName = Thread::CurrentThread->Name; while (true)
{
try
{
C H A P T E R 1 6 ■ M U L T I T H R E A D E D P R O G R A M M I N G |
693 |
RWLock->AcquireReaderLock(2);
Console::WriteLine("Reading in {0}. iVal is {1}", thrName, iVal);
RWLock->ReleaseReaderLock(); Thread::Sleep(4);
}
catch (ApplicationException^)
{
Console::WriteLine("Reading in {0}. Timed out", thrName);
}
}
}
void MyThread::WriterThread()
{
while (iVal > 0)
{
RWLock->AcquireWriterLock(-1);
Interlocked::Decrement(iVal);
Console::WriteLine("Writing iVal to {0}", iVal);
Thread::Sleep(20);
RWLock->ReleaseWriterLock();
}
}
void main()
{
Thread ^thr1 = gcnew Thread(gcnew ThreadStart(&MyThread::ReaderThread)); Thread ^thr2 = gcnew Thread(gcnew ThreadStart(&MyThread::ReaderThread)); Thread ^thr3 = gcnew Thread(gcnew ThreadStart(&MyThread::WriterThread));
thr1->Name = "Thread1"; thr2->Name = "Thread2";
thr1->IsBackground = true; thr2->IsBackground = true;
thr1->Start(); thr2->Start(); thr3->Start();
thr3->Join(); Thread::Sleep(2);
}
In actuality, the preceding code shouldn’t need to use Interlock because the region is already locked for synchronization. Notice that I created infinite loops for my reader threads. To get these threads to exit at the completion of the program, I made the background threads.
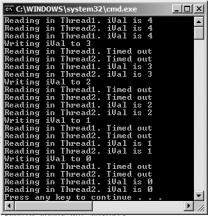
Figure 16-13 shows SyncByRWLock.exe in action. Notice that I purposely don’t specify a longenough wait for the writing process to complete so that the exception is thrown.
694 C H A P T E R 1 6 ■ M U L T I T H R E A D E D P R O G R A M M I N G
Figure 16-13. The SyncByRWLock program in action
Summary
In this chapter, you examined multithreaded programming within the .NET Framework. You started by learning the basics of multithreaded programming. Next, you moved on and explored the two ways of creating threads: Thread and ThreadPool. You finished off the chapter by covering the weighty topic of thread synchronization.
This is a rather complex topic, and I have barely scratched the surface of it. In fact, most of the text in this chapter relates to how to implement multithreaded programming using the .NET Framework and not the theory behind it. If you find this topic interesting, there are many books and articles available on the proper implementation of multithreaded programming.
Now that you know how to write multithreaded code (which you’ll need for the next chapter) you can move on to the next chapter and take a look at a third way of working over a network. This time, you will take complete control and code at the socket level.

696 C H A P T E R 1 7 ■ N E T W O R K P R O G R A M M I N G
Connection-Oriented Sockets
I’m not sure I understand why some programmers try to present an aura of mystery around connectionoriented sockets, better known by its implementation method: TCP (Transmission Control Protocol). In its simplest form, you have two parties, a client and a server, that want to communicate with each other. To accomplish this, the server opens up a socket and then the client connects to it. Once the connection is made, messages, or more accurately data packets, are sent back and forth between them, and finally the connection between the two is closed.
Okay, you can complicate things by making elaborate message protocols between the client and server, but that is not always necessary. In fact, I would argue that if it is extremely complex, then maybe you might want to sit down and think your protocol through again.
The TCP Server
There are (at least) two parties involved in setting up a TCP connection: the client (or clients) and the server. Let’s start with the server as it is in charge of providing a location to which the client(s) connect.
Four tasks must be performed by the server to create a location and establish a connection to
aclient:
1.Create a socket.
2.Bind the socket to an IPEndPoint. (An IPEndPoint is a combination of an IP address and a port.)
3.Set the socket to listening mode.
4.Accept the connection from the client in the socket.
Once the connection is established, then nearly any type of data can be sent from the server or received from the client. Usually communication between the client and server is transactional: One side sends a message and the other responds. But that is not always the case. It is perfectly all right for only one side to do all the sending, or to send multiple messages and then periodically receive a message. Basically, the sky’s the limit. By the way, this sending and receiving of messages describes what is called a protocol, and as you can see, the complexity of the protocol can range from very simple to extremely complex.
In network programming, setting up the connection, sending and receiving messages, and closing the connection is the easy part. (Okay, under the covers, magic is happening but most programmers don’t have to worry about that.) I think it’s so easy that I’m going to jump ahead and show you one way to make a connection that can receive multiple clients. There are many methods of doing this, but I think the one I’m presenting here is the most straightforward (if you read the last chapter on multithreading, that is). Another reason for jumping ahead is because you are seldom going to write a server that connects to only a single client.
The process of creating a multiconnection server involves the same four steps mentioned earlier plus a fifth, which puts the accepted connection on its own thread to run stand-alone.
Create a Socket
Before you can do any TCP communication, you need to create a socket through which the messages will flow. For a TCP connection there is only one constructor that you have to worry about:
Socket^ socket = gcnew Socket(AddressFamily::InterNetwork,
SocketType::Stream,
ProtocolType::Tcp);
C H A P T E R 1 7 ■ N E T W O R K P R O G R A M M I N G |
697 |
You may have to change the socket’s name, but the rest of this code will pretty much stay the same until the new and improved version 6 IP addresses become more prevalent. At that time, the standard address family will most likely become InterNetworkV6 with a fallback to InterNetwork, if InterNetworkV6 isn’t available.
The constructor shown here creates a socket to a version 4 IP address, which supports reliable, two-way, connection-based byte streams without duplication of data and without preservation of boundaries using the TCP protocol. (Now that is a mouthful!) We’ll come back to this later as it has one potential gotcha for the unwary.
Bind the Socket to an IPEndPoint
Now that you have a socket sitting out there in the ether, it’s time to bind it to a physical (sort of) address on your server machine. There are several ways of creating an IP endpoint address, but for the server you will probably use one of two ways, depending on the number of network interface cards (NICs) you have on your machine and how restrictive you want to make the connection to your server machine.
If you have only one NIC on your machine or you don’t care which IP address the client connects on, then you use the following:
IPEndPoint^ iped = gcnew IPEndPoint(IPAddress::Any, portnumber);
This method says: listen on any IP address available on the machine or allow the client to connect on any IP address available on the machine. If on the other hand you want to restrict the client to a single IP address (most useful when you have more than one NIC), then you use something more like this:
IPEndPoint^ iped = gcnew IPEndPoint(IPAddress::Parse("127.0.0.1"), portnumber);
or any of the other available methods that resolve the IPAddress parameter to a single IP address. (There is a multitude of ways to get an IP address, but these two are the only ways I have needed for configuring a server.)
The port number can be any number from 0 to 65535, but to avoid conflicting with the wellknown ports you should start at 1024 instead of 0. Also, you might find that another application is using your chosen port and then the system will not let you use it. To avoid this possibility, you should not hard-code the port within your code but instead make it an app.config, web.config, or Registry entry. (Of course, I’m not going to listen to my own advice and hard-code them but this is just to simplify the examples.)
By the way, to bind to a socket you simply call the following code:
socket->Bind(iped);
Set the Socket to Listening Mode
There isn’t much to setting a socket to listening mode. You just call the Listen() method of the
Socket class:
socket->Listen(10);
As you can see, it’s hardly what I would call rocket science.
The Listen() method shown here takes a parameter of the number of pending connections allowed to be queued. Normally, you will just leave it at 10 and forget about it. But what happens if you are getting periodic connection request spikes that cause the pending connections queue to be exceeded? At this point the clients are told, “Sorry we’re full, call back later…” (or something to that effect). To alleviate this, it is possible to tell the Listen() method to increase the size of the pending connection queue by setting the Listen() method’s parameter to a higher value.