

Pro Visual C++-CLI And The .NET 2.0 Platform (2006) [eng]-1
.pdf548 C H A P T E R 1 2 ■ A D O . N E T A N D D A T A B A S E D E V E L O P M E N T
DataRelation Class
A DataRelation is used to relate two DataTables together. It does this by matching DataColumns between two tables. You can almost think of it as the ADO.NET equivalent of the foreign-key relationship in a relational database (like you previously set).
One important thing you have to keep in mind is that the DataColumns must be the same data type. Remember that ADO.NET has strong data types, and when comparing different data types, one data type must be converted to the other. This conversion is not done automatically.
Constraint Classes
The Constraint classes make it possible to add a set of constraints on a particular column in your DataTable. Two types of constraints are currently supported by ADO.NET:
•ForeignKeyConstraint disallows a row to be entered unless there is a matching row in another (parent) table.
•UniqueConstraint makes sure that a column is unique within a DataTable.
Creating a Table Manually in Code
Normally, database designers build the databases that you use, but the DataColumn, DataRelation, and Constraint classes allow you as a developer to build a DataTable dynamically. The following snippet of code shows how to create the Authors DataTable manually:
// Create an empty DataTable
DataTable ^Authors = gcnew DataTable("Authors2");
// Add all the columns
Authors->Columns->Add(gcnew DataColumn("AuthorID", Type::GetType("System.Int32")));
Authors->Columns->Add(gcnew DataColumn("LastName", Type::GetType("System.String")));
Authors->Columns->Add(gcnew DataColumn("FirstName", Type::GetType("System.String")));
// Add autoincrement to AuthorID Authors->Columns["AuthorID"]->AutoIncrement = true;
//Make AuthorID unique Authors->Constraints->Add(
gcnew UniqueConstraint("PK_AuthorID", Authors->Columns["AuthorID"]));
//Make AuthorID the Primary key
array<DataColumn^>^ key = gcnew array<DataColumn^>(1); key[0] = Authors->Columns["AuthorID"]; Authors->PrimaryKey = key;
//Create a relation between AuthorID in Authors and Content tables dSet->Relations->Add("StoryLink",
Authors2->Columns["AuthorID"], dSet->Tables["Content"]->Columns["AuthorID"]);
//add table to DataSet
dSet->Tables->Add(Authors);
C H A P T E R 1 2 ■ A D O . N E T A N D D A T A B A S E D E V E L O P M E N T |
549 |
Developing with Disconnected ADO.NET
In the final two examples of this chapter, you’re going to build a couple of small Win Form applications to maintain the Authors DataTable that you’ve been working with throughout the chapter. These examples use disconnected data source access with full select, insert, update, and delete capabilities that can be either committed or rolled back. For the first example, you do all the work. For the second, you let Visual Studio 2005 do all the work. A good portion of the code (which you can find in the Downloads section of my Web site, www.ProCppCLI.net, or the Apress Web site, http:// www.apress.com) is related to auto-generated Win Forms controls and isn’t included here as it really has no relevance to this chapter’s topic. What you’ll see in the example is the code that wasn’t autogenerated by Visual Studio 2005.
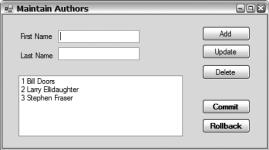
Figure 12-16 shows the final result of the first example, from which you can build your own Win Form.
Figure 12-16. The Author Maintenance tool
Building the DataAdaptor
The first thing that you need to do is build the application’s SqlDataAdaptor. Then you’ll use the SqlDataAdaptor to place data in the DataSet. Eight major steps (three of which are optional) are involved in building a SqlDataAdaptor and populating and maintaining a DataSet:
1.Create a SqlConnection.
2.Create a SqlDataAdaptor.
3.Implement a SelectCommand property.
4.Implement an InsertCommand property (optional).
5.Implement an UpdateCommand property (optional).
6.Implement a DeleteCommand property (optional).
7.Create a DataSet.
8.Populate (fill) the DataSet.
You build a SqlConnection for a disconnected database in the same way as you build a connected database:
550 C H A P T E R 1 2 ■ A D O . N E T A N D D A T A B A S E D E V E L O P M E N T
SqlConnection ^connect = gcnew SqlConnection();
#ifdef SQLAuth
// SQL Server authentication connect->ConnectionString =
"User ID=sa; Password=;"
"Data Source=(local); Initial Catalog=DCV_DB;";
#else
// Windows Integrated Security connect->ConnectionString =
"Persist Security Info=False; Integrated Security=SSPI;" "Data Source=(local); Initial Catalog=DCV_DB;";
#endif
Creating the SqlDataAdapter is a simple constructor call. You probably want to also add the primary key information. This ensures that incoming records that match existing records are updated instead of appended:
dAdapt = gcnew SqlDataAdapter();
dAdapt->MissingSchemaAction = MissingSchemaAction::AddWithKey;
The SelectCommand is the SQL command that will be used to populate the DataSet. It can be as complex or as simple as you like. The implementation of the SelectCommand requires a standard SqlCommand like the one you created earlier with connected access. Notice that the constructor takes the SQL command and the data source connection:
dAdapt->SelectCommand =
gcnew SqlCommand("SELECT AuthorID, LastName, FirstName" "FROM Authors", connect);
The InsertCommand is the SQL command that will be executed to insert added DataSet rows back into the data source. The implementation of this property is a little tricky, as it requires parameters to be passed to the command. The Add() method to the Parameters property is similar to what you have seen previously, except it has one additional parameter and the size parameter is mandatory, even if it is obvious, as in the case of Int. The additional property is the name of the column that the data will be extracted from:
// Implement Insert command dAdapt->InsertCommand =
gcnew SqlCommand("INSERT INTO Authors (LastName, FirstName) " "VALUES (@LastName, @FirstName)", connect);
// Add parameters
dAdapt->InsertCommand->Parameters->Add("@LastName", SqlDbType::VarChar, 50, "LastName");
dAdapt->InsertCommand->Parameters->Add("@FirstName", SqlDbType::VarChar, 50, "FirstName");
The UpdateCommand is the SQL command that will be executed to update rows in the data source that have been modified within the DataSet. The code does not contain anything new:
dAdapt->UpdateCommand =
gcnew SqlCommand("UPDATE Authors SET "
"LastName = @LastName, FirstName = @FirstName, " "WHERE AuthorID = @AuthorID", connect);
dAdapt->UpdateCommand->Parameters->Add("@LastName", SqlDbType::VarChar, 50, "LastName");
C H A P T E R 1 2 ■ A D O . N E T A N D D A T A B A S E D E V E L O P M E N T |
551 |
dAdapt->UpdateCommand->Parameters->Add("@FirstName", SqlDbType::VarChar, 50,
"FirstName");
dAdapt->UpdateCommand->Parameters->Add("@AuthorID", SqlDbType::Int, 4,
"AuthorID");
In the preceding WHERE clause, I use the key AuthorID, which is an auto-generated column that can’t be changed, to find the row to update. This simplifies things because if the key used to find the row to update can be changed during the update process, then when it’s changed the WHERE clause won’t be able to find the right row due to the changed key not matching the original key in the database.
So, are you stuck with only being able to use unchangeable keys? Fortunately, the answer is no. When changed, DataRows store their original values so that they can be accessed for this exact reason (they can be used for rolling back changes as well). Let’s pretend you can update AuthorID. Here is the code that needs to be changed:
dAdapt->UpdateCommand =
gcnew SqlCommand("UPDATE Authors SET "
"LastName = @LastName, FirstName = @FirstName, " "AuthorID = @AuthorID "
"WHERE AuthorID = @OldAuthorID", connect); //...All the parameters plus
dAdapt->UpdateCommand->Parameters->Add("@OldAuthorID", SqlDbType::Int, 4, "AuthorID")->SourceVersion = DataRowVersion::Original;
The DeleteCommand is the SQL command that will be executed when a DataRow is removed from the DataSet, which needs to be deleted now from the data source. Nothing new to explore here in the code:
dAdapt->DeleteCommand =
gcnew SqlCommand("DELETE FROM Authors "
"WHERE AuthorID = @AuthorID", connect); dAdapt->DeleteCommand->Parameters->Add("@AuthorID", SqlDbType::Int, 4,
"AuthorID");
You create a DataSet with a simple constructor. To fill the DataSet, you call the SqlDataAdapter class’s Fill() method. The Fill() method takes two parameters: a handle to the DataSet and the name of the data source table that you will be filling the DataSet with:
dSet = new DataSet(); dAdapt->Fill(dSet, "Authors");
Selecting Rows
You have many ways of selecting records from the DataSet. A common way of getting all the rows from a table is to use the DataRow collection found in the Rows property of the table and then enumerate through the collection. You populate the list box doing exactly that:
DataTable ^dt = dSet->Tables["Authors"];
if (dt == nullptr)
throw gcnew Exception("No Authors Table");
IEnumerator ^Enum = dt->Rows->GetEnumerator(); while(Enum->MoveNext())
{
DataRow ^row = (DataRow^)(Enum->Current); lbAuthors->Items->Add(ListBoxItem(row));
}
552 C H A P T E R 1 2 ■ A D O . N E T A N D D A T A B A S E D E V E L O P M E N T
As you can see in the ListBoxItem() method, to grab the columns, you use the indexed property of the DataRow:
String ^ListBoxItem(DataRow ^row)
{
return String::Format("{0} {1} {2}", row["AuthorID"], row["FirstName"], row["LastName"]);
}
A way of getting a specific set of DataRows from a DataTable is by using the DataTable’s Select() method. The method takes as a parameter a filter of the primary key:
array<DataRow^>^ row =
dt->Select(String::Format("AuthorID={0}", CurrentAuthorID));
You will see this code implemented later in updating and deleting rows.
Inserting Rows
Inserting a new row or, in this case, a new author is done by updating the text boxes with the information about the author and then clicking the Add button.
A good portion of the following code consists of validating, updating the list box, and cleaning up for text boxes. The actual ADO.NET-related code simply creates a new row, updates the columns with the information in the list boxes, and adds the row to the DataTable.
Notice that the actual insertion of the row into the data source with the Update() method is not found in this method. The reason for this is that I want to be able to commit or roll back all changes at one time using the Commit and Rollback buttons. Thus, the Update() method only occurs in the Commit button event. When the Update() method finally gets called, the UpdateCommand (which was coded previously) will get executed:
System::Void bnAdd_Click(System::Object^ sender, System::EventArgs^ e)
{
// Make sure the text boxes are populated
if (tbFirstName->Text->Trim()->Length == 0 || tbLastName->Text->Trim()->Length == 0) return;
//Create a new row in the DataTable DataTable ^dt = dSet->Tables["Authors"]; DataRow ^row = dt->NewRow();
//Update the columns with the new author information row["FirstName"] = tbFirstName->Text;
row["LastName"] = tbLastName->Text;
//Add the row to the Rows collection
dt->Rows->Add(row);
//Add the new row to the list box lbAuthors->Items->Add(ListBoxItem(row));
//Blank out the text boxes
tbFirstName->Text = ""; tbLastName->Text = "";
}
C H A P T E R 1 2 ■ A D O . N E T A N D D A T A B A S E D E V E L O P M E N T |
553 |
Updating Rows
Updating an author row is handled when you select a row out of the list box, update the text boxes, and finally click the Update button.
The ADO.NET-related code to update the author requires that you first select the row to be updated using the DataTable class’s Select() method. Once you have the row, you update the author information in the row columns. Like when you inserted a row, the Update() method does not get called until the Commit button is clicked, but when the Update() method finally gets called, the UpdateCommand ends up being executed:
System::Void bnUpdate_Click(System::Object^ sender, System::EventArgs^ e)
{
//Make sure we have a selected author from the listbox if (CurrentAuthorID < 0)
return;
//Select the author using its AuthorID
DataTable ^dt = dSet->Tables["Authors"]; array<DataRow^>^ row =
dt->Select(String::Format("AuthorID={0}", CurrentAuthorID));
//Since we know that AuthorID is unique only one row will be returned
//Update the row with the text box information
row[0]["FirstName"] = tbFirstName->Text; row[0]["LastName"] = tbLastName->Text;
// Update listbox
lbAuthors->Items->Insert(lbAuthors->SelectedIndex, ListBoxItem(row[0])); lbAuthors->Items->RemoveAt(lbAuthors->SelectedIndex);
}
Deleting Rows
Deletion of an author DataRow happens when you click a row in the list box and then click the Delete button.
The code to handle deleting a row is a little tricky, as it requires the use of transactional access to the DataSet. First, you need to select the row. Then you call its Delete() method. Deleting a record in the DataSet does not actually occur until the change is accepted. At this point only, a flag is set in the DataRow.
Also, like inserting and updating, the actual updating of the database does not occur until the Update() method is called when the Commit button is clicked. Ultimately, when the Update() method is called, the DeleteCommand (built previously) will be executed:
System::Void bnDelete_Click(System::Object^ sender, System::EventArgs^ e)
{
// Make sure we have a selected author from the listbox if (CurrentAuthorID < 0)
return;
// Select the author using its AuthorID DataTable ^dt = dSet->Tables["Authors"]; array<DataRow^>^ row =
dt->Select(String::Format("AuthorID={0}", CurrentAuthorID));
554 C H A P T E R 1 2 ■ A D O . N E T A N D D A T A B A S E D E V E L O P M E N T
//Since we know that AuthorID is unique only one row will be returned
//Delete the row
row[0]->Delete();
// All went well, delete the row from list box lbAuthors->Items->RemoveAt(lbAuthors->SelectedIndex);
}
Committing and Rolling Back Changed Rows
You commit all author DataRows changed when you click the Commit button.
Because a DataSet is disconnected from the database, anything that you do to it will not get reflected in the actual database until you force an update using the Update() method. Because this is the case, it is really a simple matter to either commit or roll back any changes that you have made to the DataSet.
To commit the changes to the database, simply call the Update() method, which will walk through the DataSet and update any changed records in its corresponding database record. Depending on the type of change, the appropriate SQL command (insert, update, or delete) will be executed. To commit the changes to the DataSet, you need to call the AcceptChanges() method, which will cause the DataSet to accept all changes that were made to it:
dAdapt->Update(dSet, "Authors"); dSet->AcceptChanges();
To roll back any changes, simply don’t call the Update() method, and call the RejectChanges() method to delete all changes in the DataSet that you have made since you last committed:
dSet->RejectChanges();
No (Coding) Effort Development with Disconnected ADO.NET
Lots of hard work there don’t you think? What if I were to tell you that you could provide the exact same functionality using Visual Studio 2005 with a few drag and drop operations and typing three lines of code? Hard to believe . . . but it’s true. It’s all due to the power of the Typed DataSet and the
DataGridView.
Typed DataSet
A Typed DataSet is an extension of a DataSet class where all columns of the database table are implemented as strongly typed properties. What you add after that to the class is really up to you.
I bet you are wondering how many of the three lines of code you are going to have to type make up the Typed DataSet. Fortunately, the answer is none, as Visual Studio 2005 can create a Typed DataSet for you. Okay, I’ve heard from hardcore developers that the generated Typed DataSet is not perfect, but to me it works just fine.
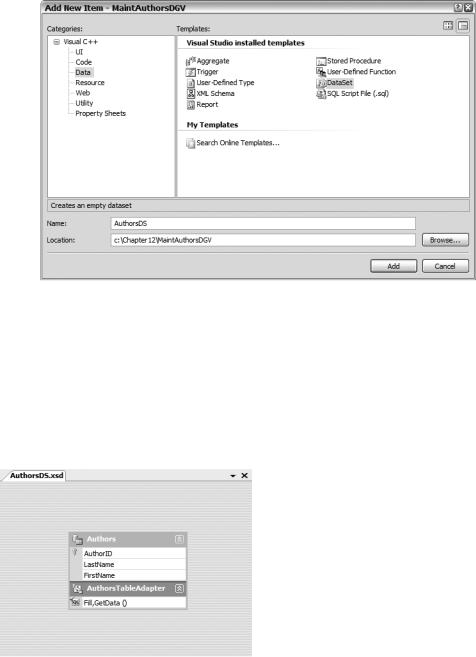
The steps to creating a Typed DataSet are straightforward:
1.Right-click the project name in the Solution Explorer.
2.Select the menu items Add New Item. This displays the dialog box shown in Figure 12-17.
556 C H A P T E R 1 2 ■ A D O . N E T A N D D A T A B A S E D E V E L O P M E N T
You’re finished. Okay, this was a rather simple example. You could also drag other tables, which incidentally retain their relationships, but I very seldom create Typed DataSets that are made up of more than one table.
DataGridView
Now comes that fun part. The DataGridView is probably one of the most powerful controls available in your screen design arsenal. It is also extremely easy to work with, but in this chapter I will barely even scratch the surface of the functionality it provides.
The DataGridView control provides a customizable table for displaying data with or without an underlying data source. In other words, you can either create your table manually or, as I will do in the example, generate it automatically by binding it to a data source. In this case, the data source is the Typed DataSet AuthorsDS.
The DataGridView class allows for a massive amount of customization. It provides more than 150 public properties, more than 80 public methods, and nearly 200 public events. Covering all these could take a fair-size book. Fortunately, at least as far as I’m concerned, all the properties, methods, and events I have to be concerned about are available via the Visual Studio 2005 Window form designer.
Here are the steps to implement a simple DataGridView:
1.Drag and drop the DataGridView from the Toolbox to your form.
2.Size it so that it nearly fills the form, but leave room for two buttons at the bottom.
3.Anchor the control to all four sides.
4.Click the triangle in the box in the top-right corner of the DataGridView.
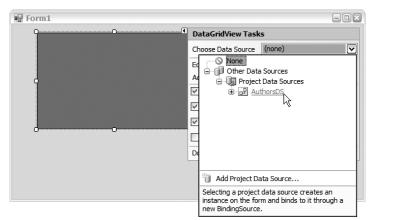
5.Click the drop-down arrow next to the Choose Data Source text box. This displays a dialog box similar to the one in Figure 12-19.
Figure 12-19. DataGridView Tasks
6.Select the AuthorsDS link. This adds two addition controls to the form, AuthorsDS and
AuthorDSBindingSource.
7.Select the AuthorDSBindingSource control and select Authors from the DataMember property drop-down list. Presto, your DataGridView changes from a gray box into a table.

C H A P T E R 1 2 ■ A D O . N E T A N D D A T A B A S E D E V E L O P M E N T |
557 |
8.Right-click within the DataGridView and select Edit Columns. This presents you with a dialog box like the one in Figure 12-20.
Figure 12-20. DataGridView Edit Columns dialog box
9.Go wild and change the look and feel of the DataGridView to your heart’s content.
10.Click OK.
Go ahead and compile and run your form. You should get a table of all the records in your Authors table. You can even edit, add, and remove them. But oops . . . you can’t save your changes to your database.
Here is where your three lines of code come in. Add two buttons, Commit and Rollback. Then in the Commit button’s click event handler, add the following two lines:
this->AuthorsTableAdapter->Update(this->AuthorsDS->Authors); this->AuthorsDS->AcceptChanges();
These lines provide the ability to commit the changes you made to the DataGridView to the database and then accept the changes to the DataSet. If you recall, you saw these same two lines in the Commit button in the prior example.
Finally, add your third and last line of code to the rollback button’s click event handler:
this->AuthorsDS->RejectChanges();
This line rejects all changes you made and restores the DataGridView back to its original state or to its state when the DataSet was last committed.