

Visual CSharp 2005 Recipes (2006) [eng]
.pdf238 C H A P T E R 7 ■ W I N D O W S F O R M S
7-11. Lay Out Controls Automatically
Problem
You have a large set of controls on a form and you want them arranged automatically.
Solution
Use the FlowLayoutPanel container to dynamically arrange the controls using a horizontal or vertical flow, or use the TableLayoutPanel container to dynamically arrange the controls in a grid.
How It Works
The FlowLayoutPanel and TableLayoutPanel containers (both new to .NET Framework 2.0) simplify the design-time and runtime layout of the controls they contain. At both design time and runtime, as you add controls to one of these panels, the panel’s logic determines where the control should be positioned, so you do not need to determine the exact location.
With the FlowLayoutPanel container, the FlowDirection and WrapContents properties determine where controls are positioned. FlowDirection controls the order and location of controls, and it can be set to LeftToRight, TopDown, RightToLeft, or BottomUp. The WrapContents property controls whether controls run off the edge of the panel or wrap around to form a new line of controls.
With the TableLayoutPanel container, the RowCount and ColumnCount properties control how many rows and columns are currently in the panel’s grid. The GrowStyle property determines how the grid grows to accommodate more controls once it is full, and it can be set to AddRows, AddColumns, or FixedSize (which means the grid cannot grow).
Figure 7-6 shows the design-time appearance of both a TableLayoutPanel container and a FlowLayoutPanel container. The TableLayoutPanel panel is configured with three rows and three
columns. The FlowLayoutPanel panel is configured to wrap contents and use left-to-right flow direction.
Figure 7-6. Using a FlowLayoutPanel panel and a TableLayoutPanel panel

C H A P T E R 7 ■ W I N D O W S F O R M S |
239 |
7-12. Use Part of a Main Menu for a Context Menu
Problem
You need to create a context menu that shows the same menu items as those displayed as part of an application’s main menu.
Solution
Use the CloneMenu method of the MenuItem class to duplicate the required portion of the main menu.
How It Works
In many applications, a control’s context-sensitive menu duplicates a portion of the main menu. However, .NET does not allow you to create a MenuItem instance that is contained in more than one menu at a time.
The solution is to make a duplicate copy of a portion of the menu using the CloneMenu method. The CloneMenu method not only copies the appropriate MenuItem items (and any contained submenus), but it also registers each MenuItem object with the same event handlers. Thus, when a user clicks a cloned menu item in a context menu, the event handler will be triggered as if the user had clicked the duplicate menu item in the main menu.
The Code
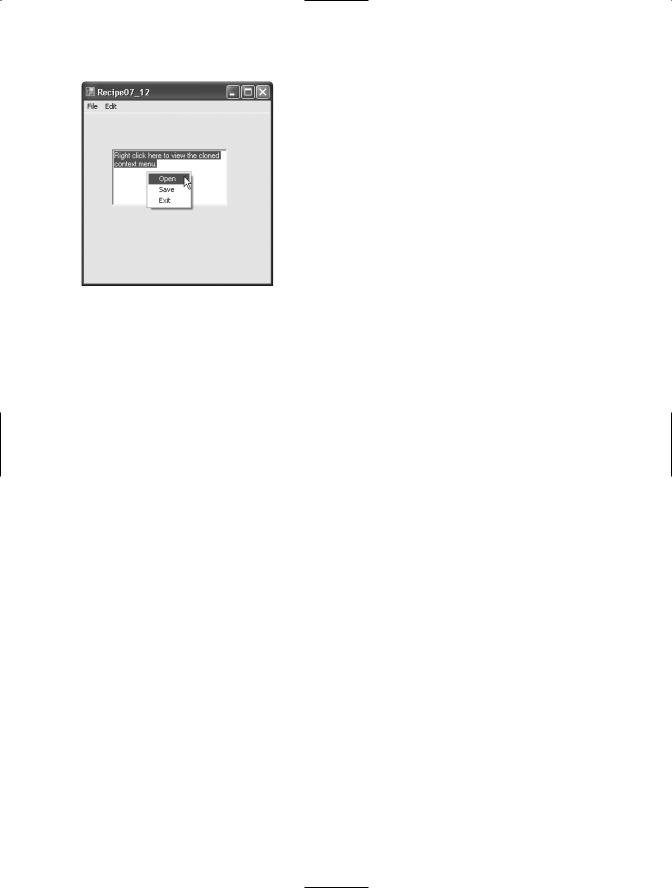
The following example uses the CloneMenu method to configure the context menu for a TextBox to be a duplicate of the File menu.
using System;
using System.Drawing; using System.Windows.Forms;
namespace Apress.VisualCSharpRecipes.Chapter07
{
public partial class Recipe07_12 : Form
{
public Recipe07_12()
{
//Initialization code is designer generated and contained
//in a separate file using the C# 2.0 support for partial
//classes.
InitializeComponent();
}
//As the main form loads, clone the required section of the main
//menu and assign it to the ContextMenu property of the TextBox. protected override void OnLoad(EventArgs e)
{
//Call the OnLoad method of the base class to ensure the Load
//event is raised correctly.
base.OnLoad(e);
ContextMenu mnuContext = new ContextMenu();

240C H A P T E R 7 ■ W I N D O W S F O R M S
//Copy the menu items from the File menu into a context menu. foreach (MenuItem mnuItem in mnuFile.MenuItems)
{
mnuContext.MenuItems.Add(mnuItem.CloneMenu());
}
//Attach the cloned menu to the TextBox. TextBox1.ContextMenu = mnuContext;
}
//Event handler to display the ContextMenu for the ListBox. private void TextBox1_MouseDown(object sender, MouseEventArgs e)
{
if (e.Button == MouseButtons.Right)
{
TextBox1.ContextMenu.Show(TextBox1, new Point(e.X, e.Y));
}
}
//Event handler to process clicks on File/Open menu item.
//For the purpose of the example, simply show a message box. private void mnuOpen_Click(object sender, EventArgs e)
{
MessageBox.Show("This is the event handler for Open.","Recipe07-12");
}
//Event handler to process clicks on File/Save menu item.
//For the purpose of the example, simply show a message box.
private void mnuSave_Click(object sender, EventArgs e)
{
MessageBox.Show("This is the event handler for Save.","Recipe07-12");
}
//Event handler to process clicks on File/Exit menu item.
//For the purpose of the example, simply show a message box. private void mnuExit_Click(object sender, EventArgs e)
{
MessageBox.Show("This is the event handler for Exit.","Recipe07-12");
}
public static void Main(string[] args)
{
Application.Run(new Recipe07_12());
}
}
}
Usage
Figure 7-7 shows how the example will look when run.
C H A P T E R 7 ■ W I N D O W S F O R M S |
241 |
Figure 7-7. Copying part of a main menu to a context menu
7-13. Make a Multilingual Form
Problem
You need to create a localizable form that can be deployed in more than one language.
Solution
Store all locale-specific information in resource files, which are compiled into satellite assemblies.
How It Works
The .NET Framework includes built-in support for localization through its use of resource files. The basic idea is to store information that is locale-specific (for example, button text) in a resource file. You can create resource files for each culture you need to support and compile them into satellite assemblies. When you run the application, .NET will automatically use the correct satellite assembly based on the locale settings of the current user/computer.
You can read to and write from resource files manually; they are XML files. However, Visual Studio also includes extensive design-time support for localized forms. It works like this:
1.Set the Localizable property of a Form to true using the Properties window.
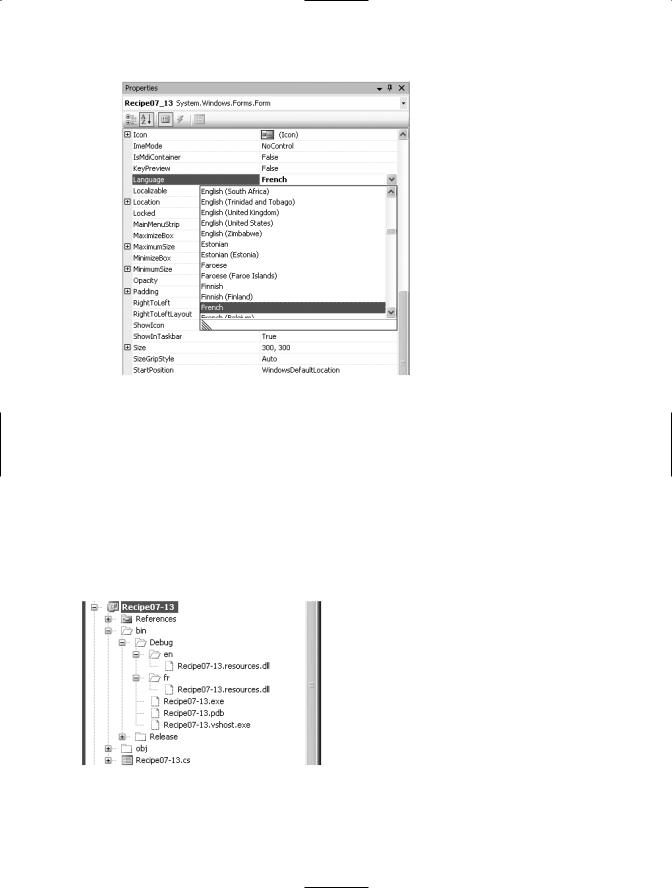
2.Set the Language property of the form to the locale for which you would like to enter information. (See Figure 7-8.) Then configure the localizable properties of all the controls on the form. Instead of storing your changes in the designer-generated code for the form, Visual Studio will actually create a new resource file to hold your data.
242 C H A P T E R 7 ■ W I N D O W S F O R M S
Figure 7-8. Selecting a language for localizing a form
3.Repeat step 2 for each language that you want to support. Each time you enter a new locale for the form’s Language property, a new resource file will be generated. If you change the Language property to a locale you have already configured, your previous settings will reappear, and you will be able to modify them.
You can now compile and test your application on differently localized systems. Visual Studio will create a separate directory and satellite assembly for each resource file in the project. You can select Project Show All Files from the Visual Studio menu to see how these files are arranged, as shown in Figure 7-9.
Figure 7-9. Satellite assembly structure
C H A P T E R 7 ■ W I N D O W S F O R M S |
243 |
The Code
Although you do not need to manually code any of the localization functionality, as a testing shortcut, you can force your application to adopt a specific culture by modifying the Thread.CurrentUICulture property of the application thread. However, you must modify this property before the form has loaded.
using System;
using System.Threading; using System.Globalization; using System.Windows.Forms;
namespace Apress.VisualCSharpRecipes.Chapter07
{
public partial class Recipe07_13 : Form
{
public Recipe07_13()
{
//Initialization code is designer generated and contained
//in a separate file using the C# 2.0 support for partial
//classes.
InitializeComponent();
}
[STAThread]
public static void Main(string[] args)
{
Thread.CurrentThread.CurrentUICulture = new CultureInfo("fr"); Application.Run(new Recipe07_13());
}
}
}
Usage
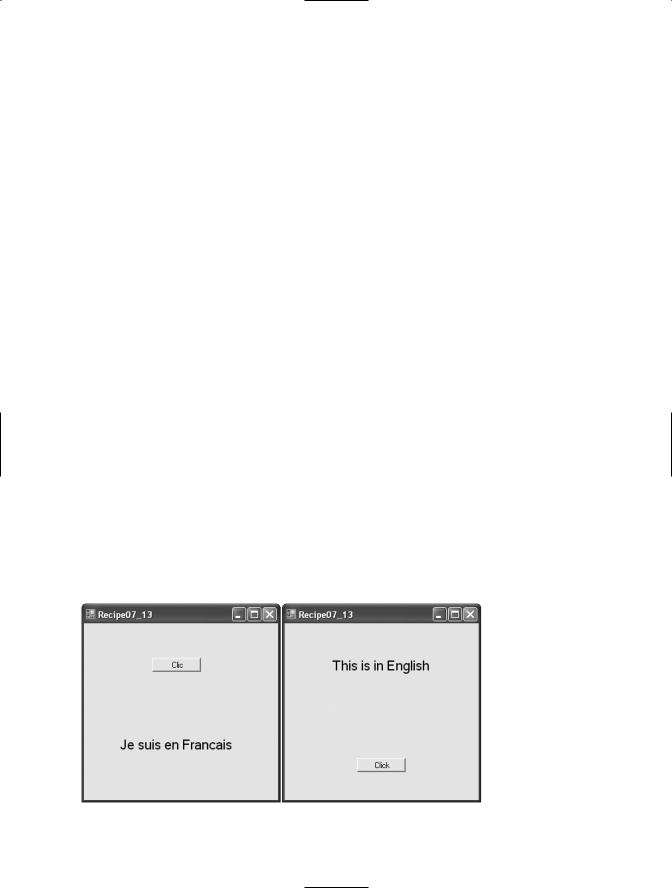
Figure 7-10 shows both the English and French versions of the Recipe07-13 example. As you can see, both the language and the layout of the form are different depending on the current locale.
Figure 7-10. English and French localizations of Recipe07-13
244 C H A P T E R 7 ■ W I N D O W S F O R M S
7-14. Create a Form That Cannot Be Moved
Problem
You want to create a form that occupies a fixed location on the screen and cannot be moved.
Solution
Make a borderless form by setting the FormBorderStyle property of the Form class to the value
FormBorderStyle.None.
How It Works
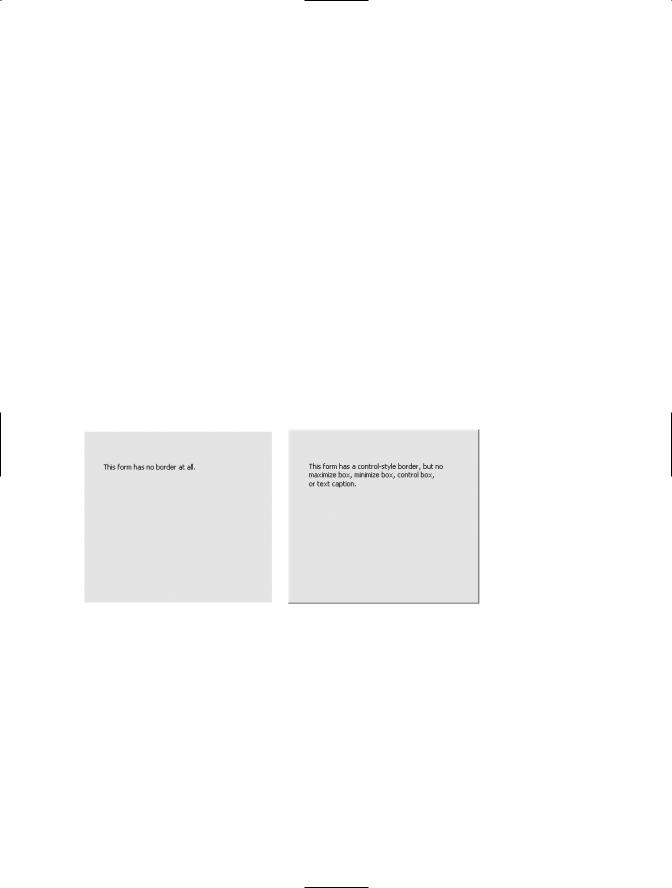
You can create a borderless form by setting the FormBorderStyle property of a Form to None. Borderless forms cannot be moved. However, as their name implies, they also lack any kind of border. If you want the customary blue border, you will need to add it yourself, either with manual drawing code or by using a background image.
One other approach to creating an immovable form does provide a basic control-style border. First, set the ControlBox, MinimizeBox, and MaximizeBox properties of the form to false. Then set the Text property to an empty string. The form will have a raised gray border or black line (depending on the FormBorderStyle option you use), similar to a button. Figure 7-11 shows both types of immovable forms.
Figure 7-11. Two types of forms that cannot be moved
7-15. Make a Borderless Form Movable
Problem
You need to create a borderless form that can be moved. This might be the case if you are creating a custom window that has a unique look (for example, for a visually rich application such as a game or a media player).
Solution
Create another control that responds to the MouseDown, MouseUp, and MouseMove events and programmatically moves the form.
C H A P T E R 7 ■ W I N D O W S F O R M S |
245 |
How It Works
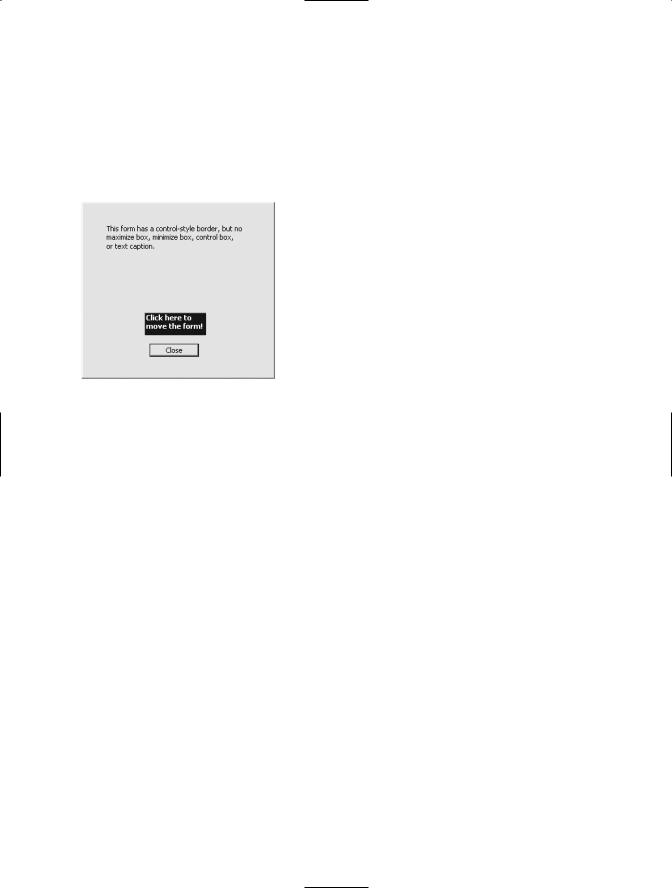
Borderless forms omit a title bar, which makes it impossible for a user to move them. You can compensate for this shortcoming by adding a control to the form that serves the same purpose. For example, Figure 7-12 shows a form that includes a label to support dragging. The user can click on this label, and then drag the form to a new location on the screen while holding down the mouse button. As the user moves the mouse, the form moves correspondingly, as though it were “attached” to the mouse pointer.
Figure 7-12. A movable borderless form
To implement this solution, take the following steps:
1.Create a form-level Boolean variable that tracks whether or not the form is currently being dragged.
2.When the label is clicked, the code sets the flag to indicate that the form is in drag mode. At the same time, the current mouse position is recorded. You add this logic to the event handler for the Label.MouseDown event.
3.When the user moves the mouse over the label, the form is moved correspondingly, so that the position of the mouse over the label is unchanged. You add this logic to the event handler for the Label.MouseMove event.
4.When the user releases the mouse button, the dragging mode is switched off. You add this logic to the event handler for the Label.MouseUp event.
The Code
The following example creates a borderless form that a user can move by clicking on a form control and dragging the form.
using System;
using System.Drawing; using System.Windows.Forms;
namespace Apress.VisualCSharpRecipes.Chapter07
{
public partial class Recipe07_15 : Form
{
//Boolean member tracks whether the form is in drag mode. If it is,
//mouse movements over the label will be translated into form movements. private bool dragging;

246 C H A P T E R 7 ■ W I N D O W S F O R M S
// Stores the offset where the label is clicked. private Point pointClicked;
public Recipe07_15()
{
//Initialization code is designer generated and contained
//in a separate file using the C# 2.0 support for partial
//classes.
InitializeComponent();
}
// MouseDown event handler for the label initiates the dragging process. private void lblDrag_MouseDown(object sender, MouseEventArgs e)
{
if (e.Button == MouseButtons.Left)
{
// Turn drag mode on and store the point clicked. dragging = true;
pointClicked = new Point(e.X, e.Y);
}
else
{
dragging = false;
}
}
//MouseMove event handler for the label processes dragging movements if
//the form is in drag mode.
private void lblDrag_MouseMove(object sender, MouseEventArgs e)
{
if (dragging)
{
Point pointMoveTo;
//Find the current mouse position in screen coordinates. pointMoveTo = this.PointToScreen(new Point(e.X, e.Y));
//Compensate for the position the control was clicked. pointMoveTo.Offset(-pointClicked.X, -pointClicked.Y);
//Move the form.
this.Location = pointMoveTo;
}
}
// MouseUp event handler for the label switches off drag mode. private void lblDrag_MouseUp(object sender, MouseEventArgs e)
{
dragging = false;
}
private void cmdClose_Click(object sender, EventArgs e)
{
this.Close();
}
[STAThread]
public static void Main(string[] args)

C H A P T E R 7 ■ W I N D O W S F O R M S |
247 |
{
Application.Run(new Recipe07_15());
}
}
}
7-16. Create an Animated System Tray Icon
Problem
You need to create an animated system tray icon (perhaps to indicate the status of a long-running task).
Solution
Create and show a NotifyIcon control. Use a timer that fires periodically (every second or so) and updates the NotifyIcon.Icon property.
How It Works
The .NET Framework makes it easy to show a system tray icon with the NotifyIcon component. You simply need to add this component to a form and supply an icon by setting the Icon property. Optionally, you can add a linked context menu through the ContextMenu property. The NotifyIcon component automatically displays its context menu when it’s right-clicked. You can animate a system tray icon by swapping the icon periodically.
The Code
The following example uses eight icons, each of which shows a moon graphic in a different stage of fullness. By moving from one image to another, the illusion of animation is created.
using System;
using System.Drawing; using System.Windows.Forms;
namespace Apress.VisualCSharpRecipes.Chapter07
{
public partial class Recipe07_16 : Form
{
//An array to hold the set of Icons used to create the
//animation effect.
private Icon[] images = new Icon[8];
// An integer to identify the current icon to display. int offset = 0;
public Recipe07_16()
{
//Initialization code is designer generated and contained
//in a separate file using the C# 2.0 support for partial
//classes.
InitializeComponent();
}