

What is a Microcontroller (Paralax, v2.2, student guide, 2004)
.pdfChapter #1: Getting Started · Page 11
Figure 1-16
Download Complete Window
If you skipped here from the “Downloading the Software from the Internet” section, click the Open button.
√If you located the software on the Parallax CD, click the Install button shown in Figure 1-17.
Figure 1-17
The Parallax CD Browser
Install button located near bottom of window.
√When the BASIC Stamp Editor InstallShield Wizard window opens, click the Next button shown in Figure 1-18.
Figure 1-18
InstallShield Wizard for the BASIC Stamp Editor
Click Next.
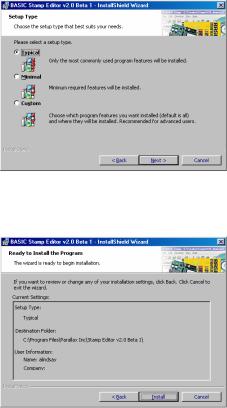
√Select Typical for your setup type as shown in Figure 1-19.
Page 12 · What’s a Microcontroller?
√Click the Next button.
Figure 1-19
Setup Type
Click Typical, then click the Next button.
√When the InstallShield Wizard tells you it is “Ready to Install the Program”, click the Install button shown in Figure 1-20.
Figure 1-20
Ready to Install.
Click the Install button.
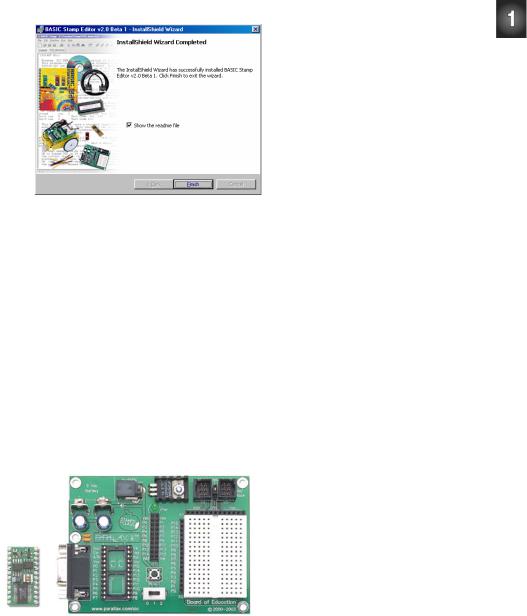
√When the InstallShield Wizard window tells you “InstallShield Wizard Completed”, as shown in Figure 1-21, click Finish.
Chapter #1: Getting Started · Page 13
Figure 1-21
InstallShield Wizard
Completed:
Click the Finish button.
ACTIVITY #3: SETTING UP THE HARDWARE AND TESTING THE SYSTEM
The BASIC Stamp module needs to be connected to power for it to run. It also needs to be connected to a PC so it can be programmed. After making these connections, you can use the BASIC Stamp Editor to test the system. This activity will show you how.
Introducing the BASIC Stamp®, Board of Education®, and HomeWork Board™
Parallax Inc.’s Board of Education® carrier board shown in Figure 1-22 next to a BASIC Stamp module. As mentioned earlier, the BASIC Stamp is a type of very small computer. This very small computer plugs into the Board of Education carrier board. As you will soon see, the Board of Education makes it easy to connect a power supply and serial cable to the BASIC Stamp module. In later activities, you will also see how the Board of Education makes it easy to build circuits and connect them to your BASIC Stamp module.
Figure 1-22
BASIC Stamp® 2
Microcontroller Module (left)
and Board of Education ®
Carrier Board (right)

Page 14 · What’s a Microcontroller?
Parallax, Inc.’s BASIC Stamp HomeWork Board™ is shown in Figure 1-23. This board is like a Board of Education with the BASIC Stamp 2 module built-in. Its surfacemounted components are visible to the left of the white breadboard area. You can use either the Board of Education with a BASIC Stamp module or the BASIC Stamp HomeWork Board as your project platform for the activities in this text.
Figure 1-23
BASIC
Stamp®
HomeWork
Board™
Project
Platform.
Learn more about the features, parts and functions of BASIC Stamp modules, Board of Education carrier boards, and the HomeWork Board project platform. See Appendix C: BASIC Stamp and Carrier Board Components and Functions on page 307.
Required Hardware
(1) BASIC Stamp 2 module AND
(1) Board of Education
-or -
(1)BASIC Stamp HomeWork Board
(1) 9 V battery
(1) strip of 4 adhesive rubber feet
(1) Serial cable
Start with a new or fully charged 9 V battery. Avoid all the confusion a dead battery can cause. Start with a new alkaline battery or a rechargeable battery that has recently been fully recharged.
Chapter #1: Getting Started · Page 15
CAUTION! Before using an AC adapter, “battery replacer”, or DC supply:
√Consult Appendix D: Batteries and Power Supplies on page 311 to make sure the supply you use is appropriate for the activities in this text.
Connecting the Hardware
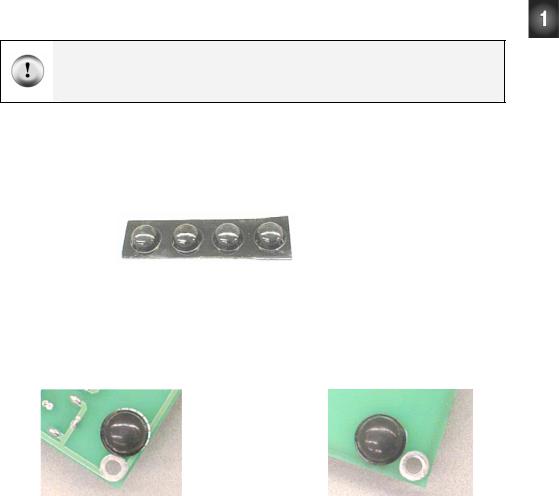
Both the Board of Education and the BASIC Stamp HomeWork Board come with a strip that has four adhesive rubber feet. These rubber feet are shown in Figure 1-24, and they should be affixed to the underside of your Board of Education or BASIC Stamp HomeWork Board.
Figure 1-24
Rubber Feet
√Remove each rubber foot from the adhesive strip and affix it to the underside of your board as shown in Figure 1-25. If you are using the Board of Education, it has circles on its underside that show where each rubber foot should be attached. For the HomeWork Board, just place a rubber foot next to each plated hole at each corner.
Figure 1-25
Rubber Foot Affixed to Underside of Board of Education (left) and HomeWork Board (right)
Next, the Board of Education or BASIC Stamp HomeWork Board should be connected to your PC or laptop by a serial cable.
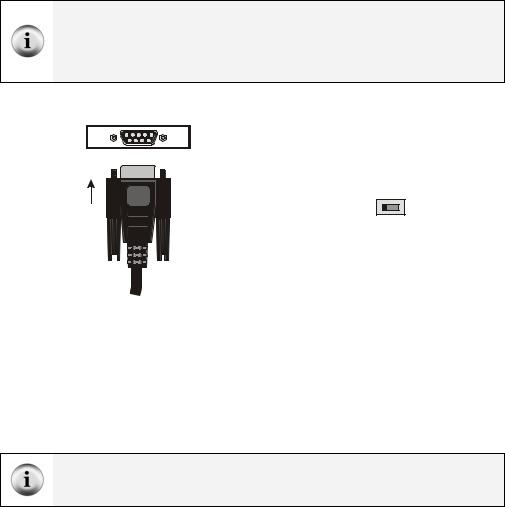
√Connect your serial cable to an available COM port on the back of your computer as shown in Figure 1-26.
Page 16 · What’s a Microcontroller?
USB Port Adapter If you are using a USB to Serial Adapter:
√Connect the USB end to your PC’s USB port.
√Connect the COM port adapter either directly to your Board of Education or HomeWork Board, or connect it to the serial cable as shown in Figure 1-26.
Com
Reset
0 1 2
Figure 1-26: PC or Laptop COM Port
Plug the serial cable into an available COM port on your PC or laptop.
Figure 1-27: 3-position Switch
Set to the 0 position to turn off the power.
If you are using the BASIC Stamp 2 module and Board of Education:
√Set the 3-position switch on the Board of Education to position-0 as shown in Figure 1-27.
Only the Board of Education Rev C has a 3-position switch. To turn off power on a Board of Education Rev B, simply disconnect the power source by either unplugging the DC supply or the battery These are shown in Figure 1-28, step 3 or 4.
√If your BASIC Stamp module is not already plugged into your Board of Education, insert it into the socket, oriented as shown in Figure 1-28, step-1. Make sure the pins are lined up properly with the holes in the socket and not folded under, then press down firmly.
√Plug the serial cable into the Board of Education as shown in step-2.
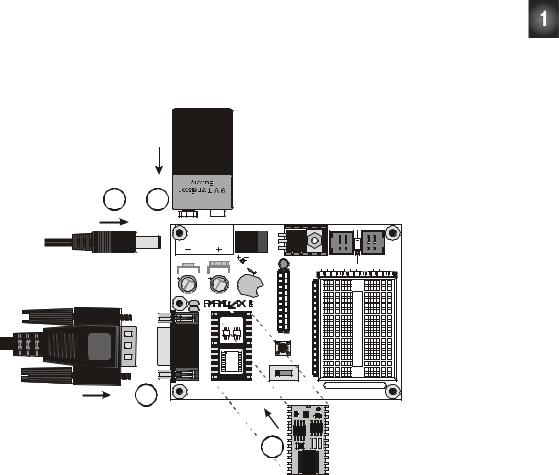
Chapter #1: Getting Started · Page 17
√Plug a DC power supply into the 6-9 VDC jack as shown in step-3, or plug a 9-V battery into the 9 VDC battery jack as shown in step-4.
√Move the 3-position switch from position-0 to position-1. The green light labeled Pwr on the Board of Education should now be on.
Powercell |
AlkalineBattery |
3 or 4
|
|
|
6-9VDC |
|
|
|
15 14 |
Vdd 13 12 |
||
|
9 Vdc |
|
|
|
|
|
|
|
|
Red |
|
Battery |
|
|
|
|
|
|
|
|
|
|
|
|
|
|
|
|
|
|
Black |
|
|
|
|
|
|
|
|
|
|
|
|
|
|
|
|
|
|
|
|
X4 |
|
X5 |
|
|
|
|
|
|
|
Pwr |
Vdd |
Vin |
Vss |
|
|
STAM |
|
Vss |
|
Vss |
X3 |
|
|
|
|
|
PS |
P0 |
|
P1 |
|
|
|
||
|
|
in |
CL |
P2 |
|
P3 |
P15 |
|
|
|
|
|
|
ASS |
|
P14 |
|
|
|||
|
|
|
|
|
P4 |
|
P5 |
|
|
|
|
|
|
|
TM |
P6 |
|
P7 |
P13 |
|
|
|
|
|
|
P8 |
|
P9 |
P12 |
|
|
|
|
Sout |
1 |
|
Vin |
P10 |
|
P11 |
P11 |
|
|
|
|
|
P12 |
|
P13 |
P10 |
|
|
||
|
Sin |
|
|
Vss |
P14 |
|
P15 |
P9 |
|
|
|
ATN |
|
|
Rst |
Vdd |
X1 |
Vin |
P8 |
|
|
|
Vss |
|
|
Vdd |
|
|
P7 |
|
|
|
|
P0 |
|
|
P15 |
|
|
|
P6 |
|
|
|
P1 |
U1 |
|
P14 |
|
|
|
P5 |
|
|
|
P2 |
|
P13 |
|
|
|
P4 |
|
|
|
|
|
|
|
|
|
|
|
|||
|
P3 |
|
|
P12 |
|
|
|
P3 |
|
|
|
P4 |
|
|
P11 |
|
Reset |
|
P2 |
|
|
|
P5 |
|
|
P10 |
|
|
|
P1 |
|
|
|
P6 |
|
|
P9 |
|
|
|
P0 |
|
|
|
P7 |
|
|
P8 |
0 |
1 |
2 |
X2 |
|
|
2 |
www.stampsinclass.com |
Board of Education |
||||||||
|
|
|
|
© 2000-2003 |
||||||
|
|
|
|
|
||||||
|
|
|
|
|
|
|
|
|
||

 1
1
Figure 1-28
Board of
Education,
BASIC Stamp
Module,
Battery and
Serial Cable.
Connect components in the order shown in the diagram. Make sure to properly orient your BASIC Stamp module right side up, matching the notch on its top edge to notch on the socket.
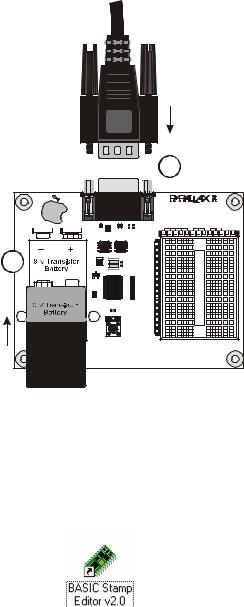
If you are using the BASIC Stamp HomeWork Board:
√Connect the serial cable to the HomeWork Board (Figure 1-29, step-1).
√Connect a 9 V battery to the battery clip as shown in step-2.
Page 18 · What’s a Microcontroller?
|
|
|
|
1 |
|
|
|
S |
|
|
(916) 624-8333 |
|
|
||
in |
TAM |
PS |
|
|
|
||
CLA |
|
www.parallaxinc.com |
|
Rev A |
|||
|
SS |
|
|
||||
|
|
|
www.stampsinclass.com |
||||
|
|
|
|
Vdd |
Vin |
Vss |
|
|
|
|
|
X3 |
|
|
|
|
|
|
|
P15 |
|
|
|
2 |
|
|
|
P14 |
|
|
|
|
|
|
P13 |
|
|
|
|
|
|
|
P12 |
|
|
|
|
|
|
|
P11 |
|
|
|
|
|
|
|
|
P10 |
|
|
|
|
|
|
|
P9 |
|
|
|
|
|
|
|
P8 |
|
|
|
|
|
|
|
P7 |
|
|
|
|
|
|
|
P6 |
|
|
|
|
|
|
|
P5 |
|
|
|
|
|
|
Power |
P4 |
|
|
|
|
|
|
P3 |
|
|
|
|
|
AettaBenilakl cewoPr |
|
P2 |
|
|
|
|
|
|
P1 |
|
|
|
||
|
|
P0 |
|
|
|
||
|
Reset |
X2 |
|
|
|
||
|
|
|
© 2002 |
||||
|
→ |
|
|
||||
|
HomeWork Board |
|
|||||
BASIC Stamp |
|
||||||
|
yr el |
|
|
|
|
|
|
|
|
l |
|
|
|
|
|
Figure 1-29
HomeWork Board and
Serial Cable
Plug the serial cable and 9 V battery into the HomeWork Board.
Testing for Communication
The BASIC Stamp Editor has a feature for testing to make sure your PC or laptop can communicate with your BASIC Stamp module.
√Double-click the BASIC Stamp Editor shortcut on your desktop. It should look similar to the one shown in Figure 1-30.
Figure 1-30
BASIC Stamp Editor Shortcut
Look for a shortcut similar to this one on your computer’s desktop.
Chapter #1: Getting Started · Page 19
The Windows Start Menu can also be used to run the BASIC Stamp Editor. Click your Windows Start button, then select Programs → Parallax, Inc. → BASIC Stamp Editor 2…, then click the BASIC Stamp Editor icon.
Your BASIC Stamp Editor window should look similar to the one shown in Figure 1-31.
The first time you run your BASIC Stamp Editor, it may display some messages and a list of your COM ports found by the software.
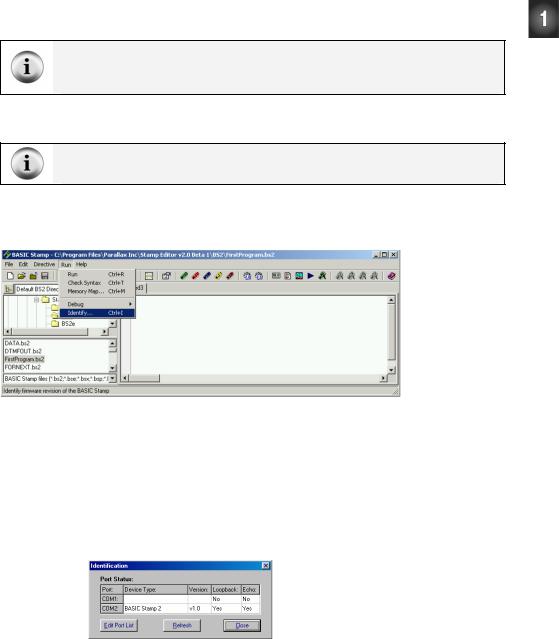
√To make sure your BASIC Stamp module is communicating with your computer, click the Run menu, then select Identify.
Figure 1-31
BASIC Stamp
Editor
Select Identify from the Run menu.
An Identification window similar to the one shown in Figure 1-32 will appear. The example in the figure shows that a BASIC Stamp 2 has been detected on COM2.
√Check the Identification window to make sure a BASIC Stamp 2 module has been detected on one of the COM ports. If it has been detected, then you are ready for Activity #4: First Program.
√If the Identification window does not detect a BASIC Stamp 2 module on any of the COM ports, go to Appendix E: Trouble-Shooting on page 315.
Figure 1-32
Identification Window
Example: BASIC Stamp 2 found on COM2.
Page 20 · What’s a Microcontroller?
ACTIVITY #4: FIRST PROGRAM
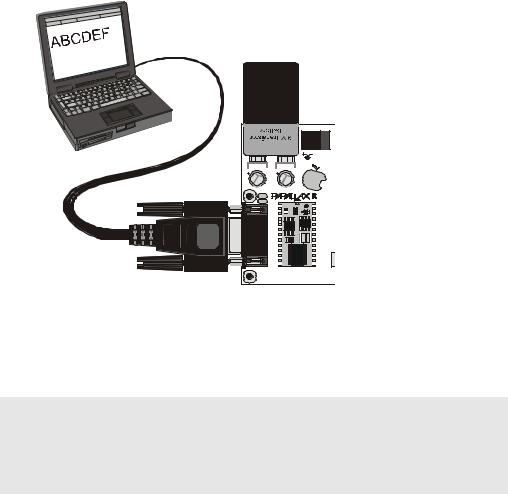
The first program you will write and test will tell the BASIC Stamp to send a message to your PC or laptop. Figure 1-33 shows how it sends a stream of ones and zeros to communicate the text characters displayed by the PC or laptop. These ones and zeros are called binary numbers. The BASIC Stamp Editor software has the ability to detect and display these messages as you will soon see.
|
|
|
|
|
|
|
|
|
|
|
|
0 |
0 |
0 |
0 |
1 |
0 |
0 |
1 |
|
|
|
|
|
|
|
|
|
|
|
|
|
|
|
|
0001 |
|
|
|
|
1 |
|
|
|
|
||||
|
|
|
|
|
|
|
|
|
|
11 |
|
|
|
|
|
|
|
|
1 |
|
|
|
||
|
|
|
|
|
|
|
|
|
0 |
|
|
|
|
|
|
|
|
|
|
0 |
|
|||
|
|
|
|
|
|
|
|
0 |
|
|
|
|
|
|
|
|
|
|
|
|
|
|||
|
|
|
|
|
|
|
|
0 |
|
|
|
|
|
|
|
|
|
|
|
|
|
|
||
|
|
|
|
|
|
|
1 |
|
|
|
|
|
|
|
|
|
|
|
|
|
0 |
|||
|
|
|
|
|
|
|
0 |
|
|
|
|
|
|
|
|
|
|
|
|
|
|
1 |
||
|
|
|
|
|
|
|
1 |
|
|
|
|
|
|
|
|
|
|
|
|
|
|
|
||
|
|
|
|
|
|
0 |
|
|
|
|
|
|
|
|
|
|
|
|
|
|
|
|
0 |
|
|
|
|
|
|
|
|
|
|
|
|
|
|
|
|
|
|
|
|
|
|
|
|
|
0 |
|
|
|
|
|
|
|
|
|
|
|
|
|
|
|
|
|
|
|
|
|
|
|
|
1 |
|
|
|
|
|
|
|
|
|
|
|
|
|
|
|
|
|
|
|
|
|
|
|
|
0 |
|
|
|
|
|
|
|
|
|
|
|
|
|
|
|
|
|
|
|
|
|
|
|
|
1 |
|
|
|
|
|
|
|
|
|
|
|
|
|
|
|
|
|
|
|
|
|
|
|
|
0 |
|
|
|
|
|
|
|
|
|
|
|
|
|
|
|
|
|
|
|
|
|
|
|
|
1 |
|
|
|
|
|
|
|
|
|
|
|
|
|
|
|
|
|
|
|
|
|
|
|
1 |
0 |
|
|
|
|
|
|
|
|
|
|
|
|
|
|
|
|
|
|
|
|
|
|
1 |
|
|
|
|
|
|
|
|
|
|
|
|
|
|
|
|
|
|
|
|
|
|
|
|
|
|
|
|
|
|
|
|
|
|
|
|
|
|
|
|
|
|
|
|
|
|
|
0 |
|
|
||
|
|
|
|
|
|
|
|
|
|
|
|
|
|
|
|
|
|
|
0 |
|
|
|
||
|
|
|
|
|
|
|
|
|
|
|
|
|
|
|
|
|
0 |
|
|
|
|
|
||
|
|
|
|
|
|
|
|
|
|
|
|
|
|
|
|
0 |
|
|
|
|
|
|
|
|
|
|
|
|
|
|
|
|
|
|
|
|
0 |
1 |
1 |
|
|
|
|
|
|
|
|
||
|
|
|
|
|
|
|
|
|
|
|
|
|
|
|
|
|
|
|
|
|
|
|||
|
|
|
|
|
|
0 |
0 |
0 |
00 |
1 |
0 |
|
|
|
|
|
|
|
|
|
|
|
|
|
|
|
|
|
|
1 |
|
|
|
|
|
|
|
|
|
|
|
|
|
||||||
|
|
|
0 |
0 |
|
|
|
|
|
|
|
|
|
|
|
|
|
|
||||||
|
1 |
|
|
|
|
|
|
|
|
|
|
|
|
|
|
|
|
|||||||
|
|
|
|
|
|
|
|
|
|
|
|
|
|
|
|
|
|
|
|
|||||
|
|
|
|
|
|
|
|
|
|
|
|
|
|
|
|
|
|
|
|
|
||||
|
|
|
|
|
|
|
|
|
|
|
|
|
|
|
|
|
|
|
|
|
|
|||
|
1 |
|
|
|
|
|
|
|
|
|
|
|
|
|
|
|
|
|
|
|
|
|
|
|
|
1 |
|
|
|
|
|
|
|
|
|
|
|
|
|
|
|
|
|
|
|
|
|
|
|
1 |
0 |
|
|
|
|
|
|
|
|
|
|
|
|
|
|
|
|
|
|
|
|
|
|
|
|
|
|
|
|
|
|
|
|
|
|
|
|
|
|
|
|
|
|
|
|
|
|
|
|
0 |
|
|
|
|
|
|
|
|
|
|
|
|
|
|
|
|
|
|
|
|
|
|
|
|
1 |
|
|
|
|
|
|
|
|
|
|
|
|
|
|
|
|
|
|
|
|
|
|
|
|
|
1 |
|
|
|
|
|
|
|
|
|
|
|
|
|
|
|
|
|
|
|
|
|
|
|
|
0 |
|
|
|
|
|
|
|
|
|
|
|
|
|
|
|
|
|
|
|
|
|
|
|
|
0 |
1 |
|
|
|
|
|
|
|
|
|
|
|
|
|
|
|
|
|
|
|
|
|
|
|
|
|
|
|
|
|
|
|
|
|
|
|
|
|
|
|
|
|
|
|
|
|
|
|
|
|
|
|
Figure 1-33 |
|
|
|
|
Messages from the |
|
|
|
|
BASIC Stamp module |
Powercell AlkalineBattery |
|
|
|
to your Computer |
|
|
|
module sends |
|
|
|
|
|
The BASIC Stamp |
|
|
6-9VDC |
|
characters to your PC |
9 Vdc |
|
|
|
or laptop by |
Battery |
|
|
|
|
|
|
TAMPS |
|
transmitting a stream |
|
in |
P0 |
of binary ones and |
|
|
S |
|
Vs |
|
|
|
|
zeros. The BASIC |
|
|
|
CLASS |
P2 |
|
|
|
|
P4 |
|
|
|
TM |
P6 |
Stamp Editor can |
|
|
P1 |
||
|
1 |
|
P8 |
|
|
|
|
|
|
Sout |
|
Vin |
P1 |
detect and convert |
ATN |
|
Rst |
||
|
Vd |
|||
Sin |
|
Vss |
P1 |
|
|
|
|
|
|
Vss |
|
Vdd |
|
these binary codes to |
P1 |
|
P14 |
|
|
P0 |
|
P15 |
|
|
P3 |
U1 |
P12 |
|
characters and display |
P2 |
|
P13 |
|
|
P4 |
|
P11 |
|
them. |
P6 |
|
P9 |
|
|
P5 |
|
P10 |
|
|
P7 |
|
P8 |
|
|
www.stampsinclass.com |
|
|
||
First Program
The program listings that you will type into the BASIC Stamp Editor and download to the BASIC Stamp module will always be shown with a gray background like this:
Example Program: FirstProgram.bs2
'What's a Microcontroller - FirstProgram.bs2
'BASIC Stamp sends message to Debug Terminal.
'{$STAMP BS2}
'{$PBASIC 2.5}
DEBUG "Hello, it's me, your BASIC Stamp!"
END