

CodeVisionAVR
2.2.4 Configuring the Project
The Project can be configured using the Project|Configure menu command or the Project Configure toolbar button.
2.2.4.1 Adding or removing a File from the Project
To add or remove a file from the currently opened project you must use the Project|Configure menu command.
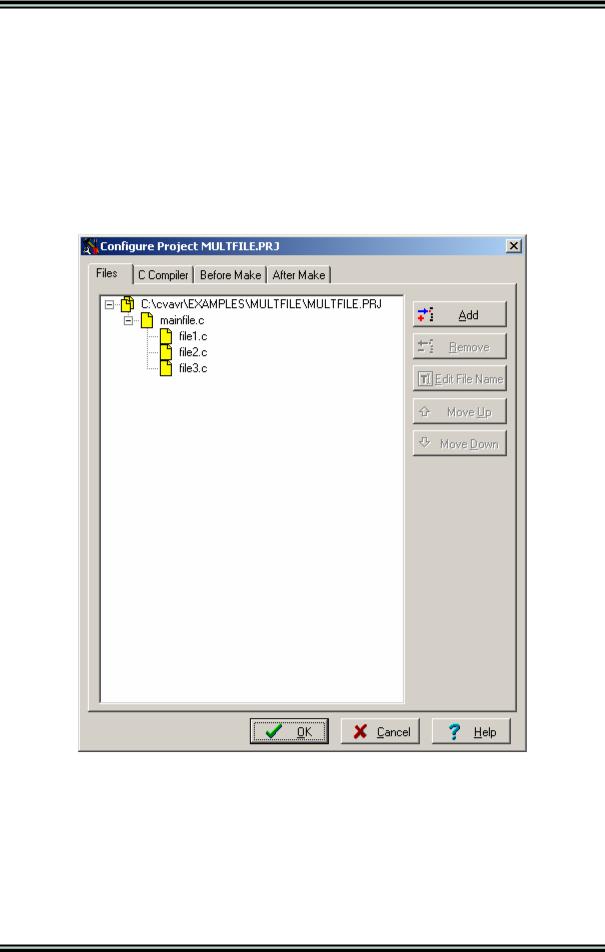
A Configure Project tabbed dialog window will open. You must select the Files tab.
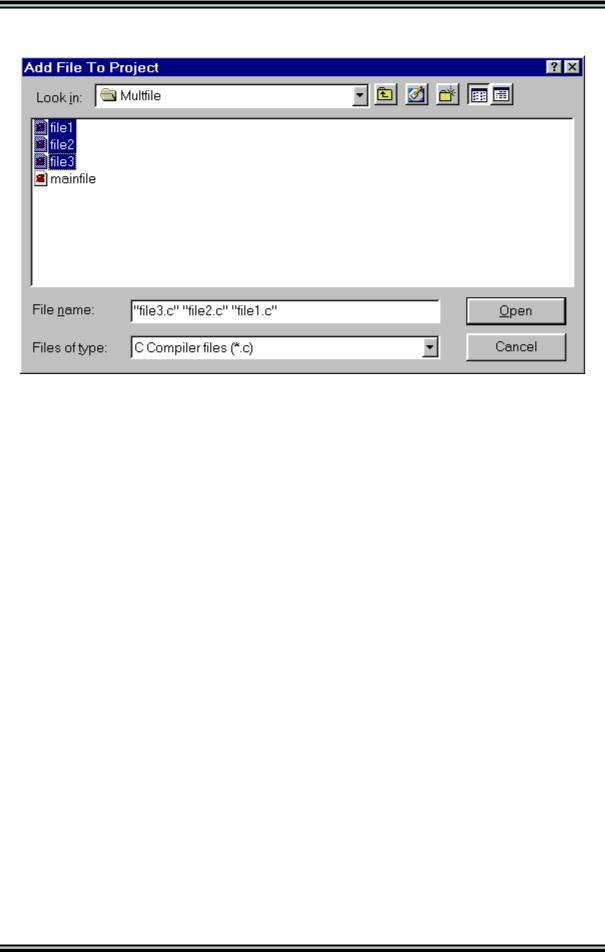
By pressing the Add button you can add a source file to the project. The first file added to the project is the main project file.
This file will always be Make -ed.
The rest of the files added to the project will be automatically linked to the main project file on Make.
© 1998-2007 HP InfoTech S.R.L. |
Page 22 |
CodeVisionAVR
Multiple files can be added by holding the Ctrl key when selecting in the Add File to Project dialog.
When the project is Open-ed all project files will be opened in the editor.
By clicking on a file, and then pressing the Remove button, you will remove this file from the project.
The project’s file compilation order can be changed by clicking on a file and moving it up, respectively down, using the Move Up, respectively Move Down, buttons.
Changes can be saved, respectively canceled, using the OK, respectively Cancel buttons.
When creating a project with multiple files the following rules must be preserved:
•only .C files must be added to the project's Files list
•there's no need to #include the .C files from the Files list as they will be automatically linked
•data type definitions and function declarations must be placed in header .H files, that will be #include -ed as necessary in the .C files
•global variables declarations must be placed in the .C files where necessary
•there's no need to declare global variables, that are not static, in header .H files, because if these files will be #include -ed more than once, the compiler will issue errors about variable redeclarations.
© 1998-2007 HP InfoTech S.R.L. |
Page 23 |
CodeVisionAVR
2.2.4.2 Setting the C Compiler Options
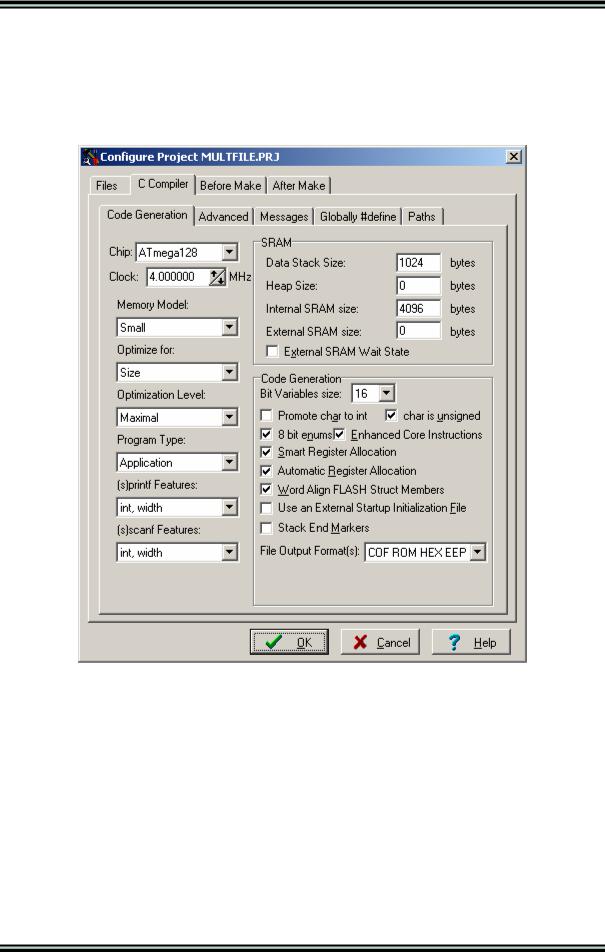
To set the C compiler options for the currently opened project you must use the Project|Configure menu command.
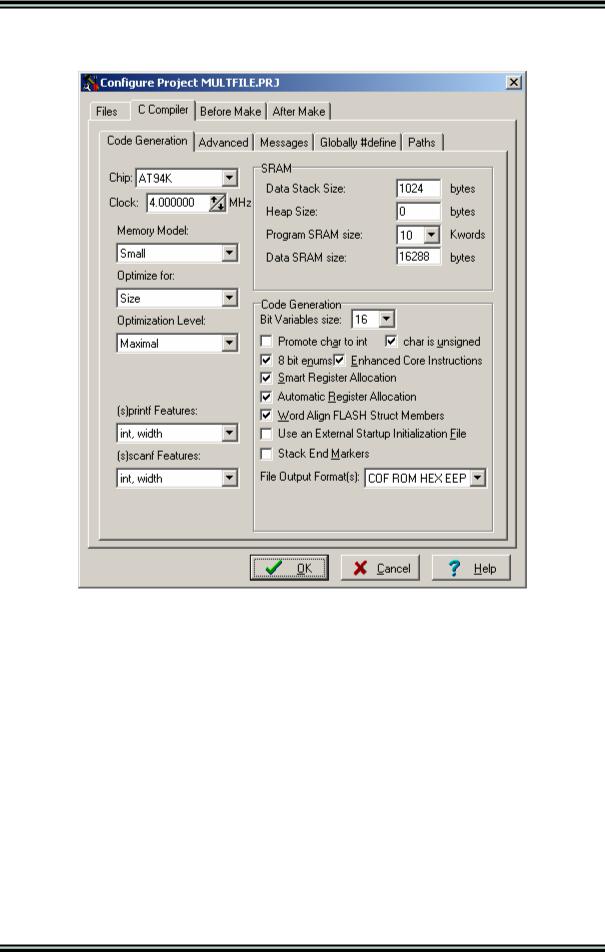
A Configure Project tabbed dialog window will open. You must select the C Compiler and Code Generation tabs.
You can select the target AVR microcontroller chip by using the Chip combo box.
You must also specify the CPU Clock Frequency in MHz, which is needed by the Delay Functions, 1 Wire Protocol Functions and Maxim/Dallas Semiconductor DS1820/DS18S20 Temperature Sensors Functions.
The required memory model can be selected by using the Memory Model list box.
The compiled program can be optimized for minimum size, respectively maximum execution speed, using the Optimize for|Size, respectively Optimize for|Speed, settings.
The amount of code optimization can be specified using the Optimization Level setting. The Maximal optimization level may make difficult the code debugging with AVR Studio.
© 1998-2007 HP InfoTech S.R.L. |
Page 24 |
CodeVisionAVR
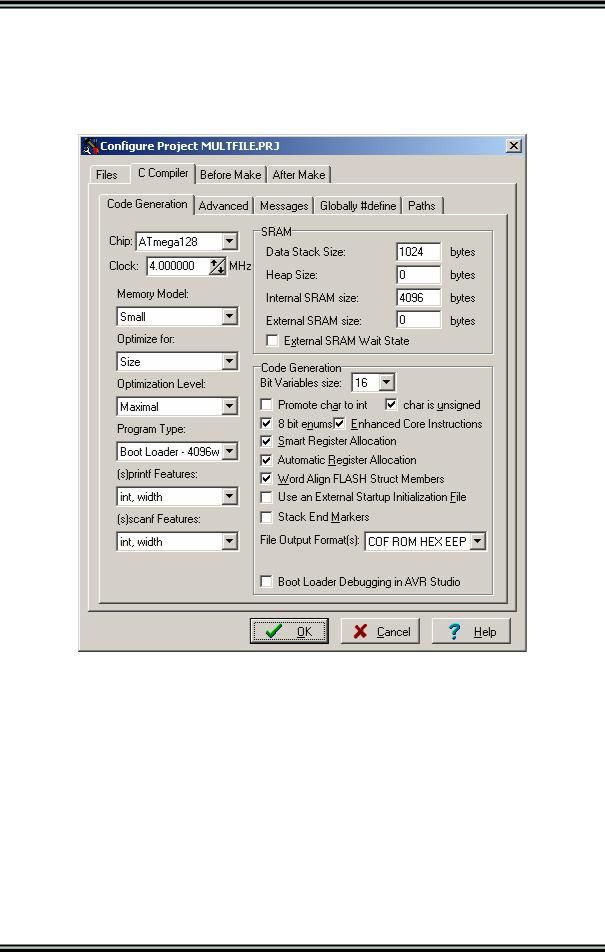
For devices that allow self-programming the Program Type can be selected as:
•Application
•Boot Loader
If the Boot Loader program type was selected, a supplementary Boot Loader Debugging in AVR Studio option is available.
If this option is enabled, the compiler will generate supplementary code that allows the Boot Loader to be source level debugged in the AVR Studio simulator/emulator.
When programming the chip with the final Boot Loader code, the Boot Loader Debugging option must be disabled.
© 1998-2007 HP InfoTech S.R.L. |
Page 25 |

CodeVisionAVR
The (s)printf features option allows to select which versions of the printf and sprintf Standard C Input/Oputput Functions will be linked in your project:
•int - the following conversion type characters are supported: 'c', 's', 'p', 'i', 'd', 'u', 'x', 'X', '%', no width or precision specifiers are supported, only the '+' and ' ' flags are supported, no input size modifiers are supported
•int, width - the following conversion type characters are supported: 'c', 's', 'p', 'i', 'd', 'u', 'x', 'X', '%', the width specifier is supported, the precision specifier is not supported, only the '+', '-', '0' and ' ' flags are supported, no input size modifiers are supported
•long, width - the following conversion type characters are supported: 'c', 's', 'p', 'i', 'd', 'u', 'x', 'X', '%' the width specifier is supported, the precision specifier is not supported, only the '+', '-', '0' and ' ' flags are supported, only the 'l' input size modifier is supported
•long, width, precision - the following conversion type characters are supported: 'c', 's', 'p', 'i', 'd', 'u', 'x', 'X', '%', the width and precision specifiers are supported, only the '+', '-', '0' and ' ' flags are supported, only the 'l' input size modifier is supported
•float, width, precision - the following conversion type characters are supported: 'c', 's', 'p', 'i', 'd', 'u', 'e', 'E', 'f', 'x', 'X', '%', the width and precision specifiers are supported, only the '+', '-', '0' and ' ' flags are supported, only the 'l' input size modifier is supported.
The more features are selected, the larger is the code size generated for the printf and sprintf functions.
The (s)scanf features option allows to select which versions of the scanf and sscanf Standard C Input/Oputput Functions will be linked in your project:
•int, width - the following conversion type characters are supported: 'c', 's', 'i', 'd', 'u', 'x', '%', the width specifier is supported, no input size modifiers are supported
•long, width - the following conversion type characters are supported: 'c', 's', 'i', 'd', 'u', 'x', '%' the width specifier is supported, only the 'l' input size modifier is supported.
The more features are selected, the larger is the code size generated for the printf and sprintf functions.
The Data Stack Size must be also specified.
If the dynamic memory allocation functions from the Standard Library are to be used, the Heap size must be also specified.
It can be calculated using the following formulae:
heap _ size =(n +1) 4 +∑n block _ sizei
i=1
where: n is the number of memory blocks that will be allocated in the heap block _ sizei is the size of the memory block i
If the memory allocation functions will not be used, then the Heap size must be specified as zero.
Eventually you may also specify the External SRAM Size (in case the microcontroller have external SRAM memory connected).
The External SRAM Wait State option enables the insertion of wait states during access to the external SRAM. This is useful when using slow memory devices.
© 1998-2007 HP InfoTech S.R.L. |
Page 26 |
CodeVisionAVR
If an Atmel AT94K05, AT94K10, AT94K20 or AT94K40 FPSLIC device will be used, than there will be the possibility to specify the Program SRAM size in Kwords.
The maximum size of the global bit variables, which are placed in the GPIOR (if present) and registers R2 to R14, can be specified using the Bit Variables size list box.
The Use GPIOR >31 option, when checked, allows using GPIOR located at addresses above 31 for global bit variables.
Note that bit variables located in GPIOR above address 31 are accessed using the IN, OUT, OR , AND instructions, which leads to larger and slower code than for bit variables located in GPIOR with the address range 0…31, which use the SBI, CBI instructions. Also the access to bit variables located in GPIOR above address 31 is not atomic.
Therefore it is recommended to leave the Use GPIOR >31 option not checked if the number of global bit variables is small enough and no additional registers are needed for their storage.
Checking the Promote char to int check box enables the ANSI promotion of char operands to int. This option can also be specified using the #pragma promotechar compiler directive.
Promoting char to int leads to increased code size and lower speed for an 8 bit chip microcontroller like the AVR.
If the char is unsigned check box is checked, the compiler treats by default the char data type as an unsigned 8 bit in the range 0…255.
If the check box is not checked the char data type is by default a signed 8 bit in the range –128…127. This option can also be specified using the #pragma uchar compiler directive.
Treating char as unsigned leads to better code size and speed.
© 1998-2007 HP InfoTech S.R.L. |
Page 27 |

CodeVisionAVR
If the 8 bit enums check box is checked, the compiler treats the enumerations as being of 8 bit char data type, leading to improved code size and execution speed of the compiled program. If the check box is not checked the enumerations are considered as 16 bit int data type as required by ANSI.
The Enhanced Instructions check box allows enabling or disabling the generation of Enhanced Core instructions for the new ATmega and AT94K FPSLIC devices.
The Smart Register Allocation check box enables allocation of registers R2 to R14 (not used for bit variables) and R16 to R21 in such a way that 16bit variables will be preferably located in even register pairs, thus favouring the usage of the enhanced core MOVW instruction for their access. This option is effective only if the Enhanced Instructions check box is also checked.
If Smart Register Allocation is not enabled, the registers will be allocated in the order of variable declaration.
The Smart Register Allocation option should be disabled if the program was developed using CodeVisionAVR prior to V1.25.3 and it contains inline assembly code that accesses the variables located in registers R2 to R14 and R16 to R21.
The registers in the range R2 to R14, not used for bit variables, can be automatically allocated to char and int global variables and global pointers by checking the Automatic Register Allocation check box.
Checking the Word Align FLASH Struct Members option enables aligning of the members of structures located in FLASH memory to an even (word) address.
This option is present only for compatibility with projects created with CodeVisionAVR prior to V1.24.4a.
For new projects this option must be left unchecked, leading to smaller code size.
An external startup file can be used by checking the Compilation|Use an External Startup File check box.
For debugging purposes you have the option Stack End Markers. If you select it, the compiler will place the strings DSTACKEND, respectively HSTACKEND, at the end of the Data Stack, respectively
Hardware Stack areas.
When you debug the program with the AVR Studio debugger you may see if these strings are overwritten, and consequently modify the Data Stack Size.
When your program runs correctly you may disable the placement of the strings in order to reduce code size.
Using the File Output Format(s) list box you can select the following formats for the files generated by the compiler:
•COFF (required by the Atmel AVR Studio debugger), ROM, Intel HEX and EEP (required by the In-System Programmer) ;
•Atmel generic OBJ, ROM, Intel HEX and EEP (required by the In-System Programmer).
If the COFF file format is selected and the Use the Terminal I/O in AVR Studio 3 check box is checked, special debugging information is generated in order to use the AVR Studio 3 Terminal I/O window for communication with the simulated AVR chip’s UART.
AVR Studio 4 does not yet support this option.
If the Use the Terminal I/O in AVR Studio 3 option is enabled, the UART or USART code will not run correctly on the real AVR chip. This option is only for debugging purposes.
© 1998-2007 HP InfoTech S.R.L. |
Page 28 |
CodeVisionAVR
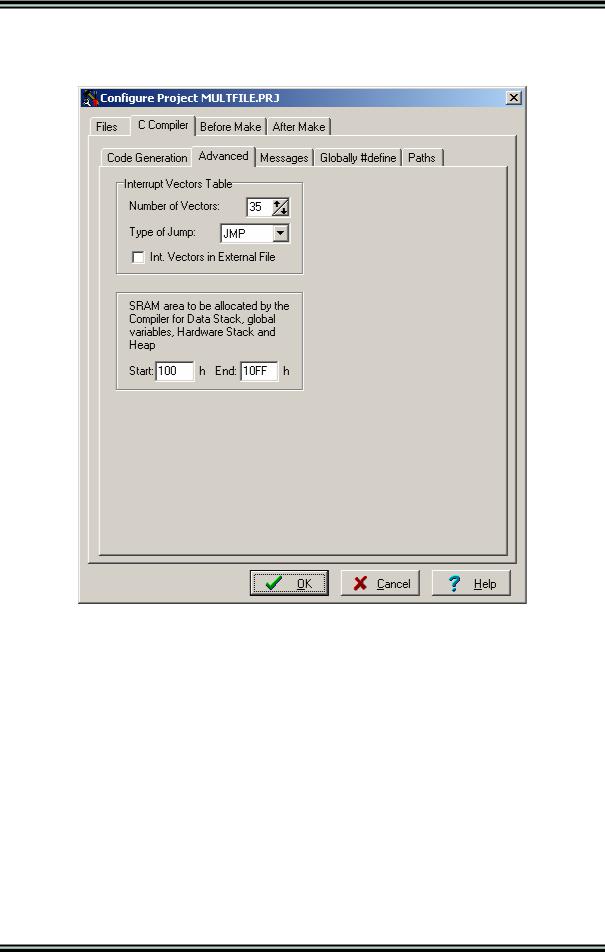
The Advanced tab, which is present only in the Professional version of the compiler, enables more detailed custom configuration like the number and jump type of the interrupt vectors and memory usage:
© 1998-2007 HP InfoTech S.R.L. |
Page 29 |
CodeVisionAVR
The Messages tab allows to individually enable or disable various compiler warnings:
The generation of warning messages during compilation can be globaly enabled or disabled by using the Enable Warnings check box.
© 1998-2007 HP InfoTech S.R.L. |
Page 30 |
CodeVisionAVR
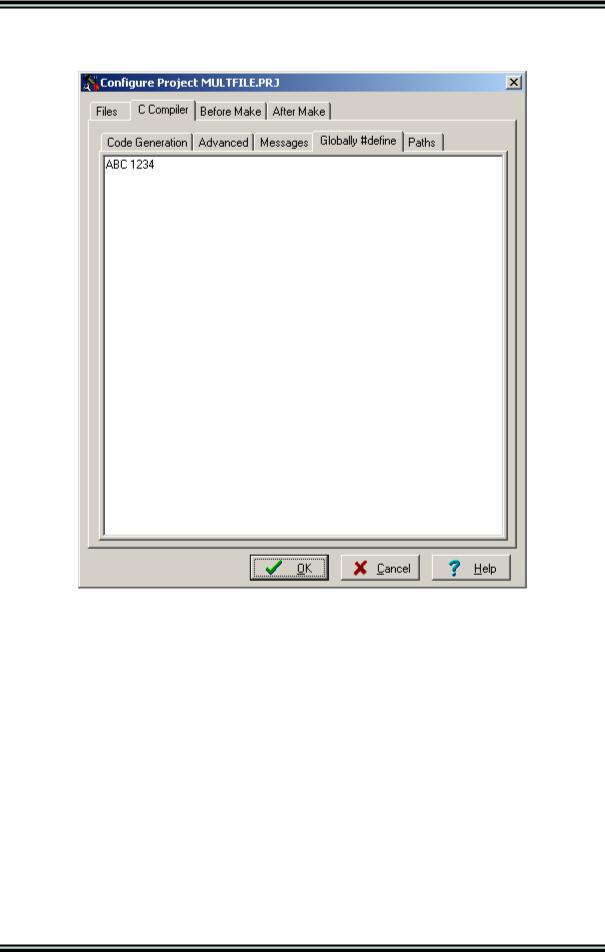
The Globally #define tab allows to #define macros that will be visible in all the project files. For example:
will be equivalent with placing the definition:
#define ABC 1234
in each project file.
© 1998-2007 HP InfoTech S.R.L. |
Page 31 |
CodeVisionAVR
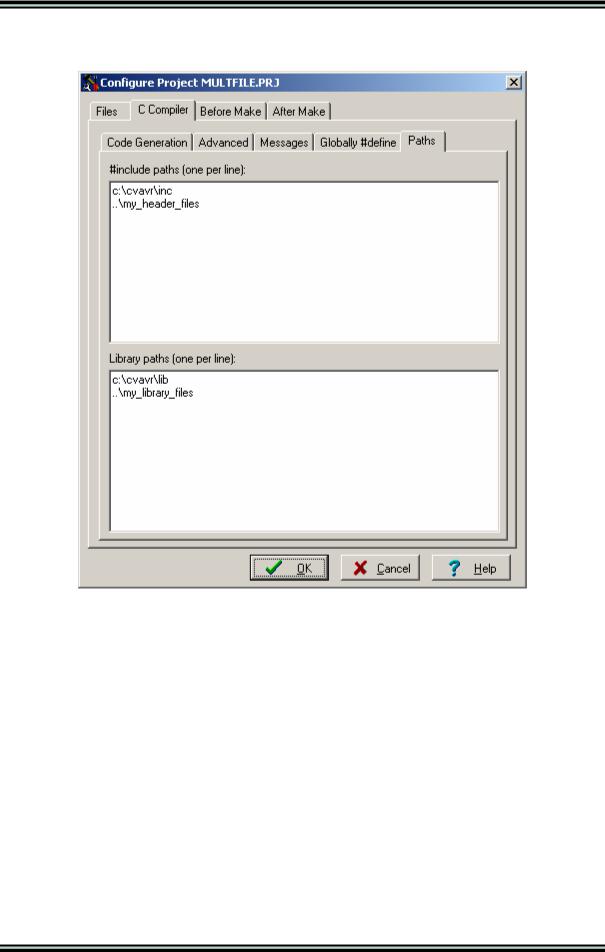
The Paths tabs allows to specify additional paths for #include and library files. These paths must be entered one per line in the appropriate edit controls.
Changes can be saved, respectively canceled, using the OK, respectively Cancel buttons.
© 1998-2007 HP InfoTech S.R.L. |
Page 32 |