

Short Tutorial on Cadence
Version 1.0
UCSN-0300-ZBT-03
March 2000
Z. Tao and M. Keramat
Analog & Mixed-Signal Laboratory
Electrical & Computer Engineering Department
UNIVERSITY OF CONNECTICUT
Storrs, CT 06269-2157
E-mail: keramat@engr.uconn.edu URL: http://www.engr.uconn.edu/~keramat/
Phone: (860) 486-5047
Fax: (860) 486-2447

Cadence Software Fundamentals
1 Introduction
This short tutorial aims at learning how to run Cadence software on Sun workstation. First, a list of basic UNIX commands is given, and then followed by setting the UNIX environment for the Cadence design tools. Finally, a simple example of simulating a CMOS Inverter is presented.
2 Basic Unix Commands
Some basic UNIX commands that you need to know are listed in Table I.
Table I. Basic Unix commands

 List the files in the current directory:
ls |
|
Displays the name of the files in the |
|
directory. |
|
|
|
|
|
|
|
|
|
|
ls -l |
|
Displays additional information (eg. |
|
permissions) about the files in the directory. |
|
|
|
|
|
|
|
|
|
|
ls -a |
|
Displays all files in the directory, including |
|
hidden files. |
|
|
|
|
|
|
|
|
|
|
|
|
ls -al |
Combines the previous two options. |
|
|
|
|
||
|
|
|
|
|
|
|
|
|
|
|
|
Change (or move between) directories: |
|
|
|
|
|
|
|
|
|
|
|
|
|
|
|
|
|
|
|
cd <directory> |
Moves to the directory specified by |
|
|
|
|
||
|
|
directory |
|
|
|
|
|
|
|
|
|
|
|
|
|
|
|
|
|
|
|
cd .. |
Moves up a directory - two periods |
|
|
|
|
||
|
|
represent the parent directory. |
|
|
|
|
|
|
|
|
|
|
|
|
|
|
|
|
|
|
|
cd ~ |
Moves to your home directory - tilde |
|
|
|
|
||
|
|
represents your home directory. |
|
|
|
|
|
|
|
|
|
|
|
|
|
|
|
|
|
- 1 -


 Make a new directory:
mkdir <directory> |
|
Makes a new directory called directory |
|
|
|
|
|
|

 Display the (path of the) current directory you are in:
Displays the name of the current directory
pwd
you are in.

 Copy a file or directory:
cp |
<existing file> |
<newfile> |
|
Creates a new file identical to |
|
existingfile but with the name newfile |
|||
|
|
|
|
|
|
|
|
|
|
|
|
|
|
|
cp |
-R <existing Dir> |
<newDir> |
|
Creates a new directory identical to |
|
existingDir but with the name newDir |
|||
|
|
|
|
|
|
|
|
|
|
|
|
|
|
|

 Rename or move a file:
mv <oldfile> <newfile>
Renames oldfile to newfile within the same directory.
|
mv <oldfile> <directory/newfile> |
|
Moves oldfile to a different directory |
|
|
with the name of newfile |
|
|
|
|
|
|
|
|
|
|
|
|
|
|
Remove (delete) a file: |
|
|
|
|
|
|
|
|
|
|
|
|
rm <file> |
Deletes file. The file cannot be recovered. |
|
|
|
|
||
|
|
|
|
|
|
|
|
|
|
|
|
Change password: |
|
|
|
|
|
|
|
|
|
|
|
|
|
|
|
|
|
|
|
yppasswd |
Change current password. |
|
|
|
|
||
|
|
|
|
|
|
|
|
|
|
3 Setting up an Account to Run Cadence
You need to login a UNIX workstation and set up your UNIX environment to run the Cadence software. If you login for the first time, it would be better to change your password to a new one. To do that, you can use “yppasswd.”
Different Steps:
Step 1:In the home directory, download “.cshrc” and “cds.lib” from the website
http://www.engr.uconn.edu/~keramat/amslab/software.html
Note: if you want to go to your home directory use “cd ~” and type “pwd.”
- 2 -

Step 2:> mkdir cadence
Step 3:> cd cadence
Step 4:> mkdir models
Step 5:> download “models.scs” from the same website above into
~/cadence/models/ .
Step 6: In order to initialize the environment parameters, you have to log out and log in again.
4 Starting Cadence Software
Step 0: > cd ~/cadence (current directory must be cadence)
Step 1: > icms &
A Command Interface Window (CIW) window appears on the screen, shown in
Fig. 1.
Fig. 1. Main window of Cadence tools.
Step 2: In CIW window, go to File… New… Library
A New Library window appears. Filling out the pop-up form according to Fig. 2, and click OK.
- 3 -
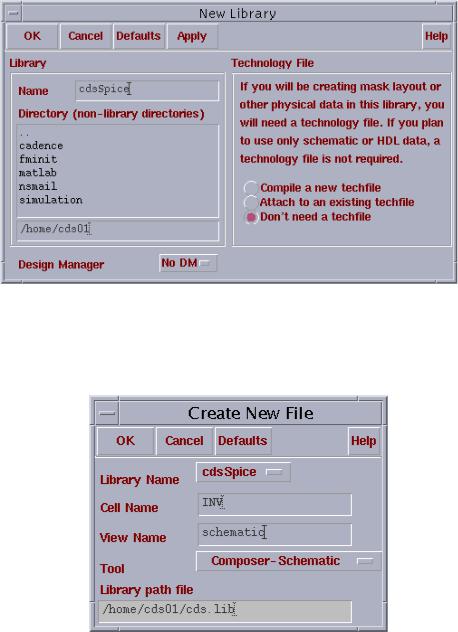
Fig. 2. Creating a new library.
Step 3: In CIW window, go to File… New… Cellview
A Create New File window appears, in Fig. 3. Filling it out and click OK.
Fig. 3. Creating a new file.
Then a new Composer-Schematic window appears in Fig. 4.
- 4 -
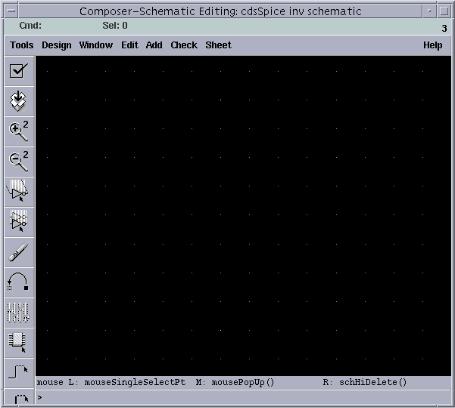
Fig. 4. The Composer-Schematic window.
Step 5: In Composer-Schematic window, go to Add… Instance …
An Add Instance window appears like Fig. 5. Click Browse, a Library Browser – Add Instance window appears as Fig. 6.
- 5 -
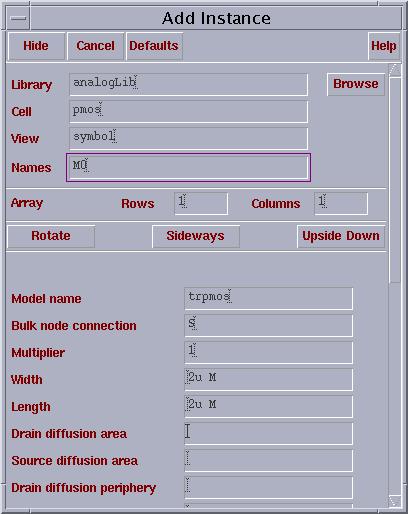
Fig. 5. Add instance window.
- 6 -
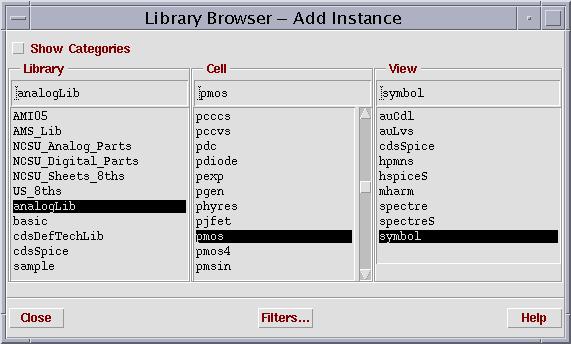
Fig. 6. Instance window.
Step 6: Select AnalogLib in Library, pmos in Cell, and symbol in View. Then go back to Fig. 5 and fill it out, finally stamp pmos device symbol in the ComposerSchematic window, shown in Fig. 7.
- 7 -
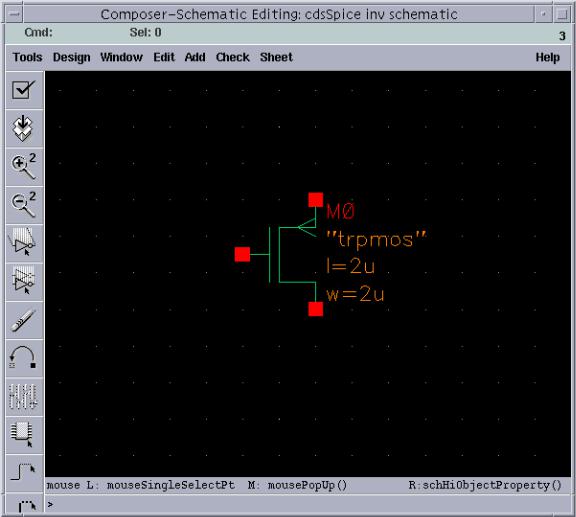
Fig. 7. Stamping pmos device.
Step 7: Repeat step 5 – 6, but adding an nmos transistor with properties in Fig. 8.
- 8 -
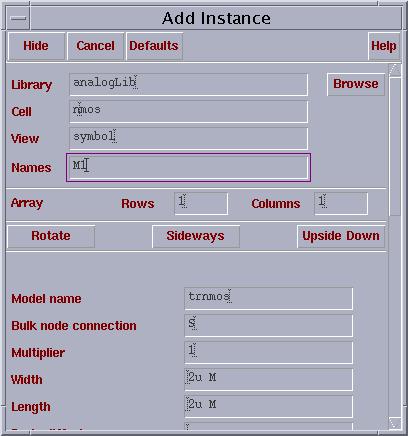
Fig. 8. Properties of an nmos transistor.
Step 8: Repeat step 5 – 6, but adding a vpulse with properties in Fig. 9.
- 9 -
