- •GENERAL INFORMATION
- •FRONT SUSPENSION
- •STEERING KNUCKLE
- •LOWER CONTROL ARM
- •DRIVESHAFTS
- •FRONT SUSPENSION SERVICE PROCEDURES
- •WHEEL ALIGNMENT
- •WHEEL ALIGNMENT SERVICE PROCEDURE
- •STRUT DAMPER ASSEMBLY
- •REMOVAL
- •INSPECTION
- •INSTALLATION
- •DISASSEMBLY (STRUT DAMPER)
- •ASSEMBLE (STRUT DAMPER)
- •SUSPENSION COIL SPRINGS
- •SPRING RETAINER UPPER
- •SPRING SEAT LOWER
- •SHOCK ABSORBERS (Strut Damper)
- •INSPECTION
- •LOWER CONTROL ARM
- •REMOVAL (ASSEMBLY)
- •INSTALLATION (ASSEMBLY)
- •LOWER CONTROL ARM PIVOT BUSHINGS
- •LARGE BUSHING
- •SMALL BUSHING
- •SMALL BUSHING
- •LARGE BUSHING
- •BALL JOINTS
- •INSPECTION BALL JOINT WEAR
- •BALL JOINT REMOVAL
- •BALL JOINT INSTALLATION
- •BALL JOINT SEAL INSTALLATION
- •SWAY BAR
- •REMOVAL
- •INSPECTION
- •INSTALLATION
- •KNUCKLE (FRONT SUSPENSION)
- •REMOVAL
- •INSTALL
- •HUB AND BEARING ASSEMBLY
- •REMOVAL
- •INSTALLATION
- •DRIVESHAFTS
- •GENERAL INFORMATION
- •DRIVESHAFT IDENTIFICATION
- •SERVICE PROCEDURES
- •DRIVESHAFTS, REMOVE INSTALL
- •HUB NUT REMOVAL
- •DRIVESHAFT ASSEMBLIES REMOVE
- •HUB NUT INSTALL
- •DRIVESHAFT RECONDITIONING PROCEDURE
- •DISASSEMBLE
- •TRIPOD REMOVAL FROM INTERCONNECTING BAR
- •INSPECT TRIPOD AND HOUSING
- •DISASSEMBLE
- •WEAR SLEEVE
- •INSPECT
- •ASSEMBLE
- •INTERMEDIATE SHAFT ASSEMBLY RECONDITION
- •INTERMEDIATE SHAFT ASSEMBLY
- •UNIVERSAL JOINT AND ROLLER
- •INTERMEDIATE SHAFT ASSEMBLY
- •BOOTS INSPECT
- •BOOTS INSTALL
- •DAMPER WEIGHTS
- •DRIVESHAFT POSITIONING SPECIFICATIONS
- •REAR SUSPENSION
- •GENERAL INFORMATION
- •SHOCK ABSORBERS
- •REMOVAL
- •INSPECTION
- •INSTALLATION
- •COIL SPRINGS AND JOUNCE BUMPER
- •REMOVAL
- •INSTALLATION
- •REMOVAL
- •INSTALLATION
- •PIVOT BUSHING AC AND AY BODY
- •REMOVE FROM VEHICLE
- •PIVOT BUSHING INSTALLATION
- •PIVOT BUSHING AC AG AJ AP BODY
- •REMOVE FROM VEHICLE
- •PIVOT BUSHING INSTALLATION
- •REAR AXLE ASSEMBLY
- •REMOVE
- •INSTALLATION
- •AUTOMATIC AIR LOAD LEVELING SYSTEM
- •GENERAL INFORMATION
- •MAJOR COMPONENTS
- •COMPRESSOR ASSEMBLY
- •CONTROL MODULE
- •HEIGHT SENSOR
- •AIR LINES AND FITTINGS
- •COMPRESSOR RELAY
- •AIR ADJUSTABLE SHOCK ABSORBERS
- •AIR DRYER
- •LEAK CHECKS
- •SYSTEM OPERATION
- •RAISING VEHICLE HEIGHT
- •LOWERING VEHICLE HEIGHT
- •COMPRESSOR PERFORMANCE TEST
- •SERVICE PROCEDURES
- •COMPRESSOR ASSEMBLY
- •AUTOMATIC AIR LOAD LEVELING SYSTEM WIRING SCHEMATIC
- •AUTOMATIC AIR LOAD LEVELING SYSTEM WIRING SCHEMATIC
- •REAR LEVELING DIAGNOSTIC PROCEDURES
- •BEFORE DIAGNOSTICS TEST
- •TEST LAMP PIN OPERATION
- •AFTER COMPLETION OF REPAIRS
- •TEST WEIGHT
- •DIAGNOSTICS (TO START PROCESS)
- •IGNITION
- •OPERATION
- •AUTOMATIC AIR LOAD LEVELING DIAGNOSTICS
- •AUTOMATIC AIR LOAD LEVELING DIAGNOSTICS
- •AUTOMATIC AIR LOAD LEVELING DIAGNOSTICS
- •AUTOMATIC AIR LOAD LEVELING DIAGNOSTICS
- •AUTOMATIC AIR LOAD LEVELING DIAGNOSTICS
- •CONTROL MODULE
- •REMOVAL
- •INSTALLATION
- •COMPRESSOR RELAY
- •REMOVAL
- •INSTALLATION
- •REMOVAL
- •INSTALLATION
- •AUTOMATIC AIR SUSPENSION
- •GENERAL INFORMATION
- •FRONT AND REAR AIR SPRINGS
- •HEIGHT SENSOR
- •CONTROL MODULE
- •COMPRESSOR ASSEMBLY
- •COMPRESSOR AIR DRYER
- •AIR LINES
- •AIR LINE FITTINGS
- •AIR CHECK, RESIDUAL
- •COMPRESSOR PERFORMANCE TEST
- •AIR LEAK CHECK
- •SYSTEM OPERATION
- •ENGINE RUN OPERATION
- •ENGINE OFF OPERATION
- •LONG TERM IGNITION OFF OPERATION
- •SYSTEM OPERATION INHIBITORS
- •SYSTEM FAILURES
- •SAFETY CONCERNS
- •SHIPPING MODE
- •DIAGNOSIS
- •INITIAL DIAGNOSTIC CHECK
- •DIAGNOSTICS PROCEDURES
- •HEIGHT SENSOR CHECK
- •HEIGHT SENSOR LOGIC CHART
- •AUTOMATIC AIR SUSPENSION DIAGNOSTICS
- •AUTOMATIC AIR SUSPENSION DIAGNOSTICS
- •AUTOMATIC AIR SUSPENSION DIAGNOSTICS
- •AUTOMATIC AIR SUSPENSION DIAGNOSTICS
- •SERVICE PROCEDURES
- •CONTROL MODULE (ASCM)
- •COMPRESSOR RELAY
- •COMPRESSOR ASSEMBLY
- •AIR DRYER
- •SOLENOIDS (STRUTS AND AIR SPRINGS)
- •REMOVAL
- •INSTALL
- •RECHARGE AIR SPRING
- •AIR SPRINGS REAR
- •REMOVAL
- •INSTALLATION
- •REMOVAL
- •INSTALLATION
- •REAR (STUB) AXLE ALIGNMENT ALL MODELS
- •GENERAL INFORMATION
- •REAR WHEEL ALIGNMENT
- •INSTALLATION OF REAR ALIGNMENT SHIMS
- •SPECIFICATIONS
- •ALIGNMENT SPECIFICATIONS AT CURB HEIGHT

2 - 86 SUSPENSION/DRIVESHAFTS
SERVICE PROCEDURES
CONTROL MODULE (ASCM)
REMOVAL
(1)Disconnect negative battery cable.
(2)Remove right side trunk trim panel.
(3)Remove electrical connectors from control module and relay (Fig. 11).
(4)Remove control module mounting screws and remove assembly.
INSTALLATION
(1)Install relay on the control module mounting bracket (if required).
(2)Place control module in mounting position.
(3)Install mounting screws and tighten to 2-3 NIm (19-29 in. lbs.) torque.
(4)Install control module and relay wiring connectors (Fig. 11).
(5)Install right side trunk trim panel.
(6)Connect negative battery cable.
Fig. 11 Control Module and Relay Wiring
COMPRESSOR RELAY
REMOVAL
(1)Remove right side trunk trim panel.
(2)Remove electrical connector from relay.
(3)Remove relay from control module mounting bracket by prying out on locating clip (Fig. 11)
INSTALLATION
(1)Push relay onto bracket (relay will Lock into position.)
(2)Install electrical connector.
Ä
(3) Install trim panel.
COMPRESSOR ASSEMBLY
REMOVAL
(1)Disconnect battery negative cable.
(2)Raise vehicle, see Hoisting, Group 0.
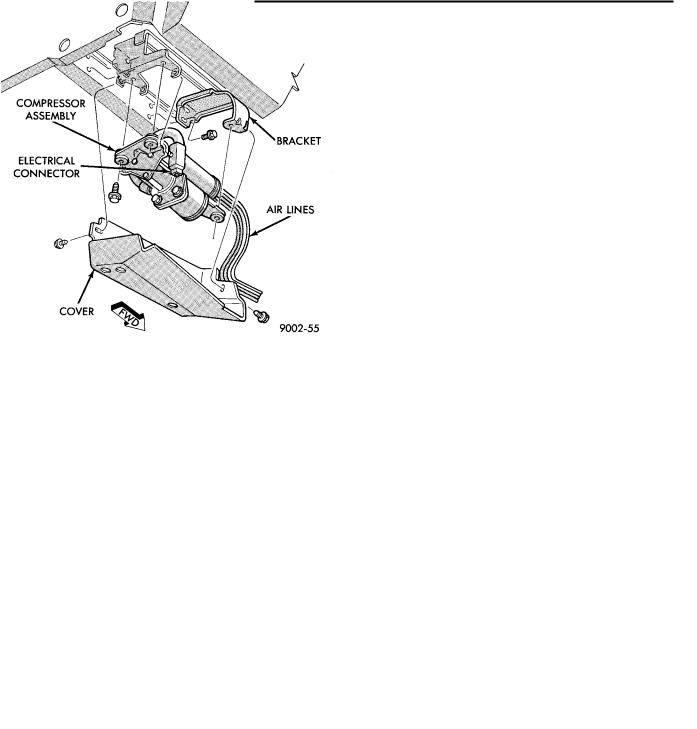
(3)Remove cover from compressor assembly. Remove air hose (see AIR LINES) and electrical connectors (Fig. 12)
(4)Remove compressor assembly mounting screws and lower assembly from vehicle.
(5)Remove mounting bracket screws and slide mounting bracket away from compressor.
Fig. 12 Compressor Assembly
INSTALLATION
(1)Slide mounting bracket on compressor and install screws and tighten to 8 NIm (70 in. lbs.) torque.
DO NOT OVER TORQUE THESE SCREWS.
(2)Install compressor assembly to frame rail and tighten screws to 8 NIm (70 in. lbs.) torque. DO NOT
OVER TORQUE THESE SCREWS.
(3)Connect air hose and electrical connector to compressor assembly.
(4)Install cover on compressor assembly and tighten screws to 6 NIm (40 in. lbs.) torque.
(5)Lower vehicle and connect battery negative
cable.
(6)Check operation of the system.
AIR DRYER
REMOVAL
Remove compressor assembly. See COMPRESSOR ASSEMBLY.
