

the_custom_bicycle
.pdfASSEMBLING THE BICYCLE
French hubs are often 96 mm. front and 122 mm. rear. The frame should be built and aligned for the hubs to be used, otherwise the chain line will be inaccurate. Although the widths of the Japanese and the Campagnolo hubs are the same, they are not perfectly interchangeable. There will be a very slight difference in chainlines if the hubs are interchanged. In appendix V, we have included proper chain line specifications. To correct minor chain line deficiencies, you can use Campagnolo freewheel spacers (part no. 651) which come in three sizes: 1,1.5, and 2 mm.
Advise your builder in advance, if you plan to use a 6-speed freewheel—it requires a 126-mm. rearstay opening.
CHAPTER 22
Riding Techniques
While it is very difficult to "coach" a rider without being familiar with his or her individual style, there are some basic rules of thumb which generally have universal application.
Gear Selection
Countless pages have been written about gear selection: for mountains, the flats, racing, training; but in the final analysis, the "correct gear" depends on the specific anatomy and style of the rider. Stocky, heavily muscled individuals tend to pedal larger gears at lower rpm's than slim, lightly muscled persons. But, what is the correct gear for you?
Generally, a rider should attempt to pedal between 80 to 100 rpm's on a tubular-tired, lightweight bicycle and 60 to 80 rpm's on a clincher tire bicycle. The recommended rpm's vary because of the difference in the revolving weight of the wheels which affects your pedaling speed. Variations within that range will reflect individual anatomy, conditioning, and how much practice at pedaling the rider has had. The argument in support of high pedal rpm's with a "low" gear is simple—the rider will be able to ride longer. Let's look at an exaggerated analogy to clarify this point. Which exercise could you best perform: lifting a 2-pound weight with one hand over your head 50 times, or lifting 100 pounds with one hand over your head once? This analogy is not perfect since it does not take the time expended into account. It does, however, demonstrate the point that a muscle is only capable of exerting a limited amount of force and, most importantly, the muscle can be conditioned to perform a large number of light repetitions in a shorter period of time than it takes to condition the muscle to double or triple the amount of force exerted. Accepting the fact that "high rpm's" are desirable, we arrive at the problem of defining "how high is high?"
• \ t n
RIDING TECHNIQUES
Rule of thumb: If the gear you have selected is too high, your legs will fatigue before your lungs. If the selected gear is too low, your lungs will fatigue first.
This rule can easily be verified by performing two test rides. First, select the lowest gear on your bicycle. Pedal as fast as you can and maintain that pace for 15 seconds. You will notice that your legs will not be tired, however, your lungs will be "burning." After resting, perform the second test. Select the highest gear on your bike and again pedal as fast as you can for 15 seconds. Your lungs will not be "burning," instead, your legs will feel "tight." Practice using this rule of thumb to maximize your output whenever you ride. If you experience abnormal fatigue in your legs, reduce the gear you are riding. If you find yourself breathing too hard, increase the gear. Proper attention to your gear ratio will result in the optimum relationship between energy expended and the speed maintained.
Riding Position
The three basic positions of the hands on the handlebars are reviewed in figures 22-1A to 22-4 on pages 232-36. Let's continue our analysis of positions to include the proper use of the body while riding the bicycle.
Maintaining a relaxed position is one of the key elements in cycling. Many people ride with their hands gripping the handlebars as if someone were trying to wrench the bars from their grip. Although you must maintain a grip on the bars, remember that the bicycle is designed to ride in a straight line without any effort except pedaling. If the bicycle requires your attention to ride in a straight line, something is probably misaligned. (Chapter 21 reviews the steps to insure that the frame is tracking correctly.) You should not be expending energy on the bicycle unless it benefits your pedaling. Imagine how tired you would be just sitting in your living room if you had a "death grip" on a pair of handlebars for two hours. All of your energy should be aimed at making the bicycle go faster; don't allow your energy to "run out" through your handlebars.
In all three handlebar positions (on the tops, behind the brake levers, and on the drops), the rider should have bent elbows. One
(continued on page 239)
THE CUSTOM BICYCLE
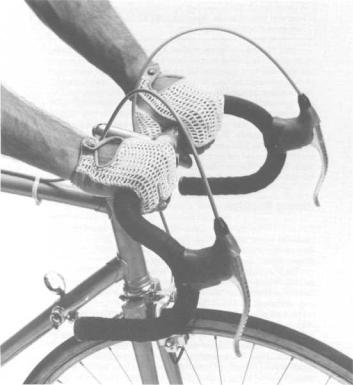
Figures 22-1A, 22-lB: Handlebar Position 1. (A) The hands are placed on the "tops" of the handlebars. Always keep one hand in this position when riding one-handed—this position provides the greatest stability. (B) Variation on above position with hands a little further apart.
RIDING TECHNIQUES
THE CUSTOM BICYCLE
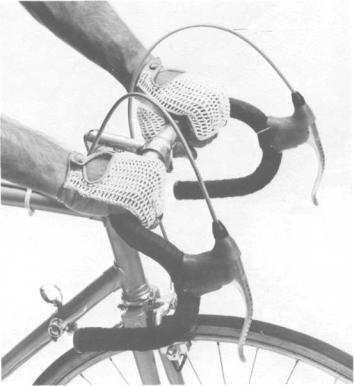
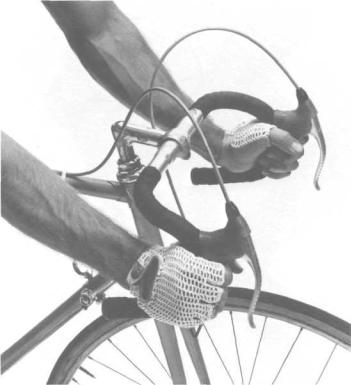
Figure 22-2: Handlebar Position 2. The hands are placed on the "tops" of the bars, behind the brake levers. This photograph demonstrates a variation of the position that is comfortable but does not permit the rider to reach the brake levers.
234
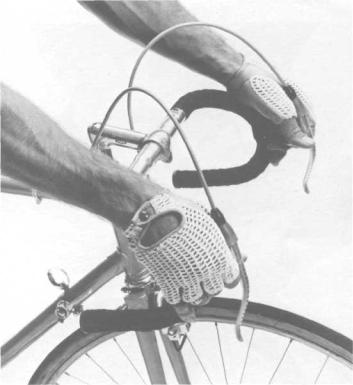
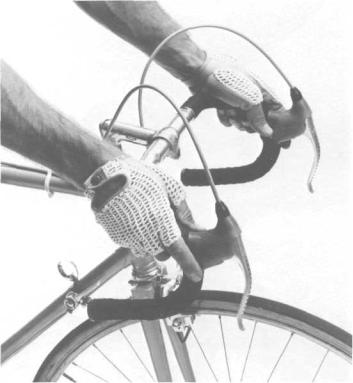
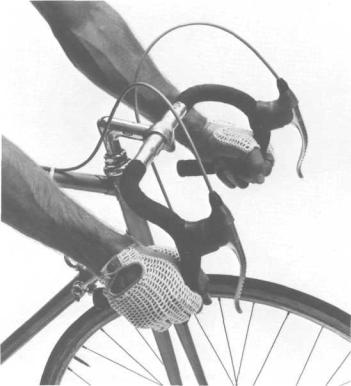
Figure 22-3: Handlebar Position 2A. Again, the hands are on the "tops," behind the brakes. However, this variation utilizes the top of the brake lever as a rest. All good-quality hand brakes include a rubber hood to insulate the hands against road shock. This position allows use of the brake by merely extending the fingers. This position is recommended for climbing when out of the saddle. This position is very stable, allows free breathing, and the levers can be used to increase pedal pressure when hill climbing.
THE CUSTOM BICYCLE
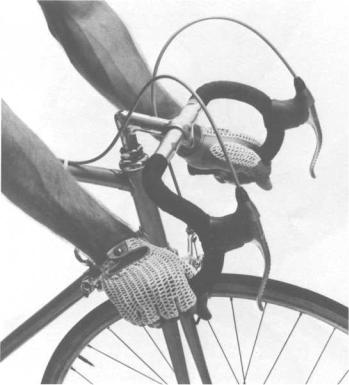
Figure 22-4: Handlebar Position 3. Proper placement of the hands in this position varies according to the physique of the rider. There is one rule of thumb: The wrist should be straight. If you hold your wrist straight before you touch the bars and then grasp the bar at the spot where your wrist is straight, you have found the "correct" position.
RIDING TECHNIQUES
Figure 22-5: Incorrect Position 3. The wrist is not straight and the hand is too close to the end of the handlebar. This position drastically reduces your control of the bicycle. Check for yourself. Try weaving back and forth with your hands in this position. Now try the same test with your hands correctly placed. The increase in stability should be immediately obvious.
237
THE CUSTOM BICYCLE
Figure 22-6: Incorrect Position 3. Again the wrists are not straight; however, this time they are flexed the opposite direction as in figure 22-5. Although this position is fairly stable, it does not allow efficient use of the arm and shoulder muscles.