

the_custom_bicycle
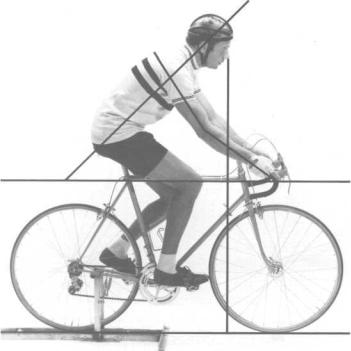
.pdfFigure 20-7: Determining length of the stem (handlebar Position 3). The stem is correctly sized if a plumb line from the nose drops approximately 1 inch behind the handlebars in Position 3. The elbows should be slightly bent. Notice that the back is lower than 45 degrees in Position 3. The rider's weight is comfortably divided—45 percent front, 55 percent rear. The arms are relaxed and the rider's weight is supported by the arms and shoulders combined. There are no acute bends in the back. (Note: The handlebar positions are numbered in anticipation of a more detailed discussion of the subject in chapter 22.)
THE CUSTOM BICYCLE
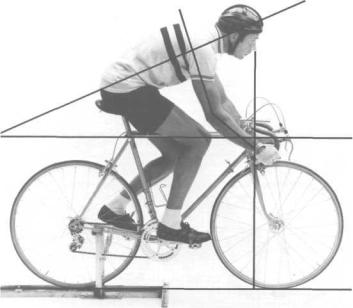
Figure 20-8: Determining length of the stem (handlebar Position 2). A plumb line from the nose drops slightly further behind the handlebars. Again the weight is smoothly divided and there are no radical bends in the back. In handlebar Position 2, the back should be at or slightly below 45 degrees and the rider should be in a position to breathe efficiently.

BICYCLE SETUP
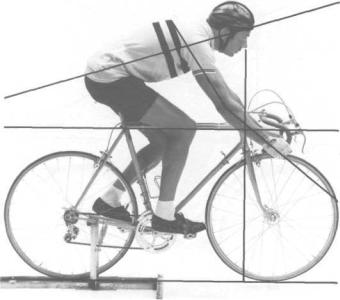
Figure 20-9: Determining the length of the stem (handlebar Position 1). The rider's weight should again be comfortably divided. There should be no critical bends in the back and the rider should be able to breathe comfortably. The back should be above 45 degrees in handlebar Position 1.
THE CUSTOM BICYCLE
Check Position 1 (figure 20-9). The back should have a smooth curve and should be above 45 degrees. No one is racing 100 percent all the time and therefore you should have a position that is efficient and comfortable. This position should be used for normal riding. If the back is not above 45 degrees, check to see if the saddle has been adjusted too far back, and check to see if the handlebar stem is too long. It may be possible that the top tube is too long.
Check Position 2 (figure 20-8). Again, the back should have a smooth curve. Your nose is approximately 1 inch behind the handlebars, and the angle of the back should be at, or below, 45 degrees. This is very important and many times does not occur if the frame has a top tube that is too short or a stem that isn't long enough. The importance of the 45-degree angle is simple but not universally understood—unless the back is below 45 degrees, the largest muscle in your body, the gluteus maximus or "rear end," is not fully utilized. This can be best demonstrated off the bicycle. Place one hand on your rear end and walk a few steps. You will notice that the muscle does not flex with each step—the majority of the muscle is not being used. Now bend over so that your back is less than 45 degrees and again walk with your hand on one "cheek." This time you will see that the whole muscle flexes with each step.
Check Position 3 (figure 20-7). The back should still have a smooth bend and the head should not have to be held up too high in order to see. Figures 20-10 to 20-13 demonstrate in exaggerated form the problems to avoid.
Having the bicycle properly adjusted is only part of sitting comfortably and efficiently on the bicycle. The following are general rules of good cycling "posture":
1. The rider should always keep his elbows slightly bent when riding. There are two reasons for this.
a.Bent elbows act as shock absorbers over bumps. This results in less strain on the joints in the wrist, elbow, and shoulder, and less strain on the neck. It also reduces the tendency to "push" the bicycle into a bump or hole that cannot be avoided. The shock absorber effect will greatly reduce stress on the tires, wheels, and frame.
(continued on page 207)
BICYCLE SETUP
Figure 20-10: Incorrect handlebar position. The hands are located too far toward the ends of the handlebars and the arms are stiff. All road shock is transmitted directly into the rider's body from the wrist to the shoulder. The arm is not acting as a shock absorber.
THE CUSTOM BICYCLE
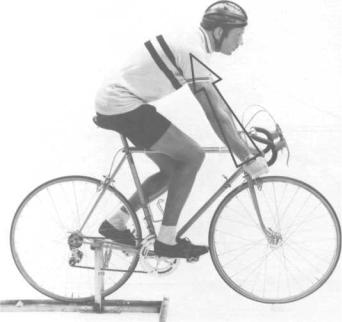
Figure 20-11: Incorrect handlebar position (short stem. Position 3). The rider's nose is ahead of the handlebars and too much weight is concentrated on the front wheel. The chest is constricted making breathing difficult. The rider has to spend a great deal of energy holding his head up to see where he is going because of the "bunched-up" position of his body.

BICYCLE SETUP
Figure 20-12: Incorrect handlebar position (long stem, Position 2). The rider's weight is too spread out. Too much weight is placed on the front wheel. The rider supports himself without the help of his shoulders.
THE CUSTOM BICYCLE
Figure 20-13: Incorrect handlebar position (long stem, Position 3). Again the rider is too stretched out and has too much weight over the front wheel. The rider's nose is 2 inches behind the handlebars. The arms are not used to assist the leg muscles—they are supporting the rider. The shoulders are not used effectively.
BICYCLE SETUP
b.If the rider is ever bumped by another rider, the elbow can be flexed and the effect of the bump minimized. If the elbows are unyielding, the front wheel will swerve. To repeat, the elbows should be bent in all three handlebar positions. As you can see in figure 20-11, when the elbows are bent in Position 3 the rider is extremely low. This position should only be used for racing under extreme stress and/or riding against a stiff head wind. Frequently, riders who have frames that are too big use Position 3 all the time and ride with stiff elbows. This does not allow the benefits of the use of the arm, chest, and shoulder muscles nor does it provide the "over 45 degree" and "under 45 degree" differences covered in figures 20-7 to 20-9.
2.When using Position 3, the wrist should be held straight. This usually results in the hand being located near the curve in the handlebars. The reason for the straight wrist can best be explained by analogy. When a weight lifter picks up a heavy weight he adjusts his hand position so that the wrist is straight, providing the maximization of the strength of the joint. To place great stress on a bent wrist requires effort to keep the wrist bent—thereby reducing the effective use of strength. The use of the arm and shoulder in increasing efficiency is discussed in the beginning of this chapter.
If you are experiencing a problem in position, or simply want to double-check the setup of your bicycle, have a helper take a sideview picture of you on the bicycle in each of the three handlebar positions. Check the previously mentioned guides against your position.
Further assistance can be utilized from the pictures found in the bicycling magazines. Remember, however, that like any sport, many riders tend toward "fads," e.g., low handlebars, high handlebars, big frames, small frames. Don't look at a sprint position and wonder why it's different than your road position. You should look for riders who share your build. Then you can analyze how they sit on the bicycle. This sounds easier than it actually is since we have never seen captions for pictures that include the rider's height, weight, leg length, foot size, or arm
THE CUSTOM BICYCLE
length. This can be overcome, however, by using transparent graph paper.
Since we can be sure that the rider is using 27-inch wheels, all you have to do is determine a scale using the number of grids you have on the graph paper. It is a fairly simple matter to approximate all the important measurements. Also when the graph paper is laid over the picture, relationships such as nose over the handlebars, angle of arms reaching for the handlebars, angle of head, relationship of saddle adjustment, and angle of the back become very obvious. Does your position have the same relationships? Remember that the professional bicycle racer probably is more supple and consequently looks more relaxed. The graph paper is merely another means of taking the experience of a "master" and generalizing to your individual needs.
To double-check that all adjustments are correct, you should perform the following test. Before you begin the analysis you will need a bathroom scale and a stack of books that are equal in thickness to the height of the scale. Fill in the blanks of the chart as follows:
Place the front wheel of your bicycle on the bathroom scale. Place some books that have been stacked to the same height as the bathroom scale under the rear wheel. Take readings of the combined weight of you and your bicycle at the front and rear wheels. This process should be completed for each of the three handlebar positions. Make sure that you are sitting on the saddle in exactly the same position that you would normally sit when riding.
The percentage of weight on the front wheel will increase from handlebar Position 1 to Position 3. Conversely, the percentage of weight on the rear wheel will decrease from handlebar Position 1 to Position 3. Your overall weight distribution should be approximately 45 percent front to 55 percent rear in handlebar Position 3 if your bicycle is properly adjusted.