
- •Downloads:
- •Update Log:
- •Table of Contents:
- •Prologue: Bare Basics
- •Chapter 1: Key Terminology & Abbreviations
- •7Zip Archive – Supposedly the best file archiver there is, but not used as much, and thus less convenient. Requires 7zip or winRar to use.
- •VisualBoyAdvance – most people’s emulator of choice, almost always referred to as “vba” for short.
- •Chapter 2: Using Nightmare Modules
- •I upload anything that I think might be useful to someone on that site. Just use the menus and search until you find it.
- •Chapter 3: File Management
- •In order to be a successful hacker you need to have a lot of good management.
- •Chapter 4: Pointer Tables
- •Chapter 5: Battle Animation Editor
- •Chapter 6: Character Editor
- •Chapter 7: Class Editor
- •Chapter 8: Item Editor
- •Item icon – obvious
- •Chapter 9: Spell Association Editor
- •Chapter 13: Movement Cost Editor
- •If the value next to a type of terrain is ‘255’ then it is uncrossable because a unit won’t have 255 movement points.
- •Chapter 16: Battle Palette Reference Editor
- •If you want to know how to actually edit battle palettes’ colors, you can find that in a later chapter that I will make.
- •Chapter 17: Arena Class Editor
- •It’s a bit of work, but making cGs is quite rewarding, and it’s easier than some stuff, that’s for sure! Good luck with your cg making!
- •Chapter 20: Lyn’s Ending Editor
- •Chapter 21: Tutorial Editing/Getting Rid of the Tutorial
- •Part 2: Downloading the Programs
- •Part 3: Preparing Your midi
- •If you still have more than 10 tracks, you should find another midi. Sorry but, there are limits in life.
- •Part 4: Applying Blazer’s Beta Music Insertion/Instrument Patch
- •Part 5: Converting Your midi
- •Part 6: Making Your midi Repeat and Transferring it to Your rom
- •If the b1 and bc are next to each other then I can almost guarantee you want to replace it, so hit “replace” and do that with every instance and once you’re finished you’re good to go.
- •Part 7: Track Pointers & Repointing
- •Part 8: Finale- Assembling Your Song & Profit
- •If you don’t have this module, you’ll have to use this outdated way of doing it. Do check to see if you have the latest Nightmare Modules in general, but otherwise… well, sorry I guess. Xp
- •Part 9: Possible Errors & Wrap-up
- •Part 10: Documentation and Stuff
- •Atrius’ Notes:
- •Charon’s Notes:
- •Part 11: The Music Hacking Run-Down (Shorter Version of Tutorial & Walls of Text)
- •Part 12: Credits & Thanks
- •Chapter 25: Music Editing with Zahlman’s Song Editor
- •If you actually do type in help and press ‘enter’ on your keyboard, it’ll give you a list of commands, and tell you some stuff. Here’s the important stuff:
- •It worked! Great! I know how to import a song!
- •Chapter 26: Exporting Music with gba2midi
- •Chapter 27: Battle Background Graphics
- •If it doesn’t, I suggest double-checking all your settings (everything should be compressed) and make sure your width is set to 30 and your height is set to 32.
- •Chapter 28: Music Array Module
- •Chapter 29: Sound Room Editing
- •Chapter 30: Chapter Unit Editing with Nightmare
- •Chapter 31: Death Quotes
- •Chapter 32: Event iDs
- •Chapter 33: Battle Conversations
- •Chapter 34: Triangle Attacks
- •Chapter 35-36: The Animation Modules & Repointing Tutorial
- •It should look like this:
- •Chapter 37: Support Editing
- •Chapter 38: Miscellaneous Nightmare Modules
- •In this chapter I’m going to quickly run through what some other nightmare modules do.
- •Vendor/Armory Editors – edits the contents of vendors and armories.
- •Vulnerary Editor – edits the amount of hp restored by a vulnerary. (Default: 10)
- •Vulnerary Editor – edits the amount of hp restored by a vulnerary.
- •Chapter 40: Text Editing with fEditor Adv
- •Chapter 41: Portrait Formatting & Preparation
- •Chapter 42: Portrait Insertion with fEditor Adv
- •I wouldn’t mess with the palette editor (the colorful boxes).
- •Chapter 43: Locating Palettes
- •Chapter 44: Editing Palettes
- •I don’t exactly have a color I want to use for this title screen background, so I’m just going to show you how to get the rgb of some random color on a portrait.
- •If something didn’t work right, make sure you:
- •Chapter 45: Working with gbage
- •Chapter 46: Chapter Data Editor
- •Vision Distance is for Fog of War (fow). If it’s ‘0’, it’s assumed there is no fog of war.
- •Hold it! (Unless you aren’t hacking fe7!)
- •Chapter 47: Map Creation
- •I’m tired of writing this tutorial. Honestly. So from now on, I’m going to stop making so many wasteful comments like the one I am typing right now.
- •Chapter 48: Map Insertion
- •If you’re looking to make a totally new chapter (instead of being limited to the old game’s exact same scenes with exact same events) then read on, because I’m going to hack events next!
- •Chapter 49: Event Assembler Basics
- •I would just always add end guards since it’s not something you need to worry about too much.
- •Chapter 50: Events – The Layout
- •Including the stlb
- •Chapter 51: Events – The Event Codes
- •Items is just a list of items with a max of 4 starting items. I prefer to use the 3rd method of writing them, with the brackets and all. Each item is separated by a comma.
- •Chapter 52: Event Construction
- •VillageGate: // name of tile data group
- •Chapter 54: Chapter Creation Finishing Touches
- •Chapter 55: Importing Tilesets
- •Part 2: The First Frame
- •Part 1b: Palette Preparing
- •Part 2: Testing the Foundation to Your Animation
- •If all goes well, your guy should be standing, kinda like this.
- •Part 3: Making the Rest of Your Frames
- •Chapter 58: Custom Battle Animations – Scripts
- •I just pulled a Xeld. Had to do that at least once in this tutorial.
- •If you don’t know what a sound sounds like, just test it out with your animation and find out. Experiment with the codes if you need to.
- •Chapter 59: Custom Spell Animations
- •0X85 command count for this spell: 10
- •It’s true! It did work! It’s still very much a work in progress, as you can see, but the point is we got he test frame working. The rest just takes time, patience, and the attitude that you can do it!
- •Chapter 60: Weapon Icons
- •If you did, you are successful. Despite the odd format of the icons, you have spotted them, and that is what is most important, in my honest opinion.
- •I have this show up:
- •Chapter 61: Map Sprites
- •Chapter 62: Proper Betatesting
- •Chapter 63: vba’s Tools
- •Chapter 64: Other vba Options
- •In this chapter I’m going to detail some of vba’s semi-obscure but not totally obscure options. Knowing how to use vba will help you test your game in various ways.
- •Chapter 65: Recording Videos & Sound
- •Chapter 66: Fixing the Desync with VirtualDubMod & Video Rendering
- •Chapter 67: ips Patching & General Patching Information
- •Chapter 68: ups Patching
- •I suggest you read the ips patching tutorial (at least the beginning) if you haven’t done so as I will not be as thorough with this chapter as I was the previous.
- •In an extremely similar manner you can apply patches. Take a look.
- •Chapter 69: jfp Patching
- •Chapter 70: xDelta Patching
- •Chapter 71: Nightmare Module Format
- •It is recommended (for reasons of readability by humans) that a newline
- •Is unused ("null") for editboxes.
- •Chapter 72: Miscellaneous Information Archive
- •Chapter 73: Useful Links & Websites
- •Chapter 74: Bonus – Assembly Hacking
- •Preparations:
- •Part 1: Background Info
- •Part 2: Inserting an Assembly Hack
- •Part 2: Breaking Down Your First asm Hack
- •I digressed a lot, but back to the point:
- •Part 3: Second Example – More Codes, More Fun
- •Read other people’s doc.
- •Part 4: More Examples – “Speed-Analyzing”
- •It’s thumb. Write to offset 0. Start with label “Initial”. Push 5 registers and the last register, then start a loop counter in r2 with starting value 0x00.
- •Ifat *Conditional id* *asm routine pointer*
- •I may have mentioned this before, but finding where to hack routines is difficult. And I’m sure I mentioned that finding space for them is difficult.
- •It’s not super long, but it’s got some new things we need to learn. Let’s get started.
- •Part 5: Finding asm Routines & Basics of Using a Debugger
- •Warning: terms may not be accurate. In fact, they almost definitely aren’t accurate, as you’ve probably figured out by now.
- •I don’t know what the flags do either, but they’re there, right next to the window. That’s g.
- •I hope to hear of your achievements in the near future!
- •Final Chapter: Credits, Thanks, and the Epilogue
Ifat *Conditional id* *asm routine pointer*
You can type in the offset of your ASM routine (don’t forget the +1 for thumb, lol) and whatever comes after is what happens if it’s true and whatever comes after the “else” is what happens if it’s false. Or something. I’m tired right now and can’t be bothered to check since this is one of those things I just use trial and error with until it works. Look, I seriously am NOT qualified to be teaching this, didn’t we establish this near the beginning? XD
https://dl.dropbox.com/u/8875056/hacking/asm/Tile%20Text%20Change%20Hack.zip – This hack changes the list of text names used for tiles in a certain map in TLP where you are in a “constellation” and so if the tile said “floor” it’d be awkward and yet I don’t know enough about tilesets (surprisingly enough) to really make my own proper tileset and stuff… so I came up with something that would just use an entirely different set of names for a specific chapter.
…
I may have mentioned this before, but finding where to hack routines is difficult. And I’m sure I mentioned that finding space for them is difficult.
One of the issues is that when you repoint, you can’t magically repoint to anywhere in the ROM. Basic branching codes use relative offsets, which to put simply, means they have like, one byte, and that one byte is a “pointer” to where to branch to. That’s a problem because if you’ve worked with pointers, you’ll know they’re usually 4 bytes. Yeah, well, in ASM, they save space by saying “this thing is X bytes ahead of or before me”. The thing is with only 1 byte for this value, it limits how far you can branch from one instruction to another.
Thus you have the bl command, which is better, but still not perfect. The bl command is an opcode that uses 4 bytes: it has… I believe 3 bytes (it might actually be like 20 bits, I don’t know and I don’t feel checking—thumref or GBATek could tell you exactly how it works but I’m more about the practicality of all) and can link to much farther locations, but still not anywhere in the ROM. So now the issue is getting a location close enough to the original routines, which are usually at the beginning of the ROM.
What I did is use the fact that weapon icons in FE7 start at about 0xC5EA4 or something (this is off the top of my head) and expanded them elsewhere. Because of that, I now had a bunch of free space from where the icons used to be. I could use this to put ASM codes. The issue is that for other people to use my codes, they would also have to expand their weapon icons, or else repoint the ASM on their own, both of which could be troubling since it isn’t exactly user-friendly, though you shouldn’t have too much of a problem with repointing weapon icons if you’re this far into my ASM tutorial. :P
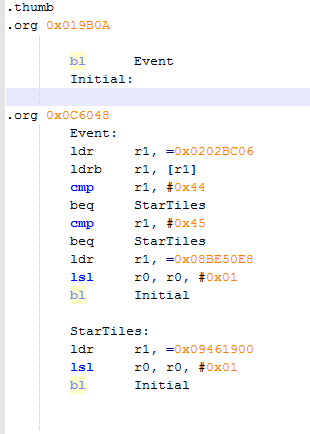
So another thing with bl commands is that for it to work right, you have to pretend the file you are making uses the actual offsets the ROM would use. Actually, you could probably technically write directly to a ROM, and there are programs which make this process easier. However, I am uncultured and taught myself this, so I am going to teach you my barbaric ways of copying and pasting ASM codes from offsets (at least until I make a program that I like and can use to make this easier OR figure out some other method that already exists that I like).
With that, I will now post the ASM hack: