
- •Downloads:
- •Update Log:
- •Table of Contents:
- •Prologue: Bare Basics
- •Chapter 1: Key Terminology & Abbreviations
- •7Zip Archive – Supposedly the best file archiver there is, but not used as much, and thus less convenient. Requires 7zip or winRar to use.
- •VisualBoyAdvance – most people’s emulator of choice, almost always referred to as “vba” for short.
- •Chapter 2: Using Nightmare Modules
- •I upload anything that I think might be useful to someone on that site. Just use the menus and search until you find it.
- •Chapter 3: File Management
- •In order to be a successful hacker you need to have a lot of good management.
- •Chapter 4: Pointer Tables
- •Chapter 5: Battle Animation Editor
- •Chapter 6: Character Editor
- •Chapter 7: Class Editor
- •Chapter 8: Item Editor
- •Item icon – obvious
- •Chapter 9: Spell Association Editor
- •Chapter 13: Movement Cost Editor
- •If the value next to a type of terrain is ‘255’ then it is uncrossable because a unit won’t have 255 movement points.
- •Chapter 16: Battle Palette Reference Editor
- •If you want to know how to actually edit battle palettes’ colors, you can find that in a later chapter that I will make.
- •Chapter 17: Arena Class Editor
- •It’s a bit of work, but making cGs is quite rewarding, and it’s easier than some stuff, that’s for sure! Good luck with your cg making!
- •Chapter 20: Lyn’s Ending Editor
- •Chapter 21: Tutorial Editing/Getting Rid of the Tutorial
- •Part 2: Downloading the Programs
- •Part 3: Preparing Your midi
- •If you still have more than 10 tracks, you should find another midi. Sorry but, there are limits in life.
- •Part 4: Applying Blazer’s Beta Music Insertion/Instrument Patch
- •Part 5: Converting Your midi
- •Part 6: Making Your midi Repeat and Transferring it to Your rom
- •If the b1 and bc are next to each other then I can almost guarantee you want to replace it, so hit “replace” and do that with every instance and once you’re finished you’re good to go.
- •Part 7: Track Pointers & Repointing
- •Part 8: Finale- Assembling Your Song & Profit
- •If you don’t have this module, you’ll have to use this outdated way of doing it. Do check to see if you have the latest Nightmare Modules in general, but otherwise… well, sorry I guess. Xp
- •Part 9: Possible Errors & Wrap-up
- •Part 10: Documentation and Stuff
- •Atrius’ Notes:
- •Charon’s Notes:
- •Part 11: The Music Hacking Run-Down (Shorter Version of Tutorial & Walls of Text)
- •Part 12: Credits & Thanks
- •Chapter 25: Music Editing with Zahlman’s Song Editor
- •If you actually do type in help and press ‘enter’ on your keyboard, it’ll give you a list of commands, and tell you some stuff. Here’s the important stuff:
- •It worked! Great! I know how to import a song!
- •Chapter 26: Exporting Music with gba2midi
- •Chapter 27: Battle Background Graphics
- •If it doesn’t, I suggest double-checking all your settings (everything should be compressed) and make sure your width is set to 30 and your height is set to 32.
- •Chapter 28: Music Array Module
- •Chapter 29: Sound Room Editing
- •Chapter 30: Chapter Unit Editing with Nightmare
- •Chapter 31: Death Quotes
- •Chapter 32: Event iDs
- •Chapter 33: Battle Conversations
- •Chapter 34: Triangle Attacks
- •Chapter 35-36: The Animation Modules & Repointing Tutorial
- •It should look like this:
- •Chapter 37: Support Editing
- •Chapter 38: Miscellaneous Nightmare Modules
- •In this chapter I’m going to quickly run through what some other nightmare modules do.
- •Vendor/Armory Editors – edits the contents of vendors and armories.
- •Vulnerary Editor – edits the amount of hp restored by a vulnerary. (Default: 10)
- •Vulnerary Editor – edits the amount of hp restored by a vulnerary.
- •Chapter 40: Text Editing with fEditor Adv
- •Chapter 41: Portrait Formatting & Preparation
- •Chapter 42: Portrait Insertion with fEditor Adv
- •I wouldn’t mess with the palette editor (the colorful boxes).
- •Chapter 43: Locating Palettes
- •Chapter 44: Editing Palettes
- •I don’t exactly have a color I want to use for this title screen background, so I’m just going to show you how to get the rgb of some random color on a portrait.
- •If something didn’t work right, make sure you:
- •Chapter 45: Working with gbage
- •Chapter 46: Chapter Data Editor
- •Vision Distance is for Fog of War (fow). If it’s ‘0’, it’s assumed there is no fog of war.
- •Hold it! (Unless you aren’t hacking fe7!)
- •Chapter 47: Map Creation
- •I’m tired of writing this tutorial. Honestly. So from now on, I’m going to stop making so many wasteful comments like the one I am typing right now.
- •Chapter 48: Map Insertion
- •If you’re looking to make a totally new chapter (instead of being limited to the old game’s exact same scenes with exact same events) then read on, because I’m going to hack events next!
- •Chapter 49: Event Assembler Basics
- •I would just always add end guards since it’s not something you need to worry about too much.
- •Chapter 50: Events – The Layout
- •Including the stlb
- •Chapter 51: Events – The Event Codes
- •Items is just a list of items with a max of 4 starting items. I prefer to use the 3rd method of writing them, with the brackets and all. Each item is separated by a comma.
- •Chapter 52: Event Construction
- •VillageGate: // name of tile data group
- •Chapter 54: Chapter Creation Finishing Touches
- •Chapter 55: Importing Tilesets
- •Part 2: The First Frame
- •Part 1b: Palette Preparing
- •Part 2: Testing the Foundation to Your Animation
- •If all goes well, your guy should be standing, kinda like this.
- •Part 3: Making the Rest of Your Frames
- •Chapter 58: Custom Battle Animations – Scripts
- •I just pulled a Xeld. Had to do that at least once in this tutorial.
- •If you don’t know what a sound sounds like, just test it out with your animation and find out. Experiment with the codes if you need to.
- •Chapter 59: Custom Spell Animations
- •0X85 command count for this spell: 10
- •It’s true! It did work! It’s still very much a work in progress, as you can see, but the point is we got he test frame working. The rest just takes time, patience, and the attitude that you can do it!
- •Chapter 60: Weapon Icons
- •If you did, you are successful. Despite the odd format of the icons, you have spotted them, and that is what is most important, in my honest opinion.
- •I have this show up:
- •Chapter 61: Map Sprites
- •Chapter 62: Proper Betatesting
- •Chapter 63: vba’s Tools
- •Chapter 64: Other vba Options
- •In this chapter I’m going to detail some of vba’s semi-obscure but not totally obscure options. Knowing how to use vba will help you test your game in various ways.
- •Chapter 65: Recording Videos & Sound
- •Chapter 66: Fixing the Desync with VirtualDubMod & Video Rendering
- •Chapter 67: ips Patching & General Patching Information
- •Chapter 68: ups Patching
- •I suggest you read the ips patching tutorial (at least the beginning) if you haven’t done so as I will not be as thorough with this chapter as I was the previous.
- •In an extremely similar manner you can apply patches. Take a look.
- •Chapter 69: jfp Patching
- •Chapter 70: xDelta Patching
- •Chapter 71: Nightmare Module Format
- •It is recommended (for reasons of readability by humans) that a newline
- •Is unused ("null") for editboxes.
- •Chapter 72: Miscellaneous Information Archive
- •Chapter 73: Useful Links & Websites
- •Chapter 74: Bonus – Assembly Hacking
- •Preparations:
- •Part 1: Background Info
- •Part 2: Inserting an Assembly Hack
- •Part 2: Breaking Down Your First asm Hack
- •I digressed a lot, but back to the point:
- •Part 3: Second Example – More Codes, More Fun
- •Read other people’s doc.
- •Part 4: More Examples – “Speed-Analyzing”
- •It’s thumb. Write to offset 0. Start with label “Initial”. Push 5 registers and the last register, then start a loop counter in r2 with starting value 0x00.
- •Ifat *Conditional id* *asm routine pointer*
- •I may have mentioned this before, but finding where to hack routines is difficult. And I’m sure I mentioned that finding space for them is difficult.
- •It’s not super long, but it’s got some new things we need to learn. Let’s get started.
- •Part 5: Finding asm Routines & Basics of Using a Debugger
- •Warning: terms may not be accurate. In fact, they almost definitely aren’t accurate, as you’ve probably figured out by now.
- •I don’t know what the flags do either, but they’re there, right next to the window. That’s g.
- •I hope to hear of your achievements in the near future!
- •Final Chapter: Credits, Thanks, and the Epilogue
Chapter 50: Events – The Layout
How do we actually make our events? Well, there are different ‘sections’ for different types of codes. We need to know the layout of the events, and then make the actual events. We do all of this in a simple text file. If you by some chance don’t know how to make a text file, I can tell you how to do it on windows. Either A) right-click on a folder, do New-> Text Document (it might say Notepad File or something maybe), then rename it to something that makes sense like “Chapter X events”, B) go to program files in the start menu, then go to Accessories, then load Notepad, and save the file, or C) copy an existing text file, rename it, and open that.
Now I’m going to post my template; don’t be alarmed.
//Made by markyjoe1990 of Youtube
//Modified by Nintenlord
//Modified by Blazer
#define DISABLE_TUTORIALS
#include EAstdlib.event
EventPointerTable(0x??,Pointers)
org 0x????????
Pointers:
POIN Turn_events
POIN Character_events
POIN Location_events
POIN Misc_events
POIN BallistaData BallistaData
POIN BadEN BadEH BadEN BadEH
POIN GoodEN GoodEH GoodEN GoodEH
POIN Opening_event Ending_event
Turn_events:
CODE 0x00
Character_events:
CODE 0x00
Location_events:
CODE 0x00
Misc_events:
CauseGameOverIfLordDies
CODE 0x00
Ballista_events:
CODE 0x00
Opening_event:
ENDB
Ending_event:
MNCH 0x??
ENDA
GoodEN:
UNIT Empty
GoodEH:
UNIT Empty
BadEN:
UNIT Empty
BadEH:
UNIT Empty
#ifdef _FE7_
#define TileMap(TCN,X1,X2,L1,L2,TilePointer) "CODE TCN X1 X2 L1; CODE L2 0x00 0x00 0x00; POIN TilePointer"
#endif
org 0xC9C9C8+(4*0x??) // - Pointer to tile map changes
POIN TileChanges
org 0x????????
TileChanges:
TileMap(0x00,X1,X2,Y1,Y2,TilePointer)
CODE $FF
CODE $00
CODE $00
TilePointer:
CODE (Tile hex)
CODE $00
MESSAGE Events end at offset currentOffset
//The map for this chapter is at offset: ????????
This template includes:
all main structure events
getting rid of the tutorial
Including the stlb
the format for tile map changes
event table repointing
normal and hard mode enemies (no differentiation between E/H modes to save space/I forgot which is which…)
Please copy that to your text file and take a good look at it. I’m going to explain everything from top to bottom.
“//” denotes a comment. Anything after that is ignored, but can be seen. Thus all the comments there that say who have edited the template are rightfully ignored by the program.
#define DISABLE_TUTORIALS - disables the tutorials. I covered this in a MUCH earlier chapter. Once you disable the tutorials once, you don’t need to do it again.
#include bla.event – this includes the standard definitions so that you don’t have to waste space defining them all in one text file. You can include other definitions (like your own) as well.
EventPointerTable(0x??,Pointers) – this is to repoint the pointer in the event table (you can also do it manually using a hex editor or the Event Reference module). 0x?? is the ‘reference byte’ for the events. To know what this is, you can go into the Chapter Data Editor and scroll down to where it says ‘Event Data Pointer’ or something like that. I’ll show you a screen real quick:
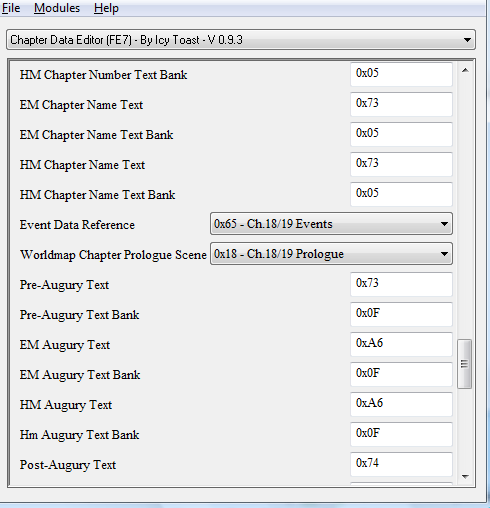
It’s called ‘Event Data Reference’ (I was close). The byte is 0x65, so that’s what I use. The text ‘Pointers’ is a pointer itself. What this does is go to entry 0x65 in the event table and repoint the pointer there to wherever the ‘Pointers’ data is.
org 0x???????? – this is uh… we’ll say it’s a code that says where to put data. Anything that comes after it (but before the next org) goes at this offset. For our events, we need a bunch of freespace. We’ve been through this before. Note that when you put your offset, you don’t need the ‘0x08’ in front of it. Personally I am using 0xCB3800 although this is not typically free space so I don’t suggest using it yourself.
Pointers:
POIN Turn_events
POIN Character_events
POIN Location_events
POIN Misc_events
POIN BallistaData BallistaData
POIN BadEN BadEH BadEN BadEH
POIN GoodEN GoodEH GoodEN GoodEH
POIN Opening_event Ending_event
These pointers are the header we were talking about. As said before, the EventPointerTable code repoints a pointer in the event table to wherever this data is—and we specified where this data is with the org code. The pointers themselves are the base 16 pointers for FE7 events. FE6 and FE8 have a slightly different format, IIRC.
Anyway, POIN is a code that makes a pointer. It’s going to make a pointer of each word there (a word is separated by a space, of course). So if we make a pointer to “Turn_events”, there has to be some events labeled “Turn_events”. Verily, there is.
Turn_events:
CODE 0x00
Before I explain what turn events are, let me explain what it means to put a name and a colon after it. It’s making a ‘label’ or a ‘group’ or an ‘event’. Because you use the same thing for units, I don’t want to call them events, so I am going to call it a label. Back to the POIN code above, it points to this Turn_events, which has some code beneath it. Right now all it has is a CODE 0x00—CODE 0x00 is a nullifier that signifies the end of these events. The actual events we’d put here are events that take place during a certain turn—for example, for a scene at the opening, you could have a scene on turn 1, and for a scene on turn 4, you’d use turn events. I won’t actually teach you what codes to use here/how to make turn events until later though.
From here on out I’m going to be less detailed on my explanations, so here we go:
Character events – talks/conversations between characters
Location events – villages, shops, doors, chests, etc., any events that take place on a certain tile
Miscellaneous events – other types of events. Includes “after-events” and chapter goal conditions.
Ballista events – events for ballista units
Opening event – the events for the opening scene. If battle preparations are on, then it loads this automatically, and the event ends with “ENDB”. If battle preparations are off, you need to have a turn event on turn 1 that uses the opening event, and the event ends with “ENDA” (you also have to manually load units onto the map).
Ending event – the event at the ending scene. This is only directly used if you have a seize event with event ID 0x03.
GoodEN – Ally unit data for Eliwood* normal mode.
GoodEH – Ally unit data for Eliwood hard mode.
BadEN – Enemy unit data for Eliwood normal mode.
BadEH – Enemy unit data for Eliwood hard mode.
*Also used for Lyn’s mode
The stuff at the bottom is all for tile changes, except for the message at the end, which just says where the events end after they are inserted. You’ll see what I mean when you assemble events. As for a map’s tile changes, you’ll have to see another chapter on that. :P