
- •Downloads:
- •Update Log:
- •Table of Contents:
- •Prologue: Bare Basics
- •Chapter 1: Key Terminology & Abbreviations
- •7Zip Archive – Supposedly the best file archiver there is, but not used as much, and thus less convenient. Requires 7zip or winRar to use.
- •VisualBoyAdvance – most people’s emulator of choice, almost always referred to as “vba” for short.
- •Chapter 2: Using Nightmare Modules
- •I upload anything that I think might be useful to someone on that site. Just use the menus and search until you find it.
- •Chapter 3: File Management
- •In order to be a successful hacker you need to have a lot of good management.
- •Chapter 4: Pointer Tables
- •Chapter 5: Battle Animation Editor
- •Chapter 6: Character Editor
- •Chapter 7: Class Editor
- •Chapter 8: Item Editor
- •Item icon – obvious
- •Chapter 9: Spell Association Editor
- •Chapter 13: Movement Cost Editor
- •If the value next to a type of terrain is ‘255’ then it is uncrossable because a unit won’t have 255 movement points.
- •Chapter 16: Battle Palette Reference Editor
- •If you want to know how to actually edit battle palettes’ colors, you can find that in a later chapter that I will make.
- •Chapter 17: Arena Class Editor
- •It’s a bit of work, but making cGs is quite rewarding, and it’s easier than some stuff, that’s for sure! Good luck with your cg making!
- •Chapter 20: Lyn’s Ending Editor
- •Chapter 21: Tutorial Editing/Getting Rid of the Tutorial
- •Part 2: Downloading the Programs
- •Part 3: Preparing Your midi
- •If you still have more than 10 tracks, you should find another midi. Sorry but, there are limits in life.
- •Part 4: Applying Blazer’s Beta Music Insertion/Instrument Patch
- •Part 5: Converting Your midi
- •Part 6: Making Your midi Repeat and Transferring it to Your rom
- •If the b1 and bc are next to each other then I can almost guarantee you want to replace it, so hit “replace” and do that with every instance and once you’re finished you’re good to go.
- •Part 7: Track Pointers & Repointing
- •Part 8: Finale- Assembling Your Song & Profit
- •If you don’t have this module, you’ll have to use this outdated way of doing it. Do check to see if you have the latest Nightmare Modules in general, but otherwise… well, sorry I guess. Xp
- •Part 9: Possible Errors & Wrap-up
- •Part 10: Documentation and Stuff
- •Atrius’ Notes:
- •Charon’s Notes:
- •Part 11: The Music Hacking Run-Down (Shorter Version of Tutorial & Walls of Text)
- •Part 12: Credits & Thanks
- •Chapter 25: Music Editing with Zahlman’s Song Editor
- •If you actually do type in help and press ‘enter’ on your keyboard, it’ll give you a list of commands, and tell you some stuff. Here’s the important stuff:
- •It worked! Great! I know how to import a song!
- •Chapter 26: Exporting Music with gba2midi
- •Chapter 27: Battle Background Graphics
- •If it doesn’t, I suggest double-checking all your settings (everything should be compressed) and make sure your width is set to 30 and your height is set to 32.
- •Chapter 28: Music Array Module
- •Chapter 29: Sound Room Editing
- •Chapter 30: Chapter Unit Editing with Nightmare
- •Chapter 31: Death Quotes
- •Chapter 32: Event iDs
- •Chapter 33: Battle Conversations
- •Chapter 34: Triangle Attacks
- •Chapter 35-36: The Animation Modules & Repointing Tutorial
- •It should look like this:
- •Chapter 37: Support Editing
- •Chapter 38: Miscellaneous Nightmare Modules
- •In this chapter I’m going to quickly run through what some other nightmare modules do.
- •Vendor/Armory Editors – edits the contents of vendors and armories.
- •Vulnerary Editor – edits the amount of hp restored by a vulnerary. (Default: 10)
- •Vulnerary Editor – edits the amount of hp restored by a vulnerary.
- •Chapter 40: Text Editing with fEditor Adv
- •Chapter 41: Portrait Formatting & Preparation
- •Chapter 42: Portrait Insertion with fEditor Adv
- •I wouldn’t mess with the palette editor (the colorful boxes).
- •Chapter 43: Locating Palettes
- •Chapter 44: Editing Palettes
- •I don’t exactly have a color I want to use for this title screen background, so I’m just going to show you how to get the rgb of some random color on a portrait.
- •If something didn’t work right, make sure you:
- •Chapter 45: Working with gbage
- •Chapter 46: Chapter Data Editor
- •Vision Distance is for Fog of War (fow). If it’s ‘0’, it’s assumed there is no fog of war.
- •Hold it! (Unless you aren’t hacking fe7!)
- •Chapter 47: Map Creation
- •I’m tired of writing this tutorial. Honestly. So from now on, I’m going to stop making so many wasteful comments like the one I am typing right now.
- •Chapter 48: Map Insertion
- •If you’re looking to make a totally new chapter (instead of being limited to the old game’s exact same scenes with exact same events) then read on, because I’m going to hack events next!
- •Chapter 49: Event Assembler Basics
- •I would just always add end guards since it’s not something you need to worry about too much.
- •Chapter 50: Events – The Layout
- •Including the stlb
- •Chapter 51: Events – The Event Codes
- •Items is just a list of items with a max of 4 starting items. I prefer to use the 3rd method of writing them, with the brackets and all. Each item is separated by a comma.
- •Chapter 52: Event Construction
- •VillageGate: // name of tile data group
- •Chapter 54: Chapter Creation Finishing Touches
- •Chapter 55: Importing Tilesets
- •Part 2: The First Frame
- •Part 1b: Palette Preparing
- •Part 2: Testing the Foundation to Your Animation
- •If all goes well, your guy should be standing, kinda like this.
- •Part 3: Making the Rest of Your Frames
- •Chapter 58: Custom Battle Animations – Scripts
- •I just pulled a Xeld. Had to do that at least once in this tutorial.
- •If you don’t know what a sound sounds like, just test it out with your animation and find out. Experiment with the codes if you need to.
- •Chapter 59: Custom Spell Animations
- •0X85 command count for this spell: 10
- •It’s true! It did work! It’s still very much a work in progress, as you can see, but the point is we got he test frame working. The rest just takes time, patience, and the attitude that you can do it!
- •Chapter 60: Weapon Icons
- •If you did, you are successful. Despite the odd format of the icons, you have spotted them, and that is what is most important, in my honest opinion.
- •I have this show up:
- •Chapter 61: Map Sprites
- •Chapter 62: Proper Betatesting
- •Chapter 63: vba’s Tools
- •Chapter 64: Other vba Options
- •In this chapter I’m going to detail some of vba’s semi-obscure but not totally obscure options. Knowing how to use vba will help you test your game in various ways.
- •Chapter 65: Recording Videos & Sound
- •Chapter 66: Fixing the Desync with VirtualDubMod & Video Rendering
- •Chapter 67: ips Patching & General Patching Information
- •Chapter 68: ups Patching
- •I suggest you read the ips patching tutorial (at least the beginning) if you haven’t done so as I will not be as thorough with this chapter as I was the previous.
- •In an extremely similar manner you can apply patches. Take a look.
- •Chapter 69: jfp Patching
- •Chapter 70: xDelta Patching
- •Chapter 71: Nightmare Module Format
- •It is recommended (for reasons of readability by humans) that a newline
- •Is unused ("null") for editboxes.
- •Chapter 72: Miscellaneous Information Archive
- •Chapter 73: Useful Links & Websites
- •Chapter 74: Bonus – Assembly Hacking
- •Preparations:
- •Part 1: Background Info
- •Part 2: Inserting an Assembly Hack
- •Part 2: Breaking Down Your First asm Hack
- •I digressed a lot, but back to the point:
- •Part 3: Second Example – More Codes, More Fun
- •Read other people’s doc.
- •Part 4: More Examples – “Speed-Analyzing”
- •It’s thumb. Write to offset 0. Start with label “Initial”. Push 5 registers and the last register, then start a loop counter in r2 with starting value 0x00.
- •Ifat *Conditional id* *asm routine pointer*
- •I may have mentioned this before, but finding where to hack routines is difficult. And I’m sure I mentioned that finding space for them is difficult.
- •It’s not super long, but it’s got some new things we need to learn. Let’s get started.
- •Part 5: Finding asm Routines & Basics of Using a Debugger
- •Warning: terms may not be accurate. In fact, they almost definitely aren’t accurate, as you’ve probably figured out by now.
- •I don’t know what the flags do either, but they’re there, right next to the window. That’s g.
- •I hope to hear of your achievements in the near future!
- •Final Chapter: Credits, Thanks, and the Epilogue
If you’re looking to make a totally new chapter (instead of being limited to the old game’s exact same scenes with exact same events) then read on, because I’m going to hack events next!
Chapter 49: Event Assembler Basics
There’s two main ways to do events. You can do them straight in hex with a hex editor, or with the Event Assembler. The Event Assembler is much easier, so I’m going to cover this.
First, some things to start you off:
EA = Event Assembler
STLB = Standard Library = the standard definitions included with the EA
EALF = Event Assembler Language file = the text file with all the EA codes you can use.
Assemble = use the Event Assembler to interpret the codes in a text file and turn it into hex that the game comprehends.
Disassemble = Opposite of assemble, take the game’s events and put it into a text file with codes that you can understand.
You should of course know what pointers and offsets are. While knowledge of programming languages can be useful, it is not by any means necessary.
Download the Event Assembler and extract its files as you would any other program. I’m now going to tell you about the basics of event assembling.
The program itself isn’t going to be used much. Open it up and see for yourself.
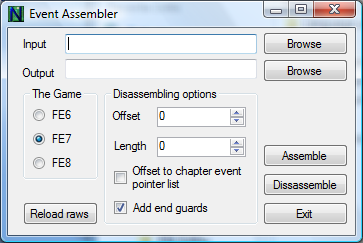
The input is either where you put the text file (for assembling) or the ROM (for disassembling). You put the opposite thing in the output (so for assembling, you’re going to output a ROM, and for disassembling, you will output a text file).
Obviously you have to choose which game you want. When disassembling, you need to input an offset. The offset can either be an offset a pointer in the event reference table, or it can be the actual ‘header’ of the events. The header is a list of pointers saying what event data is where. If you are going to point to the latter, you need to select the appropriate checkbox.
I would just always add end guards since it’s not something you need to worry about too much.
Of course, when you have your correct input and settings, click “assemble” to assemble or “disassemble” to disassemble. This is how you work the EA. You’ll likely reference this part of the tutorial later because you’re not actually going to do any assembling for a while.
Your event assembler folder should look like this, but without the NewMacros file or template file.
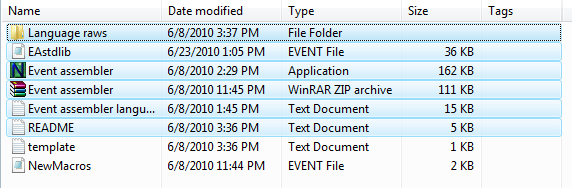
“Language raws” is a folder of the EA assembler language raws… as in, it defines what code is what/it’s hex equivalent and the format of the code, as well as some other stuff. You can change it if you want.
EAstdlib is a library of standard EA definitions. You can edit it if you want, but since it’s the standard definitions, it’s not exactly supposed to be edited. If you look at my icon, it shows a notepad in it. That’s because I have set .event files to open with Notepad so I can edit them. Yes, that’s right—to edit the file, just open it in notepad.
Now, what exactly are definitions? It defines stuff. It can define a name for a value—for example, Lyn’s character hex is 0x2D, but instead of typing 0x2D, you could type ‘Lyn’ in the event assembler. This is easier than remembering the hex for every character/having to look it up. Tutorial (i.e. Lyn’s mode) Lyn would be Lyn_t. As said, you can view the files and see the definitions for each game.
#ifdef _FE8_
#ifndef _NO_FE8_DEFINITIONS_
#define Eirika 0x01
#define Seth 0x02
#define Gilliam 0x03
… (more entries)
#endif
#endif
This is stolen from the STLB. #ifdef _FE8_ is an ‘if’ statement that see if it’s FE8. It also checks to see if _NO_FE8_DEFINITIONS is marked. That is, if you DON’T want to use the standard FE8 definitions but rather your own definitions, you could use _NO_FE8_DEFINITIONS in your code, and when the EA checks to see if it should use the definitions, it’d be like “no, this is marked, so I can’t do it”.
For each #ifdef/#ifndef there has to be an #endif. Thus after all the definitions for characters, classes, and items, is an endif.
There are also these ‘shortcuts’ called macros. Macros simplify otherwise long processes. Let’s look at a few macros as well as other definitions in the STLB.
//Backwards compability
#ifdef _FE7_
#define IFEV IFEF
#endif
This defines one code as another code, so if a person had used an older verison and used one spelling, their code would still work.
#ifdef _FE8_
#define GotoPrepScreen "GOTO $591FD8; ENDA"
#endif
This macro makes a code “GotoPrepScreen” that the EA interprets as the code in quotes next to it. Instead of remembering that offset and the whole code, you can just type something easy to remember. Much better, huh? While we’re at it, do you see the semi-colon after the 8? A semi-colon is like a way of signifying a line break (a new line) without actually making it. Thus the EA knows that “GOTO” and “ENDA” are separate codes.
#define Village(eventID,offset,X,Y) "VILL eventID offset [X,Y] 0xE; LOCA eventID [X,Y-1] 0x1D"
While you still don’t know how to actually use macros and codes in your events, you should understand how they work. Everything inside of the parantheses, separated by commas, is a paremeter. eventID is a parameter—we know what event IDs are, of course. So is the offset of the village, as is the X and Y co-ordinates. However, that small code on the left comes out to be the code on the right—it’s much easier for us to use the code on the left. Make sure you get the connection—the input ‘X’ and ‘Y’ is the same input on the right for the ‘X’ and ‘Y’ there. However, we’re avoiding all the other codes and bytes by using our little shortcut. It’s why macros are so useful.
I think we’ve covered macros well enough that we can move on to the next file in the folder.
The Event assembler language file that I will be calling “EALF” is a list of all the codes you can use with the Event Assembler. It does not, however, include macros. It contains the “base codes”—the very codes that are defined in the language raws. It says what paremeters there are and explains the basics of each code.
I’m going to cover many codes (as well as some of my own macros) in another chapter. I will not cover every code, but I will cover enough that you will know what codes to use when and where and how they work in conjunction with the rest of the events.
The README should be read. Nothing else to say about that.
There’s also the template file Markyjoe1990 made. It has a base layout for codes. I’m going to give you a similar template in the next chapter.
The other file you saw me have was a custom file for my own macros. Don’t worry, I’ll share the macros with you in a couple chapters. :D