
- •Downloads:
- •Update Log:
- •Table of Contents:
- •Prologue: Bare Basics
- •Chapter 1: Key Terminology & Abbreviations
- •7Zip Archive – Supposedly the best file archiver there is, but not used as much, and thus less convenient. Requires 7zip or winRar to use.
- •VisualBoyAdvance – most people’s emulator of choice, almost always referred to as “vba” for short.
- •Chapter 2: Using Nightmare Modules
- •I upload anything that I think might be useful to someone on that site. Just use the menus and search until you find it.
- •Chapter 3: File Management
- •In order to be a successful hacker you need to have a lot of good management.
- •Chapter 4: Pointer Tables
- •Chapter 5: Battle Animation Editor
- •Chapter 6: Character Editor
- •Chapter 7: Class Editor
- •Chapter 8: Item Editor
- •Item icon – obvious
- •Chapter 9: Spell Association Editor
- •Chapter 13: Movement Cost Editor
- •If the value next to a type of terrain is ‘255’ then it is uncrossable because a unit won’t have 255 movement points.
- •Chapter 16: Battle Palette Reference Editor
- •If you want to know how to actually edit battle palettes’ colors, you can find that in a later chapter that I will make.
- •Chapter 17: Arena Class Editor
- •It’s a bit of work, but making cGs is quite rewarding, and it’s easier than some stuff, that’s for sure! Good luck with your cg making!
- •Chapter 20: Lyn’s Ending Editor
- •Chapter 21: Tutorial Editing/Getting Rid of the Tutorial
- •Part 2: Downloading the Programs
- •Part 3: Preparing Your midi
- •If you still have more than 10 tracks, you should find another midi. Sorry but, there are limits in life.
- •Part 4: Applying Blazer’s Beta Music Insertion/Instrument Patch
- •Part 5: Converting Your midi
- •Part 6: Making Your midi Repeat and Transferring it to Your rom
- •If the b1 and bc are next to each other then I can almost guarantee you want to replace it, so hit “replace” and do that with every instance and once you’re finished you’re good to go.
- •Part 7: Track Pointers & Repointing
- •Part 8: Finale- Assembling Your Song & Profit
- •If you don’t have this module, you’ll have to use this outdated way of doing it. Do check to see if you have the latest Nightmare Modules in general, but otherwise… well, sorry I guess. Xp
- •Part 9: Possible Errors & Wrap-up
- •Part 10: Documentation and Stuff
- •Atrius’ Notes:
- •Charon’s Notes:
- •Part 11: The Music Hacking Run-Down (Shorter Version of Tutorial & Walls of Text)
- •Part 12: Credits & Thanks
- •Chapter 25: Music Editing with Zahlman’s Song Editor
- •If you actually do type in help and press ‘enter’ on your keyboard, it’ll give you a list of commands, and tell you some stuff. Here’s the important stuff:
- •It worked! Great! I know how to import a song!
- •Chapter 26: Exporting Music with gba2midi
- •Chapter 27: Battle Background Graphics
- •If it doesn’t, I suggest double-checking all your settings (everything should be compressed) and make sure your width is set to 30 and your height is set to 32.
- •Chapter 28: Music Array Module
- •Chapter 29: Sound Room Editing
- •Chapter 30: Chapter Unit Editing with Nightmare
- •Chapter 31: Death Quotes
- •Chapter 32: Event iDs
- •Chapter 33: Battle Conversations
- •Chapter 34: Triangle Attacks
- •Chapter 35-36: The Animation Modules & Repointing Tutorial
- •It should look like this:
- •Chapter 37: Support Editing
- •Chapter 38: Miscellaneous Nightmare Modules
- •In this chapter I’m going to quickly run through what some other nightmare modules do.
- •Vendor/Armory Editors – edits the contents of vendors and armories.
- •Vulnerary Editor – edits the amount of hp restored by a vulnerary. (Default: 10)
- •Vulnerary Editor – edits the amount of hp restored by a vulnerary.
- •Chapter 40: Text Editing with fEditor Adv
- •Chapter 41: Portrait Formatting & Preparation
- •Chapter 42: Portrait Insertion with fEditor Adv
- •I wouldn’t mess with the palette editor (the colorful boxes).
- •Chapter 43: Locating Palettes
- •Chapter 44: Editing Palettes
- •I don’t exactly have a color I want to use for this title screen background, so I’m just going to show you how to get the rgb of some random color on a portrait.
- •If something didn’t work right, make sure you:
- •Chapter 45: Working with gbage
- •Chapter 46: Chapter Data Editor
- •Vision Distance is for Fog of War (fow). If it’s ‘0’, it’s assumed there is no fog of war.
- •Hold it! (Unless you aren’t hacking fe7!)
- •Chapter 47: Map Creation
- •I’m tired of writing this tutorial. Honestly. So from now on, I’m going to stop making so many wasteful comments like the one I am typing right now.
- •Chapter 48: Map Insertion
- •If you’re looking to make a totally new chapter (instead of being limited to the old game’s exact same scenes with exact same events) then read on, because I’m going to hack events next!
- •Chapter 49: Event Assembler Basics
- •I would just always add end guards since it’s not something you need to worry about too much.
- •Chapter 50: Events – The Layout
- •Including the stlb
- •Chapter 51: Events – The Event Codes
- •Items is just a list of items with a max of 4 starting items. I prefer to use the 3rd method of writing them, with the brackets and all. Each item is separated by a comma.
- •Chapter 52: Event Construction
- •VillageGate: // name of tile data group
- •Chapter 54: Chapter Creation Finishing Touches
- •Chapter 55: Importing Tilesets
- •Part 2: The First Frame
- •Part 1b: Palette Preparing
- •Part 2: Testing the Foundation to Your Animation
- •If all goes well, your guy should be standing, kinda like this.
- •Part 3: Making the Rest of Your Frames
- •Chapter 58: Custom Battle Animations – Scripts
- •I just pulled a Xeld. Had to do that at least once in this tutorial.
- •If you don’t know what a sound sounds like, just test it out with your animation and find out. Experiment with the codes if you need to.
- •Chapter 59: Custom Spell Animations
- •0X85 command count for this spell: 10
- •It’s true! It did work! It’s still very much a work in progress, as you can see, but the point is we got he test frame working. The rest just takes time, patience, and the attitude that you can do it!
- •Chapter 60: Weapon Icons
- •If you did, you are successful. Despite the odd format of the icons, you have spotted them, and that is what is most important, in my honest opinion.
- •I have this show up:
- •Chapter 61: Map Sprites
- •Chapter 62: Proper Betatesting
- •Chapter 63: vba’s Tools
- •Chapter 64: Other vba Options
- •In this chapter I’m going to detail some of vba’s semi-obscure but not totally obscure options. Knowing how to use vba will help you test your game in various ways.
- •Chapter 65: Recording Videos & Sound
- •Chapter 66: Fixing the Desync with VirtualDubMod & Video Rendering
- •Chapter 67: ips Patching & General Patching Information
- •Chapter 68: ups Patching
- •I suggest you read the ips patching tutorial (at least the beginning) if you haven’t done so as I will not be as thorough with this chapter as I was the previous.
- •In an extremely similar manner you can apply patches. Take a look.
- •Chapter 69: jfp Patching
- •Chapter 70: xDelta Patching
- •Chapter 71: Nightmare Module Format
- •It is recommended (for reasons of readability by humans) that a newline
- •Is unused ("null") for editboxes.
- •Chapter 72: Miscellaneous Information Archive
- •Chapter 73: Useful Links & Websites
- •Chapter 74: Bonus – Assembly Hacking
- •Preparations:
- •Part 1: Background Info
- •Part 2: Inserting an Assembly Hack
- •Part 2: Breaking Down Your First asm Hack
- •I digressed a lot, but back to the point:
- •Part 3: Second Example – More Codes, More Fun
- •Read other people’s doc.
- •Part 4: More Examples – “Speed-Analyzing”
- •It’s thumb. Write to offset 0. Start with label “Initial”. Push 5 registers and the last register, then start a loop counter in r2 with starting value 0x00.
- •Ifat *Conditional id* *asm routine pointer*
- •I may have mentioned this before, but finding where to hack routines is difficult. And I’m sure I mentioned that finding space for them is difficult.
- •It’s not super long, but it’s got some new things we need to learn. Let’s get started.
- •Part 5: Finding asm Routines & Basics of Using a Debugger
- •Warning: terms may not be accurate. In fact, they almost definitely aren’t accurate, as you’ve probably figured out by now.
- •I don’t know what the flags do either, but they’re there, right next to the window. That’s g.
- •I hope to hear of your achievements in the near future!
- •Final Chapter: Credits, Thanks, and the Epilogue
Chapter 31: Death Quotes
This will not teach how to edit death quote text. Death quote text works the same as other text (even though I haven’t actually taught how to edit text yet). This just edits the stuff in the Nightmare modules.
We’ll start with death quote editor part 1-2. If I’m right, this is Lyn’s mode death quotes and… something else. Part 2 starts after the 0x00 entry near the middle. It *probably* should be 2 different modules, except the data is right next to each other, so it’s kind of confusing.
Anyhow, character and chapter is obvious-use 0x43 for most characters unless they have a special death quote in a specific chapter (in which case specify the chapter, of course).
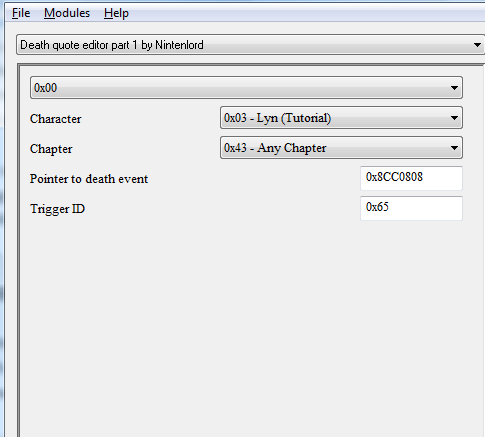
The pointer to the death event is a pointer to a very short event that usually just contains a text event. For example, if you go to CC0808 in a hex editor (for Lyn’s death quote, the first entry) you’ll see “0D000000 A8070000 09000000 0A000000 00000000”.
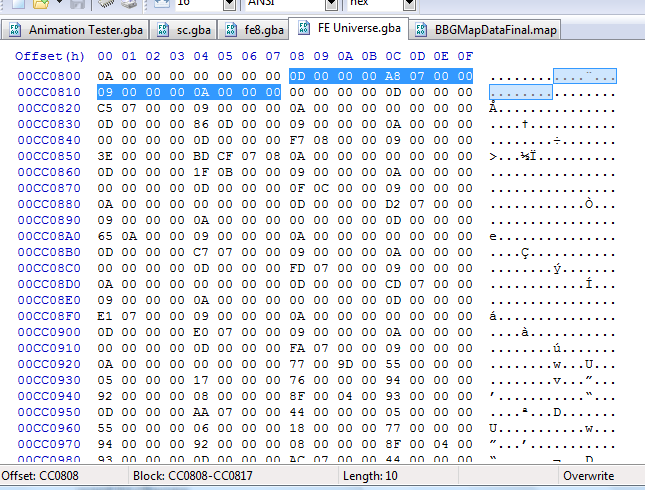
The 0D part is the command for normal text. A807 is the text pointer, but reversed due to little endian, so it’s actually 7A8. This is what you go to in FEditor Adv to edit her death quote text. The ‘09’ command clears the text and ‘0A’ ends the event. The 00s are just insignificant nullifiers for the most part (but don’t edit them anyhow). The main part to worry about is the A8070000 since that’s the text pointer/ID/reference (from now on I’m calling it text ID for simplicity’s sake) that you might want to change.
Now, later on, you may want to write your own custom death quote event using the Event Assembler; if you don’t know about this, then don’t worry about it, but if you want to know how, simply do something like this:
ORG 0xD20400
DeathQuoteEvent: *insert events here* ENDA
Then link to the event using the death quote module by updating the pointer in the module (and be sure to add 0x08000000 to the offset or it won’t work).
On a side note, if you’re going to repoint death quotes, note that part 1 and 2 BOTH need to be repointed… so yeah.
[Back to the main topic] The trigger ID is something that will take a bit of learning to understand. It’s like a number that references an event. I call it an event ID. In this case, Lyn’s death quote has event ID 0x65 attached to it. This is important because when event 0x65 is triggered, the game over scene occurs. Yes—if you want a game over scene after the death quote, just give the character a ‘Trigger ID’ of 0x65. As long as the game’s events are coded to react to this death quote, this should work properly.
The Trigger ID can also be used in conjunction with other events though. You could set it to say, 0x0B, and then make an event that happens when 0x0B is triggered. So you could make it so that if you kill a unit, the chapter ends right after… Just like a boss. Yes, bosses typically have a Trigger ID of 0x02 (although their data is in death quote editor part 2, for whatever reason). Similarly Trigger IDs 0x01 and 0x03 are also reserved, so it’s better not to touch 0x01-0x03 and 0x65. Managing them is kinda hard but it’s feasible. I’ll cover more about this in the next chapter.
Anyway, let’s continue to part 2 of the death quote editors. This one is a bit better. It’s the same except it gives us the option to just put a text ID instead of ALWAYS having to have an event. But still, there is an option for an event if you want (if not, it’s 00). The Trigger ID works the same (I will cover more about it in the next chapter).