

PHP does not define a default access specifier for data members. If
you attempt to declare a data member without an access specifier, an
error occurs. For example, the data member declaration in the follow-
Ing class is invalid because it does not include an access specifier:
class BankAccount {
$Balance = 0; // invalid
}
Next, you declare four data members, $DBConnect, $storeID,
$inventory[], and $shoppingCart[], to the OnlineStore class. The
$DBConnect data member stores the database connection details.
The $storeID data member stores the ID of the current store. The
$inventory[] array keeps track of the products in the store’s inven-
tory, and the $shoppingCart[] array keeps track of the amount of
each item in a customer’s shopping cart. The $inventory[] and
$shoppingCart[] arrays both use the productID field from the
inventory table of the online_store database as the element key. To
adhere to the principles of information hiding, you must declare all
of the data members as private. Later in this chapter, you will write
member functions that access and manipulate the values in each
array.
To add data members to the OnlineStore class:
1.
Return to the class_OnlineStore.php script in your text
editor.
Add the following private data member declarations to the
class definition:
2.
CHAPTER
10
Developing
Object-Oriented PHP
private
private
private
private
$DBConnect
= NULL;
$storeID
= "";
$inventory
= array();
$shoppingCart
= array();
3.
582
Save
the class_OnlineStore.php script.
Serializing
Objects
In
Chapter 9, you learned about PHP’s various state preservation
techniques,
including how to use sessions. In addition to keeping
track
of current Web site visitors, session variables can store informa-
tion
that can be shared among multiple scripts that are called as part
of
the same session. But how do you share objects within the same
session?
You could assign the value of an object’s data members to
session
variables, but you would need to instantiate a new object and
reassign
the session variable values to the data members each time
you
call a new script. However, this approach would be difficult if
you
have an object with dozens of data members. A better choice is
to
serialize the object between script calls within the same session.
Serialization
refers
to the process of converting an object into a string
that
you can store for reuse. Serialization stores both data members
and
member functions into strings, which can be stored in text files
and
databases or passed to another script. To serialize an object, you
pass
an object name to the serialize()
function.
The following
statement
serializes the $Checking
object
and assigns the returned
string
to a variable named $SavedAccount:
$SavedAccount
= serialize($Checking);
Serialization
is
also
used to
store
the data
in
large
arrays.
To
convert serialized data back into an object, you use the
unserialize()
function.
The following statement converts the seri-
alized
data in the $SavedAccount
variable
back into the $Checking
object:
$Checking
= unserialize($SavedAccount);
To
use serialized objects between scripts, you assign a serialized
object
to a session variable. For example, the following statements
serialize
the $Checking
object
and assign the returned string to a
variable
named SavedAccount
in
the $_SESSION
autoglobal:
Later
in this
chapter, you
will learn
how to use
two special
serialization methods,
__sleep() and
__wakeup(), in your
classes.
session_start();
$_SESSION('SavedAccount') = serialize($Checking);
Converting a serialized value in a session variable is very similar to
converting a serialized value in a standard variable. The following
statement converts the serialized data in the SavedAccount session
variable back into the $Checking object:
$Checking = unserialize($_SESSION('SavedAccount'));

Declaring
Data Members
To
modify the GosselinGourmetCoffee.php script so it uses sessions
to
store serialized OnlineStore
objects:
1.
Return
to the GosselinGourmetCoffee.php script in your
text
editor.
Add
a session_start()
statement
to the first script section
at
the start of the file:
<?php
session_start();
require_once("inc_OnlineStoreDB.php");
require_once("class_OnlineStore.php");
...
2.
583
3.
At
the end of the first script section, replace the if...else
statement
that instantiates the $Store
object
with the follow-
ing
version, which calls the unserialize()
function
if the
currentStore
variable
exists in the $_SESSION
autoglobal:
if
(class_exists("OnlineStore")) {
if
(isset($_SESSION['currentStore']))
$Store = unserialize($_SESSION['currentStore']);
else
$Store = new OnlineStore();
}
else {
$ErrorMsgs[] = "The OnlineStore class is not
available!";
$Store = NULL;
}
4.
Add the following statement to the end of the else clause
at the end of the second script section, just after the
echo "</table>"; statement. This statement will serialize
the $Store object into a variable named currentStore in the
$_SESSION autoglobal:
$_SESSION['currentStore'] = serialize($Store);
5.
Save the GosselinGourmetCoffee.php script.
Short Quiz
1.
2.
3.
Describe the concept of information hiding.
List the three levels of access specifiers in PHP.
Differentiate between a public access specifier and a private
access specifier.
CHAPTER
10
Developing
Object-Oriented PHP
4.
5.
Explain
why objects should be serialized.
Describe
the steps used to pass a serialized object between
scripts.
584
Working
with Member Functions
Because
member functions perform most of the work in a class, you
will
now learn about the various techniques associated with them.
Member
functions are usually declared as public, but they can also be
declared
as private. Public member functions can be called by any-
one,
whereas private member functions can be called only by other
member
functions in the same class.
You
might wonder about the usefulness of a private member func-
tion,
which cannot be accessed by a client of the program. Suppose
your
program needs some sort of utility function that clients have no
need
to access. For example, the BankAccount
class
might need to cal-
culate
interest by calling a function named calcInterest().
To use
your
program, the client does not need to access the calcInterest()
function.
By making the calcInterest()
function
private, you pro-
tect
your program and add another level of information hiding. A
general
rule of thumb is to create public member functions for any
functions
that clients need to access and to create private member
functions
for any functions that clients do not need to access.
You
declare a member function within the body of a class definition
and
include an access specifier before the function
keyword.
Other
than
including an access specifier, there is little difference between
standard
functions and member functions. Unlike data members, you
are
not required to define a member function with an access speci-
fier.
If you do exclude the access specifier, the member function’s
default
access is public. However, it’s good programming practice
to
include an access specifier with any member function definition
to
clearly identify the accessibility of the function. The following
statement
demonstrates how to declare a member function named
withdrawal()
in
the BankAccount
class:
class
BankAccount {
public
$Balance = 958.20;
public function withdrawal($Amount) {
$this->Balance -= $Amount;
}
}
if (class_exists("BankAccount"))
$Checking = new BankAccount();
Working
with Member Functions
else
exit("<p>The
BankAccount class is not available!</p>");
printf("<p>Your checking account balance is $%.2f.</p>",
$Checking->Balance);
$Cash = 200;
$Checking->withdrawal(200);
printf("<p>After withdrawing $%.2f, your checking account
balance is $%.2f.</p>", $Cash, $Checking->Balance);
585
The following version of the withdrawal() function raises an error
because the statement within the function attempts to subtract a
value from the undefined local variable named $Balance:
public function withdrawal($Amount) {
$Balance -= $Amount;
}
Using the $this Reference
Within a class function, it is often necessary to refer to members
of the object. Outside of the class, you refer to the members of the
object using the name of the object, the member selection notation
(->), and the name of the member function or variable. Within the
class function definition, you cannot use the object name (no objects
of the class are instantiated until after the class is defined). PHP pro-
vides a special reference, $this, to refer to the current object of the
class. The $this reference uses member selection notation to access
class members in the same way you use an instantiated object to refer
to a data member. If you do not use the $this reference to refer to a
data member from within a member function, PHP treats the data
member as a variable that is local to the scope of the function.
Initializing with Constructor Functions
When you first instantiate an object from a class, you will often want
to assign initial values to data members or perform other types of
initialization tasks, such as calling a function member that might
calculate and assign values to data members. Although you can
assign simple values to data members when you declare them, a bet-
ter choice is to use a constructor function. A constructor function is
a special function that is called automatically when an object from a
class is instantiated. You define and declare constructor functions the
same way you define other functions, although you do not include a
return type because constructor functions do not return values. Each
class definition can contain its own constructor function, named
either __construct() (with two leading underscore characters) or
the same name as the class. PHP first searches for the __construct()
CHAPTER
10
Developing
Object-Oriented PHP
function
within a class definition. You do not need to specify an
access
specifier with a constructor function, although if you do, you
can
only specify public access. The following code demonstrates how
to
use the __construct()
function
to initialize the data members in
the
BankAccount
class
(note the use of the $this
reference):
586
class
BankAccount {
private
$AccountNumber;
private $CustomerName;
private $Balance;
function __construct() {
$this->AccountNumber = 0;
$this->Balance = 0;
$this->CustomerName = "";
}
}
The __con-
struct()
function takes
precedence
over a func-
tion with the same name
as the class.
The following code demonstrates how to create a constructor func-
tion using the same name as its class:
class BankAccount {
private $AccountNumber;
private $CustomerName;
private $Balance;
function BankAccount() {
$this->AccountNumber = 0;
$this->Balance = 0;
$this->CustomerName = "";
}
}
For classes
that use a
database
connection,
constructor
functions are commonly
used in PHP to handle the
database connection
tasks.
To add a __construct() function to the OnlineStore class:
1.
Return to the class_OnlineStore.php script in your text
editor.
Add the following __construct() function definition to the
end of the class declaration:
function __construct() {
}
2.
3.
Add the following statements to the __construct() function
to instantiate a database object. Notice that the first state-
ment uses the $this reference to refer to the $DBConnect
data member that you declared earlier. The assignment
statement copies the local $DBConnect variable, created in
inc_OnlineStoreDB.php, to the object data member of the
same name.
include("inc_OnlineStoreDB.php");
$this->DBConnect = $DBConnect;
4.
Save the class_OnlineStore.php script.
Working
with Member Functions
5.
6.
Return
to the GosselinGourmetCoffee.php script.
Delete
the following line that requires inc_OnlineStoreDB.php.
You
no longer need the line because the OnlineStore
class
handles
the database connection details.
require_once("inc_OnlineStoreDB.php");
7.
Save
the GosselinGourmetCoffee.php script.
587
Cleaning
Up with Destructor Functions
Just
as a default constructor function is called when a class object is
first
instantiated, a destructor function is called when the object is
destroyed.
A destructor
function cleans
up any resources allocated to
an
object after the object is destroyed. A destructor function is com-
monly
called in two ways: when a script ends or when you manually
delete
an object with the unset()
function.
You generally do not need
to
use a destructor function, although many programmers use one
to
close previously opened file handles and database connections. To
add
a destructor function to a PHP class, create a function named
__destruct()
(with
two leading underscore characters). The follow-
ing
code contains a destructor function that closes the database con-
nection
opened with the constructor function:
function
__construct() {
$DBConnect
= new mysqli("php_db", "dongosselin",
"rosebud", "real_estate")
}
function __destruct() {
$DBConnect->close();
}
To add a __destruct() function to the OnlineStore class that closes
the database object you instantiated with the __construct() function:
1.
Return to the class_OnlineStore.php script in your text
editor.
Add the following __destruct() function definition to the
end of the class declaration:
function __destruct() {
}
2.
3.
Add the following statement to the __destruct() function
to close the database object. Again, notice that the statement
uses the $this reference to refer to the $DBConnect data
member.
if (!$this->DBConnect->connect_error)
$this->DBConnect->close();
CHAPTER
10
Developing
Object-Oriented PHP
4.
5.
6.
Save
the class_OnlineStore.php script.
Return
to the GosselinGourmetCoffee.php script.
Delete
the final PHP script section. You no longer need it
because
the OnlineStore
class
handles the database connec-
tion
details.
<?php
if
(!$DBConnect->connect_error)
$DBConnect->close();
?>
588
7.
Save the GosselinGourmetCoffee.php script.
Writing Accessor and Mutator Functions
Even if you make all data members in a class private, you can still
allow your program’s clients to retrieve or modify the value of data
members via accessor and mutator functions. Accessor functions are
public member functions that a client can call to retrieve the value
of a data member. Similarly, mutator functions are public member
functions that a client can call to modify the value of a data mem-
ber. Because accessor functions often begin with the word “set” and
mutator functions often begin with “get,” they are also called set or
get functions, respectively. Set functions modify data member val-
ues; get functions retrieve data member values. To allow a client to
pass a value to your program that will be assigned to a private data
member, you include parameters in a set function’s definition. You
can then write code in the body of the set function that validates
the data passed from the client, prior to assigning values to private
data members. For example, if you write a class named Payroll
that includes a private data member containing the current state
income-tax rate, you could write a public accessor function named
getStateTaxRate() that allows clients to retrieve the variable’s
value. Similarly, you could write a public mutator function named
setStateTaxRate() that performs various types of validation on the
data passed from the client (such as making sure the value is not null
or not greater than 100%) prior to assigning a value to the private
state tax rate data member.
Another use of the accessor and mutator functions is to hide any
internal data conversion from the client. Your data member can only
store a single value, such as length or amount. To store this value, you
must use a particular measurement unit, such as feet or U.S. dollars.
To store a value represented in different units, such as centimeters
or Japanese yen, the client would normally have to do the conver-
sion before setting the value or after getting it. With accessor and
mutator functions, you simply provide alternate set and get member
Another term
for accessor
is observer,
and another
term for
mutator is transformer.
Working
with Member Functions
functions
that hide the conversion from the client. For example, con-
sider
a Temperature
class
with a private data member temp,
two pub-
lic
accessor functions named getTempF()
and
getTempC(),
and two
public
mutator functions, setTempF()
and
setTempC().
Because the
client
can never see temp,
the client cannot tell if the temperature is
stored
within the Temperature
class
in degrees Fahrenheit or degrees
Celsius.
It doesn’t matter to the client, though, because the client can
set
or get the value using either unit.
The
following code demonstrates how to use set and get member
functions
with the $Balance
data
member in the BankAccount
class.
The
setBalance()
function
is declared with an access specifier of
public
and
accepts a single parameter containing the value to assign
to
the $Balance
data
member. The getBalance()
function
is also
declared
as public
and
contains a single statement that returns the
value
assigned to the $Balance
data
member. Statements at the end
of
the example call the functions to set and get the $Balance
data
member.
class
BankAccount {
private
$Balance = 0;
public function setBalance($NewValue) {
$this->Balance = $NewValue;
}
public function getBalance() {
return $this->Balance;
}
}
if (class_exists("BankAccount"))
$Checking = new BankAccount();
else
exit("<p>The BankAccount class is not available!</p>");
$Checking->setBalance(100);
echo "<p>Your checking account balance is "
. $Checking->getBalance() . "</p>\n";
589
Next, you add two mutator functions and two accessor functions
to the OnlineStore class: setStoreID(), getStoreInformation(),
getProductList(), and addItem(). The setStoreID() func-
tion assigns a value to the $storeID data member. The
getStoreInformation() function queries the database and returns
an array with the store information. The getProductList() function
queries the database and displays a table with the product informa-
tion. The addItem() function allows users to add items in the table to
their shopping carts.
To add the four functions to the OnlineStore class:
1.
Return to the class_OnlineStore.php script in your text
editor.
CHAPTER
10
Developing
Object-Oriented PHP
2.
590
Add
the following setStoreID()
function
to the end of the
class
definition. The function stores the store ID and popu-
lates
the $inventory[]
array
from the inventory
table
based
on
the store ID. At the same time, the $shoppingCart[]
array
is
initialized. Notice that the data is only initialized if the new
$storeID
value
is different from the current $storeID
data
member
value, and that the new $storeID
value
is only kept if
it
matches a store ID in the inventory
table.
public
function setStoreID($storeID) {
if
($this->storeID != $storeID) {
$this->storeID = $storeID;
$SQLString = "SELECT * FROM inventory " .
" where storeID = '" .
$this->storeID . "'";
$QueryResult = @$this->DBConnect->
query($SQLString);
if ($QueryResult === FALSE) {
$this->storeID = "";
}
else {
$this->inventory = array();
$this->shoppingCart = array();
while (($Row = $QueryResult->fetch_
assoc())
!== NULL) {
$this->inventory[$Row['productID']]
= array();
$this->inventory[$Row['productID']]
['name']
= $Row['name'];
$this->inventory[$Row['productID']]
['description']
= $Row['description'];
$this->inventory[$Row['productID']]
['price']
= $Row['price'];
$this->
shoppingCart[$Row['productID']]
= 0;
}
}
}
}
3.
Add the following getStoreInformation() function to the
end of the class definition. If the $storeID data member is
empty or there is a database error, the function returns FALSE.
Working
with Member Functions
public
function getStoreInformation() {
$retval
= FALSE;
if ($this->storeID != "") {
$SQLString = "SELECT * FROM store_info " .
" where storeID = '" .
$this->storeID . "'";
$QueryResult = @$this->DBConnect->
query($SQLString);
if ($QueryResult !== FALSE) {
$retval = $QueryResult->fetch_assoc();
}
}
return($retval);
}
Add the following getProductList() function to the end
591
4.
of the class definition. This code is similar to the statements
you added earlier to the GosselinGourmetCoffee.php script,
except that this version adds an Add Item link to each row
in the table that executes the addItem() function to add a
product to the shopping cart. The statements that build the
Add Item link append the session ID variable to the link to
keep track of the current session if cookies are disabled on
the user’s Web browser. The link is also appended with the
product ID of the current product and the type of operation,
which other Web pages that utilize the class will use to deter-
mine which member function to call. This function will return
TRUE for success or FALSE for failure.
public function getProductList() {
$retval = FALSE;
$subtotal = 0;
if (count($this->inventory) > 0) {
echo "<table width='100%'>\n";
echo "<tr><th>Product</
th><th>Description</th>" .
"<th>Price Each</th><th># in Cart</th>" .
"<th>Total Price</th><th> </
th></tr>\n";
foreach ($this->inventory as $ID => $Info) {
echo "<tr><td>" .
htmlentities($Info['name'])
. "</td>\n";
echo "<td>" .
htmlentities($Info['description']) .
"</td>\n";
printf("<td class='currency'>$%.2f
</td>\n", $Info['price']);
echo "<td class='currency'>" .
$this->shoppingCart[$ID] .
"</td>\n";
printf("<td class='currency'>$%.2f
</td>\n", $Info['price'] *
$this->shoppingCart[$ID]);
CHAPTER
10
Developing
Object-Oriented PHP
echo
"<td><a href='" .
$_SERVER['SCRIPT_NAME']
.
"?PHPSESSID=" . session_id() .
"&ItemToAdd=$ID'>Add " .
" Item</a></td>\n";
$subtotal += ($Info['price'] *
$this->shoppingCart[$ID]);
}
echo "<tr><td colspan='4'>Subtotal</td>\n";
printf("<td class='currency'>$%.2f</td>\n",
$subtotal);
echo "<td> </td></tr>\n";
echo "</table>";
$retval = TRUE;
}
return($retval);
}
592
5.
Add the following addItem() function to the end of the class
definition. The first statement retrieves the product ID that
was appended to the Add Item link in the getProductList()
function you added in the last step. The second statement
adds 1 to the count of that item in the $shoppingCart[] array.
public function addItem() {
$ProdID = $_GET['ItemToAdd'];
if (array_key_exists($ProdID, $this->
shoppingCart))
$this->shoppingCart[$ProdID] += 1;
}
6.
Save the class_OnlineStore.php script.
To modify the GosselinGourmetCoffee.php script so that it calls the
member functions you just added to the OnlineStore class:
1.
Return to the GosselinGourmetCoffee.php script in your
text editor.
Add the following variable declarations to the first script sec-
tion, immediately after the require_once() call:
$storeID = "COFFEE";
$storeInfo = array();
2.
3.
Modify the nested if statement that creates the new
OnlineStore object as follows:
if (class_exists("OnlineStore")) {
if (isset($_SESSION['currentStore']))
$Store = unserialize($_
SESSION['currentStore']);
else {
$Store = new OnlineStore();
}
Working
with Member Functions
$Store->setStoreID($storeID);
$storeInfo
= $Store->getStoreInformation();
}
else
{
$ErrorMsgs[]
= "The OnlineStore class is not
available!";
$Store = NULL;
}
Be sure to
add curly
braces around
the state-
ments in the
nested if statement.
593
4.
Modify the <title> tag as follows to display the store name:
<title><?php echo $storeInfo['name']; ?></title>
5.
Add the following <link> tag immediately after the <title>
tag to include the style sheet for this store:
<link rel="stylesheet" type="text/css" href="<?php echo
$storeInfo['css_file']; ?>" />
6.
Modify the first three statements in the body of the document
as follows to display the store information:
<h1><?php echo htmlentities($storeInfo['name']); ?></h1>
<h2><?php echo htmlentities($storeInfo['description']);
?></h2>
<p><?php echo htmlentities($storeInfo['welcome']); ?></p>
7.
Replace the entire PHP script section below the previous
three lines with the following PHP script section that shows
the inventory in a table and sets the session variable:
<?php
$Store->getProductList();
$_SESSION['currentStore'] = serialize($Store);
?>
8.
Save the GosselinGourmetCoffee.php script and then upload
it to the Web server.
Open the GosselinGourmetCoffee.php script in your Web
browser by entering the following URL: http://<yourserver>/
PHP_Projects/Chapter.10/Chapter/GosselinGourmetCoffee.
php. Your Web browser should look similar to Figure 10-7. Do
not click any of the links or reload the Web page. If you do,
you will receive error messages because you still need to add
several other functions to the OnlineStore class.
9.
CHAPTER
10
Developing
Object-Oriented PHP
594
Figure
10-7
Web
page after adding accessors and mutators to the OnlineStore
object
10.
Close
your Web browser window.
Serialization
Functions
When
you serialize an object with the serialize()
function,
PHP
looks
in the object’s class for a special function named __sleep()
(with
two leading underscores), which you can use to perform many
of
the same tasks as a destructor function. However, because a
destructor
function is always called when a script that instantiates an
object
of a class ends, you do not need to duplicate any functionality
between
a destructor function and the __sleep()
function.
The pri-
mary
reason for including a __sleep()
function
in a class is to specify
which
data members of the class to serialize. If you do not include a
__sleep()
function
in your class, the serialize()
function
serializes
all
of its data members.
You
don’t necessarily have to serialize every data member in a class,
particularly
for large objects that contain numerous data members. If
you
do include a __sleep()
function
in your class, the function must
Working
with Member Functions
return
an array of the data members to serialize or you will receive
an
error. For example, the following code demonstrates how to use
a
__sleep()
function
to serialize only the $Balance
data
member
in
the BankAccount
class.
Notice how the name 'Balance',
not the
$Balance
data
member, is passed to the array constructor: It does not
include
the $this
reference
or a dollar sign. Instead, you simply pass
the
name of the data member, without the leading dollar sign, sur-
rounded
by either single or double quotation marks.
function
__sleep() {
$SerialVars
= array('Balance');
return $SerialVars;
}
595
Although the destructor function is always called, a constructor func-
tion is only called when you instantiate a new class object. This means
that when you use the unserialize() function to restore a serialized
class object, the constructor function does not execute. However,
when the unserialize() function executes, PHP looks in the object’s
class for a special function named __wakeup() (with two leading
underscore characters), which you can use to perform many of the
same tasks as a constructor function. You use the __wakeup() func-
tion to perform any initialization the class requires when the object is
restored. A typical use of the __wakeup() function is to initialize data
members that were not saved with the serialization process, if there
are any. Another use of the __wakeup() function is to restore any
database or file connections that were lost during object serialization.
To add a __wakeup() function to the OnlineStore class that restores
the connection to the online_store database when an object is
restored with the unserialize() function:
1.
Return to the class_OnlineStore.php script in your text
editor.
Add the following __wakeup() function definition to the end
of the class declaration:
function __wakeup() {
}
2.
3.
Add the following statements to the __wakeup() function to
restore the database connection:
include("inc_OnlineStoreDB.php");
$this->DBConnect = $DBConnect;
4.
Save the class_OnlineStore.php script and upload it to the
Web server.
CHAPTER
10
Developing
Object-Oriented PHP
To
modify the GosselinGourmetCoffee.php script so it will add an
item
to the cart when the visitor clicks the Add Item link:
1.
Return
to the GosselinGourmetCoffee.php script in your
text
editor.
Add
the following if
statement
after the call to the
getStoreInformation()
member
function in the first script
section.
The if
statement
checks for the $_GET['ItemToAdd']
variable.
If it is set, the addItem()
method
of the $Store
object
executes. (You will add more operations in the Rein-
forcement
Exercises section later in this chapter.)
if
(isset($_GET['ItemToAdd']))
$Store->addItem();
596
2.
The complete if clause should look like the following code:
if (class_exists("OnlineStore")) {
if (isset($_SESSION['currentStore']))
$Store = unserialize($_
SESSION['currentStore']);
else {
$Store = new OnlineStore();
}
$Store->setStoreID($storeID);
$storeInfo = $Store->getStoreInformation();
if (isset($_GET['ItemToAdd']))
$Store->addItem();
}
3.
Save the GosselinGourmetCoffee.php script and upload it to
the Web server.
Open the GosselinGourmetCoffee.php script in your Web
browser by entering the following URL: http://<yourserver>/
PHP_Projects/Chapter.10/Chapter/GosselinGourmetCoffee.
php. Click the Add Item links for the various coffees. Your
Web browser should look similar to Figure 10-8, with updated
item amounts, prices, and subtotal values.
4.

Working
with Member Functions
597
Figure
10-8
5.
Gosselin’s
Gourmet Coffee Web page after using the Add Item links
Close
your Web browser window.
In
studying the various class techniques presented in this chapter,
you
might have forgotten that the goal of object-oriented programs is
code
reuse. Now that you have developed the OnlineStore
class,
you
will
see how easy it is to reuse the code on other Web pages by creat-
ing
the OldTymeAntiques.php and ElectronicsBoutique.php scripts.
To
create the OldTymeAntiques.php and ElectronicsBoutique.php
scripts:
1.
Return
to the GosselinGourmetCoffee.php script in your
text
editor and immediately save it as OldTymeAntiques.php.
Change
the assignment of the $storeID
variable
as follows:
$storeID
= "ANTIQUE";
2.
3.
Save
the OldTymeAntiques.php script and then immediately
save
it as ElectronicsBoutique.php.
Change
the assignment of the $storeID
variable
as follows:
$storeID
= "ELECBOUT";
4.
CHAPTER
10
Developing
Object-Oriented PHP
5.
Save
the ElectronicsBoutique.php script and close it in your
text
editor.
Open
the OldTymeAntiques.php script in your Web browser
by
entering the following URL: http://<yourserver>/PHP_
Projects/Chapter.10/Chapter/OldTymeAntiques.php.
Notice
how
the entire appearance of the page has changed, as well
as
the items available for sale. Figure 10-9 shows the Old
Tyme
Antiques Web page. Click the Add Item links for the
different
items. Everything should work just like it did for the
GosselinGourmetCoffee.php
Web page.
6.
598
Figure
10-9
The
Old Tyme Antiques online store Web page
7.
Open
the ElectronicsBoutique.php script in your
Web
browser by entering the following URL:
http://<yourserver>/PHP_Projects/Chapter.10/Chapter/
ElectronicsBoutique.php.
Notice how the appearance of the
page
and the items available for sale have changed again.
Working
with Member Functions
Figure
10-10 shows the Electronics Boutique Web page.
Click
the Add Item links for the different items. Everything
should
work normally for this site.
599
Figure
10-10
8.
The
Electronics Boutique online store Web page
Close
your Web browser window.
Short
Quiz
1.
Describe
a situation in which you might want to declare a
member
function as private.
Explain
the purpose of the $this
reference.
What
two names may be assigned to a constructor function?
Describe
the purpose of a destructor function.
Describe
the purpose of accessors and mutators.
2.
3.
4.
5.
CHAPTER
10
Developing
Object-Oriented PHP
Summing
Up
•
The
term “object-oriented programming” (OOP) refers to the cre-
ation of reusable software objects that can be easily incorporated
into multiple programs. The term “object” specifically refers to
programming code and data that can be treated as an individual
unit or component. (Objects are often called components.)
• The term “data” refers to information contained within variables or
other types of storage structures.
• The functions associated with an object are called methods, and
the variables associated with an object are called properties or
attributes.
• Objects are encapsulated, which means that all code and required
data are contained within the object itself.
• An interface represents elements required for a source program to
communicate with an object.
• In object-oriented programming, the code, methods, attributes, and
other information that make up an object are organized into classes.
• An instance is an object that has been created from an existing
class. When you create an object from an existing class, you are
instantiating the object.
• A particular instance of an object inherits its methods and proper-
ties from a class—that is, it takes on the characteristics of the class
on which it is based.
• A constructor is a special function with the same name as its class; it
is called automatically when an object from the class is instantiated.
• The term “data structure” refers to a system for organizing data.
• The functions and variables defined in a class are called class mem-
bers. Class variables are referred to as data members or member
variables, whereas class functions are referred to as member func-
tions or function members.
• A class definition contains the data members and member func-
tions that make up the class.
• PHP provides the following functions that allow you to use
external files in your PHP scripts: include(), require(),
include_once(), and require_once().
• The principle of information hiding states that class members
should be hidden when other programmers do not need to access
or know about them.
600

Comprehension
Check
•
Access
specifiers control a client’s access to individual data mem-
bers and member functions.
• Serialization refers to the process of converting an object into a
string that you can store for reuse.
• A constructor function is a special function that is called automati-
cally when an object from a class is instantiated.
• A destructor function cleans up any resources allocated to an
object after the object is destroyed.
• Accessor functions are public member functions that a client can
call to retrieve the value of a data member.
• Mutator functions are public member functions that a client can
call to modify the value of a data member.
• When you serialize an object with the
serialize() function, PHPlooks in the object’s class for a special function named __sleep(),
which you can use to perform many of the same tasks as a destruc-
tor function.
• When the
unserialize() function executes, PHP looks in theobject’s class for a special function named __wakeup(), which you
can use to perform many of the same tasks as a constructor function.
601
Comprehension Check
1.
Reusable software objects are often referred to as
.
a. methods
b. components
c. widgets
d. functions
2.
3.
Explain the benefits of object-oriented programming.
The functions associated with an object are called
.
a. properties
b. fields
c. methods
d. attributes
CHAPTER
10
Developing
Object-Oriented PHP
4.
The
term “black box” refers to
a.
a property
b.
debugging
c.
encapsulation
.
602
d.
an interface
5.
A(n)is
an object that has been created
from
an existing class.
a.
pattern
b.
structure
c.
replica
d.
instance
6.
An
object inherits its characteristics from a class. True
or
False?
A
function that is used as the basis for an object is called
a(n).
a.
method
b.
class
c.
class constructor
d.
object variable
8.
Which
of the following operators is used in member selection
notation?
a.
>
b.
->
c.
=>
d.
.
9.
What
is the correct syntax to connect to the MySQL database
server
using a mysqli
object?
a.
$Variable
= mysqli_connect("host", "user", "password",
"database_name");
7.
b.
$Variable
= new mysqli_connect("host", "user",
"password",
"database_name");
Comprehension
Check
c.
$Variable
= mysqli("host", "user", "password",
"database_name");
d.
$Variable
= new mysqli("host", "user",
"password",
"database_name");
10.
Explain how to handle a MySQL connection error using a
mysqli
object.
11.
The terms “variable” and “object” are often used
interchange-
ably
in object-oriented programming. True or False?
12. Class names usually begin with a(n)
distinguish them from other identifiers.
a. number
b. exclamation mark (!)
c. ampersand (&)
d. uppercase letter
13. Which of the following functions returns the name of the
class upon which an object is based?
a. class_of()
b. instanceof()
c. class_name()
d. get_class()
14. What extension should you use for external PHP scripts,
and why?
15. Explain the principle of information hiding.
16. Which of the following access specifiers prevents clients from
calling member functions or accessing data members?
a. internal
b. public
c. private
d. privileged
to
603
CHAPTER
10
Developing
Object-Oriented PHP
17.
Which of the following is a valid name for a constructor
function?
a. construct()
b. __construct()
604
c. constructor()
d. __constructor()
18. When is a destructor called? (Choose all that apply.)
a. when a script ends
b. when the constructor function ends
c. when you delete a class object with the unset() function
d. when you call the serialize() function
19. Explain the use of accessor and mutator functions. How are
accessor functions often named? How are mutator functions
often named?
20. When serializing objects, how do you specify which data
members to serialize?
Reinforcement Exercises
Exercise 10-1
In this project, you will add two member functions, removeItem()
and emptyCart(), to the OnlineStore class. These functions allow
you to remove individual items or all items from the shopping cart.
To add the removeItem() and emptyCart() member functions to the
OnlineStore class:
1.
In your text editor, open the class_OnlineStore.php script
from your Chapter directory for Chapter 10.
Add the following removeItem() function definition to
the end of the class definition. The statements use the
$_GET['ItemToRemove'] variable to identify the item. If the
item is found and the value in the $shoppingCart[] array
data member for that item is greater than 0, subtract 1 from
the $shoppingCart[] array element.
2.
Reinforcement
Exercises
private
function removeItem() {
$ProdID
= $_GET['ItemToRemove'];
if (array_key_exists($ProdID, $this->
shoppingCart))
if ($this->shoppingCart[$ProdID]>0)
$this->shoppingCart[$ProdID] -= 1;
}
605
3.
Add the following emptyCart() function definition to the end
of the class declaration. The statements empty the cart by set-
ting the value of all of the elements of the $shoppingCart[]
array data member to 0.
private function emptyCart() {
foreach ($this->shoppingCart as $key => $value)
$this->shoppingCart[$key] = 0;
}
4.
Add the following processUserInput() function definition
to the end of the class declaration. The statements call the
appropriate member function based on elements found in the
$_GET[] array.
public function processUserInput() {
if (!empty($_GET['ItemToAdd']))
$this->addItem();
if (!empty($_GET['ItemToRemove']))
$this->removeItem();
if (!empty($_GET['EmptyCart']))
$this->emptyCart();
}
5.
Modify the declaration of the addItem() function to change it
from public to private, as follows:
private function addItem() {
6.
Next, you need to modify the getProductList() member
function so that it displays links that call the removeItem()
and emptyCart() functions. First, find and remove the follow-
ing statement from the foreach loop:
echo "<td><a href='" .
$_SERVER['SCRIPT_NAME'] .
"?PHPSESSID=" . session_id() .
"&ItemToAdd=$ID'>Add " .
" Item</a></td>\n";
7.
Replace the echo statement removed above with the following
pair of echo statements:
CHAPTER
10
Developing
Object-Oriented PHP
echo
"<td><a href='" .
$_SERVER['SCRIPT_NAME']
.
"?PHPSESSID=" . session_id() .
"&ItemToAdd=$ID'>Add " .
" Item</a><br />\n";
echo "<a href='" . $_SERVER['SCRIPT_
NAME'] .
"?PHPSESSID=" . session_id() .
"&ItemToRemove=$ID'>Remove " .
" Item</a></td>\n";
606
8.
Modify the echo statement immediately before the echo state-
ment that displays the closing </table> tag (the one with the
element within <td> tags) to read as follows:
echo "<td><a href='" .
$_SERVER['SCRIPT_NAME'] .
"?PHPSESSID=" . session_id() .
"&EmptyCart=TRUE'>Empty " .
" Cart</a></td></tr>\n";
9.
Save the class_OnlineStore.php script.
10. Open the GosselinGourmetCoffee.php file. Remove the fol-
lowing statement:
if (isset($_GET['ItemToAdd']))
$Store->addItem();
11. Replace the statement you just deleted with the following
statement:
$Store->processUserInput();
12. Save and close the GosselinGourmetCoffee.php file.
13.
Repeat Steps 10 through 12 for both the OldTymeAntiques.php
file and the ElectronicsBoutique.php file.
14. Upload all four files (class_OnlineStore.php,
GosselinGourmentCoffee.php, OldTymeAntiques.php, and
ElectronicsBoutique.php) to the Web server.
15. Open the GosselinGourmetCoffee.php script in your Web
browser by entering the following URL: http://<yourserver>/
PHP_Projects/Chapter.10/Chapter/GosselinGourmetCoffee.
php. Click the Remove Item link for various products to verify
that you cannot remove an item that hasn’t been entered.
Click the Add Item link to add items, and then click the
Remove Item link for those items to verify that the count is
reduced. Finally, click the Empty Cart link to verify that the
count for all of the items goes to 0. Figure 10-11 shows the
Reinforcement
Exercises
Gosselin’s
Gourmet Coffee Web page after adding the remove
item
and empty cart functionality.
607
Figure
10-11
Gosselin’s
Gourmet Coffee Web page
16.
Close your Web browser window.
Exercise
10-2
In
this project, you will add a checkout()
function
to the
OnlineStore
class
that allows customers to check out by saving
order
information to a database table. For the sake of simplicity, the
checkout()
function
does not record customer information, although
it
does use the session ID to uniquely identify each order.
CHAPTER
10
Developing
Object-Oriented PHP
To
add a checkout()
function
to the OnlineStore
class:
1.
Log
in to MySQL Monitor with the MySQL user name and
password
you created in Chapter 7.
Enter
the following command to select the online_stores
database:
mysql>
USE online_stores;[ENTER
]
608
2.
3.
Enter
the following command to create a table named orders,
which
will contain each shopping cart order. The table con-
sists
of three columns: orderID,
productID,
and quantity.
Remember
from Chapter 9 that a session ID is 32 characters,
and
that a product ID was defined as 10 characters earlier in
this
chapter in the inventory
table.
mysql>
CREATE TABLE orders (productID
VARCHAR(10),[ENTER
]
->
orderID VARCHAR(32), quantity INT);[ENTER
]
4.
Leave the MySQL Monitor session open and return to the
class_OnlineStore.php script in your text editor. Add the
following checkout() function definition to the end of the
class definition. The foreach loop builds a SQL string for each
product in the shopping cart and inserts it into the database.
public function checkout() {
$ProductsOrdered = 0;
foreach($this->shoppingCart as $productID =>
$quantity) {
if ($quantity > 0) {
++$ProductsOrdered;
$SQLstring = "INSERT INTO orders " .
" (orderID, productID, quantity) " .
" VALUES('" . session_id() . "', " .
"'$productID', $quantity)";
$QueryResult =
$this->DBConnect->
query($SQLstring);
}
}
echo "<p><strong>Your order has been " .
"recorded.</strong></p>\n";
}
If this were a
checkout form
for a real
online store,
code would
need to be added to
ensure that only one
order was placed for a
single session value. For
simplicity, that step is
omitted in this example.
5.
In the getProductList() member function, immediately
after the echo statement for the closing </table> tag, insert
the following echo statement:
echo "<p><a href=' 'Checkout.php?PHPSESSID=" .
session_id() . "&CheckOut=$storeID'>Checkout</
a></p>\n";

Reinforcement
Exercises
6.
Save
the class_OnlineStore.php script.
Exercise
10-3
In
this project, you will create a script named Checkout.php that calls
the
checkout()
function
you created in Exercise 10-2.
To
create the Checkout.php script:
1.
Create
a new document in your text editor and type the
<!DOCTYPE>
declaration,
<html>
element,
header informa-
tion,
and <body>
element.
Use the strict DTD and leave the
<title>
element
empty for now.
Add
the following PHP script section to the start of the docu-
ment,
above the <!DOCTYPE>
tag:
<?php
session_start();
require_once("class_OnlineStore.php");
$storeID
= $_GET['CheckOut'];
$storeInfo
= array();
if
(class_exists("OnlineStore")) {
if
(isset($_SESSION['currentStore']))
$Store = unserialize($_
SESSION['currentStore']);
else {
$Store = new OnlineStore();
}
$Store->setStoreID($storeID);
$storeInfo = $Store->getStoreInformation();
}
else {
$ErrorMsgs[] = "The OnlineStore class is not
available!";
$Store = NULL;
}
?>
609
2.
3.
Modify the <title> tag as follows to display the store name:
<title><?php echo $storeInfo['name']; ?> Checkout</
title>
4.
Add the following <link> tag immediately after the <title>
tag to include the style sheet for this store:
<link rel="stylesheet" type="text/css" href="<?php
echo
$storeInfo['css_file']; ?>" />
5.
Add the following statements in the body of the document to
display the store information:
CHAPTER
10
Developing
Object-Oriented PHP
<h1><?php
echo htmlentities($storeInfo['name']);
?></h1>
<h2>Checkout</h2>
6.
610
Add
the following PHP script section to the end of the docu-
ment
body. The statement in the script section calls the
checkout()
method.
<?php
$Store->checkout();
?>
7.
Save
the document as Checkout.php in the Chapter direc-
tory
for Chapter 10 and then upload both Checkout.php and
class_OnlineStore.php
to the Web server.
Open
the GosselinGourmetCoffee.php script in your Web
browser
by entering the following URL: http://<yourserver>/
PHP_Projects/Chapter.10/Chapter/GosselinGourmetCoffee.
php.
Use the shopping category links to add several products
to
your shopping cart, and then click the Checkout link on the
Your
Shopping Cart page. You should see the message con-
firming
your order.
Close
your Web browser window.
8.
9.
10.
Return to MySQL Monitor in your console window and enter
the
following command. The products you entered should
appear in the database table.
mysql> SELECT * FROM orders;[ENTER
]
11. Type exit or quit and press Enter to log out of MySQL
Monitor.
Exercise 10-4
Create a Movies class that determines the cost of a ticket to a cinema,
based on the moviegoer’s age. Assume that the cost of a full-price
ticket is $10. Assign the age to a private data member. Use a public
member function to determine the ticket price, based on the follow-
ing schedule:
Age
Under 5
5 to 17
18 to 55
Over 55
Price
Free
Half price
Full price
$2 off

Discovery
Projects
Exercise
10-5
Write
a class-based All-in-One Web form that calculates the correct
amount
of change to return when performing a cash transaction. The
script
should have an include file that defines a class named Change.
Allow
the user (a cashier) to enter the cost of a transaction and the
exact
amount of money that the customer hands over to pay for
the
transaction. Use set and get functions to store and retrieve both
amounts
to and from private data members. Then use member func-
tions
to determine the largest amount of each denomination to return
to
the customer. Assume that the largest denomination a customer
will
use is a $100 bill. Therefore, you need to calculate the correct
amount
of change to return, the number of $50, $20, $10, $5, and $1
bills
to return, and the number of quarters, dimes, nickels, and pen-
nies
to return. For example, if the price of a transaction is $5.65 and
the
customer hands the cashier $10, the cashier should return $4.35
to
the customer as four $1 bills, a quarter, and a dime. Include code
that
requires the user to enter a numeric value for the two cash trans-
action
fields.
611
Discovery
Projects
The
Chinese Zodiac site is a comprehensive project that you have
updated
in the Discovery Projects in each chapter. All files for the
Chinese
Zodiac site are saved in a folder named ChineseZodiac in the
root
Web folder on the server, and all database tables are stored in the
chinese_zodiac
database.
Discovery
Project 10-1
In
this project, you will create an event_calendar
table
in MySQL to
store
an event calendar, and an EventCalendar
class
for manipulating
the
event_calendar
table.
In later projects, you will create Web pages
to
add and delete events, and to display the calendar. For the sake of
simplicity,
the ability to add and remove events will not be restricted,
and
the events will consist of only a date, a title, and a description.
To
create the EventCalendar
class
and the MySQL event_calendar
table:
1.
Log
in to MySQL Monitor with the MySQL user name and
password
you created in Chapter 7.
CHAPTER
10
Developing
Object-Oriented PHP
2.
Enter
the following command to select the chinese_zodiac
database:
mysql>
USE chinese_zodiac;[ENTER
]
3.
612
Enter
the following command to create a table named
event_calendar,
which will contain each calendar event. The
table
consists of four columns: EventID,
EventDate,
Title,
and
Description.
The EventID
field
is an auto-incrementing
primary
key. The EventDate
field
is of type DATE,
and Title
and
Description
are
both VARCHAR
fields.
mysql>
CREATE TABLE event_calendar (EventID
INT[ENTER
]
->
AUTO_INCREMENT PRIMARY KEY, EventDate
DATE,[ENTER ]
-> Title VARCHAR(50), Description
VARCHAR(250));[ENTER ]
4.
Type exit or quit and press Enter to log out of MySQL
Monitor.
Create a new document in your text editor and add a PHP
script section, as follows:
<?php
?>
5.
6.
Add the following code to connect to the chinese_zodiac
database on the MySQL server. Replace host, user, and
password with the name of the MySQL server and the user
name and password you created in Chapter 7.
$ErrorMsgs = array();
$DBConnect = @new mysqli("host", "user", "password",
"chinese_zodiac");
if ($DBConnect->connect_error)
$ErrorMsgs[] = "The database server is not
available. " .
"Connect Error is " . $mysqli->
connect_errno .
" " . $mysqli->connect_error . ".";
7.
Save the document as inc_ChineseZodiacDB.php in the
Includes subfolder of the ChineseZodiac folder.
Create a new document in your text editor and add a PHP
script section, as follows:
<?php
?>
8.
Discovery
Projects
9.
Add
the following class definition for the EventCalendar
class
to
the script section:
class
EventCalendar {
}
10.
Add the following statement to the start of the class definition
to
declare the private data member
private $DBConnect = NULL;
613
11. Add the following __construct() function to the end of the
class definition:
function __construct() {
include("Includes/inc_ChineseZodiacDB.php");
$this->DBConnect = $DBConnect;
}
12. Add the following __destruct() function to the end of the
class definition:
function __destruct() {
if (!$this->DBConnect->connect_error)
$this->DBConnect->close();
}
13. Add the following __wakeup() function to the end of the class
definition:
function __wakeup() {
include("Includes/inc_ChineseZodiacDB.php");
$this->DBConnect = $DBConnect;
}
14. Save the document as class_EventCalendar.php in the
ChineseZodiac folder.
Discovery Project 10-2
In this project, you will create a Web page to add events to the
Chinese zodiac event calendar. You will also add a member func-
tion to the EventCalendar class that will add the new event to the
event_calendar table in the database.
To create the Web page to add events to the calendar using the
EventCalendar class:
1.
2.
Reopen the class_EventCalendar.php file in the text editor.
Add the following addEvent() function to the end of the
class definition. Notice that, although the $Date and $Title
CHAPTER
10
Developing
Object-Oriented PHP
parameters
cannot be empty, the $Description
parameter
can
be empty.
public
function addEvent($Date, $Title,
$Description)
{
if
((!empty($Date)) && (!empty($Title))) {
$SQLstring = "INSERT INTO event_calendar" .
" (EventDate, Title, Description) " .
" VALUES('$Date', '$Title', '" .
$Description . "')";
$QueryResult =
$this->DBConnect->query($SQLstring);
if ($QueryResult === FALSE)
echo "<p>Unable to save the event. " .
"Error code " . $this->
DBConnect->errno .
": " . $this->DBConnect->error
. "</p>\n";
else
echo "<p>The event was successfully
saved.</p>\n";
}
else
echo "<p>You must provide a date and title
for the event.</p>\n";
}
614
3.
4.
Save class_EventCalendar.php and close it in the text editor.
Create a new document in your text editor and type the
<!DOCTYPE> declaration, <html> element, header information,
and <body> element. Use the strict DTD and “Add Calendar
Event” as the content of the <title> element.
Add the following PHP script section to the beginning of the
document, above the <!DOCTYPE> declaration, to create or
retrieve an EventCalendar object:
<?php
session_start();
require_once("class_EventCalendar.php");
if (class_exists("EventCalendar")) {
if (isset($_SESSION['currentCalendar']))
$Calendar = unserialize($_
SESSION['currentCalendar']);
else {
$Calendar = new EventCalendar ();
}
}
else {
$Calendar = NULL;
}
?>
5.

Discovery
Projects
6.
Add
the following statements and PHP code section to the
body
of the document:
<h1>Add
Calendar Event</h1>
<?php
if
(isset($_POST['EventDate']) &&
isset($_POST['EventTitle']) &&
isset($_POST['EventDesc'])) {
if ($Calendar === NULL)
echo "<p>There was an error " .
creating the EventCalendar" .
object.</p>\n";
else
$Calendar->addEvent(
stripslashes($_POST['EventDate']),
stripslashes($_POST['EventTitle']),
stripslashes($_POST['EventDesc']));
$_SESSION('currentCalendar') =
serialize($Calendar);
}
?>
615
7.
Add the following Web form to the end of the document body
to allow user input of the event information:
<form action="AddCalendarEvent.php?PHPSESSID=<?php
echo
session_id(); ?>" method="POST">
<p>Date (yyyy-mm-dd): <input type="text"
name="EventDate" /> (required)</p>
<p>Title: <input type="text"
name="EventTitle" /> (required)</p>
<p>Title: <input type="text"
name="EventDesc" /> (optional)</p>
<p><input type="submit" name="submit"
value="Save Event" /></p>
</form>
8.
Add the following link to the end of the document body to
allow users to visit the events calendar:
<a href="EventCalendar.php?PHPSESSID=<?php echo
session_id(); ?>">View the event calendar</a>
9.
Save the document as AddCalendarEvent.php in the
ChineseZodiac folder and upload the document to the Web
server.
Discovery Project 10-3
In this project, you will create a Web page to display the Chinese
zodiac event calendar in a monthly calendar format. For each day
with events, you will display the event title as a hyperlink to an “Event
CHAPTER
10
Developing
Object-Oriented PHP
Details”
page, which you will create in Discovery Project 10-4. You
will
also add a member function to the EventCalendar
class
that will
display
the events from the event_calendar
table
in the database for
a
specified month.
616
To
create the Web page to display a monthly event calendar using the
EventCalendar
class:
1.
2.
Reopen
the class_EventCalendar.php file in the text editor.
Add
the following getMonthlyCalendar()
function
to the end
of
the class definition, which has parameters for the desired
month
and year. Notice that if the $Year
or
$Month
param-
eters
are empty, the current year or month is retrieved using
the
date()
function.
public
function getMonthlyCalendar($Year, $Month) {
if
(empty($Year))
$Year = date('Y'); // Four digit year
if (empty($Month))
$Month = date('n'); // Month number, no
// leading 0
$FirstDay = mktime(0,0,0,$Month,1,$Year);
$FirstDOW = date('w',$FirstDay); // Day of week
$LeapYearFlag = date('L',$FirstDay); // 1=Leap
// Year, 0=Not
$MonthName = date('F',$FirstDay); // Month name
if ($Month == 2)
$LastDay = 28 + $LeapYearFlag;
else if (($Month == 4) || ($Month == 6) ||
($Month == 9) || ($Month == 11))
$LastDay = 30;
else
$LastDay = 31;
echo "<table>\n";
// Create the calendar heading
echo "<tr><td><a href='" . $_SERVER['SCRIPT_NAME'] .
"?PHPSESSID=" . session_id() . "&Year=" .
($Year – 1) .
"&Month=$Month'>Previous Year</a></td>\n";
if ($Month==1)
echo "<td><a href='" . $_SERVER['SCRIPT_
NAME'] .
"?PHPSESSID=" . session_id() . "&Year=" .
($Year – 1) . "&Month=12'>Previous " .
"Month</a></td>\n";
else
echo "<td><a href='" . $_SERVER['SCRIPT_
NAME'] .
"?PHPSESSID=" . session_id() .
"&Year=$Year" .
"&Month=" . ($Month – 1) . "'>Previous " .
"Month</a></td>\n";
Discovery
Projects
echo
"<td colspan='3'>$MonthName $Year</td>\n";
if
($Month==12)
echo
"<td><a href='" . $_SERVER['SCRIPT_
NAME'] .
"?PHPSESSID=" . session_id() . "&Year=" .
($Year + 1) . "&Month=1'>Next " .
"Month</a></td>\n";
else
echo "<td><a href='" . $_SERVER['SCRIPT_
NAME'] .
"?PHPSESSID=" . session_id() .
"&Year=$Year" .
"&Month=" . ($Month + 1) . "'>Next " .
"Month</a></td>\n";
echo "<td><a href='" . $_SERVER['SCRIPT_NAME'] .
"?PHPSESSID=" . session_id() .
"&Year=" . ($Year – 1) .
"&Month=$Month'>Previous Year</a></
td></tr>\n";
echo "<tr>";
// insert empty cells for days from Sunday to
// the first day
for ($i = 0; $i < $FirstDOW; ++$i)
echo "<td> </td>";
for ($i = 1; $i <= $LastDay; ++$i) {
if ((($FirstDOW + $i) % 7) == 1)
echo "<tr>";
echo "<td valign='top'>$i";
$SQLstring = "SELECT EventID, Title " .
" FROM event_calendar " .
" WHERE EventDate='$Year-$Month-
$i'";
$QueryResult = @$this->DBConnect->
query($SQLstring);
if ($QueryResult !== FALSE) {
if ($QueryResult->num_rows > 0) {
while (($Row = $QueryResult->
fetch_assoc()) !== NULL)
echo "<br /><a
href='EventDetails.php?"
. "PHPSESSID=" .
session_id() .
"&EventID=" .
$Row['EventID'] .
"'>" .
htmlentities($Row['Title'])
. "</a>";
}
}
echo "</td>";
if ((($FirstDOW + $i) % 7) == 0)
echo "</tr>";
}
617
CHAPTER
10
Developing
Object-Oriented PHP
//
insert empty cells for
//
days after the last day
if
((($i + $j + $FirstDOW) % 7) != 0) {
for
($j = 0; (($i + $j + $FirstDOW) % 7)
!= 0; ++$j)
echo "<td> </td>";
echo "</tr>";
}
}
618
3.
4.
Save class_EventCalendar.php and close it in the text editor.
Create a new document in your text editor and type the
<!DOCTYPE> declaration, <html> element, header informa-
tion, and <body> element. Use the strict DTD and “Event
Calendar” as the content of the <title> element.
Add the following PHP script section to the beginning of the
document, above the <!DOCTYPE> declaration, to create or
retrieve an EventCalendar object:
<?php
session_start();
require_once("class_EventCalendar.php");
if (class_exists("EventCalendar")) {
if (isset($_SESSION['currentCalendar']))
$Calendar = unserialize($_
SESSION['currentCalendar']);
else {
$Calendar = new EventCalendar ();
}
}
else {
$Calendar = NULL;
}
?>
5.
6.
Add the following statements and PHP code section to the
body of the document:
<h1>Event Calendar </h1>
<?php
if ($Calendar === NULL)
echo "<p>There was an error creating the " .
" EventCalendar object.</p>\n";
else
$Calendar->getMonthlyCalendar(
$_GET['Year'],
$_GET['Month']);
?>
7.
Add the following link to the end of the document body to
allow users to add events to the calendar:

Discovery
Projects
<a
href="AddCalendarEvent.php?PHPSESSID=<?php echo
session_id();
?>">Add an event to the
calendar</a>
8.
Save the document as EventCalendar.php in the
ChineseZodiac folder.
Upload EventCalendar.php and class_EventCalendar.php to
the Web server.
619
9.
10. Open EventCalendar.php in your Web browser by enter-
ing the following URL: http://<yourserver>/ChineseZodiac/
EventCalendar.php. You will see an empty calendar for the
current month and year. Use the link at the bottom of the
page to add some events to the calendar, then use the link at
the bottom of the page to return to the event calendar. Use
the links in the calendar header to browse through the calen-
dar and find the events you entered. Remember that the links
for the events will not work until you complete Discovery
Project 10-4.
Discovery Project 10-4
Create an EventDetails.php file to display the title and description of
the event based on the event ID passed to the script. Add a member
function called getEventDetails() that accepts the event ID as a
parameter and retrieves and displays the event information. Use ses-
sions to serialize and unserialize the EventCalendar object.
Discovery Project 10-5
Create a RemoveCalendarEvent.php file to remove an event from
the calendar based on the event ID passed to the script. Add a mem-
ber function called removeCalendarEvent() that accepts the event ID
as a parameter and deletes the event information from the database.
Use sessions to serialize and unserialize the EventCalendar object.
Modify the getMonthlyCalendar() member function to add a link
after each event’s title that will call the RemoveCalendarEvent.php file
with the event ID as a parameter.

APPENDIX
Working
with XHTML
A
As
explained in Chapter 1, PHP is an embedded scripting language.
A
PHP script is embedded, or contained within, an XHTML page.
Because
of this restriction, familiarity with XHTML is required for
using
PHP. This appendix provides a brief overview of XHTML and
shows
you how to install some development tools to assist you with
building
XHTML and PHP files.
Installing
an Editor
For
many users of this book, the instructor and the school will pro-
vide
a complete and integrated development environment. However,
if
such tools are not provided, you will need a text editor for
creating
your
PHP files. You may also need an FTP or SCP client so that you
can
upload the PHP files to a Web server.
In
this section, you will learn how to install Portable Apps Suite and
Notepad++
for Windows. Portable Apps Suite is a tool that allows
you
to run programs that are installed on a flash drive. Notepad++ is
a
text editor with an integrated FTP client.
Installing
Portable Apps Suite
Because
USB flash drives have become larger and faster, you can
install
applications directly onto the flash drive. By attaching the flash
drive
to any compatible system, you can access your programs even if
they
are not installed on that machine. This makes it easier to develop
APPENDIX
A
Web
pages at home and on school computers using the same devel-
opment
tools.
There
are USB flash drive “portable application” solutions for most
operating
systems. For Macintosh systems, the FSuite CD provides
a
collection of portable applications. Linux users have Portable Apps
for
Linux, and even a version of Linux that boots from a USB drive.
Portable
Apps Suite is the Windows solution. Through the integrated
Portable
Apps menu, installed applications can be launched.
To
install Portable Apps Suite for Windows:
1.
2.
621
Insert
the USB flash drive into an available port.
Open
your Web browser and enter http://www.portableapps.
com
in the location bar to go to the Portable Apps home page.
Click
Suite on the navigation bar of the Portable Apps Web
page
to open the Suite home page. From the Suite home page,
click
the Download button, select the version you want to
install
(Platform, Suite Lite, or Standard) and start the down-
load.
Save the downloaded file to the USB drive.
When
the download is complete, open Windows Explorer,
navigate
to the USB drive, and double-click the PortableApps.
com_type_Setup_version_language.exe
file on your flash drive,
where
type is “Platform,” “Suite_Light,” or “Suite,” version
is the
current
version number, and language is a two-letter language
abbreviation
(such as “en” for English).
Install
the Portable Apps program in the root directory of
your
flash drive.
After
the installation is complete, view the contents of the
flash
drive and double-click the StartPortableApps.exe file.
The
Portable Apps menu displays a list of installed programs,
as
shown in Figure A-1. Also, a Portable Apps icon appears in
the
system tray on the taskbar.
The
full
process of
downloading
and installing
Portable Apps
Suite may take up to 20
minutes, depending on
the version you selected
and the download speed.
3.
4.
5.
6.
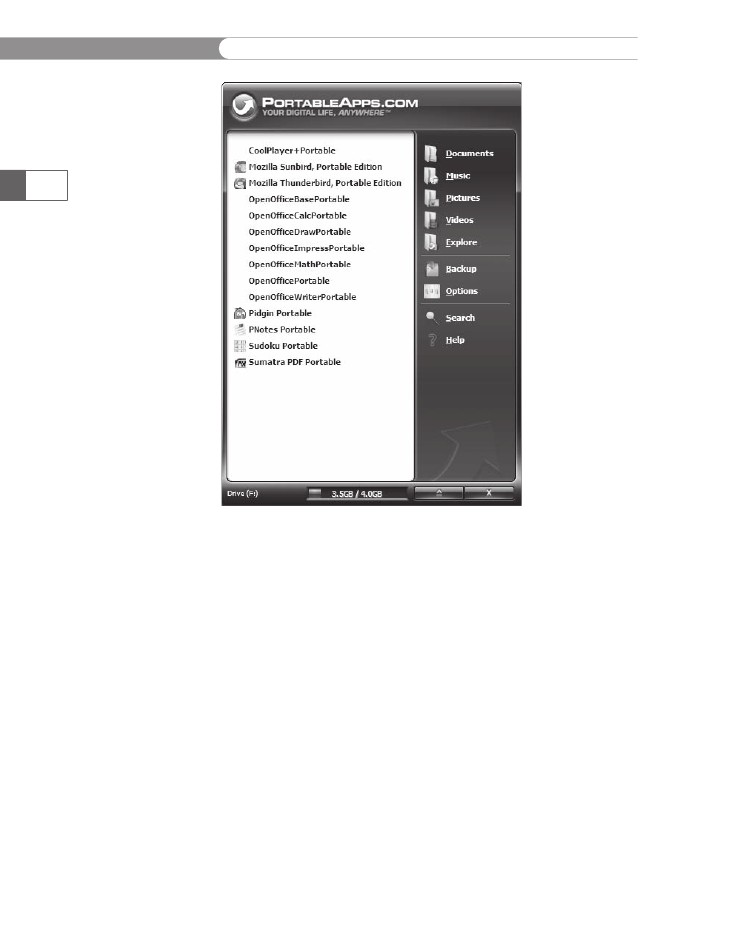
APPENDIX
A
622
Figure
A-1
The
Portable Apps menu
Installing
Notepad++
A
graphical HTML editor can simplify the task of creating Web
pages.
However, graphical HTML editors automatically add many
unfamiliar
elements and attributes to documents that can confuse
you
and distract from the learning process. Therefore, this book
shows
you how to create Web pages using a simple text editor.
If
your instructor has not required a specific text editor to complete
your
assignments, many options are available. Programs such as
TextPad,
TextWrangler, jEdit, NEdit, and Notepad++ all provide PHP
syntax
highlighting, which assists you by color-coding XHTML and
PHP
keywords, comments, and operators. Many text editors, includ-
ing
the ones listed above, also provide PHP parsers to check the syn-
tax
of a PHP script and highlight any errors.
Notepad++
is available to install as part of Portable Apps Suite for
Windows.
You can install it in your Portable Apps Suite, where it will
APPENDIX
A
appear
as a menu item. Additionally, Notepad++ has an integrated
FTP
client, which simplifies uploading files to a Web server.
To
download and install Notepad++ for the Portable Apps Suite:
1.
Return
to the PortableApps.com Web site and select the
Applications
menu link.
In
the Development section, click the Notepad++ Portable
link.
Download
the Notepad++ program directly to the root direc-
tory
of your flash drive.
Close
your browser and return to the Portable Apps menu. If
the
menu is closed, you can display it by clicking the Portable
Apps
icon in the system tray on the taskbar.
From
the Portable Apps menu, click the Options but-
ton
and select Install New Application. Navigate to the
NotepadPlusPlusPortable_xxx.paf.exe
file, where xxx is the
version
of Notepad++ on your flash drive. Click Open to
install
Notepad++.
When
the installation is complete, redisplay the Portable Apps
menu
by clicking the Portable Apps Menu icon on the taskbar.
Notepad++
Portable appears in the menu list.
Click
the Notepad++ Portable option in the Portable Apps
menu
to open Notepad ++.
You
will learn to configure Notepad++ as you begin to create
Web
pages using XHTML and PHP. For now, click the Close
button
on the title bar to close Notepad++.
To
close the Portable Apps program, click the Portable Apps
Menu
icon on the taskbar to open the menu. Click the X but-
ton
in the lower-right corner to close the menu, which will
remove
the icon from the system tray on the taskbar. (It is
important
to close the Portable Apps program correctly to
ensure
that your server profiles are available the next time
you
launch the program.) You can also right-click the Portable
Apps
Menu icon and select Exit to close the application.
The
next time you insert your flash drive in the USB port,
select
“Start PortableApps.com using the program provided
on
this device” and click OK.
When
the Portable Apps menu appears, select Notepad++
from
the menu.
623
2.
3.
4.
5.
6.
7.
8.
9.
10.
11.
APPENDIX
A
Several
popular features of Notepad++ are described in the follow-
ing
list. Take some time to explore all the features so you can take
full
advantage
of Notepad++. Figure A-2 shows Notepad++ with a PHP
script
loaded.
624
Figure
A-2
The
Notepad++ editor
The
syntax
highlighting
is
not
applied
until
the docu-
ment
is saved.
•
Syntax
highlighting is a useful debugging technique as you learn
to write PHP code because it displays elements, attributes, and
values in the source code in a different color. Syntax highlighting
is applied using the default style, but you can configure your own
syntax highlighting for XHTML, CSS, and PHP using the Style
Configurator option in the Settings menu.
• The toolbar has two Save icons—one that saves the current docu-
ment and one that saves all open documents.
• Options in the Run menu display the current document in either
the Internet Explorer or Mozilla Firefox browser. (Firefox is the
default installation with Portable Apps Suite.)
• Select Plugins | FTP SynchronizeA | Show FTP Folders to display
an FTP pane to the right of the Notepad++ window. Click the
Open Settings Dialog icon to open a dialog box that lets you cre-
ate a server profile. After you create a profile, you can click the
Connect icon in the FTP pane to connect to your remote server
account and upload files directly to your server from Notepad++.
• For a Web page to appear in the browser, it must reside in the
folder structure within the base Web directory (www or pub-
lic_html). To upload the current file to a folder on the server, click

APPENDIX
A
the
folder and select “Upload current file to folder” from the FTP
toolbar.
To upload a file from your flash drive, right-click the folder,
select
“Upload other file here. . .”, and navigate to the destination
of
the
file you want to upload.
If
you are using another text editor, use the help system or docu-
mentation
to explore its features. Many features in Notepad++ are
available
in other editors, and other editors may offer different fea-
tures,
such as automatically closing XHTML tags. The more familiar
you
are with the text editor, the easier it will be for you to build PHP
scripts.
Once
you have a basic understanding of Notepad++ or the text editor
you
will use, you are ready to explore the XHTML specification and
learn
how to format XHTML pages using Cascading Styles Sheets
(CSS).
625
The
Basics of XHTML
In
2001, the World Wide Web Consortium (W3C) released a for-
mal
recommendation for XHTML 1.0. This XHTML specification
requires
a stricter coding standard than the earlier HTML 4.0 stan-
dard
to accommodate multiple browsers and to maintain compat-
ibility
with other media devices, such as PDAs and mobile phones.
One
goal of XHTML is to separate information from presentation. To
accomplish
this goal, the W3C decided that some common HTML
elements
and attributes used for display and formatting would not be
supported
in XHTML. Instead, the W3C recommends that you use
CSS
to format the document for browser display.
The
W3C does
not actually
release a ver-
sion of a par-
ticular
technology. Instead, it
issues a formal recom-
mendation for a technol-
ogy, which essentially
means that the technol-
ogy is (or will be) a recog-
nized industry standard.
DOCTYPE Declaration