

Use the mysql_fetch_assoc() function to display the resultset in an
attractive table format. Save the file as view_zodiac_feedback.php
In the ChineseZodiac folder and upload the file to the server. Open

Discovery
Projects
the
view_zodiac_feedback.php file in the browser to verify that all
public
messages are displayed.
Discovery
Project 8-4
Reopen
inc_web_forms.php in the Includes subdirectory of the
ChineseZodiac
directory. At the bottom of the file, add two sections,
one
for each new link. Describe the process of the Zodiac Feedback
form
in the first, and describe the process of retrieving records from
a
database in the second. Add [Test the Script] and [View the Script]
links
for each. When clicked, the [Test the Script] links should open
the
zodiac_feedback.html and view_zodiac_feedback.php scripts.
When
the [View the Script] links are clicked, they should display the
source
code for the process_zodiac_feedback.php and view_zodiac_
feedback.php
scripts.
Add
two new text links to the top of the file: Add Zodiac Feedback
and
View Zodiac Feedback, which link to the two sections you added
to
the bottom of the file.
Save
the inc_web_forms.php file and upload it to the Includes folder
in
the ChineseZodiac directory on the Web server.
Open
inc_home_links_bar.php, which you created in Discovery
Project
3-3. The file is in the Includes folder in the ChineseZodiac
directory
on the Web server. Add a Site Feedback text link that opens
zodiac_feedback.html.
Save the inc_home_links_bar.php file and
upload
the file to the server. Display the Chinese Zodiac Web site in
the
browser and click the Site Feedback text link to test the site feed-
back
process.
495
Discovery
Project 8-5
Open
inc_footer.php, which you created in Discovery Project 2-2
and
modified in Discovery Project 5-5. Modify the file to query a ran-
dom
quote from the randomproverb
table
instead of the proverbs.txt
file.
Use the count()
MySQL
aggregate function to determine the
number
of proverbs in the table. Use the PHP rand()
function
to
determine
which proverb to display.
Each
time you retrieve a proverb from the randomproverb
table,
update
the display_count
for
that record with a MySQL query func-
tion
using the index
field,
as follows:
$SQLString
= "UPDATE randomproverb SET display_count ".
"
= display_count + 1 WHERE proverb = " .
$ProverbArray;

CHAPTER
Managing
State
Information
In
this chapter, you will:
Learn
about state information
Use
hidden form fields to save state information
Use
query strings to save state information
Use
cookies to save state information
Use
sessions to save state information
9
Understanding
State Information
Information
about individual visits to a Web site is called state
information.
HTTP was originally designed to be stateless,
which
means
that Web browsers stored no data about pages viewed on
previous
visits to a Web site. In this chapter, you will learn how to
maintain
state,
or store persistent data about a Web site visit, using
hidden
form fields, query strings, cookies, and sessions. When you
maintain
state, HTTP is said to be stateful.
497
Understanding
State Information
The
original stateless design of the Web allowed early Web servers to
process
requests for Web pages quickly because they did not need to
remember
any unique requirements for different clients. Similarly,
Web
browsers needed no special information to load a particular
Web
page from a server. Although this stateless design was efficient,
it
was also limiting. Because a Web server could not remember indi-
vidual
user information, the browser was forced to treat every visit
to
a Web page as an entirely new session, even if the browser had just
opened
a different Web page on the same server. This design ham-
pered
interactivity and limited the amount of personal interaction a
Web
site could provide.
This
chapter shows different methods of maintaining state informa-
tion.
Although the chapter focuses on establishing a user’s identity
and
maintaining it as the user visits different pages on a Web site,
this
is
only one example of what you can do when state information is
maintained.
Web
portal sites provide individual users with customizable pages
made
of sections, each of which displays content such as a calendar,
friends
list, message queue, or news headlines. Users set prefer-
ences
for what each section displays. This information is stored
in
a database, in a record associated with the user’s ID. Whenever
the
user returns to a previously visited page, the user’s preferences
are
retrieved from the database and the Web page is displayed
accordingly.
One
of the most important reasons to maintain a visitor’s identity
within
a Web site is for Web page access control. Consider a Web-
based
time tracking system, which might have links for entering,
reviewing,
approving, and reporting an employee’s work hours. All
employees
need access to the links for entering and reviewing their
own
hours. A supervisor needs additional access to review the time
sheets.
A payroll clerk needs access to reports of all employees’ hours,
once
the hours have been approved. All of these permissions can
be
stored in the database, linked to the user’s ID. Once the
visitor’s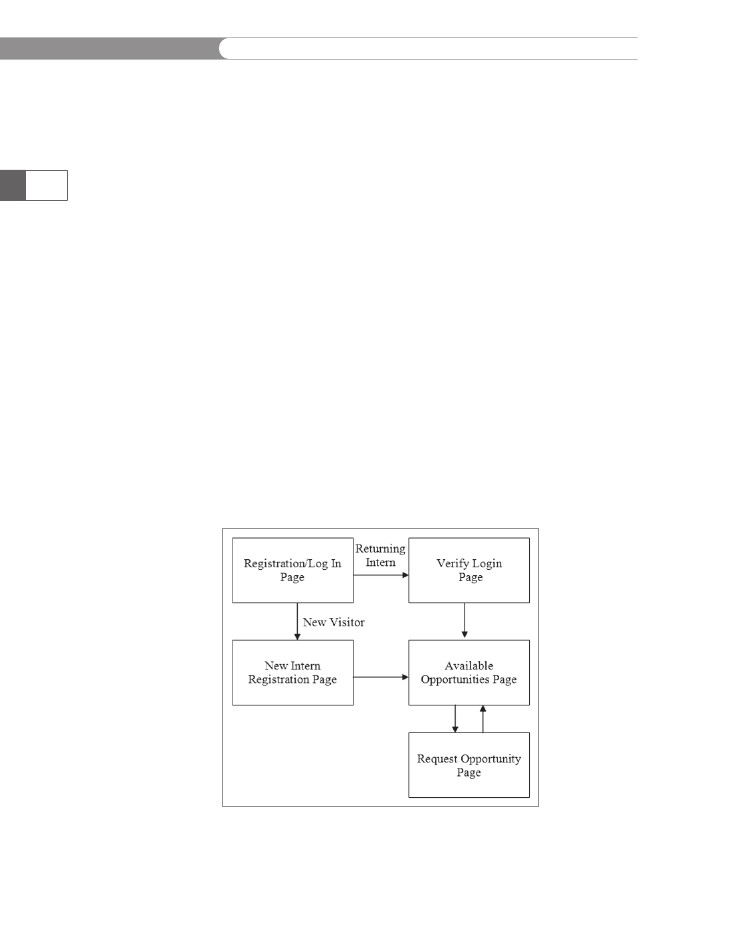
CHAPTER
9
Managing
State Information
identity
has been established, the PHP script can limit the available
pages
based on permissions in the database.
Customizations
do not need to be limited to an individual user’s iden-
tity.
A Web-based time tracking system may be shared by a number
of
companies. A company that has an existing Web site may already
have
developed a unique look for its site, with custom colors, fonts,
and
styles. By associating each user with a company, and storing
information
about that company’s custom design in the database, the
PHP
script can display a page that matches the look of the company’s
own
Web pages, providing a consistent user experience.
A
user’s browsing history can also be used to customize a Web site.
Many
online stores display a list of recently viewed or recently pur-
chased
merchandise when a user returns to their Web site. These
individual
histories and orders are stored in a database, and then
retrieved
when the visitor returns to the store’s Web site. Some sites
employ
complex algorithms that analyze a user’s history and then
present
a list of recommended items.
The
four tools for maintaining state information with PHP are hidden
form
fields, query strings, cookies, and sessions. This chapter shows
you
how to use each tool to maintain state information while working
with
the College Internship Available Opportunities Web site, which
consists
of four Web pages. Figure 9-1 illustrates how visitors navigate
through
the Web site.
498
Figure
9-1 College Internship Available Opportunities
Web
site page flow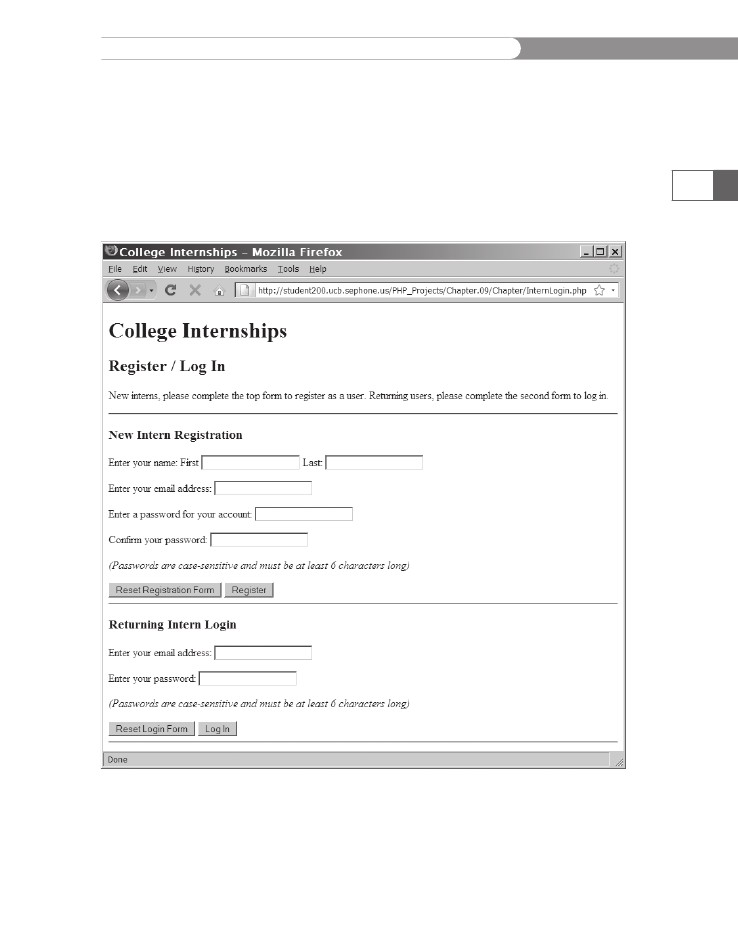
Understanding
State Information
The
first page that visitors open is the Registration/Log In page,
which
is in the upper-left corner of Figure 9-1. New visitors to the
Web
site must first get an Intern ID and enter their contact informa-
tion
before accessing the Available Opportunities page, which is the
site’s
main page. Visitors are required to use a valid e-mail address
as
their user name. Returning visitors can enter their login informa-
tion
and access the Available Opportunities page directly. Figure 9-2
shows
the Registration/Log In Web page.
499
Figure
9-2
Registration/Log
In Web page
After
a user logs in, the Web site must keep track of information
about
the user the entire time the client Web browser navigates
CHAPTER
9
Managing
State Information
through
the various pages on the site. In other words, the Web site
must
maintain state information about the client session.
As
you work with the College Internship Available Opportunities
Web
site, keep in mind that the goal of this chapter is to teach you
how
to maintain state information with PHP. The Web site is inten-
tionally
simple to allow you to focus on using state techniques. It does
not
have the most efficient or elegant design possible. For example,
the
PHP code that makes up the Web site contains minimal valida-
tion
functions to keep the code structure simple and focus on the
techniques
presented in this chapter. If you try to cause an error (or
“break”
a script), you will succeed. Most important, remember that
even though the Web site requires user ID numbers and passwords, it
is not secure. Refer to your Web server’s documentation for informa-
tion on how to secure your Web site.
To create a database named internships, along with three tables
named interns, opportunities, and assigned_opportunities:
1.
500
Log in to MySQL Monitor with the MySQL user name and
password you created in Chapter 7.
Enter the following command to create a database named
internships:
mysql> CREATE DATABASE internships;[ENTER
]
2.
3.
After you see the “Query OK” message, enter the following
command to select the internships database:
mysql> USE internships;[ENTER
]
4.
Enter the following command to create the interns table:
mysql> CREATE TABLE interns (internID SMALLINT NOT
NULL AUTO_INCREMENT PRIMARY KEY, email VARCHAR(40),
password_md5 VARCHAR(32), first VARCHAR(40),
last VARCHAR(40));[ENTER ]
5.
Enter the following command to create the opportunities
table:
mysql> CREATE TABLE opportunities (opportunityID
SMALLINT NOT NULL AUTO_INCREMENT PRIMARY KEY,
company VARCHAR(40), city VARCHAR(25), start_date
DATE, end_date DATE, position VARCHAR(30), description
VARCHAR(250));[ENTER ]
6.
Enter the following command to create the
assigned_opportunities table:
mysql> CREATE TABLE assigned_opportunities
(opportunityID SMALLINT, internID SMALLINT,
date_selected DATE, date_approved DATE);[ENTER
]

Understanding
State Information
7.
Enter
the following command to load the opportunities.txt
file
into the opportunities
table.
Be sure to include the full
path
to opportunities.txt.
mysql>
LOAD DATA INFILE 'opportunities.txt' INTO
TABLE
opportunities;[ENTER ]
8.
After
you see the “Query OK” message, type exit
or
quit
and
press
Enter to log out of MySQL Monitor.
501
To
create the Registration/Log In page:
1.
Create
a new document in your text editor and type the
<!DOCTYPE>
declaration,
<html>
element,
header information,
and
<body>
element.
Use the strict DTD and “College Intern-
ships”
as the content of the <title>
element.
Add
the following text and elements to the document body:
<h1>College
Internships</h1>
<h2>Register
/ Log In</h2>
<p>New
interns, please complete the top form to
register
as a user. Returning users, please complete
the
second form to log in.</p>
<hr
/>
2.
3.
Add
the following Web form to allow new interns to register
for
an intern ID:
<h3>New
Intern Registration</h3>
<form
method="post" action="RegisterIntern.php">
<p>Enter
your name: First
<input
type="text" name="first" />
Last:
<input type="text" name="last" /></p>
<p>Enter your e-mail address:
<input type="text" name="email" /></p>
<p>Enter a password for your account:
<input type="password" name="password" /></p>
<p>Confirm your password:
<input type="password" name="password2" /></p>
<p><em>(Passwords are case-sensitive and
must be at least 6 characters long)</em></p>
<input type="reset" name="reset"
value="Reset Registration Form" />
<input type="submit" name="register"
value="Register" />
</form>
<hr />
4.
Add a second Web form to allow returning users to log in.
The VerifyLogin.php script will be created later in the chapter.

CHAPTER
9
Managing
State Information
<h3>Returning
Intern Login</h3>
<form
method="post" action="VerifyLogin.php">
<p>Enter
your e-mail address:
<input
type="text" name="email" /></p>
<p>Enter your password:
<input type="password" name="password" /></p>
<p><em>(Passwords are case-sensitive and
must be at least 6 characters long)</em></p>
<input type="reset" name="reset"
value="Reset Login Form" />
<input type="submit" name="login" value="Log In" />
</form>
<hr />
502
Although this
document has
no PHP code
sections, it is
saved as a
PHP file because PHP
code will be added later
in this chapter.
5.
Save the document as InternLogin.php in the Chapter direc-
tory for Chapter 9 and upload the document to the server.
To create the New Intern Registration page:
1.
Create a new document in your text editor and type the
<!DOCTYPE> declaration, <html> element, header information,
and <body> element. Use the strict DTD and “Intern Registra-
tion” as the content of the <title> element.
Add the following text, elements, and script section to the
document body:
<h1>College Internship</h1>
<h2>Intern Registration</h2>
<?php
?>
2.
3.
Add the following code to the script section to validate the
e-mail address entered. The preg_match() function is the
same one used in Chapter 3.
$errors = 0;
$email = "";
if (empty($_POST['email'])) {
++$errors;
echo "<p>You need to enter an e-mail address.</p>\n";
}
else {
$email = stripslashes($_POST['email']);
if (preg_match("/^[\w−]+(\.[\w−]+)*@" .
"[\w−]+(\.[\w−]+)*(\.[a-zA-Z]{2, })$/i",
$email) == 0) {
++$errors;
echo "<p>You need to enter a valid " .
"e-mail address.</p>\n";
$email = "";
}
}
Understanding
State Information
4.
Add
the following code to the script section to validate the
password.
The code verifies that both password fields were
entered,
that they match, and that the password is at least 6
characters
long.
if
(empty($_POST['password'])) {
++$errors;
echo "<p>You need to enter a password.</p>\n";
$password = "";
}
else
$password = stripslashes($_POST['password']);
if (empty($_POST['password2'])) {
++$errors;
echo "<p>You need to enter a confirmation
password.</p>\n";
$password2 = " ";
}
else
$password2 = stripslashes($_POST['password2']);
if ((!(empty($password))) && (!(empty($password2)))) {
if (strlen($password) < 6) {
++$errors;
echo "<p>The password is too short.</p>\n";
$password = "";
$password2 = "";
}
if ($password <> $password2) {
++$errors;
echo "<p>The passwords do not match.</p>\n";
$password = "";
$password2 = "";
}
}
503
5.
Add the following if statement to the end of the script
section to connect to the database server and open the
internships database. Be sure to replace host with the host
name of your MySQL server, and user and password with
your user name and password.
if ($errors == 0) {
$DBConnect = @mysql_connect("host", "user",
"password");
if ($DBConnect === FALSE) {
echo "<p>Unable to connect to the database
server. " .
"Error code " . mysql_errno() . ": " .
mysql_error() . "</p>\n";
++$errors;
}
CHAPTER
9
Managing
State Information
else
{
$DBName
= "internships";
$result = @mysql_select_db($DBName,
$DBConnect);
if ($result === FALSE) {
echo "<p>Unable to select the
database. " .
"Error code " . mysql_
errno($DBConnect) .
": " . mysql_error($DBConnect) .
"</p>\n";
++$errors;
}
}
}
504
6.
Add the following statements to the end of the script section
to verify that the e-mail address entered is not already in the
interns table:
$TableName = "interns";
if ($errors == 0) {
$SQLstring = "SELECT count(*) FROM $TableName" .
"where email=$email";
$QueryResult = @mysql_query($SQLstring,
$DBConnect);
if ($QueryResult !== FALSE) {
$Row = mysql_fetch_row($QueryResult);
if ($Row[0]>0) {
echo "<p>The email address entered (" .
htmlentities($email) .
") is already registered.</p>\n";
++$errors;
}
}
}
7.
Add the following if statement to show the appropriate mes-
sage if there were errors:
if ($errors > 0) {
echo "<p>Please use your browser's BACK button
to return" .
" to the form and fix the errors
indicated.</p>\n";
}
8.
Finally, at the end of the script section, enter the following
statements to add the new user to the interns table. Note
that an MD5 hash of the password is stored in the database
for security reasons. Each user’s Intern ID value is the pri-
mary key of the row in which the user’s personal information
is stored. Therefore, the mysql_insert_id() function returns
Understanding
State Information
the
primary key to the $InternID
variable.
The last statement
closes
the database connection.
if
($errors == 0) {
$first
= stripslashes($_POST['first']);
$last = stripslashes($_POST['last']);
$SQLstring = "INSERT INTO $TableName " .
" (first, last, email, password_md5) " .
" VALUES( '$first', '$last',
'$email', " .
" '" . md5($password) . "')";
$QueryResult = @mysql_query($SQLstring,
$DBConnect);
if ($QueryResult === FALSE) {
echo "<p>Unable to save your registration " .
" information. Error code " .
mysql_errno($DBConnect) . ": " .
mysql_error($DBConnect) . "</p>\n";
++$errors;
}
else {
$InternID = mysql_insert_id($DBConnect);
}
mysql_close($DBConnect);
}
505
You learned
in Chapter 8
that the pri-
mary key for
a table and
the public identifier (such
as the “Intern ID” value)
are normally separate
fields.
9.
Add the following text and elements immediately before the
end of the script section:
if ($errors == 0) {
$InternName = $first . " " . $last;
echo "<p>Thank you, $InternName. ";
echo "Your new Intern ID is <strong>" .
$InternID . "</strong>.</p>\n";
}
10.
Save the document as RegisterIntern.php in the Chapter
directory for Chapter 9 and upload the document to the
server.
Open the InternLogin.php file in your Web browser by
entering the following URL: http://<yourserver>/PHP_
Projects/Chapter.09/Chapter/InternLogin.php. Enter a valid
e-mail address and a password of at least 6 characters in the
New Intern Registration form. Be sure to enter the same
password in the confirmation fields or you will receive an
error. Click the Register button to obtain an Intern ID value.
You should see the Web page shown in Figure 9-3. (The first
Intern ID value should be 1.)
Close your Web browser window.
11.
12.

CHAPTER
9
Managing
State Information
506
Figure
9-3
New
Intern Registration Web page after successful registration
Short
Quiz
1.
2.
3.
4.
Describe
the term “state information.”
What
are the advantages of a stateless design?
What
are the disadvantages of a stateless design?
What
are three applications for which maintaining state infor-
mation
may be useful?
What
are the four tools for maintaining state information?
5.
Using
Hidden Form Fields to Save
State
Information
Hidden
input
elements
are visible in
the URL
when you
use the get method, and
are visible in the source
code of the Web page.
Do not use a hidden input
element to hold sensitive
information such as pass-
words, because it is not
secure.
As you should know from your study of HTML, a hidden form field is
not displayed by the Web browser, so it allows you to hide information
from users. You create hidden form fields with the <input> element.
Hidden form fields temporarily store data that needs to be sent to a
server along with the rest of a form, but that a user does not need to
see. You create hidden form fields using the same syntax for other fields
created with the <input> element: <input type="hidden">. The only
attributes you can include with a hidden form field are name and value.
When you submit a form to a PHP script, you can access the values
submitted from the form by using the $_GET[] and $_POST[] auto-
globals. If you then want to pass form values from one PHP script
to another, you can store the values in hidden form fields, which are
submitted along with other types of form fields.
Using
Hidden Form Fields to Save State Information
Next,
you will create the Verify Login and Available Opportunities
pages
and add a form with a hidden input on the New Intern
Registration
page. When the user successfully logs in using the
Registration/Log
In page or successfully registers as a new intern on
the
New Intern Registration page, the Intern ID is submitted to the
Available
Opportunities page.
To
create the Verify Login page:
1.
507
Create
a new document in your text editor and type the
<!DOCTYPE>
declaration,
<html>
element,
header information,
and
<body>
element.
Use the strict DTD and “Verify Intern
Login”
as the content of the <title>
element.
Add
the following text, elements, and script section to the
document
body:
<h1>College
Internship</h1>
<h2>Verify
Intern Login</h2>
<?php
?>
2.
3.
Add
the following if
statement
to the script section to
connect
to the database server and open the internships
database.
Be sure to replace host
with
the host name of your
MySQL
server, and user
and
password
with
your user name
and
password.
$errors
= 0;
$DBConnect
= @mysql_connect("host", "user",
"password");
if
($DBConnect === FALSE) {
echo
"<p>Unable to connect to the database
server. " .
"Error code " . mysql_errno() . ": " .
mysql_error() . "</p>\n";
++$errors;
}
else {
$DBName = "internships";
$result = @mysql_select_db($DBName,
$DBConnect);
if ($result === FALSE) {
echo "<p>Unable to select the database. " .
"Error code " . mysql_
errno($DBConnect) .
": " . mysql_error($DBConnect) .
"</p>\n";
++$errors;
}
}
CHAPTER
9
Managing
State Information
4.
Add
the following statements to the end of the script section
to
verify that the e-mail address and password entered are in
the
interns
table.
Remember that the MD5 hash of the pass-
word
is stored in the database, not the password itself.
$TableName
= "interns";
if
($errors == 0) {
$SQLstring
= "SELECT internID, first, last FROM
$TableName"
. " where email='" . stripslashes($_
POST['email']) .
"' and password_md5='" .
md5(stripslashes($_POST['password'])) . "'";
$QueryResult = @mysql_query($SQLstring,
$DBConnect);
if (mysql_num_rows($QueryResult)==0) {
echo "<p>The e-mail address/password " .
" combination entered is not valid.
</p>\n";
++$errors;
}
else {
$Row = mysql_fetch_assoc($QueryResult);
$InternID = $Row['internID'];
$InternName = $Row['first'] . " " .
$Row['last'];
echo "<p>Welcome back, $InternName!</p>\n";
}
}
508
5.
Add the following if statement to show the appropriate
message if there were errors:
if ($errors > 0) {
echo "<p>Please use your browser's BACK button
to return " .
" to the form and fix the errors
indicated.</p>\n";
}
6.
Finally, add the following code to the end of the PHP script
section to include the form with the hidden field if there were
no errors.
if ($errors == 0) {
echo "<form method='post' " .
" action='AvailableOpportunities.php'>\n";
echo "<input type='hidden' name='internID' " .
" value='$InternID'>\n";
echo "<input type='submit' name='submit' " .
" value='View Available Opportunities'>\n";
echo "</form>\n";
}

Using
Hidden Form Fields to Save State Information
7.
Save
the document as VerifyLogin.php in the Chapter direc-
tory
for Chapter 9 and upload the file to the server.
To
add the form with the hidden input to the New Intern Registration
page:
1.
2.
Reopen
the RegisterIntern.php script in your text editor.
Add
the following code to the end of the PHP script section to
include
the form with the hidden field if there were no errors:
if
($errors == 0) {
echo
"<form method='post' " .
" action='AvailableOpportunities.php'>\n";
echo "<input type='hidden' name='internID' " .
" value='$InternID'>\n";
echo "<input type='submit' name='submit' " .
" value='View Available Opportunities'>\n";
echo "</form>\n";
}
509
3.
Save RegisterIntern.php in the Chapter directory for
Chapter 9 and upload the file to the server.
To create the Available Opportunities page:
1.
Create a new document in your text editor and type the
<!DOCTYPE> declaration, <html> element, header informa-
tion, and <body> element. Use the strict DTD and “Available
Opportunities” as the content of the <title> element.
Add the following text, elements, and script section to the
document body:
<h1>College Internship</h1>
<h2>Available Opportunities</h2>
<?php
?>
2.
3.
Add the following statement to the script section, which
retrieves the Intern ID submitted in the hidden form field.
If no ID was submitted, set $InternID to −1, which will not
match any records. The $_REQUEST[] autoglobal array is used
because it contains all of the array elements of the $_GET[],
$_POST[], and $_COOKIE[] autoglobal arrays. Each of these
arrays will be used later in the chapter to pass the Intern ID to
this page.
if (isset($_REQUEST['internID']))
$InternID = $_REQUEST['internID'];
else
$InternID = −1;
In a real-
world PHP
application,
you should
use the
$_GET[], $_P0ST[],
or $_COOKIE[] auto-
global as appropriate.
You should avoid using
the $_REQUEST[] auto-
global because of associ-
ated security issues. (For
a more complete explana-
tion, see Appendix D,
“Secure Coding with
PHP”.)
CHAPTER
9
Managing
State Information
4.
Add
the following statements to the end of the script section
to
connect to the database server and open the internships
database.
Be sure to replace host
with
the name of your
MySQL
server, and user
and
password
with
your user name
and
password.
$errors
= 0;
$DBConnect
= @mysql_connect("host", "user",
"password");
if
($DBConnect === FALSE) {
echo
"<p>Unable to connect to the database
server. " .
"Error code " . mysql_errno() . ": " .
mysql_error() . "</p>\n";
++$errors;
}
else {
$DBName = "internships";
$result = @mysql_select_db($DBName,
$DBConnect);
if ($result === FALSE) {
echo "<p>Unable to select the database. " .
"Error code " . mysql_
errno($DBConnect) . ": " .
mysql_error($DBConnect) . "</p>\n";
++$errors;
}
}
510
5.
Add the following statements to the end of the script section
to retrieve the user’s information from the interns table.
Notice in this version that the SQL statement uses the Intern
ID, which is stored in the $InternID variable, to retrieve user
information from the table.
$TableName = "interns";
if ($errors == 0) {
$SQLstring = "SELECT * FROM $TableName WHERE " .
" internID='$InternID'";
$QueryResult = @mysql_query($SQLstring, $DBConnect);
if ($QueryResult === FALSE) {
echo "<p>Unable to execute the query. " .
"Error code " . mysql_
errno($DBConnect) . ": " .
mysql_error($DBConnect) . "</p>\n";
++$errors;
}
else {
if (mysql_num_rows($QueryResult) == 0) {
echo "<p>Invalid Intern ID!</p>";
++$errors;
}
}
}
Using
Hidden Form Fields to Save State Information
6.
Add
the following statements to the end of the script section
to
retrieve the user’s first and last names from the resultset:
if
($errors == 0) {
$Row
= mysql_fetch_assoc($QueryResult);
$InternName = $Row['first'] . " " . $Row['last'];
} else
$InternName = "";
511
7.
Add the following statements to the end of the script sec-
tion. The query checks the assigned_opportunities table to
determine if the current intern ID has been approved for an
opportunity.
$TableName = "assigned_opportunities";
$ApprovedOpportunities = 0;
$SQLstring = "SELECT COUNT(opportunityID) FROM
$TableName " .
" WHERE internID='$InternID' " .
" AND date_approved IS NOT NULL";
$QueryResult = @mysql_query($SQLstring, $DBConnect);
if (mysql_num_rows($QueryResult) > 0) {
$Row = mysql_fetch_row($QueryResult);
$ApprovedOpportunities = $Row[0];
mysql_free_result($QueryResult);
}
8.
Add the following statements to the end of the script sec-
tion. The query retrieves the list of opportunity IDs from
the assigned_opportunities table that has been selected
for the current intern ID. The query result is stored in the
$SelectedOpportunities array. The last statement frees the
data retrieved by the query.
$SelectedOpportunities = array();
$SQLstring = "SELECT opportunityID FROM $TableName " .
" WHERE internID='$InternID'";
$QueryResult = @mysql_query($SQLstring, $DBConnect);
if (mysql_num_rows($QueryResult) > 0) {
while (($Row = mysql_fetch_row($QueryResult))
!== FALSE)
$SelectedOpportunities[] = $Row[0];
mysql_free_result($QueryResult);
}
9.
Add the following statements to the end of the script sec-
tion. The query retrieves the list of opportunity IDs from the
assigned_opportunities table that has been approved for
any intern ID. An opportunity that has been approved is no
longer available for selection. The query result is stored in the
$AssignedOpportunities array. The last statement frees the
data retrieved by the query.
CHAPTER
9
Managing
State Information
$AssignedOpportunities
= array();
$SQLstring
= "SELECT opportunityID FROM $TableName " .
"
WHERE date_approved IS NOT NULL";
$QueryResult = @mysql_query($SQLstring, $DBConnect);
if (mysql_num_rows($QueryResult) > 0) {
while (($Row = mysql_fetch_row($QueryResult))
!== FALSE)
$AssignedOpportunities[] = $Row[0];
mysql_free_result($QueryResult);
}
512
10.
Add the following statements to the end of the script sec-
tion. The query retrieves the list of opportunities from
the opportunities table. The query result is stored in the
$Opportunities array. The last statement closes the database
connection.
$TableName = "opportunities";
$Opportunities = array();
$SQLstring = "SELECT opportunityID, company, city, " .
" start_date, end_date, position,
description " .
" FROM $TableName";
$QueryResult = @mysql_query($SQLstring, $DBConnect);
if (mysql_num_rows($QueryResult) > 0) {
while (($Row = mysql_fetch_assoc($QueryResult))
!== FALSE)
$Opportunities[] = $Row;
mysql_free_result($QueryResult);
}
mysql_close($DBConnect);
11.
Add the following statements to the end of the script sec-
tion. The statements dynamically build a table of the available
opportunities. The table also contains links to the RequestOp-
portunity.php script, which you will create later in this chap-
ter. The last paragraph element contains a link back to the
Registration/Log In page.
echo "<table border='1' width='100%'>\n";
echo "<tr>\n";
echo "<th style='background-color:cyan'>Company</
th>\n";
echo "<th style='background-color:cyan'>City</th>\n";
echo "<th style='background-color:cyan'>Start
Date</th>\n";
echo "<th style='background-color:cyan'>End
Date</th>\n";
echo "<th style='background-color:cyan'>Position</
th>\n";
echo "<th style='background-color:cyan'>Description</
th>\n";
echo "<th style='background-color:cyan'>Status</
th>\n";

Using
Hidden Form Fields to Save State Information
echo
"</tr>\n";
foreach
($Opportunities as $Opportunity) {
if
(!in_array($Opportunity['opportunityID'],
$AssignedOpportunities)) {
echo "<tr>\n";
echo "<td>" .
htmlentities($Opportunity['company']) .
"</td>\n";
echo "<td>" .
htmlentities($Opportunity['city']) .
"</td>\n";
echo "<td>" .
htmlentities($Opportunity
['start_date']) .
"</td>\n";
echo "<td>" .
htmlentities($Opportunity['end_date']) .
"</td>\n";
echo "<td>" .
htmlentities($Opportunity['position']) .
"</td>\n";
echo "<td>" .
htmlentities($Opportunity
['description']) .
"</td>\n";
echo "<td>";
if (in_array($Opportunity['opportunityID'],
$SelectedOpportunities))
echo "Selected";
else {
if ($ApprovedOpportunities>0)
echo "Open";
else
echo "<a href=
'RequestOpportunity.php?" .
"internID=$InternID&" .
"opportunityID=" .
$Opportunity['opportunityID'] .
"'>Available</a>";
}
echo "</td>\n";
echo "</tr>\n";
}
}
echo "</table>\n";
echo "<p><a href='InternLogin.php'>Log Out</a></
p>\n";
513
Passing the
Intern ID as
a URL token
is very inse-
cure. Later
in this chapter, you will
learn better methods to
maintain secure data (like
the Intern ID) across Web
pages.
12.
Save the document as AvailableOpportunities.php in the
Chapter directory for Chapter 9.
Open the InternLogin.php file in your Web browser by
entering the following URL: http://<yourserver>/PHP_
Projects/Chapter.09/Chapter/InternLogin.php. In the
13.

CHAPTER
9
Managing
State Information
Returning
Intern Login form, enter the e-mail address and
password
that you registered with the New Intern Registra-
tion
form and click the Log In button. You should see the
“Welcome
back” message shown in Figure 9-4.
514
Figure 9-4
The Verify Login Web page for a successful login
14.
Click the View Available Opportunities button to open the
Available Opportunities page, which is shown in Figure 9-5.
Figure 9-5 The Available Opportunities Web page with the Intern information at the top of the screen

Using
Query Strings to Save State Information
15.
Close
your Web browser window.
Short
Quiz
1.
What
two attributes are used in a hidden field to temporarily
store
data and send it to the server?
Hidden
fields can be retrieved from which autoglobals?
Explain
the risks associated with using hidden elements to
submit
form data using the get
method.
515
2.
3.
Using
Query Strings to Save State
Information
One
way to preserve information following a user’s visit to a Web
page
is to append a query string to the end of a URL. As you learned
in
Chapter 4, a query string is a set of name/value pairs appended
to
a target URL. It consists of a single text string that contains
one
or more pieces of information. For example, the name/value
pairs
for a user’s first and last name may consist of something like
"firstName=Don"
and
"secondName=Gosselin".
You can use a query
string
to pass information such as search criteria from one Web page
to
another; simply add a question mark (?)
immediately after the
URL,
followed by the query string that contains the information you
want
to preserve in name/value pairs. In this manner, you are pass-
ing
information to another Web page, similar to the way you can pass
arguments
to a function or method. You separate individual name/
value
pairs within the query string using ampersands (&).
A question
mark
(?)
and a query string are automatically appended to the URL
of
a server-side script for any forms that are submitted with the GET
method.
However, you can also append a query string to any URL on
a
Web page; if you do, PHP will treat the information as if it were
sub-
mitted
with the GET
method.
The following code provides an example
of
an <a>
element
that contains a query string consisting of three
name/value
pairs:
<a
href="http://www.example.com/TargetPage.php?firstName=
Don&lastName=Gosselin&occupation=writer">Link
Text</a>
You
can access any query string data that is appended to a URL from
PHP
by using the $_GET[]
autoglobal,
the same as for any forms sub-
mitted
with the GET
method.
For example, the TargetPage.php script
(the
target of the link) can display the values from the query string in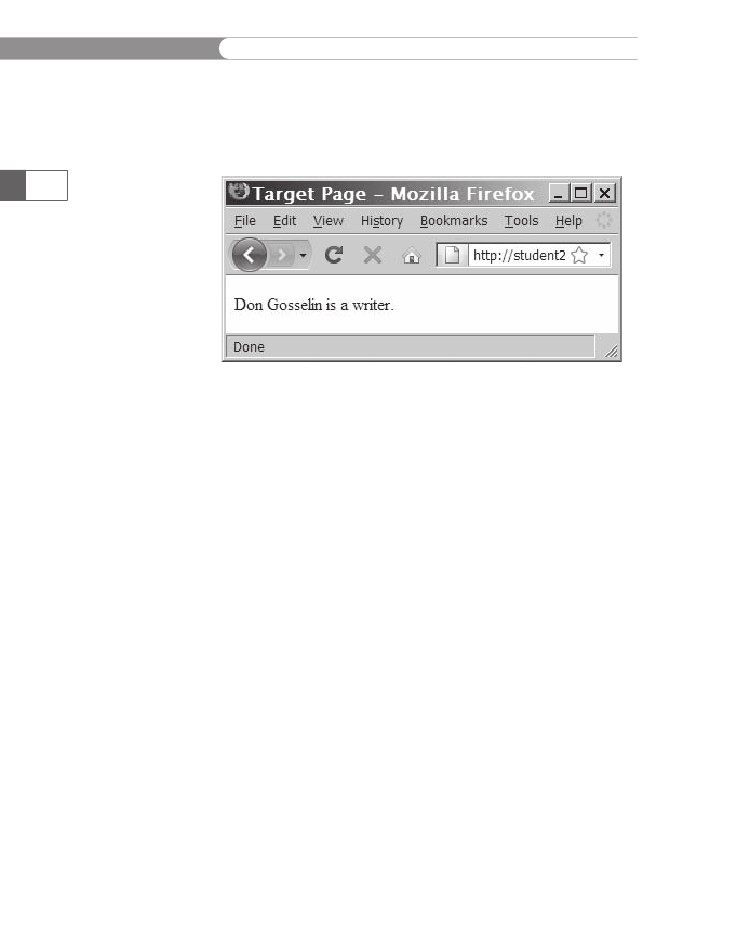
CHAPTER
9
Managing
State Information
the
preceding element by using the following statements. Figure 9-6
shows
the output in a Web browser.
echo
"<p>{$_GET['firstName']} {$_GET['lastName']} is a
{$_GET['occupation']}.</p>\n";
516
Figure
9-6
Output
of the contents of a query string
To
modify the Verify Login page so that the Intern ID is passed as a
query
string instead of being stored in a hidden form field:
1.
2.
Return
to the VerifyLogin.php document in your text editor.
Replace
the form that contains the hidden form fields with the
following
text and elements. The PHP script appends a query
string
to the AvailableOpportunities.php URL consisting of a
name/value
pair of internID=$InternID.
echo
"<p><a href='AvailableOpportunities.php?" .
"internID=$InternID'>Available
" .
" Opportunities</a></p>\n";
3.
4.
Save the VerifyLogin.php document.
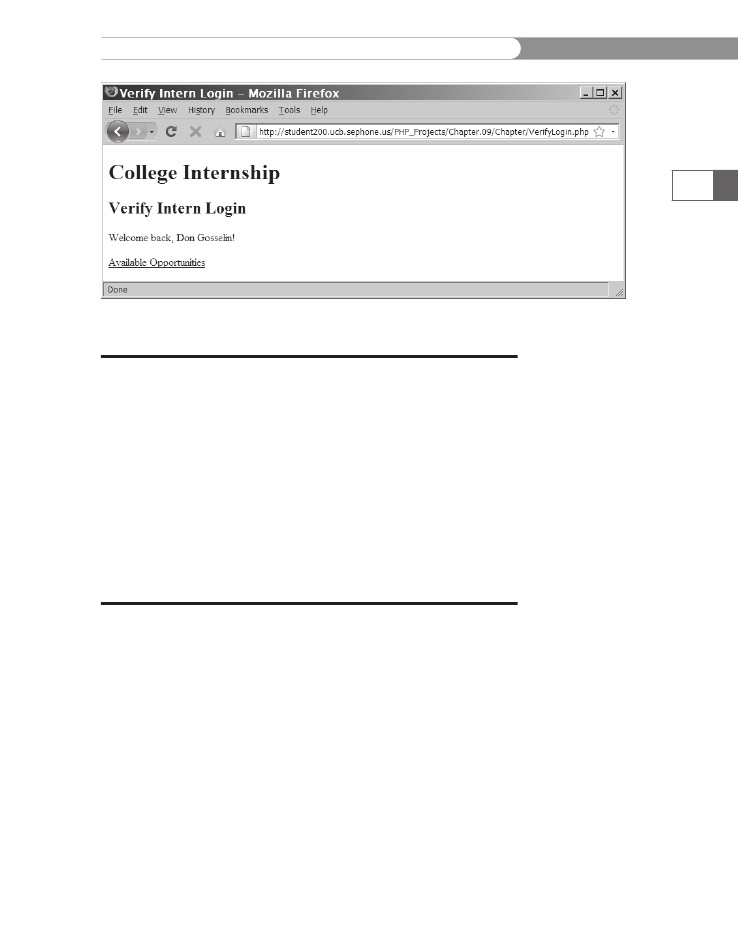
Open the InternLogin.php file in your Web browser by
entering the following URL: http://<yourserver>/PHP_
Projects/Chapter.09/Chapter/InternLogin.php. In the Return-
ing Intern Login form, enter the e-mail address and password
that you registered with the New Intern Registration form
and click the Log In button. As shown in Figure 9-7, you
should see the “Welcome Back” Web page with a link instead
of the Submit button.
Click the Available Opportunities link to open the Available
Opportunities page. The page should open just as it did with
the hidden form field.
5.
Using
Cookies to Save State Information
517
Figure
9-7
Login
Successful Web page after replacing the form with a link
Short
Quiz
1.
Explain
how a query string is used to pass information from
one
Web page to another.
Query
strings permanently maintain state information. True
or
False?
Illustrate
how the XHTML anchor (<a>)
element can be used
to
append a query string to a hyperlink.
Describe
how data appended to a URL can be accessed using
the
$_GET[]
autoglobal.
2.
3.
4.
Using
Cookies to Save State
Information
When
choosing a method of saving state information, you need to
consider
whether you want the state information to be available
after
the current session of a Web page has ended—in other words,
whether
you want the state information to be permanent. Query
strings
do not permanently maintain state information because the
information
contained in a query string is available only when you
open
a Web page using that query string. After a Web page that reads
a
query string closes, the query string is lost. Hidden form fields
maintain
state information between Web pages, but the data they
contain
is also lost when the Web page that reads the hidden fields
CHAPTER
9
Managing
State Information
518
closes.
To make it possible to store state information for more than
just
the current Web page, Netscape Communications added support
for
cookies to the Mosaic Netscape Web browser. Cookies,
derived
from
the programming concept called “magic cookies,” are small
pieces
of information about a user that are stored by a Web server
in
text files on the user’s computer. Nearly all modern Web browsers
support
the use of cookies, which can be temporary or persistent.
Temporary
cookies remain
available only for the current browser ses-
sion.
Persistent
cookies remain
available beyond the current browser
session
and are stored in a text file on a client computer.
Each
time the Web client visits a Web server, saved cookies for the
requested
Web page are sent from the client to the server. The server
then
uses the cookies to customize the Web page for the client.
Cookies
were originally created for use with CGI scripts, but are now
commonly
used by client-side scripting languages such as JavaScript
and
server-side scripting languages such as PHP.
You
have probably seen cookies in action if you have ever visited a
Web
site where you entered a user name in a prompt dialog box or in
a
text field, and then found that you were greeted by that user name
the
next time you visited the Web site. This greeting could occur with
each
subsequent visit to the same Web site, whether during the same
browser
session or during a different browser session days or weeks
later.
The Web page remembers your personal information by storing
it
locally on your computer in a cookie. Another example of a cookie
is
a counter that tracks the number of times an individual user has
visited
a Web site.
The
use of cookies has a number of limitations. Individual Web
browsers
can limit the number of cookies each server or domain can
store
on a user’s computer (normally between 20 and 70 cookies). In
addition,
Web browsers can limit the total number of cookies stored
on
a user’s computer (at least 300). If these limits are exceeded, a
Web
browser
may start discarding older cookies. Additionally, the maxi-
mum
size for an individual cookie is limited to 4 kilobytes.
Creating
Cookies
You
use the setcookie()
function
to create cookies in PHP. The syn-
tax
is as follows:
setcookie(name
[, value, expires, path, domain, secure])
You
create a cookie by passing to the setcookie()
function
a
required
name
argument
and five optional arguments: value,
expires,
path,
domain,
and secure.
You must pass each of the arguments in
the
order specified in the preceding syntax. To omit the value,
path,
Using
Cookies to Save State Information
and
domain
arguments,
specify an empty string as the argument
value.
To omit the expires
and
secure
arguments,
specify 0 as the
argument
value.
You
must call the setcookie()
function
before you send the Web
browser
any output, including white space, HTML elements, or out-
put
from the echo
or
print
statements.
If any output exists before
you
call the setcookie()
function,
you will receive an error and the
function
returns a value of FALSE.
Also, keep in mind that users can
choose
whether to accept cookies that a script attempts to write
to
their systems. If the setcookie()
function
runs successfully, it
returns
a value of TRUE,
even if a user rejects the cookie.
519
The
name and value Arguments
Although
the only required argument of the setcookie()
function
is
the name
attribute,
a cookie is of no use if you do not specify the
value
argument
because a cookie with a NULL
value
is indistinguish-
able
from a nonexistent cookie. Cookies created with only the name
and
value
arguments
are temporary cookies because they are avail-
able
for only the current browser session. The following code creates
a
cookie named firstName
and
assigns it a value of “Don”:
<?php
setcookie("firstName",
"Don");
?>
<!DOCTYPE
html PUBLIC "-//W3C//DTD XHTML 1.0 Strict//EN"
"http://www.w3.org/TR/xhtml1/DTD/xhtml1-strict.dtd">
<html xmlns="http://www.w3.org/1999/xhtml">
<head>
<title>College Internships</title>
...
Notice that
the script
section is
placed above
the HTML
elements in the preceding
example. Remember that
you must call the
setcookie() function
before you send the Web
browser any output,