CHAPTER
5
Working
with Files and Directories
292
a
description of the image, and a file input field for the image. To
accompany
each image file, create a text file that contains the name
and
description of the image. Create a separate Web page that displays
the
pictures with a caption showing the name and description fields.
Ensure
that the Projects directory has read and write permissions for
everyone.
Discovery
Projects
The
Chinese Zodiac site is a comprehensive project that will be
updated
in the Discovery Projects in each chapter. All files for the
Chinese
Zodiac site will be saved in a folder named ChineseZodiac in
the
root Web folder on the server.
Discovery
Project 5-1
Reopen
inc_site_layout.php, which you created in Discovery
Project
4-1. The file is in the Includes folder of the ChineseZodiac
folder.
Replace
the “[Insert site layout content here]” placeholder with Web
con-
tent
that describes the process of developing a dynamic Web template.
Be
sure to differentiate between dynamic and static content and illus-
trate
the syntax for targeting content to a dynamic content section.
Save
the inc_site_layout.php file and upload it to the server. The con-
tents
of this file should appear in the dynamic content section when
you
click the Site Layout button or the Site Layout text hyperlink
from
the Chinese zodiac Web template.
Discovery
Project 5-2
Create
a new document in your text editor and create an All-in-One
Web
form that prompts the user for his or her birth year. Validate
the
user input to require the user to enter a number. Use a nested
sage,
“You were born under the sign of the [zodiac sign]”, and display
the
zodiac image representing the posted year. Use the Chinese
zodiac
images that you saved in the Images folder in Discovery
Project
1-4. Track the number of times each year is entered by storing
a
counter for each year in a file in a “statistics” subdirectory.
Ensure
that
the PHP scripting engine has read and write permissions for the
“statistics”
subdirectory. Display a message at the bottom of the pageIf...Else statement to display the appropriate version of the mes-
showing how many times the specified year has been entered using
the message “You are visitor [count] to enter [year]”. Use a separate
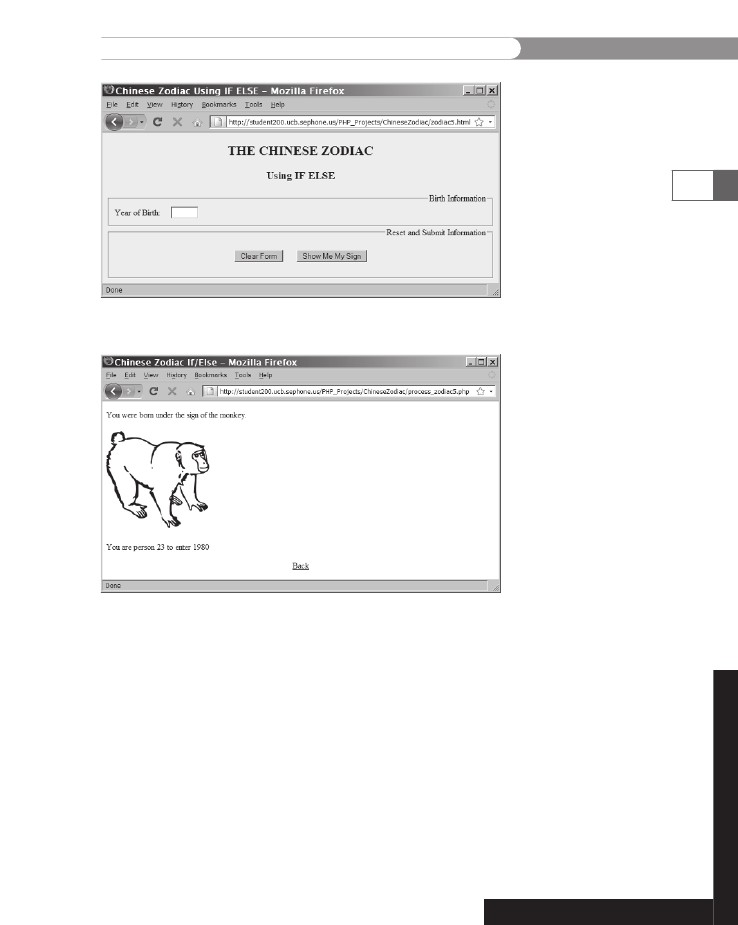
file for each year. Figure 5-18 shows a sample Web form and Figure
5-19 shows a sample output Web page.
Discovery
Projects
293
Figure
5-18 Sample Web form for the if...else
program
Figure
5-19
Sample
output for the if...else
statement
Save
the file as BirthYear_ifelse.php and upload it to the
ChineseZodiac
folder on the server. Create the “statistics” subdirec-
tory
and ensure that the write permissions are set to allow the PHP
scripting
engine to write files in the directory.
Reopen
the BirthYear_ifelse.php file. Modify the script to use a
switch
statement
instead of the nested if...else
statements.
Save
the
file as BirthYear_switch.php and upload it to the ChineseZodiac
folder
on the server.
CHAPTER
5
Working
with Files and Directories
Discovery
Project 5-3
Create
a new document in your text editor and type the <!DOCTYPE>
declaration,
<html>
element,
document head, and <body>
ele-
ment.
Use the strict DTD and “Show Source Code” as the content
of
the <title>
element.
This script will display the source code
of
a PHP script with syntax highlighting. This is accomplished by
using
the file_get_contents()
function
you learned in this chap-
ter
to read the script into a string, and by using a new function,
highlight_string().
The highlight_string()
function
takes a
string
of PHP code and displays it with color-coded syntax highlight-
ing
in a Web browser. To use these functions, insert the following
PHP
code block in the body:
<?php
if
(isset($_GET['source_file'])) {
$SourceFile
= file_get_contents(
stripslashes($_GET['source_file']));
highlight_string($SourceFile);
}
else
echo "<p>No source file name entered</p>\n";
?>
294
Save the document as ShowSourceCode.php in the ChineseZodiac
directory and upload the document to the Web server.
Open the inc_string_functions.php file in your text editor and
replace the “[Insert string function content here]” placeholder text
with the title “String and Character Functions.” Add a text navigation
bar below the title with the following internal hyperlinks that link to
a description of the PHP program. You can insert the text navigation
bar directly in the inc_control_structures.php file or create the bar as
a separate file and include it.
<a href="#string">String Functions</a>
<a href="#char">Character Functions</a>
Below the text navigation bar, create a section for each hyper-
link and insert an anchor to the named section. The first section,
“String Functions”, is for the SimilarNames.php script you created in
Discovery Project 3-4. The second section, “Character Functions”, is
for the EmbeddedWords.php script you created in Discovery Project
3-5. Describe the purpose of each PHP program. For example: “This
script counts the number of times each letter appears in a string and
compares that count to the number of times each letter appears in the
names of the Chinese zodiac signs to determine if the name can be

Discovery
Projects
made
from the characters in the string.” The code for the two anchor
targets
is listed below.
<a
id="string">String Functions</a>
<a
id="char">Character Functions</a>
Below
the descriptive content, insert a text hyperlink with the link
text
“[Test the Script]” that opens the appropriate PHP script for
the
section.
Add
a second text hyperlink with the link text “[View the Source
Code]”
that displays the source code of the respective PHP program.
Use
the following code for the hyperlink, replacing file_name
with
the
name
of the program referenced in the “[Test the Script]” hyperlink:
<a
href="ShowSourceCode.php?source_file=file_name">[View
the
Source
Code]</a>
295
Save
the file and upload it to the Includes folder in the ChineseZodiac
folder
on the server. Open index.php by entering the following
URL
in your Web browser’s address bar: http://<yourserver>/
ChineseZodiac/index.php.
Click the String Functions button or menu
item
to display the updated inc_string_functions.php. Test the links
to
verify that they display properly.
Discovery
Project 5-4
Open
the inc_control_structures.php file in your text editor and
replace
the “[Insert control structure content here]” placeholder text
with
the title “Conditional Statements and Looping Structures.” Add
a
text navigation bar below the title with the following internal
hyper-
links
that link to a description of the PHP program. You can insert the
text
navigation bar directly in the inc_control_structures.php file or
create
the bar as a separate file and include it.
<a
<a
<a
<a
href="#if_else">If...Else
Statement</a>
href="#switch">Switch
Statement</a>
href="#while_loop">While
Loop</a>
href="#for_loop">For
Loop</a>
Below
the text navigation bar, create a section for each hyperlink and
insert
an anchor to the named section. Describe the purpose of each
PHP
program. For example: “This all-in-one form prompts the user
to
enter a 4-digit birth year, which is validated for numeric input.
The
browser displays the user’s Chinese zodiac sign and the associ-
ated
zodiac image using an if...else statement.” The code for the four
anchor
targets is listed below:
<a
id="if_else">If...Else Statement</a>
<a
id="switch">Switch Statement</a>
CHAPTER
5
Working
with Files and Directories
<a
id="while_loop">While Loop</a>
<a
id="for_loop">For Loop</a>
296
Below
the descriptive content, insert a text hyperlink with the link
text
“[Test the Script]” that opens the appropriate script. For the
“lf...
Else
Statement” section, use the BirthYear_ifelse.php script created
in
Discovery Project 5-2. For the “Switch Statement” section, use
the
BirthYear_switch.php
script, also created in Discovery Project 5-2.
For
the “While Loop” section, use the Chinese_Zodiac_while_loop.
php
script created in Discovery Project 2-5. For the “For Loop”
section,
use the Chinese_Zodiac_for_loop.php script created in
Discovery
Project 2-4.
Add
a second text hyperlink with the link text “[View the Source
Code]”
that calls the ShowSourceCode.php script created in
Discovery
Project 5-3 to display the source code of the appropriate
PHP
script for this section. Use the following code for the hyperlink,
replacing
file_name
with
the name of the program referenced in the
“[Test
the Script]” hyperlink:
<a href="ShowSourceCode.php?source_file=file_name">[View the
Source Code]</a>
Save the file and upload it to the Includes folder in the ChineseZodiac
folder on the server. Open index.php by entering the following
URL in your Web browser’s address bar: http://<yourserver>/
ChineseZodiac/index.php. Click the Control Structures button or
menu item to display the updated inc_control_structures.php. Test
the links to verify that they display properly.
Discovery Project 5-5
Create an All-in-One Web form with a text area box for the user to
enter a Chinese proverb and write the data to a file named
proverbs.txt in the ChineseZodiac directory. Be sure that the
proverbs.txt file has read and write permissions for the PHP scripting
engine. Use the fwrite() function to incrementally append each new
proverb that is submitted using the Add Chinese Proverb button on
the Web form.
Name the file UploadProverb.php and transfer the file to the
ChineseZodiac directory on the server. Open UploadProverb.php in
the Web browser and use the Web form to post a number of Chinese
proverbs to the proverbs.txt file on the Web server.
Reopen inc_footer.php and modify the code to use the file()
function to read the contents of the proverbs.txt file into an array.
Count the number of items in the array using the count() function
Discovery
Projects
and
store the result in a variable named $ProverbCount.
Use the
PHP
rand(0,
$ProverbCount-1) function
to generate a random
array
index. Use the echo statement to display the text “A randomly
displayed
Chinese proverb read from a text file”. Below the descrip-
tion,
display a Chinese proverb using the random index to select the
proverb
from the array.
View
the Chinese Zodiac Web site in the Web browser. Refresh the
browser
to verify that a different proverb appears each time the
browser
is refreshed.
297
Discovery
Project 5-6
Create
a PHP All-in-One Web form to upload images to the Images
subfolder
in the ChineseZodiac folder on the server. Remember that
you
must set the permissions on the directory to give the PHP scripting
engine
write access to the directory. Name the file UploadImage.php
and
save it in the ChineseZodiac folder, then upload it to the Web
server.
Search
the Web for at least five small dragon images. Save them in
a
folder and size them to approximately 100 pixels by 100 pixels.
Name
the images Dragon1, Dragon2, and so on with a valid image
extension.
Use the UploadImage.php Web form to upload the dragon
images
to the Web server.
In
Discovery
Project 6-1,
you will ran-
domly dis-
play one of
the dragon
images below the ran-
domly displayed Chinese
proverb.

CHAPTER
Manipulating
Arrays
In
this chapter, you will:
Manipulate
array elements
Declare
and initialize associative arrays
Iterate
through an array
Find
and extract elements and values
Sort,
combine, and compare arrays
Understand
multidimensional arrays
Use
arrays in Web forms
6
Manipulating
Elements
Earlier
in this book, you learned that an array contains a set of data
represented
by a single variable name. You also learned that PHP
includes
two types of arrays: indexed and associative. You refer to the
elements
in an indexed array by their numeric position, whereas you
refer
to the elements in an associative array with an alphanumeric
key.
In this chapter, you will learn how to use advanced techniques on
both
indexed and associative arrays.
299
Manipulating
Elements
As
you use arrays in your scripts, you will undoubtedly need to add
and
remove elements. For example, suppose you have an online shop-
ping
cart program that uses an array to store the names of products
that
a customer plans to purchase. As the customer selects additional
products
to purchase, or decides not to purchase an item, you will
need
to manipulate the elements in the array of products.
In
this chapter, you work on a Message Board script that allows users
to
post and read messages to and from a text file. (Message boards
are
online discussion groups in which users with similar interests
exchange
messages.) The Message Board script you use in this chapter
is
fairly simple, unlike some of the real message boards you have prob-
ably
seen and used yourself. However, the Message Board script lets
you
practice the advanced array techniques presented in this chapter.
This
simple implementation of a message board has only two pages.
PostMessage.php
is an All-in-One Web form for posting messages
to
the message board. MessageBoard.php is the page for viewing,
organizing,
and deleting messages. Messages are written to the
messages.txt
file at PHP_Projects/Chapter.06/Chapter/MessageBoard/
on
the Web server.
To
create an All-in-One form for posting messages to the Message
Board,
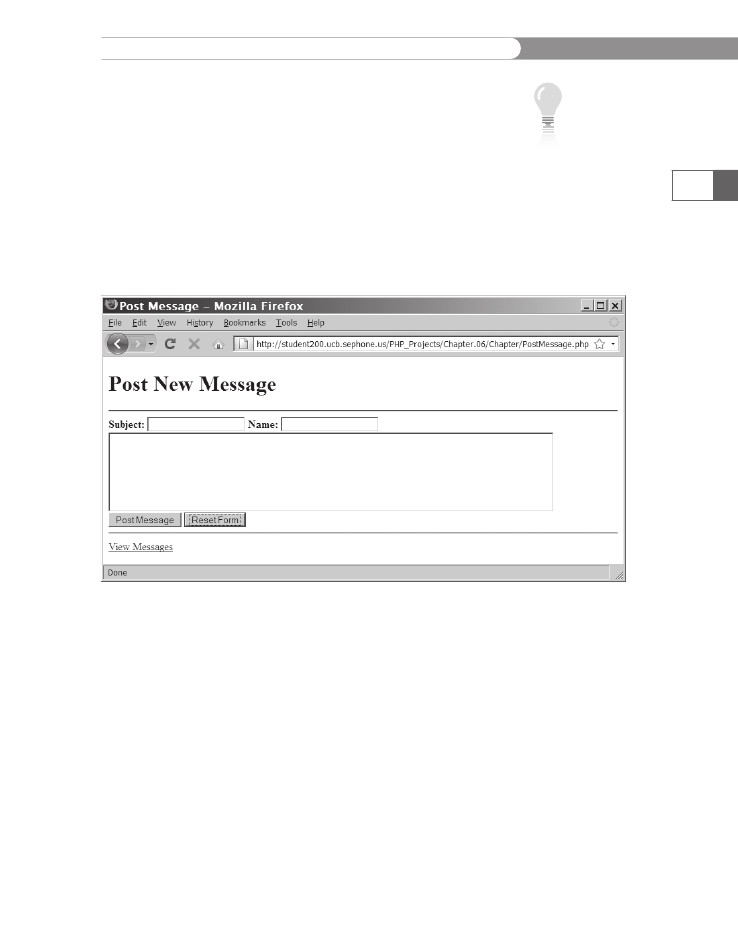
which stores messages in a text file:
1.
2.
Create
a new document in your text editor.
Type
the <!DOCTYPE>
declaration,
<html>
element,
header
information,
and <body>
element.
Use the strict DTD and
“Post
Message” as the content of the
Add the following script section to the document body:
<?php
?>
3.
4.
Add the following code to the script section to append the
submitted message to the messages.txt file. The code uses
the fopen(), fwrite(), and fclose() functions you stud-
ied in Chapter 5 to write the lines of the messages.txt file.

CHAPTER
6
Manipulating
Arrays
300
Remember
that opening a file with the “a” method
parameter
will
append to an existing file or create the file if it doesn’t
exist.
Note the use of the strict comparison operator (===)
to
verify
that the value is FALSE
and
the data type is Boolean.
Because
the message lines use the tilde (~)
character to sepa-
rate
fields, you will need to remove any tilde characters in the
message
fields themselves.
if
(isset($_POST['submit'])) {
$Subject
= stripslashes($_POST['subject']);
$Name = stripslashes($_POST['name']);
$Message = stripslashes($_POST['message']);
// Replace any '~' characters
//with '-' characters
$Subject = str_replace("~", "-", $Subject);
$Name = str_replace("~", "-", $Name);
$Message = str_replace("~", "-", $Message);
$MessageRecord =
"$Subject~$Name~$Message\n";
$MessageFile =
fopen("MessageBoard/messages.txt",
"ab");
if ($MessageFile === FALSE)
echo "There was an error saving your
message!\n";
else {
fwrite($MessageFile, $MessageRecord);
fclose($MessageFile);
echo "Your message has been saved.\n";
}
}
5.
Add the following XHTML code after the PHP code block to
display the Web form:
<h1>Post New Message</h1>
<hr />
<form action="PostMessage.php" method="POST">
<span style="font-weight:bold">Subject:</span>
<input type="text" name="subject" />
<span style="font-weight:bold">Name:</span>
<input type="text" name="name" /><br />
<textarea name="message" rows="6"
cols="80"></textarea><br />
<input type="submit" name="submit"
value="Post Message" />
<input type="reset" name="reset"
value="Reset Form" />
</form>
<hr />
<p>
<a href="MessageBoard.php">View Messages</a>
</p>
The View
Messages link
will not work
until you
create
MessageBoard.php in
the next exercise.
Manipulating
Elements
6.
Save
the document as PostMessage.php in the Chapter
directory
for Chapter 6 and upload the file to the server.
Create
a subdirectory on the Web server named
MessageBoard.
Verify that the user, group, and others
are
given permissions to read, write, and execute for the
subdirectory.
Open
the PostMessage.php file in your Web browser by enter-
ing
the following URL: http://<yourserver>/PHP_Projects/
Chapter.06/Chapter/PostMessage.php.
Figure 6-1 shows
the
form.
7.
8.
The
user
account for
your Web
server is the
only account
that will read and write
the messages.txt file. By
default, the owner of a
file can read and write the
file, so there is no need
to use the chmod()
function on the
messages.txt file.
301
Figure 6-1
9.
The Post New Message page of the Message Board
Use the form to store some messages in messages.txt.
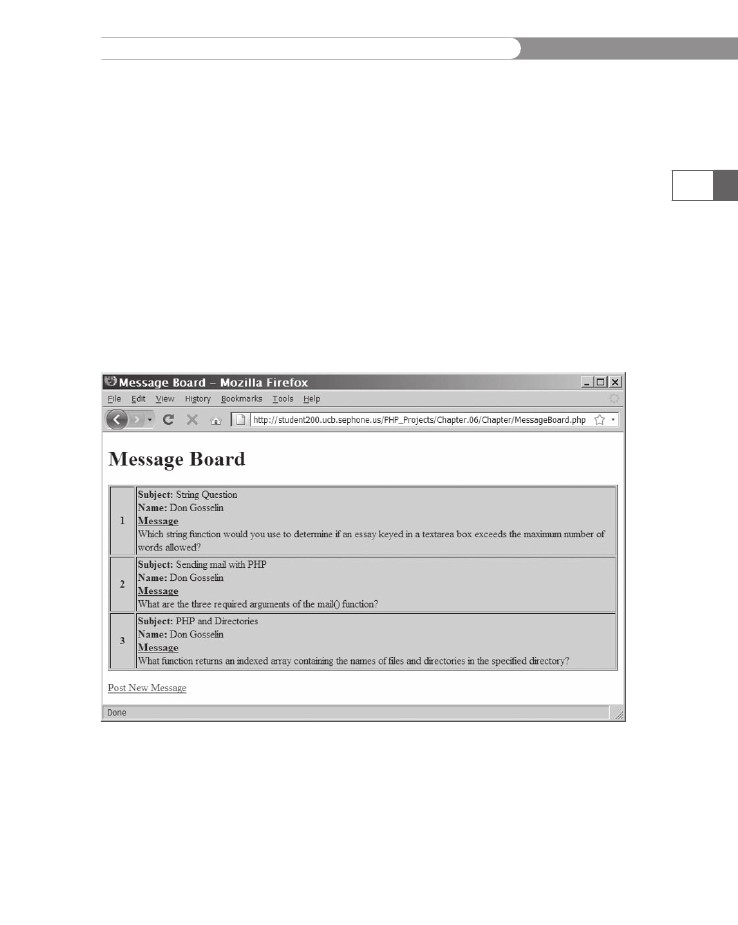
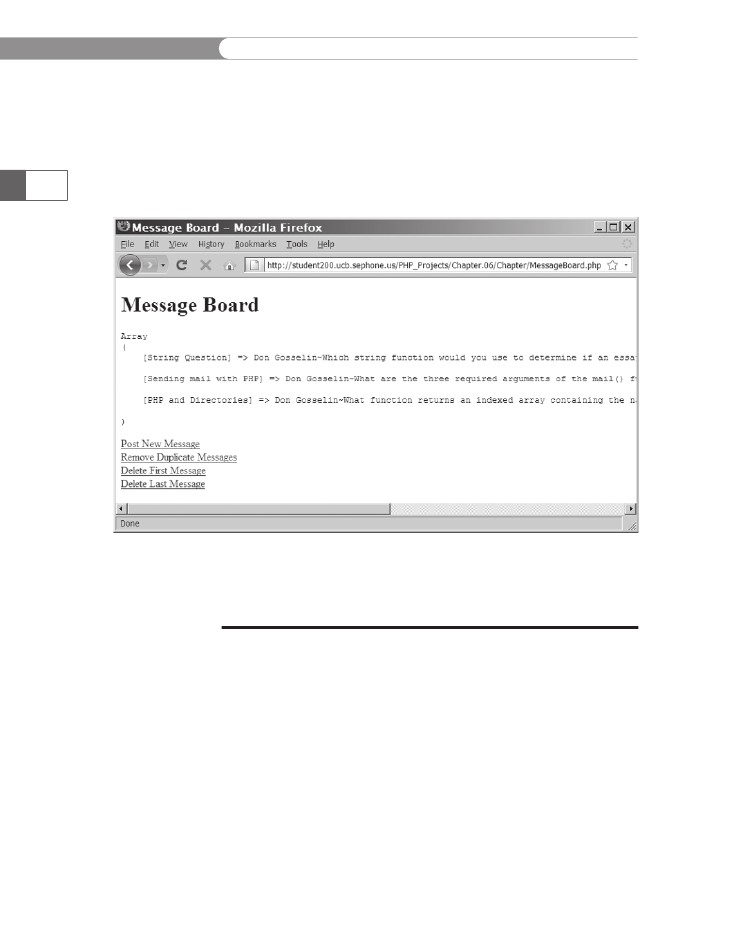
To create the main page for the Message Board, which displays the
messages stored in messages.txt:
1.
2.
Create a new document in your text editor.
Type the <!DOCTYPE> declaration, <html> element, header
information, and <body> element. Use the strict DTD and
“Message Board” as the content of the
<title> element.
CHAPTER
6
Manipulating
Arrays
3.
Add
the following XHTML code and script section to the
document
body:
<h1>Message
Board</h1>
<?php
?>
<p>
<a
href="PostMessage.php">
Post
New Message</a>
</p>
302
4.
Add the following code to the script section to read the mes-
sages.txt file and display the messages in a table. This code
uses the file() function you learned in Chapter 5 to read
the messages.txt file into the $MessageArray array, and the
explode() function you learned in Chapter 3 to split each
message string into an array of substrings based on a separa-
tor string, which in this case is a tilde (~). The array of sub-
strings is stored in $CurrMsg.
if ((!file_exists("MessageBoard/messages.txt"))
|| (filesize("MessageBoard/messages.txt")
== 0))
echo "<p>There are no messages
posted.</p>\n";
else {
$MessageArray =
file("MessageBoard/messages.txt");
echo "<table
style=\"background-color:lightgray\"
border=\"1\" width=\"100%\">\n";
$count = count($MessageArray);
for ($i = 0; $i < $count; ++$i) {
$CurrMsg = explode("~",
$MessageArray[$i]);
echo "<tr>\n";
echo "<td width=\"5%\"
style=\"text-align:center;
font-weight:bold\">" .
($i + 1) . "</td>\n";
echo "<td width=\"95%\"><span
style=\"font-weight:bold\">Subject:
</span> " .
htmlentities($CurrMsg[0]) .
"<br />\n";
echo "<span
style=\"font-weight:bold\">Name:
</span> " .
htmlentities($CurrMsg[1]) .
"<br />\n";
Manipulating
Elements
echo
"<span
style=\"text-decoration:underline;
font-weight:bold\">Message
</span><br />\n" .
htmlentities($CurrMsg[2]) .
"</td>\n";
echo "</tr>\n";
}
echo "</table>\n";
}
303
5.
Save the document as MessageBoard.php in the Chapter
directory for Chapter 6 and upload the file to the Web server.
Open the MessageBoard.php file in your Web browser by
entering the following URL: http://<yourserver>/PHP_
Projects/Chapter.06/Chapter/MessageBoard.php. Figure 6-2
shows example output for three messages.
6.
Figure 6-2
7.
The Message Board page of the Message Board
Close your Web browser window.
CHAPTER
6
Manipulating
Arrays
Adding
and Removing Elements from the
Beginning
of an Array
To
add or remove elements from the beginning of an array, use the
array_shift()
and
array_unshift()
functions.
The array_shift()
function
removes the first element from the beginning of an array,
whereas
the array_unshift()
function
adds one or more elements
to
the beginning of an array. You pass to the array_shift()
function
the
name of the array whose first element you want to remove. You
pass
to the array_unshift()
function
the name of an array followed
by
comma-separated values for each element you want to add. For
example,
the following code declares and initializes an array of the
top-selling
vehicles in the United States for December 2008. The list
needs
to be updated for January 2009. The array_shift()
function
removes
the first vehicle, the Chevrolet Impala, from the top of the
array.
The array_unshift()
function
adds the new member of the
list,
the Honda CR-V, to the top of the array. Figure 6-3 shows the
output
of the print_r()
function.
Recall from Chapter 1 that the
print_r()
function
displays the indexes and values of an array. Note
the
use of the XHTML <pre>
tags
to keep the output from being dis-
played
in a single line.
$TopSellers
= array(
"Chevrolet
Impala",
"Chevrolet Malibu",
"Chevrolet Silverado",
"Ford F-Series",
"Toyota Camry",
"Toyota Corolla",
"Nissan Altima",
"Honda Accord",
"Honda Civic",
"Dodge Ram");
echo "<h2>Original Array</h2>\n";
echo "<pre>\n";
print_r($TopSellers);
echo "</pre>\n";
array_shift($TopSellers);
echo "<h2>Array after Shifting</h2>\n";
echo "<pre>\n";
print_r($TopSellers);
echo "</pre>\n";
array_unshift($TopSellers, "Honda CR-V");
echo "<h2>Array after Unshifting</h2>\n";
echo "<pre>\n";
print_r($TopSellers);
echo "</pre>\n";
304

Manipulating
Elements
305
Figure
6-3
Output
of an array modified with the
array_shift() and array_unshift() functions
CHAPTER
6
Manipulating
Arrays
To
modify MessageBoard.php to use the array_shift()
function
to
remove
the first message in the Message Board script:
1.
2.
306
Reopen
MessageBoard.php in your text editor.
Add
the following code to the start of the PHP block. The
code
checks to see if an action was passed in the URL. If an
action
was passed, the messages.txt file is checked. If the mes-
sages.txt
file exists and it contains messages, the contents of
the
messages.txt file are read into an array using the file()
function.
if
(isset($_GET['action'])) {
if
((file_exists(
"MessageBoard/messages.txt")) &&
(filesize(
"MessageBoard/messages.txt") != 0)) {
$MessageArray = file(
"MessageBoard/messages.txt");
}
}
3.
Add the following switch() statement immediately after the
line that reads the contents of the messages.txt file into an
array. You use a switch() statement instead of an if() state-
ment because more cases will be added later. If the action is
“Delete First”, use the
array_shift() function to remove thefirst element in the array.
switch ($_GET['action']) {
case 'Delete First':
array_shift($MessageArray);
break;
} // End of the switch statement
4.
Add the following if() statement after the switch() state-
ment. If any messages are left in the array, the code in the
block will be executed. The code will be added in the next
step. If no messages are left in the array, the messages.txt file
is deleted with the unlink() function.
if (count($MessageArray)>0) {
}
else
unlink(
"MessageBoard/messages.txt");
5.
Insert the following code in the if code block of the above
if() statement. The first statement uses the implode() func-
tion to convert $MessageArray[] into a text string, which is
assigned to the $NewMessages variable. Recall from Chapter 3
that the implode() function concatenates an array of strings
Manipulating
Elements
into
a single string. The second statement then uses the
fopen()
function
to open a handle named $MessageStore
to
the
messages.txt file. Notice that the fopen()
function
uses the
“wb”
deletes all of the file’s current contents. If successful, this allows
the fwrite() statement to replace the entire contents of the
file with the new list of messages in the $NewMessages variable.
$NewMessages =
implode($MessageArray);
$MessageStore = fopen(
"MessageBoard/messages.txt",
"wb");
if ($MessageStore === false)
echo "There was an error
updating the message
file\n";
else {
fwrite($MessageStore,
$NewMessages);
fclose($MessageStore);
}
307
The script should appear as follows:
if (isset($_GET['action'])) {
if ((file_exists(
"MessageBoard/messages.txt")) &&
(filesize(
"MessageBoard/messages.txt") != 0)) {
$MessageArray = file(
"MessageBoard/messages.txt");
switch ($_GET['action']) {
case 'Delete First':
array_shift($MessageArray);
break;
} // End of the switch statement
if (count($MessageArray)>0) {
$NewMessages =
implode($MessageArray);
$MessageStore = fopen(
"MessageBoard/messages.txt",
"wb");
if ($MessageStore === false)
echo "There was an error
updating the message
file\n";
else {
fwrite($MessageStore,
$NewMessages);
fclose($MessageStore);
}
}
else
CHAPTER
6
Manipulating
Arrays
unlink(
"MessageBoard/messages.txt");
}
}
if ((!file_exists("MessageBoard/messages.txt"))
|| (filesize("MessageBoard/messages.txt")
== 0))
echo "<p>There are no messages
posted.</p>\n";
else {
...
308
6.
Modify the paragraph element at the end of the file so it
contains an anchor element that calls the MessageBoard.php
file with the proper parameters to delete the first message, as
follows:
<p>
<a href="PostMessage.php">
Post New Message</a><br />
<a href="MessageBoard.php?action=Delete%20First">
Delete First Message</a>
</p>
7.
Save the MessageBoard.php file and upload the file to the
server.
Open the MessageBoard.php file in your Web browser by
entering the following URL: http://<yourserver>/PHP_
Projects/Chapter.06/Chapter/MessageBoard.php. Click the
Delete First Message link to test the new code. The first
message in your list should be deleted.
Close your Web browser window.
8.
9.
Adding and Removing Elements from the End
of an Array
The easiest way to add more elements to the end of an array is sim-
ply to use the array name and brackets syntax that you first saw in
Chapter 1. For example, the first statement in the following code uses
the array() construct to create the initial $HospitalDepts[] array.
The second statement then adds a new value, “Pediatrics,” as the
fourth element of the array.
$HospitalDepts = array(
"Anesthesia",
"Molecular Biology",
"Neurology");
$HospitalDepts[] = "Pediatrics";
Manipulating
Elements
You
can also add and remove elements from the end of an array
by
using the array_pop()
and
array_push()
functions.
The
array_pop()
function
removes the last element from the end of an
array,
whereas the array_push()
function
adds one or more ele-
ments
to the end of an array. You pass to the array_pop()
function
the
name of the array whose last element you want to remove. You
pass
to the array_push()
function
the name of an array followed
by
a comma-separated list of values for each element you want to
add.
In the following example, the array_pop()
function
removes
the
last department, “Pediatrics,” from the end of the array, and
the
array_push()
function
adds two departments, “Psychiatry” and
“Pulmonary
Diseases,” to the end of the array.
$HospitalDepts = array(
"Anesthesia",
"Molecular Biology",
"Neurology",
"Pediatrics");
array_pop($HospitalDepts);
// Removes "Pediatrics"
array_push($HospitalDepts, "Psychiatry",
"Pulmonary Diseases");
309
To modify MessageBoard.php to use the array_pop() function to
remove the last message in the Message Board script:
1.
2.
Reopen MessageBoard.php in your text editor.
Add the following code as a second case to the switch()
statement. This case uses the array_pop() function to
remove the last element in the array.
case 'Delete Last':
array_pop($MessageArray);
break;
3.
Modify the paragraph element at the end of the file so it con-
tains another anchor element that calls the MessageBoard.php
file with the proper parameters to delete the last message, as
follows:
<p>
<a href="PostMessage.php">
Post New Message</a><br />
<a href="MessageBoard.php?action=Delete%20First">
Delete First Message</a><br />
<a href="MessageBoard.php?action=Delete%20Last">
Delete Last Message</a>
</p>
4.
Save the MessageBoard.php file and upload the file to the Web
server.
CHAPTER
6
Manipulating
Arrays
5.
Open
the MessageBoard.php file in your Web browser by
entering
the following URL: http://<yourserver>/PHP_
Projects/Chapter.06/Chapter/MessageBoard.php.
Click the
Delete
Last Message link to test the new code. The last mes-
sage
in your list should be deleted.
Close
your Web browser window.
310
6.
Adding
and Removing Elements Within an Array
So
far, you have learned to add and remove elements from the begin-
ning
and end of an array. The array_splice()
function
allows you to
add
or remove elements located anywhere else in an array. After add-
ing
or removing array elements, the array_splice()
function
also
renumbers
the indexes for an array. The syntax for the function is
array_splice(array_name,
start_index, number_to_delete,
values_to_insert);.
The array_name
argument
indicates the name
of
the array you want to modify. The start_index
argument
indi-
cates
the element within the array at which elements should be added
or
removed. In other words, it is the index of the first element to be
deleted
or moved. The number_to_delete
argument
is an integer
value
that indicates the number of elements to remove from the
array,
starting with the element indicated by the start_index
argu-
ment.
The values_to_insert
argument
is a value or array of val-
ues
you want to insert into the array at the index specified by the
start_index
argument.
The remaining elements of the array, if any,
are
relocated to start at the first index after the last inserted
value.
To
add an element within an array, include a value of 0 as the
third
argument of the array_splice()
function.
For example, the
array_splice()
function
in the following code adds a new ele-
ment
with a value of “Ophthalmology” between the “Neurology”
and
“Pediatrics” elements, and renumbers the elements. Because
“Pediatrics”
is the first element that needs to be moved,
is set to 3, the index of “Pediatrics”.
$HospitalDepts = array(
"Anesthesia",//
"Molecular Biology", //
"Neurology",//
"Pediatrics");//
array_splice($HospitalDepts,
"Ophthalmology");
first element (0)
second element (1)
third element (2)
fourth element (3)
3, 0,
To add more than one element within an array, pass the array()
construct as the fourth argument to the array_splice() function.
Within the array() construct, include the new element values sepa-
rated by commas, as if you were creating a new array. The following
Manipulating
Elements
example
shows how to add two new elements, “Opthalmology” and
“Otolaryngology,”
between the “Neurology” and “Pediatrics” elements:
$HospitalDepts = array(
"Anesthesia",// first element (0)
"Molecular Biology", // second element (1)
"Neurology",// third element (2)
"Pediatrics");// fourth element (3)
array_splice($HospitalDepts, 3, 0,
array("Opthalmology",
"Otolaryngology"));
311
You can also delete array elements by omitting the fourth argument
from the array_splice() function. After the deletions, the remain-
ing indexes are renumbered, just as when you add new elements.
For example, to delete the second and third elements (“Molecular
Biology” and “Neurology”) from the $HospitalDepts[] array, you use
the following array_splice() statement:
$HospitalDepts = array(
"Anesthesia",//
"Molecular Biology", //
"Neurology",//
"Pediatrics");//
array_splice($HospitalDepts,
first element (0)
second element (1)
third element (2)
fourth element (3)
1, 2);
If you do not
include the
third argu-
ment
(number_
to_delete), the
array_splice() func-
tion deletes all the ele-
ments from the second
argument (start_
index) to the end of the
array.
To modify MessageBoard.php to use the array_splice() function to
remove a specific message from the Message Board script:
1.
2.
Reopen MessageBoard.php in your text editor.
Add the following code as a third case to the switch() state-
ment. This case uses the array_splice() function to remove
the element specified by the $_GET['message'] array element
from the $MessageArray array.
case 'Delete Message':
if (isset($_GET['message']))
array_splice(
$MessageArray,
$_GET['message'],
1);
break;
3.
To restrict the second column of the table to 85% of the table
width, modify the code as follows:
echo "<td width=\"85%\"><span
style=\"font-weight:bold\">
Subject:</span> " .
htmlentities($CurrMsg[0]) .
"<br />\n";
CHAPTER
6
Manipulating
Arrays
4.
Immediately
before the line of code that defines the closing
</tr>
tag,
add the following code to define a third column for
the
table:
echo
"<td width=\"10%\"
style=\"text-align:center\">"
.
"<a href='MessageBoard.php?" .
"action=Delete%20Message&" .
"message=$i'>" .
"Delete This Message</a></td>\n";
312
The row output portion of the script should appear as follows:
...
echo "<tr>\n";
echo "<td width=\"5%\"
style=\"text-align:center;
font-weight:bold\">" .
($i + 1) . "</td>\n";
echo "<td width=\"85%\"><span
style=\"font-weight:bold\">Subject:
</span> " .
htmlentities($CurrMsg[0]) .
"<br />\n";
echo "<span
style=\"font-weight:bold\">Name:
</span> " .
htmlentities($CurrMsg[1]) .
"<br />\n";
echo "<span
style=\"text-decoration:underline;
font-weight:bold\">Message
</span><br />\n" .
htmlentities($CurrMsg[2]) .
"</td>\n";
echo "<td width=\"10%\"
style=\"text-align:center\">" .
"<a href='MessageBoard.php?" .
"action=Delete%20Message&" .
"message=$i'>" .
"Delete This Message</a></td>\n";
echo "</tr>\n";
...
5.
Save the MessageBoard.php file and upload the file to the
server.
Open the MessageBoard.php file in your Web browser by
entering the following URL: http://<yourserver>/PHP_
Projects/Chapter.06/Chapter/MessageBoard.php. Select a
message and click the corresponding Delete This Message
link. The message will be deleted from the list.
Close your Web browser window.
6.
7.

Manipulating
Elements
You
can also use the unset()
function
to remove array elements
and
other variables. You pass to the unset()
function
the array
name
with the index number of the element you want to remove
in
brackets. To remove multiple elements, separate each element
name
with a comma. For example, the following unset()
function
removes
the “Molecular Biology” and “Neurology” elements from the
$HospitalDepts[]
array:
unset($HospitalDepts[1],
$HospitalDepts[2]);
313
One
problem with the unset()
function
is that it does not renumber
the
remaining elements in the array. If you executed the print_r()
function
with the $HospitalDepts[]
array
after executing the pre-
ceding
unset()
function,
you would see that the “Anesthesia” element
has
an index of 0 and “Pediatrics” still has an index of 3, as if
you had
not
removed the “Molecular Biology” and “Neurology” elements.
To
renumber an indexed array’s elements, you need to use the
array_values()
function.
You pass to this function the name of the
array
whose indexes you want to renumber. The array_values()
function
does not operate directly on an array. Instead, it returns
a
new array with the renumbered indexes. For this reason, you
need
to write a statement that assigns the array returned from the
array_values()
function
to a new variable name or to the origi-
nal
array. The following statement demonstrates how to use the
array_values()
function
to renumber the element indexes in the
$HospitalDepts[]
array,
and then assign the renumbered array back
to
the $HospitalDepts[]
array:
$HospitalDepts
= array_values($HospitalDepts);
The
array
passed to
the array_
values()
function is
passed by value, not by
reference. This means
that, unlike the array_
splice() function, the
array passed in is not
changed. The return value
of the array_values()
function is the renumbered
array. In the preceding
example, the return value
is written back to the
same array variable that
was passed to the
array_values()
function.
To modify the MessageBoard.php file so that it uses the unset()
function instead of the array_splice() function to delete messages:
1.
2.
Return to the MessageBoard.php file in your text editor.
Modify the “Delete Message” case statement as follows to
replace the array_splice() statement with the unset() and
array_values() statements:
case 'Delete Message':
if (isset($_GET['message'])) {
$Index = $_GET['message'];
unset($MessageArray[$Index]);
$MessageArray =
array_values(
$MessageArray);
}
break;
3.
Save the MessageBoard.php file and upload the file to the Web
server.
CHAPTER
6
Manipulating
Arrays
4.
Open
the MessageBoard.php file in your Web browser by
entering
the following URL: http://<yourserver>/PHP_
Projects/Chapter.06/Chapter/MessageBoard.php.
Select a
message
and click the corresponding Delete This Message
link.
The message will be deleted from the list.
Close
your Web browser window.
314
5.
Removing
Duplicate Elements
You
might need to ensure that an array in a script does not contain
duplicate
values. For example, your script may use arrays of e-mail
addresses,
customer names, or sales items, each of which should
contain
unique elements. You can use the array_unique()
func-
tion
to remove duplicate elements from an array. You pass to this
function
the name of the array from which you want to remove
duplicate
elements. As with the array_values()
function,
the
array_unique()
function
does not operate directly on an array.
Instead,
it returns a new array with the renumbered indexes. For this
reason,
you need to write a statement that assigns the array returned
from
the array_unique()
function
to a new variable name or to the
original
array.
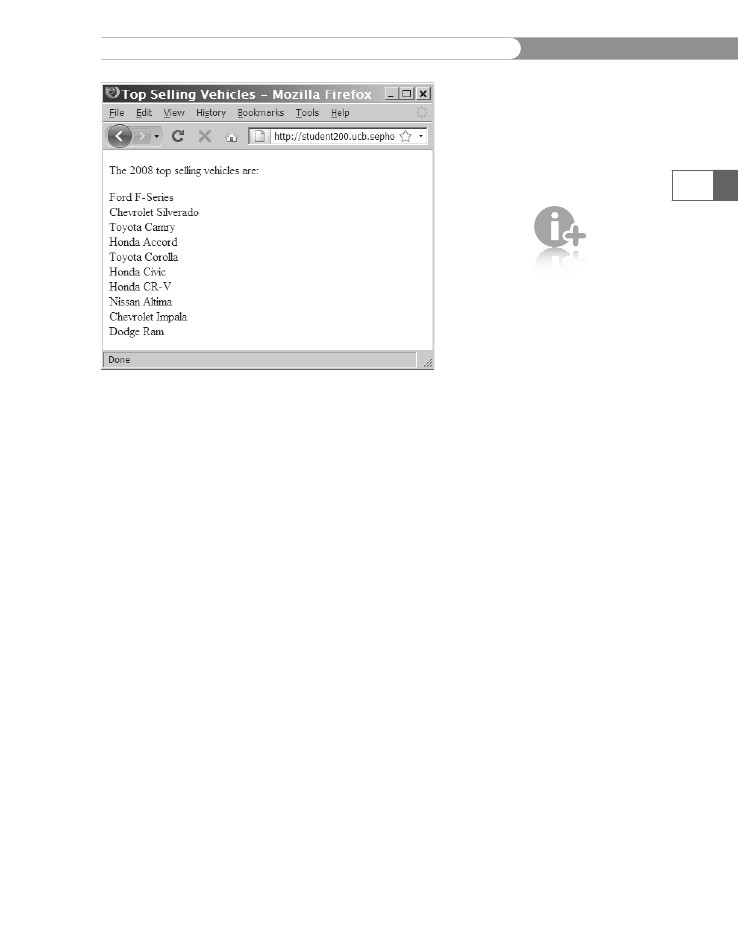
The
following code shows an example of the array that contains the
top-selling
vehicles for 2008. The array should only contain unique
values,
but several of the names are duplicated. The array_unique()
function
removes the duplicate elements and then assigns the renum-
bered
array back to the $TopSellers[]
array.
Figure 6-4 shows the
output.
$TopSellers
= array(
"Ford
F-Series", "Chevrolet Silverado",
"Toyota Camry", "Honda Accord",
"Toyota Corolla", "Ford F-Series",
"Honda Civic", "Honda CR-V", "Honda Accord",
"Nissan Altima", "Toyota Camry",
"Chevrolet Impala", "Dodge Ram",
"Honda CR-V");
echo "<p>The 2008 top selling vehicles
are:</p>\n<p>";
$TopSellers = array_unique($TopSellers);
$TopSellers = array_values($TopSellers);
for ($i = 0; $i < count($TopSellers); ++$i) {
echo "{$TopSellers[$i]}<br />\n";
}
echo "</p>\n";
Manipulating
Elements
315
The
array_
unique()
function
does not
renumber
the indexes after remov-
ing duplicate values in an
array. For this reason, the
preceding code includes
a statement that uses the
array_values() func-
tion to renumber the
indexes in the
$TopSellers[] array.
Figure 6-4 Output of an array after removing duplicate
values with the array_unique() function
To modify MessageBoard.php to use the array_unique() function to
remove duplicate messages in the Message Board script:
1.
2.
Reopen MessageBoard.php in your text editor.
Add the following code as a fourth case to the switch()
statement. This case uses the array_unique() and
array_values() functions to remove duplicate elements
from the array.
case 'Remove Duplicates':
$MessageArray = array_unique(
$MessageArray);
$MessageArray = array_values(
$MessageArray);
break;
3.
Modify the paragraph element at the end of the file so it con-
tains another anchor element that calls the MessageBoard.php
file with the proper parameters to delete the duplicate mes-
sages, as follows:
<p>
<a href="PostMessage.php">
Post New Message</a><br />
<a href=
"MessageBoard.php?action=Remove%20Duplicates">
Remove Duplicate Messages</a><br />
CHAPTER
6
Manipulating
Arrays
<a
href="MessageBoard.php?action=Delete%20First">
Delete
First Message</a><br />
<a href="MessageBoard.php?action=Delete%20Last">
Delete Last Message</a>
</p>
4.
316
5.
Save MessageBoard.php and upload the file to the Web server.
Open the PostMessage.php file in your Web browser by enter-
ing the following URL: http://<yourserver>/PHP_Projects/
Chapter.06/Chapter/PostMessage.php. Add several new
messages that contain identical information, and then click
the View Messages link to display the Message Board page.
You should see the duplicate messages. Click the Remove
Duplicate Messages link to test the new code. Any duplicate
versions of the same message should be deleted.
Close your Web browser window.
6.
Short Quiz
1.
What two functions are used to add or remove elements from
the beginning of an array?
Briefly describe the array_pop() and array_push()
functions.
What function is used to add a new element at any position in
an array?
Explain the process of using the array_splice() function to
delete an array element.
What function must be used in conjunction with the
array_unique() function to renumber the indexes after the
duplicates have been removed?
2.
3.
4.
5.
Declaring and Initializing Associative
Arrays
As you know, PHP creates indexed arrays by default with a start-
ing index of 0. For example, the following code uses the array()
construct to create the indexed $Provinces[] array that you saw
in Chapter 1:
Declaring
and Initializing Associative Arrays
$Provinces
= array("Newfoundland and Labrador",
"Prince
Edward Island", "Nova Scotia",
"New Brunswick", "Quebec", "Ontario",
"Manitoba", "Saskatchewan", "Alberta",
"British Columbia");
With associative arrays, you can use any alphanumeric keys that you
want for the array elements. You specify an element’s key by using the
array operator (=>) in the array() construct. The syntax for declaring
and initializing an associative array is as follows:
$array_name = array(key => value, ...);
317
For example, the following code creates an array named
$ProvincialCapitals[], which contains the Canadian provinces and
their capitals. The name of each province is used as the element key,
and the name of each capital city is assigned as the element’s value.
$ProvincialCapitals = array(
"Newfoundland and Labrador" => "St. John's",
"Prince Edward Island" => "Charlottetown",
"Nova Scotia" => "Halifax",
"New Brunswick" => "Fredericton",
"Quebec" => "Quebec City",
"Ontario" => "Toronto",
"Manitoba" => "Winnipeg",
"Saskatchewan" => "Regina",
"Alberta"=>"Edmonton",
"British Columbia" => "Victoria");
You can also use the following syntax to assign key values to an asso-
ciative array by using array names and brackets. Note that when using
this syntax, you use the standard assignment operator (=) and not the
array operator (=>).
$ProvincialCapitals["Newfoundland and Labrador"]
= "St. John's";
$ProvincialCapitals["Prince Edward Island"]
= "Charlottetown";
$ProvincialCapitals["Nova Scotia"]
= "Halifax";
...
The preceding syntax creates the array if it doesn’t exist. If the array
does exist, each assignment statement overwrites any existing ele-
ments that already use the same key or appends any new keys and
values to the end of the array.
CHAPTER
6
Manipulating
Arrays
To
refer to an element in an associative array, you place an element’s
key
in single or double quotation marks inside the array brackets. The
following
code displays the capitals of Quebec and British Columbia:
echo
"<p>The capital of Quebec is
{$ProvincialCapitals['Quebec']}.</p>\n";
echo "<p>The capital of British Columbia is " .
$ProvincialCapitals["British Columbia"] .
".</p>\n";
318
If you create an associative array and then add a new element with-
out specifying a key, PHP automatically assumes that the array is
indexed and assigns the new element an index of 0 or the next avail-
able integer. The following example declares and initializes an array
named $TerritorialCapitals[], which contains the capitals of
the Canadian territories. The first two statements assign keys to the
first two elements in the array. However, because the third statement
does not declare a key, the element is assigned a value of 0. Figure 6-5
shows the output of the print_r() function.
Associative
arrays are
best used
when the
array key
provides additional infor-
mation about the value of
the array element. In the
previous example, the
key provided the name of
the province for which the
value was the name of
the capital. When an
array is a simple list of
values, such as lines read
from a text file, you
should use an indexed
array because there is
not a key that provides
additional information
about the array
element’s value.
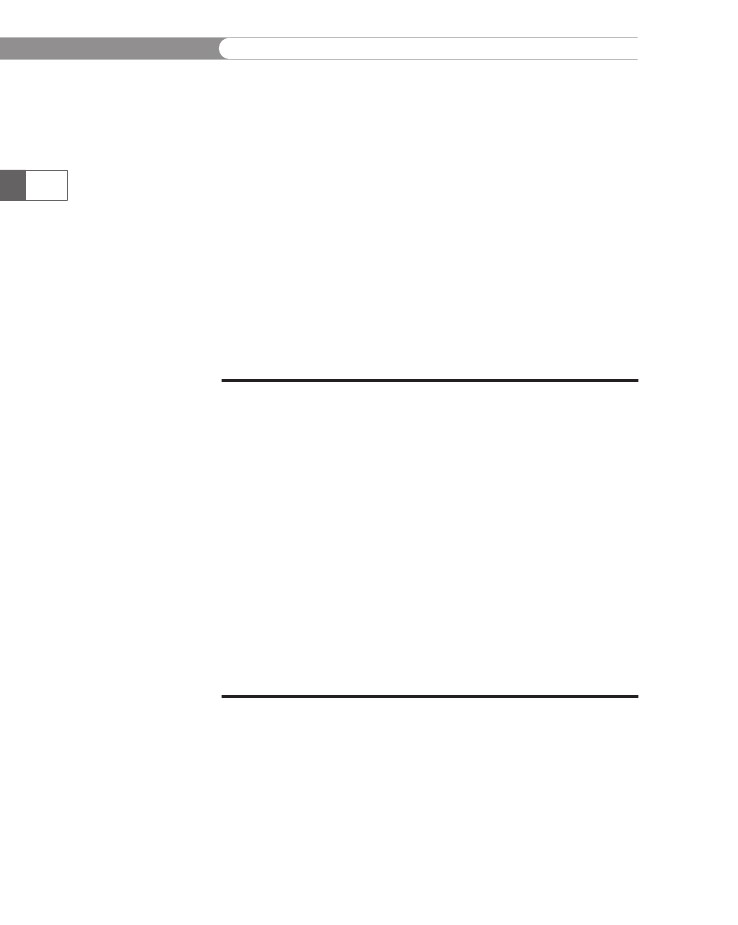
$TerritorialCapitals["Nunavut"] = "Iqaluit";
$TerritorialCapitals["Northwest Territories"]
= "Yellowknife";
$TerritorialCapitals[] = "Whitehorse";
echo "<pre>\n";
print_r($TerritorialCapitals);
echo "</pre>\n";
Figure 6-5
Output of an array with associative and indexed elements
The functionality of associative arrays also allows you to start the
numbering of indexed arrays at any integer you want. For example,
the following code uses the array() construct to declare and initial-
ize an array named $Territories[] that contains just the names of
the Canadian territories. Notice that only the first element uses the
array operator (=>) to begin numbering at 1 instead of 0. The subse-
quent elements are automatically assigned the next available integer.
Declaring
and Initializing Associative Arrays
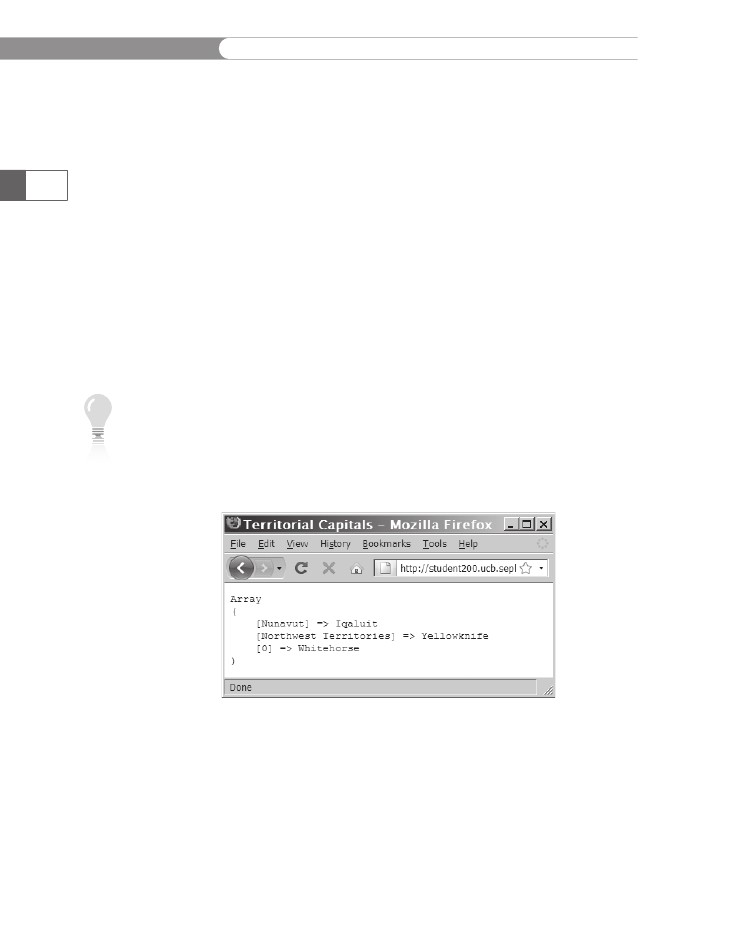
$Territories
= array(1 => "Nunavut",
"Northwest
Territories", "Yukon Territory");
For the $Territories[] array created with the preceding statement,
the first element is $Territories[1] (“Nunavut”), the second ele-
ment is $Territories[2] (“Northwest Territories”), and the third
element is $Territories[3] (“Yukon Territory”). You can also spec-
ify index values by using the array name and brackets as follows:
$Territories[1] = "Nunavut";
$Territories[2] = "Northwest Territories";
$Territories[3] = "Yukon Territory";
319
In many programming languages, if you declare an array and use
a starting index other than 0, empty elements are created for each
index between 0 and the index value you specify. In PHP, only the
elements specified are created, regardless of the index. No empty ele-
ments are created. The following code shows another example of the
$Territories[] array, but this time the starting index is 100. Because
the second and third statements do not declare an index or key, the
starting index of 100 is incremented by 1 and used as the index for
the next two elements. However, as the count() function shows in
Figure 6-6, the array consists of just three elements.
$Territories[100] = "Nunavut";
$Territories[] = "Northwest Territories";
$Territories[] = "Yukon Territory";
echo "<pre>\n";
print_r($Territories);
echo "</pre>\n";
echo '<p>The $Territories array consists of ',
count($Territories), " elements.</p>\n";
Use the
array_
values()
function to
renumber an
indexed array with a start-
ing element of 0.
Figure 6-6
Output of an array with a starting index of 100
CHAPTER
6
Manipulating
Arrays
In
the next exercise, the array returned with the file()
function
is
converted
to an associative array that uses the message subject as the
key.
Although the array will still be stored in the messages.txt file as
an
indexed array, you will use the associative version of the array
later
in
this chapter to find and sort data in the messages.
320
To
modify the MessageBoard.php file so that the array returned with
the
file()
function
is converted to an associative array:
1.
2.
Return
to the MessageBoard.php file in your text editor.
Add
the following for
loop
immediately after the $count
declaration
statement in the else
clause.
The for
loop
uses
$MessageArray[],
by way of $CurrMsg[],
to build
a
new associative array named $KeyMessageArray[].
Again,
the explode()
function
is used to split each line of
$MessageArray[]
into
an array of message fields, which is
stored
in $CurrMsg[].
Notice that $KeyMessageArray[]
uses
the
first element (index 0), the subject name, in $CurrMsg[]
as
the
key name.
for
($i = 0; $i < $count; ++$i) {
$CurrMsg
= explode("~",
$MessageArray[$i]);
$KeyMessageArray[$CurrMsg[0]] =
$CurrMsg[1] . "~" . $CurrMsg[2];
}
3.
Add the following echo and print_r() statements immedi-
ately after the new for loop’s closing brace. The print_r()
function is only a temporary way of displaying the contents of
$KeyMessageArray[] until you learn how to iterate through
arrays in the next section.
echo "<pre>\n";
print_r($KeyMessageArray);
echo "</pre>\n";
4.
Add a block comment around the echo statement for the
opening <table> tag in the else clause.
Add block comments around the second for loop and echo
statement for the closing </table> tag in the else clause. You
will modify this for loop in the next exercise.
The else portion of your modified PHP script should appear
as follows:
5.
Declaring
and Initializing Associative Arrays
else
{
$MessageArray
=
file("MessageBoard/messages.txt");
/*
echo "<table
style=\"background-color:lightgray\"
border=\"1\" width=\"100%\">\n";
*/
$count = count($MessageArray);
for ($i = 0; $i < $count; ++$i) {
$CurrMsg = explode("~",
$MessageArray[$i]);
$KeyMessageArray[$CurrMsg[0]] =
$CurrMsg[1] . "~" . $CurrMsg[2];
}
echo "<pre>\n";
print_r($KeyMessageArray);
echo "</pre>\n";
/*
for ($i = 0; $i < $count; ++$i) {
$CurrMsg = explode("~",
$MessageArray[$i]);
echo "<tr>\n";
echo "<td width=\"5%\"
style=\"text-align:center;
font-weight:bold\">" .
($i + 1) . "</td>\n";
echo "<td width=\"85%\"><span
style=\"font-weight:bold\">Subject:
</span> " .
htmlentities($CurrMsg[0]) .
"<br />\n";
echo "<span
style=\"font-weight:bold\">Name:
</span> " .
htmlentities($CurrMsg[1]) .
"<br />\n";
echo "<span
style=\"text-decoration:underline;
font-weight:bold\">Message
</span><br />\n" .
htmlentities($CurrMsg[2]) .
"</td>\n";
echo "<td width=\"10%\"
style=\"text-align:center\">" .
"<a href='MessageBoard.php?" .
"action=Delete%20Message&" .
"message=$i'>" .
"Delete This Message</a></td>\n";
echo "</tr>\n";
}
echo "</table>\n";
*/
}
321
CHAPTER
6
Manipulating
Arrays
6.
7.
Save
the MessageBoard.php file and upload it to the server.
Open
the MessageBoard.php file in your Web browser
by
entering the following URL: http://<yourserver>/
PHP_Projects/Chapter.06/Chapter/MessageBoard.php.
The
print_r()
function
should output an associative version of
the
messages array. An example is shown in Figure 6-7.
322
Figure
6-7
Output
of the $KeyMessageArray
associative
array
8.
Close
your Web browser window.
Short
Quiz
1.
Describe
the difference in assigning a key with an indexed
array
versus an associative array.
Explain
what happens if you do not assign a key to an associa-
tive
array.
Which
operator is used to define associative array keys within
the
array()
construct?
What
function is used to determine the number of elements
in
an associative array?
2.
3.
4.