

Validating String Data
Many of the string functions covered in Chapter 3 can be used to
produce strings with consistent formatting. Regular expression func-
tions are some of the best tools for verifying that string data meets
the strict formatting required for e-mail addresses, Web page URLs,
or date values. In Chapter 3, you used regular expressions in suc-
cessive examples to continually refine the requirements of an e-mail
address and to isolate strings that were not in the correct format.
Handling
Submitted Form Data
Strings
are often not formatted as expected. The user may enter
spaces
before or after a text entry, or magic quotes may add escape
characters
before a single or double quotation mark. In this chapter
and
the previous one, you have been introduced to two functions that
will
assist in cleaning up posted data: the stripslashes()
function,
which
removes the leading slashes for escape sequences in strings;
and
the trim()
function,
which removes any leading or trailing white
space
from a string.
For
example, the following function ensures that the entered field,
passed
as the $data
parameter,
is a telephone number in the form
###-###-####:
function
validatePhoneNumber($data, $fieldName) {
global
$errorCount;
if (empty($data)) {
echo "<p>The field $fieldName is
required.</p>\n";
++$errorCount;
$retval = "";
} else { // Only clean up the input if it isn't empty
$data = trim($data);
$data = stripslashes($data);
$pattern = "/\d{3}-\d{3}-\d{4}/";
if (preg_match($pattern, $data)) {
$retval = $data;
} else {
echo "<p>The field $fieldName must be a
telephone number in the form
###-###-####.</p>\n";
++$errorCount;
$retval = "";
}
}
return($retval);
}
201
Handling Multiple Errors
A common but poor programming practice is to stop processing a
form when an error is found and display the error to the user. The
user corrects the error, only to find that another field in the form
is also filled out incorrectly. For a large and complex form, this can
result in multiple attempts before a form is processed successfully.
A better practice is to record the error, usually in an array, and con-
tinue processing the form. This allows the script to display a complete
list of all the errors found. Users can then go back and correct all of
the errors at one time.
CHAPTER
4
Handling
User Input
To
validate the input of the Scholarship.html form:
1.
Return
to the process_Scholarship.php document in your
text
editor.
Add
a new function, displayRequired().
This function
accepts
one argument, $fieldName,
which is the name of the
field
as it appears on the Web form. This function displays an
error
message.
function
displayRequired($fieldName) {
echo
"The field \"$fieldName\" is required.<br />n";
}
2.
202
3.
Add a second new function called validateInput() below
the displayRequired() function. This function takes two
parameters. The first parameter, $data, is a string to be vali-
dated. The second parameter, $fieldName, is the name of the
form field. The function returns the $data parameter after it
has been cleaned up. Notice that the function uses the global
variable $errorCount.
function validateInput($data, $fieldName) {
global $errorCount;
if (empty($data)) {
displayRequired($fieldName);
++$errorCount;
$retval = "";
} else { // Only clean up the input if it isn't
// empty
$retval = trim($data);
$retval = stripslashes($retval);
}
return($retval);
}
4.
Immediately after the validateInput() function, declare and
initialize a new variable called $errorCount as follows:
$errorCount = 0;
5.
Modify the assignment statements for the $firstName
and $lastName variables to receive the output of the
validateInput() function:
$firstName = validateInput($_POST['fName'],
"First name");
$lastName = validateInput($_POST['lName'],
"Last name");
6.
Add a conditional statement immediately after the value
of $lastName has been assigned. This statement will either
display the total number of errors or a “Thank you” message if
there were no errors.

Handling
Submitted Form Data
if
($errorCount>0)
echo
"Please use the \"Back\" button to
re-enter the data.<br />\n";
else
echo "Thank you for filling out the scholarship
form, " . $firstName . " " . $lastName . ".";
7.
8.
Save the document and upload it to the Web server.
Open the Scholarship.html page in the Web browser by enter-
ing the following URL: http://<yourserver>/PHP_Projects/
Chapter.04/Chapter/Scholarship.html.
Attempt to submit the form to the process_Scholarship.php
form handler without entering any data for the first or last
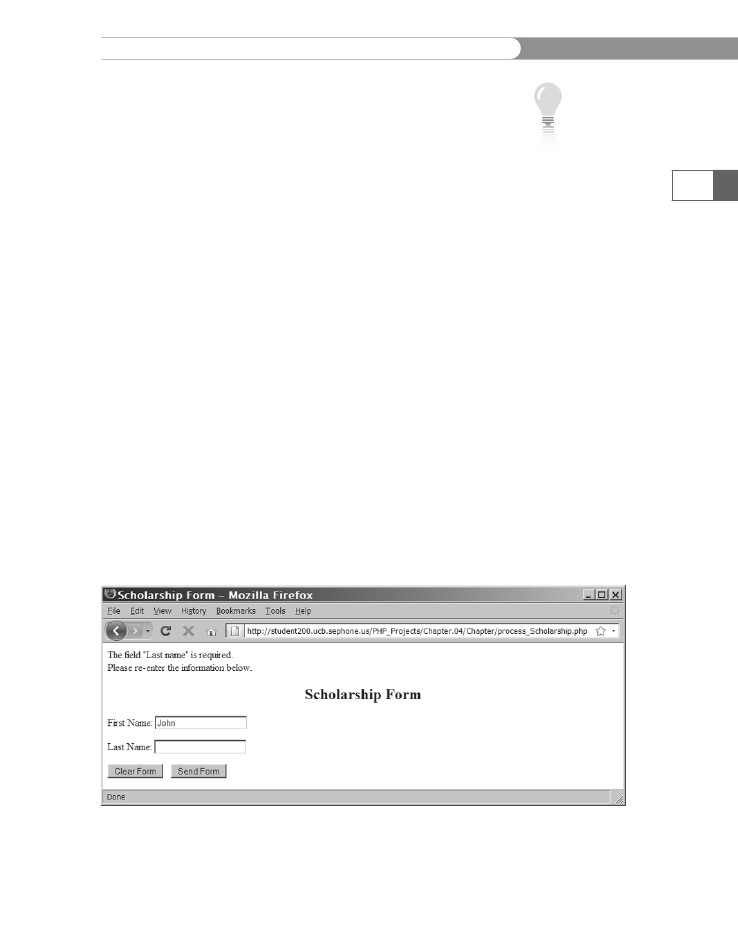
name fields. You should see the result shown in Figure 4-7,
with two error messages.
203
9.
Figure 4-7
Empty input with form validation
10. Close the Web browser window.
Redisplaying the Web Form
In the previous example, error messages were displayed after you vali-
dated the data input on the form. However, when you went back to
the form, you needed to rekey the information in the form controls.
A better option would be to redisplay the form with the controls set
to the values that the user entered the last time the form was submit-
ted. As a result, the user only has to enter data for fields that were left
empty or did not contain a valid response. The user does not have to
retype data that was entered correctly the first time. This type of form
is often called a sticky form.
To redisplay the Web form, you need to add the XHTML form ele-
ments to the output of the PHP script. Because the Web form only
needs to be redisplayed if there was an error in the Web form valida-
tion, the code to output the Web form should be part of the error-
handling section of the script. The code to redisplay the Web form
can go into a function for convenience in isolating that part of the
code from the remainder of the script.
CHAPTER
4
Handling
User Input
204
The
most convenient way to embed large portions of XHTML code
within
a PHP script is to use advanced
escaping from XHTML. When
you
insert a PHP script section, you are escaping from XHTML. With
advanced
escaping, you close one PHP script section, insert some
XHTML
elements, and then open another PHP script section to con-
tinue
the script. Any XHTML code between the two script sections
is
considered output, as it would have been using an echo
or
print
statement.
You have already seen some simple examples of advanced
escaping
in Chapter 1, where multiple PHP script sections appeared
in
a single PHP script.
If
the closing tag for the first PHP script section is within a
function
or
the control block for a conditional structure, the XHTML code will
only
be displayed when the function is called or the conditional con-
trol
block is executed. If the closing tag for the first PHP script
section
is
within the control block of a looping structure, the XHTML code
will
be displayed with each iteration of the loop.
The
following code declares a function named ShowHomePageLink().
The
function displays an image and a message, both of which are
hyperlinks
to index.php.
This function could have been coded as a
series
of echo
or
print
statements,
but it is much easier to read using
advanced
escaping.
function
ShowHomePageLink() {
?>
<p>
<a href="index.php"><img src="images/homelink.gif" /></a>
<br />
<a href="index.php">Home Page</a>
</p>
<?php
}
When you
close the PHP
script section
within a con-
trol block or
function declaration, the
PHP script will continue
from within the control
block or function declara-
tion when the next PHP
script section begins.
The following exercise illustrates how to redisplay the Web form.
Advanced escaping from XHTML will be used to display the Web
form. Additionally, the Web form will be a sticky form, keeping the
values of the fields that were entered correctly.
To redisplay the Web form within the process_Scholarship.php script:
1.
2.
Reopen the process_Scholarship.php script in your editor.
Add the following function to redisplay the Web form:
function redisplayForm($firstName, $lastName) {
?>
<h2 style = "text-align:center">Scholarship Form</h2>
<form name="scholarship" action="process_
Scholarship.php"
method="post">
Handling
Submitted Form Data
<p>First
Name: <input type="text" name="fName"
value="<?php
echo $firstName; ?>" /></p>
<p>Last
Name: <input type="text" name="lName"
value="<?php
echo $lastName; ?>" /></p>
<p><input
type="reset" value="Clear Form" />
<input
type="submit" name="Submit" value="Send
Form"
/>
</form>
<?php
}
This
code is
nearly identi-
cal to the
code in
Scholarship.
html and could be copied
from there. The only dif-
ference is the addition of
a “value” attribute to each
of the input controls,
which is used to make a
sticky form.
205
3.
Modify the if clause of the final if. . .else statement to call
the redisplayForm() function if there were errors. Add the
text shown in bold below:
if ($errorCount>0) {
echo "Please re-enter the information below.<br />\n";
redisplayForm($firstName, $lastName);
}
else
4.
5.
Save the document and upload it to the Web server.
Open the Scholarship.html page in the Web browser by enter-
ing the following URL: http://<yourserver>/PHP_Projects/
Chapter.04/Chapter/Scholarship.html.
Attempt to submit the form without entering any data for one
of the two fields. You should see a result similar to that shown
in Figure 4-8, with one error message and the Web form with
the value you entered automatically reinserted into the same
field. Enter data for the empty field and resubmit the form to
see the “Thank you” message.
6.
Figure 4-8
7.
The error message with the redisplayed sticky form
Close your Web browser window.
CHAPTER
4
The
mail()
function may
not be avail-
able on your
server (or
your local machine, if you
are running a local PHP
server). In addition to
properly configuring PHP
to send mail, you need to
have an e-mail program
available on the server or
the local machine. If the
mail() function is not
available on your system,
you will not be able to
perform the exercise in
this section.
Handling User Input
Using the Submitted Data
Once the data entered into the Web form is validated, it needs to be
used. Exactly how the data is used varies depending on the purpose
of the form. In some cases, information can be written to or queried
from a database. In other cases, a file can be downloaded to the user.
In this section, the data from the Web form will be used to generate
an e-mail message and display a confirmation message for the user.
206
E-mailing the Web Form
In PHP, an e-mail message is sent using the mail() function. The basic
syntax for this function is mail(recipient(s), subject, message).
The value you assign to the recipient(s) argument is a string
of one or more e-mail addresses in the standard format for an
“Address Specifier”, as defined by the Internet Message Format
documentation. The two simplest forms of address specifiers are
the plain e-mail address, as in jdoe@example.net, and the recipi-
ent’s name followed by the e-mail address in angle brackets, as in
Mary Smith <mary.smith@example.com>.