

1.4 Self-control test
No |
Question |
Check off the right box |
1. |
Select three types of database organization? |
|
|
|
|
|
|
|
|
|
|
|
|
|
|
|
|
2. |
Structure of database will change, if you |
|
|
|
|
|
|
|
|
|
|
|
|
|
3. |
What does the function of the key field consist in? |
|
|
|
|
|
|
|
|
|
|
|
|
|
4. |
What makes the structure of table? |
|
|
|
|
|
|
|
|
|
|
|
|
|
5. |
What extension has a file of MS Access database? |
|
|
|
|
|
|
|
|
|
|
|
|
|
6. |
A key field have to be… |
|
|
|
|
|
|
|
|
|
|
7. |
What is a field in Microsoft Access? |
|
|
|
|
|
|
|
|
|
|
2 Creating a table in ms access 2003
Purpose: to get practical skills of tables creating for relational database in MS Access 2003.
2.1 Theoretical material
Tables are the basis of the database, that store data about objects, process or events.
To begin designing the database, please click-on the Design “button” at the top of the Database menu screen. In the next window you should choose the way of table creation (Design view, Wizard, Entering data).
• Create Table in Design view will allow you to create the basic table structure and define all the field names, data types and Field Properties. It allows you to define the fields in the table before adding any data to the datasheet.
• Create table by using wizard will step you through the creation of a table.
• Create table by entering data will give you a blank datasheet with unlabelled columns that looks much like an Excel worksheet.
Double clicking on Create table in Design view displays the Table Design screen where you define fields for your table. The screen is divided into two parts: a top pane for entering the field name, data type, and an option description of the field and a bottom pane for specifying field properties.

Figure 2.1 – Table Design screen
To create table in Design view follow these steps:
Create a new, blank database.
In the Database window, click Tables under Objects, and then click New.
In the New Table dialog box, double-click Design View.
In the <Table Name>: Table dialog box, define each of the fields that you want to include in your table. To do so, follow these steps:
Click in the Field Name column, and then type a unique name for the field.
In the Data Type column, accept the default data type of Text that Access assigns or click in the Data Type column, click the arrow, and then select the data type that you want.
In the Description column, type a description of the information that this field will contain. This description is displayed on the status bar when you are adding data to the field, and it is included in the Object Definition of the table. The description is optional.
Once you have added some fields, you may need to insert a field between two other fields. To do so, click in the row below where you want to add the new field, and then on the Insert menu, click Rows. This creates a blank row in which you can add a new field.
To add a field to the end of the table, click in the first blank row.
After you have added all the fields, define a primary key field before saving your table. A primary key is one or more fields whose value or values uniquely identify each record in a table. To define a primary key, follow these steps:
Select the field or fields that you want to define as the primary key.
To select one field, click the row selector for the desired field.
To select multiple fields, hold down the CTRL key, and then click the row selector for each field.
On the Edit menu, click Primary Key.
If you want the order of the fields in a multiple-field primary key to be different from the order of those fields in the table, click Indexes on the toolbar to display the Indexes dialog box, and then reorder the field names for the index named PrimaryKey.
You do not have to define a primary key, but it is usually a good idea. If you do not define a primary key, Microsoft Access asks if you want Access to create one for you when you save the table.
When you are ready to save your table, on the File menu, click Save, and then type a unique name for the table.
The field name shouldn’t be larger than 68 symbols and it shouldn’t have symbols like ! . [ ].
Each row in column Data type is a combo box, which elements are Access data types. Field type is determined by the character of the data entered into it.
Table 2.1 - Data types MS Access 2003
Text |
You may type in any alphabetical/numerical data that you desire - up to a maximum of 255 characters. As indicated, this is a text field, so you can't do mathematical calculations. Examples of Text data are: names, addresses, room numbers, phone numbers etc. |
Memo |
This field is for lots of text. You can have up to 32,000 characters. |
Number |
This field is for numbers where you want to add, subtract, multiply, divide, average, and do numerical calculations. This field can be a very large size, so when we get to Field Properties, we'll talk about "sizing" this field so it doesn't take up to much "space" in storage. |
Date/Time |
Dates and Times in one of Access format |
Currency |
Use for data that can be only one of two possible values, such as Yes/No, True/False, On/Off. Null values are not allowed. Stores 1 bit. |
AutoNumber |
Use for unique sequential (incrementing by 1) or random numbers that are automatically inserted when a record is added. |
Yes/No |
Use for data that can be only one of two possible values, such as Yes/No, True/False, On/Off. Null values are not allowed. Stores 1 bit. |
OLE Object |
Use for OLE objects (such as Microsoft Word documents, Microsoft Excel spreadsheets, pictures, sounds, or other binary data) that were created in other programs using the OLE protocol. Stores up to 1 gigabyte (limited by disk space). |
Hyperlink |
Use for hyperlinks. A hyperlink can be a UNC path or a URL. Stores up to 2048 characters. |
After you create a field and set its data type, you can set additional field properties. The field's data type determines which other properties you can set. For example, you can control the size of a Text field by setting its Field Size property.
For Number and Currency fields, the Field Size property is particularly important, because it determines the range of field values. For example, a one-bit Number field can store only integers ranging from 0 to 255.
The Field Size property also determines how much disk space each Number field value requires. Depending on the field size, the number can take up exactly 1, 2, 4, 8, 12, or 16 bytes.
Note Text and Memo fields have variable field value sizes. For these data types, Field Size sets the maximum space available for any one value.
Table 2.2 - General properties of fields
Property name |
Characteristic |
Field Size |
You can use the Field Size property to set the maximum size for data that is stored in a field that is set to the Text data type, the Number data type, or the AutoNumber data type. |
Format |
You can use the Format property to customize the way that numbers, dates, times, and text appear and print. The Format property only controls how the information in the field appears. The property does not store the information as formatted. |
Input Mask |
You can use the Input Mask property to make data entry easier and to control the values that users can enter in a Text Box control. The mask uses two placeholder characters, 9 and 0. The 9 indicates an optional digit (which makes it optional to enter an area code), and each 0 indicates a mandatory digit. For example, an input mask for a telephone numbers: (999) 000-000;0;_ 9 - User can enter a digit (0 to 9) 0 - User must enter a digit (0 to 9) # - User can enter a digit, space, plus or minus sign L - User must enter a letter A - User must enter a letter or a digit ! - Causes the input mask to fill from left to right instead of from right to left Input masks are made up one mandatory part and two optional parts, and each part is separated by a semicolon. The purpose of each part is as follows:
|
Caption |
You can use the Caption property to provide helpful information to the user through captions on objects in various views:
|
Default Value |
You can specify a value for a field that is automatically entered in the field when a new record is created. For example, in an Addresses table, you can set the default value for the City field to New York. When you add a record to the table, you can either accept this value or you can enter the name of a different city. |
Validation Rule |
You can use the Validation Rule property to specify requirements for data that are entered in a record, in a field, or in a control. When data is entered that violates the Validation Rule setting, you can use the Validation Text property to specify the message that you want to appear when the violation occurs. |
Validation Text |
You can specify a message that must appear when a validation rule is violated. |
Required |
You can use the Required property to specify if a value is required in a field. If this property is set to Yes, when you enter data in a record, you must enter a value in the field or in any control that is bound to the field, and the value cannot be Null. For example, you may want to make sure that a LastName control has a value for each record. When you want to permit Null values in a field, you must not only set the Required property to No, but if there is a Validation Rule property setting, that setting must also explicitly state validationrule Or Is Null. |
Allow Zero Length |
You can use the AllowZeroLength property to specify if a zero-length string (" ") is a valid entry in a table field. |
Indexed |
You can use the Indexed property to set a single-field index. An index speeds up queries on the indexed fields. An index also speeds up sorting operations and grouping operations on the indexed fields. For example, if you search for specific employee names in a LastName field, you can create an index for this field to speed up the search for a specific name. |
Each table in your database should have a “primary key.” A primary key is a field that uniquely identifies each record in the data base. In a database of book collection, there might be two books with the same author so author is not a good primary key. However, every book has a unique “call number”, so “call number” would be a good choice for a primary key. To set the primary key for your table, highlight the key field and choose Primary Key from the Edit menu.
When the primary key is set, you should find a little key icon next to the field name on the left side. To remove a primary key, simply repeat this procedure to toggle the primary key off.
One of the strongest features of a relational database is its ability to combine information from several places to display exactly what you want. Microsoft Access 2003 provides this feature in the lookup field data type in its tables. Lookup fields allows you to use information in other tables or queries, creating a link between those two objects.
With the wizard we have defined the field with a search list based on a list of values, we see this reflected in the fields properties in Lookup tab in the following way.
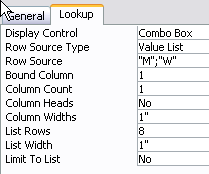
Figure 2.2 – The fields properties in Lookup tab
The properties that appear will show us the following (tab. 2.3).
Table 2.3 - The Lookup fields properties
Property name |
Characteristic |
Display control |
A Combo box, indicate we can type a value or we can click on the box to display the list and choose one of values. |
Row source type |
In our case its a list of values that we had introduced. |
Row source |
In this property we have define the table name or different values of the list separated by semicolons. |
Bound Column |
Determines which column Access will get from the value to store in the field. |
Column Heads |
Determines whether a first line with column headers will appear in the drop down list. If this property contains the Yes value, it will take the first line of values as the column headings. |
Columns Widths |
Determines the width of every column on the list. If there are various columns widths will be separated by semicolons. |
List Rows |
Determines how many rows are displayed when the list drops down. |
List Width |
Indicates the total width of the list. |
Limit to list |
If this property contains No, we can introduce a value that is not in the list, whilst if we indicate Yes, the value needs to be one of those on the list. If the user tries to enter a value not contained in the list, Access will return an error message and will not allow this value to be saved. |
To prevent the duplication of in formation in a database by repeating fields in more than one table, table relationships can be established to link fields of tables together. Follow the steps below to set up a relational database:
1.
Click the Relationships button on the toolbar:
![]()
2. From the Show Table window (click the Show Table button on the toolbar to make it appear), double click on the names of the tables you would like to include in the relationships. When you have finished adding tables, click Close.
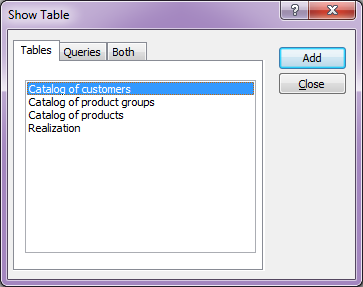
Figure 2.3 – The Show table window
To link fields in two different tables, click and drag a field from one table to the corresponding field on the other table and release the mouse button. The Edit Relationships window will appear as shown in Figure 2.4.
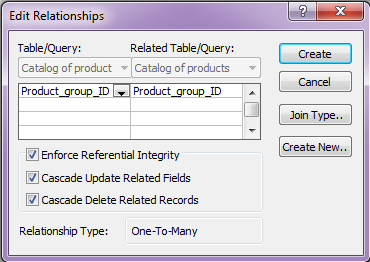
Figure 2.4 – The Edit Relationships
From this window, select different fields if necessary and select an option from Enforce Referential Integrity if necessary. These options give Access permission to automatically make changes to referential tables if key records in one of the tables are deleted. Check the Enforce Referential Integrity, Cascade Update Related Fields, Cascade Delete Related Fields boxes to ensure that the relationships are valid a and that the data is not accidentally deleted when data is added, edited, or deleted. Click Create to create the link.
A line
 now
connects the two fields in the Relationships window. Note the
symbols "1" (indicating the "One" side) and the
infinity symbol (indicating the "Many" side) on the
relationship. Close the relationships screen and select Yes to save
the changes to the Relationships layout.
now
connects the two fields in the Relationships window. Note the
symbols "1" (indicating the "One" side) and the
infinity symbol (indicating the "Many" side) on the
relationship. Close the relationships screen and select Yes to save
the changes to the Relationships layout.
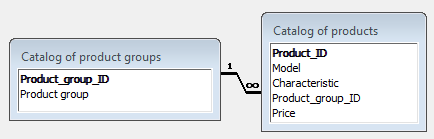
Figure 2.5 – Relation between two tables