- •Preface
- •Who Should Read This Book
- •Organization and Presentation
- •Contacting the Authors
- •Acknowledgments
- •Contents
- •Introduction
- •Why Microsoft .NET?
- •The Microsoft .NET Architecture
- •Internet Standards
- •The Evolution of ASP
- •The Benefits of ASP.NET
- •What Is .NET?
- •.NET Experiences
- •.NET Clients
- •.NET Services
- •.NET Servers
- •Review
- •Quiz Yourself
- •Installation Requirements
- •Installing ASP.NET and ADO.NET
- •Installing the .NET Framework SDK
- •Testing Your Installation
- •Support for .NET
- •Review
- •Quiz Yourself
- •Designing a Database
- •Normalization of Data
- •Security Considerations
- •Review
- •Quiz Yourself
- •Creating a Database
- •Creating SQL Server Tables
- •Creating a View
- •Creating a Stored Procedure
- •Creating a Trigger
- •Review
- •Quiz Yourself
- •INSERT Statements
- •DELETE Statements
- •UPDATE Statements
- •SELECT Statements
- •Review
- •Quiz Yourself
- •The XML Design Specs
- •The Structure of XML Documents
- •XML Syntax
- •XML and the .NET Framework
- •Review
- •Quiz Yourself
- •ASP.NET Events
- •Page Directives
- •Namespaces
- •Choosing a Language
- •Review
- •Quiz Yourself
- •Introducing HTML Controls
- •Using HTML controls
- •How HTML controls work
- •Intrinsic HTML controls
- •HTML Control Events
- •The Page_OnLoad event
- •Custom event handlers
- •Review
- •Quiz Yourself
- •Intrinsic Controls
- •Using intrinsic controls
- •Handling intrinsic Web control events
- •List Controls
- •Rich Controls
- •Review
- •Quiz Yourself
- •Creating a User Control
- •Adding User Control Properties
- •Writing Custom Control Methods
- •Implementing User Control Events
- •Review
- •Quiz Yourself
- •Common Aspects of Validation Controls
- •Display property
- •Type Property
- •Operator Property
- •Using Validation Controls
- •RequiredFieldValidator
- •RegularExpressionValidator
- •CompareValidator
- •RangeValidator
- •CustomValidator
- •ValidationSummaryx
- •Review
- •Quiz Yourself
- •Maintaining State Out of Process for Scalability
- •No More Cookies but Plenty of Milk!
- •Out of Process State Management
- •Review
- •Quiz Yourself
- •Introducing the Key Security Mechanisms
- •Web.config and Security
- •Special identities
- •Using request types to limit access
- •New Tricks for Forms-based Authentication
- •Using the Passport Authentication Provider
- •Review
- •Quiz Yourself
- •ASP.NET Updates to the ASP Response Model
- •Caching with ASP.NET
- •Page Output Caching
- •Absolute cache expiration
- •Sliding cache expiration
- •Fragment Caching
- •Page Data Caching
- •Expiration
- •File and Key Dependency and Scavenging
- •Review
- •Quiz Yourself
- •A Brief History of Microsoft Data Access
- •Differences between ADO and ADO.NET
- •Transmission formats
- •Connected versus disconnected datasets
- •COM marshaling versus text-based data transmission
- •Variant versus strongly typed data
- •Data schema
- •ADO.NET Managed Provider Versus SQL Managed Provider
- •Review
- •Quiz Yourself
- •Review
- •Quiz Yourself
- •Creating a Connection
- •Opening a Connection
- •Using Transactions
- •Review
- •Quiz Yourself
- •Building a Command
- •Connection property
- •CommandText property
- •CommandType property
- •CommandTimeout property
- •Appending parameters
- •Executing a Command
- •ExecuteNonQuery method
- •Prepare method
- •ExecuteReader method
- •Review
- •Quiz Yourself
- •Introducing DataReaders
- •Using DataReader Properties
- •Item property
- •FieldCount property
- •IsClosed property
- •RecordsAffected property
- •Using DataReader Methods
- •Read method
- •GetValue method
- •Get[Data Type] methods
- •GetOrdinal method
- •GetName method
- •Close method
- •Review
- •Quiz Yourself
- •Constructing a DataAdapter Object
- •SelectCommand property
- •UpdateCommand, DeleteCommand, and InsertCommand properties
- •Fill method
- •Update method
- •Dispose method
- •Using DataSet Objects
- •DataSetName property
- •CaseSensitive property
- •Review
- •Quiz Yourself
- •Constructing a DataSet
- •Tables property
- •TablesCollection Object
- •Count property
- •Item property
- •Contains method
- •CanRemove method
- •Remove method
- •Add method
- •DataTable Objects
- •CaseSensitive property
- •ChildRelations property
- •Columns property
- •Constraints property
- •DataSet property
- •DefaultView property
- •ParentRelations property
- •PrimaryKey property
- •Rows property
- •Dispose method
- •NewRow method
- •Review
- •Quiz Yourself
- •What Is Data Binding?
- •Binding to Arrays and Extended Object Types
- •Binding to Database Data
- •Binding to XML
- •TreeView Control
- •Implement the TreeView server control
- •Review
- •Quiz Yourself
- •DataGrid Control Basics
- •Binding a set of data to a DataGrid control
- •Formatting the output of a DataGrid control
- •Master/Detail Relationships with the DataGrid Control
- •Populating the Master control
- •Filtering the detail listing
- •Review
- •QUIZ YOURSELF
- •Updating Your Data
- •Handling the OnEditCommand Event
- •Handling the OnCancelCommand Event
- •Handling the OnUpdateCommand Event
- •Checking that the user input has been validated
- •Executing the update process
- •Deleting Data with the OnDeleteCommand Event
- •Sorting Columns with the DataGrid Control
- •Review
- •Quiz Yourself
- •What Is Data Shaping?
- •Why Shape Your Data?
- •DataSet Object
- •Shaping Data with the Relations Method
- •Review
- •Quiz Yourself
- •OLEDBError Object Description
- •OLEDBError Object Properties
- •OLEDBError Object Methods
- •OLEDBException Properties
- •Writing Errors to the Event Log
- •Review
- •Quiz Yourself
- •Introducing SOAP
- •Accessing Remote Data with SOAP
- •SOAP Discovery (DISCO)
- •Web Service Description Language (WSDL)
- •Using SOAP with ASP.NET
- •Review
- •Quiz Yourself
- •Developing a Web Service
- •Consuming a Web Service
- •Review
- •Quiz Yourself
- •ASP and ASP.NET Compatibility
- •Scripting language limitations
- •Rendering HTML page elements
- •Using script blocks
- •Syntax differences and language modifications
- •Running ASP Pages under Microsoft.NET
- •Using VB6 Components with ASP.NET
- •Review
- •Quiz Yourself
- •Preparing a Migration Path
- •ADO and ADO.NET Compatibility
- •Running ADO under ASP.NET
- •Early Binding ADO COM Objects in ASP.NET
- •Review
- •Quiz Yourself
- •Answers to Part Reviews
- •Friday Evening Review Answers
- •Saturday Morning Review Answers
- •Saturday Afternoon Review Answers
- •Saturday Evening Review Answers
- •Sunday Morning Review Answers
- •Sunday Afternoon Review Answers
- •What’s on the CD-ROM
- •System Requirements
- •Using the CD with Windows
- •What’s on the CD
- •The Software Directory
- •Troubleshooting
- •ADO.NET Class Descriptions
- •Coding Differences in ASP and ASP.NET
- •Retrieving a Table from a Database
- •Displaying a Table from a Database
- •Variable Declarations
- •Statements
- •Comments
- •Indexed Property Access
- •Using Arrays
- •Initializing Variables
- •If Statements
- •Case Statements
- •For Loops
- •While Loops
- •String Concatenation
- •Error Handling
- •Conversion of Variable Types
- •Index

90 |
Saturday Morning |
Creating a User Control
Since User Controls will be included in other ASP.NET pages, you should not include <html> and <body> elements around the content. Additionally, User Controls that post events should not contain an HTML Form control. These elements should be placed in the containing page.
Start with a simple example, creating a custom address User Control.
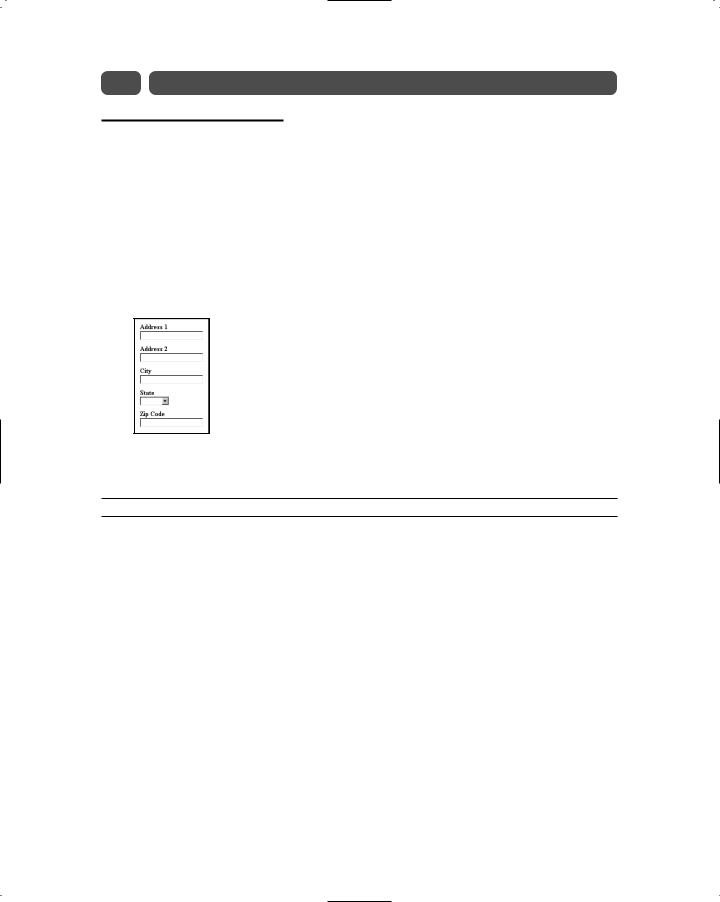
The first thing you need to do is create the UI elements for the control. In your address control you have two textboxes for street address, one textbox for city, a dropdown list for state, and a textbox for Zip Code. Figure 10-1 illustrates what the User Control should look like.
Figure 10-1 Address User Control UI
Listing 10-1 shows the HTML that we’ll use to construct the address User Control UI.
Listing 10-1 User Control UI in HTML
<asp:Panel ID=”Address” runat=”server”> <asp:Table ID=AddressTable runat=”server”>
<asp:TableRow ID=Address1Row runat=”server”> <asp:TableCell ID=Address1Cell runat=”server”>
<asp:Label ID=Address1Label text=”Address 1” runat=”server”
/></BR>
<asp:Textbox ID=txtAddress1 columns=25 maxlength=50 runat=”server”
/>
</asp:TableCell>
</asp:TableRow>
<asp:TableRow ID=Address2Row runat=”server”> <asp:TableCell ID=Address2Cell runat=”server”>
<asp:Label ID=Address2Label text=”Address 2” runat=”server”
/></BR>
<asp:Textbox ID=txtAddress2 columns=25 maxlength=50 runat=”server”
/>
</asp:TableCell>
</asp:TableRow>
<asp:TableRow ID=CityRow runat=”server”> <asp:TableCell ID=CityCell runat=”server”>
<asp:Label ID=CityLabel text=”City” runat=”server” /></BR> <asp:Textbox ID=txtCity columns=25 maxlength=50 runat=”server” />

Session 10—Introducing User Controls |
91 |
</asp:TableCell>
</asp:TableRow>
<asp:TableRow ID=StateRow runat=”server”> <asp:TableCell ID=StateCell runat=”server”>
<asp:Label ID=StateLabel text=”State” runat=”server” /></BR> <asp:DropDownList ID=cmbState runat=”server”>
<asp:ListItem selected=true></asp:ListItem> <asp:ListItem value=2>California</asp:ListItem> <asp:ListItem value=3>Virginia</asp:ListItem>
</asp:DropDownList>
</asp:TableCell>
</asp:TableRow>
<asp:TableRow ID=ZipCodeRow runat=”server”> <asp:TableCell ID=ZipCodeCell runat=”server”>
<asp:Label ID=ZipCodeLabel text=”Zip Code” runat=”server” /></BR> <asp:Textbox ID=txtZipCode columns=10 maxlength=5 runat=”server”
/>
</asp:TableCell>
</asp:TableRow>
<asp:TableRow ID=SubmitRow runat=”server”>
<asp:TableCell ID=SubmitCell horizontalalign=center runat=”server”> <asp:Button ID=Submit text=”Submit” runat=”server” />
</asp:TableCell>
</asp:TableRow>
</asp:Table>
</asp:Panel>
If you inspect Listing 10-1 closely, you’ll notice that it is simply a collection of ASP.NET Web controls. So, now that we have the UI HTML written, how do we turn it into a simple User Control? Get this . . . instead of giving the file an .aspx extension, simply give an
.ascx extension and that’s it. You have your first User Control, albeit a very simple one. Go ahead and name your User Control file address.ascx.
Now that you have a User Control, you need to include it in an ASP.NET page. In order to do this, you must register the control with the page using the Register directive, which takes the following form:
<% @Register TagPrefix=”myControl” TagName=”Address” src=”address.ascx” %>
That’s pretty self-explanatory with the exception of the TagPrefix and TagName attributes. If you’ll recall from Session 9, “Using Web Controls,” when adding a Table Web control, for example, to an ASP.NET page, you use the following syntax:
<asp:Table . . .runat=”server” />
You can generalize this declaration using the following syntax:
<[TagPrefix]:[TagName] . . .runat=”server” />
So, when you add your Address control to an ASP.NET page, you would use the following syntax:
<myControl:Address . . . runat=”server”>

92 |
Saturday Morning |
The following code shows the address.aspx script that will contain the Address User Control:
<% @Page Language=”VB” %>
<% @Register TagPrefix=”myControl” TagName=”Address” src=”address.ascx” %> <HTML>
<HEAD>
<TITLE>User Control Example</TITLE> <STYLE>
BODY, TABLE, INPUT, SELECT {font-family:trebuchet; font-size:10pt} </STYLE>
</HEAD>
<BODY>
<FORM ID=frmAddress runat=”server”> <myControl:Address ID=AddressControl runat=”server” /> </FORM>
</BODY>
</HTML>
Adding User Control Properties
One of the things that make Web and HTML controls so useful is that they support properties, methods, and events against which you can program. Guess what? You can customize your User Control by adding your own custom properties, methods, and events to a User Control. Let’s start with a few properties.
For this example, you’ll be creating your properties using VB. In VB, the syntax for creating a property is
[Public|Private] Property [Name] As [Data Type]
Get
‘ Get Implementation Code
End Get
Set
‘ Set Implementation Code
End Set
End Property
Listing 10-2 shows the code for a property for each of our form elements: Address1,
Address2, City, StateID, and ZipCode.
Listing 10-2 Form element properties
<script language=”VB” runat=”server”> Private m_FontColor As System.Drawing.Color Private m_Counter As Integer
Public Property Address1 As String Get
Address1 = txtAddress1.text End Get
Set

Session 10—Introducing User Controls |
93 |
txtAddress1.text = value End Set
End Property
Public Property Address2 As String Get
Address2 = txtAddress2.text End Get
Set
txtAddress2.text = value End Set
End Property
Public Property City As String Get
City = txtCity.text End Get
Set
txtCity.text = value End Set
End Property
Public Property StateID As String Get
StateID = cmbState.Items(cmbState.SelectedIndex).Value End Get
Set
For m_Counter = 0 To (cmbState.Items.Count - 1)
If cmbState.Items(m_Counter).Value = value Then cmbState.SelectedIndex = m_Counter
End If
Next End Set
End Property
Public Property ZipCode As String Get
ZipCode = txtZipCode.text End Get
Set
txtZipCode.text = value End Set
End Property
Public Property FontColor As System.Drawing.Color Get
FontColor = m_FontColor
End Get Set
m_FontColor = value Address1Label.ForeColor = value Address2Label.ForeColor = value CityLabel.ForeColor = value StateLabel.ForeColor = value ZipCodeLabel.ForeColor = value
End Set
Continued
