

Formatting ratios
Sometimes, it is useful to display the result of a division as the ratio of two numbers - the dividend and the divisor. In the example below, we have assets and liabilities. We would like to display the ratio in the format x : 1 where x is assets divided by liabilities. This can be achieved by creating a custom format for the cell as shown below. The format code is 0.00″ : 1″
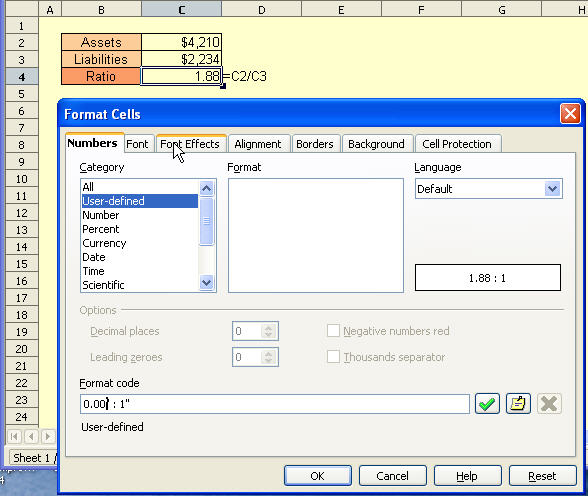
The end result is shown below. This works under the assumption the ratio is always relative to 1.

This entry was posted on Monday, September 5th, 2005 at 5:24 pm and is f
Filling a multiplication chart
September 1st, 2005
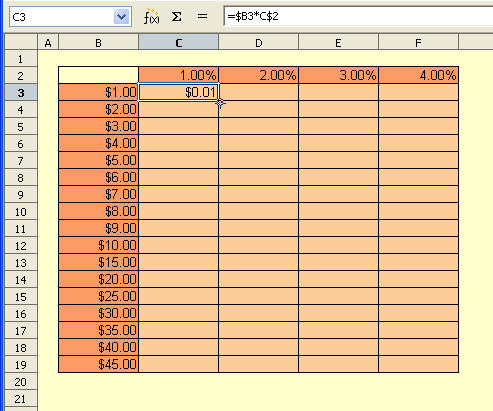
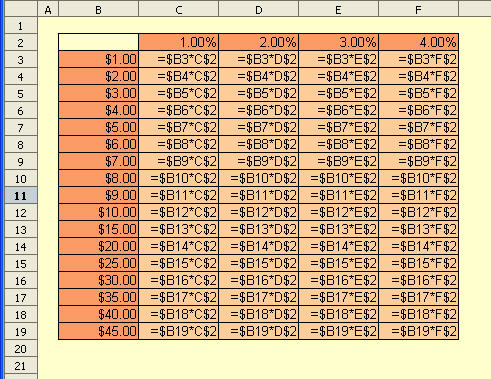
With OOo, it is a straightforward task to generate a “data table” that is basically just multiplying a row by a column. So we have percentages running across the top row and dollar amounts down the first column, everything in between we’d like to be the product of that % and dollar amount.
Step 1: Enter the desired dollar amounts in column B and the percentage values in row 2. Enter the following formula in C3: =$B3*C$2. Pay close attention to the notation in the formula.
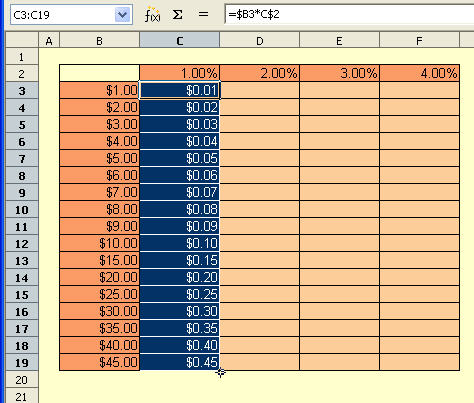
Step 2: Position the cursor in the lower right corner of C3 and drag downwards. The formulae are adjusted for each cell with only the row number changing on the dollar value.
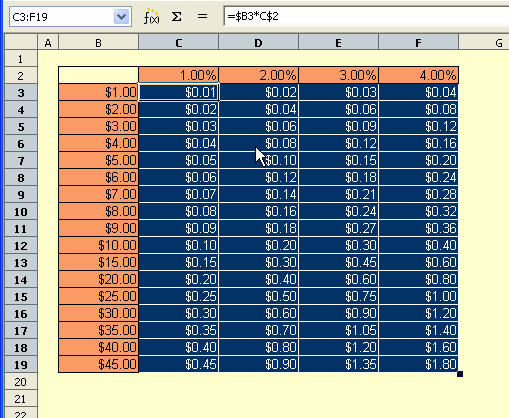
Step 3: Now you can drag the column of formulae to the right - and this time, only the columns of the percentage values in each formula change.
Step 4:Confirm the formulae that have been generated by selecting Tools - Options and then the OpenOffice.org Calc - View options dialog. Make sure the Formulas checkbox is active and this is what you will see.
Macros: Text Utilities Part I
August 29th, 2005
It is straightforward to enhance the capabilities of OOo Calc with your home grown functions and features. In this tip, we add the ability to change the case of the text in a range of selected cells.(UPPER CASE, lower case or Proper Case).
As you can in the screenshot below, we have added a new top level menu item TextUtils with 3 new functions, UpperC, LowerC, andProperC. The last function capitalizes the first character only.
We could have invoked these functions with Tools - Macros etc but from a user’s standpoint, it is much more convenient to invoke them the way we have implemented it.
Pretty straightforward - the results of applying UpperC to the selected cells.
First - the source code…
Sub UpperC oDesktop = createUnoService(”com.sun.star.frame.Desktop”) oDocument = ThisComponent oSelectedCells = oDocument.CurrentSelection oActiveCells = oSelectedCells.RangeAddress oSheets = oDocument.Sheets oSheet = oSheets.getByIndex(oActiveCells.Sheet) ‘ active table For nRow = oActiveCells.StartRow To oActiveCells.EndRow For nCol = oActiveCells.StartColumn To oActiveCells.EndColumn oCell = oSheet.getCellByPosition(nCol,nRow) CellVal = oCell.getString() oCell.setString(UCase(CellVal)) Next Next End Sub
Sub LowerC oDesktop = createUnoService(”com.sun.star.frame.Desktop”) oDocument = ThisComponent oSelectedCells = oDocument.CurrentSelection oActiveCells = oSelectedCells.RangeAddress oSheets = oDocument.Sheets oSheet = oSheets.getByIndex(oActiveCells.Sheet) ‘ active table For nRow = oActiveCells.StartRow To oActiveCells.EndRow For nCol = oActiveCells.StartColumn To oActiveCells.EndColumn oCell = oSheet.getCellByPosition(nCol,nRow) CellVal = oCell.getString() oCell.setString(LCase(CellVal)) Next Next End Sub
Sub ProperC oDesktop = createUnoService(”com.sun.star.frame.Desktop”) oDocument = ThisComponent oSelectedCells = oDocument.CurrentSelection oActiveCells = oSelectedCells.RangeAddress oSheets = oDocument.Sheets oSheet = oSheets.getByIndex(oActiveCells.Sheet) ‘ active table For nRow = oActiveCells.StartRow To oActiveCells.EndRow For nCol = oActiveCells.StartColumn To oActiveCells.EndColumn oCell = oSheet.getCellByPosition(nCol,nRow) CellVal = oCell.getString() oCell.setString(UCase(Left(CellVal,1)) & Right(CellVal,Len(CellVal) - 1) ) Next Next End Sub
Creating the new menu entries is simple. Invoke the Menu Customization dialog with Tools - Customize as shown below…
Select the Menus tab. Add a new top level menu item - TextUtils and then a seperate entry for each of our new functions.
Here is the Add Commands dialog. We select the module in the left hand box and the macro subroutine on the right. By default, the menu entry is given the same name as the subroutine but hat can be changed.
In the next installment, we will add a dialog to enhance out new functionality even further.
Posted in OpenOffice Basic | 2 Comments »