

Auto Filling Cells 2
Filling a Cell Range with a Series 4
Filling a multiplication chart 6
Paste Special I 8
Paste Special II - Removing formulae 10
Using Names as constants 11
Conditional Formatting I 13
Conditional Formatting II 16
Conditional Formatting III 18
Conditional Formatting IV : Masking errors 19
Adding a background graphic 21
Basic functions : SUMIF 26
Cell Counting 1: COUNTIF 27
Ranking and sorting data I 27
Conditional summation revisited 29
Largest values in an array 29
Date & Time Basics 30
Date & Time : Calculating Dates of Holidays 31
Financial Functions 1 : Mortgage calculation 33
Financial Functions 2: Accumulation 35
Financial Functions 3 : Complex Accumulation 36
Financial Functions: CUMIPMT & CUMPRINC 38
Financial Functions: Calculating Principal & Interest 39
Array Formulas: Working with Matrices 41
Datasources : Spreadsheets 44
Datapilot Revisited 47
DataPilot Revisited II 50
Data Filtering : Standard Filter 52
Data Filtering : Advanced Filter 54
Basic functions : SUBTOTAL 58
Adding notes to cells 60
A simple recursive macro: GCD 62
Auto Filling Cells
September 10th, 2004
Use this procedure to automatically increment data as you fill down a column or across a row.
1.Select the cell range whose existing contents you want to extend to more cells. Then release the mouse button.

2.Move the mouse pointer on top of the automatic fill handle in the lower right of the selected cell. The mouse cursor turns into a target cross. 3.Click and hold down the left mouse button on the automatic fill handle, and drag in the desired direction of the fill, selecting all the cells you want to contain data.

Here are a few examples of how the automatic fill sequence works: The sequence 1, 2 becomes 1, 2, 3, 4, and so on
The sequence 1, 3 becomes 1, 3, 5, 7, and so on The cell content “Quarter 1″ becomes Quarter 1, Quarter 2, Quarter 3, and so on Automatic fill only increments data that OpenOffice.org Calc recognizes, such as numbers, dates and cell references. If Calc does not recognize data, automatic fill duplicates the data exactly. However, you can create sort lists that contain lists that Calc will recognize and automatically increment. To create a sort list, choose Tools - Options - Spreadsheet - Sort Lists

If you just want to copy the range without changing the values, hold down the Ctrl key while dragging.
Posted in Using OpenOffice Calc | No Comments »
Filling a Cell Range with a Series
February 24th, 2005
A quick way to fill a range of cells with a series of values that increase/decrease in a geometric fashion.
Let us consider the simple example below. We wish to complete the series of values atrting at B3 (shaded).

The Fill Series dialog is invoked with Edit - Fill - Series as shown below.

OOo Calc makes it’s best guess regarding the continuation of the series.
In this example, we will elave everything at the default settings and close the dialog with OK

The completed series! Next,we will look at handling dates.

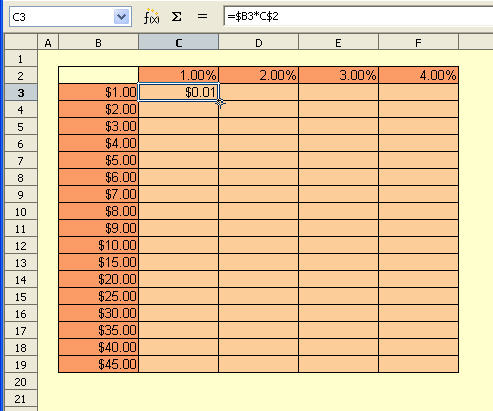
Filling a multiplication chart
September 1st, 2005
With OOo, it is a straightforward task to generate a “data table” that is basically just multiplying a row by a column. So we have percentages running across the top row and dollar amounts down the first column, everything in between we’d like to be the product of that % and dollar amount.
Step 1: Enter the desired dollar amounts in column B and the percentage values in row 2. Enter the following formula in C3: =$B3*C$2. Pay close attention to the notation in the formula.
Step 2: Position the cursor in the lower right corner of C3 and drag downwards. The formulae are adjusted for each cell with only the row number changing on the dollar value.

Step 3: Now you can drag the column of formulae to the right - and this time, only the columns of the percentage values in each formula change.

Step 4:Confirm the formulae that have been generated by selecting Tools - Options and then the OpenOffice.org Calc - View options dialog. Make sure the Formulas checkbox is active and this is what you will see.
