

Creating a table «Students»
Table 7 Structure of the table « Students
Field name |
Data Type |
ID student |
Number |
Last name |
Text |
First name |
Text |
Middle name |
Text |
№ group |
Number |
Address |
Text |
Phone |
Text |
Medallist |
Text |
Some annotations:
ID student
This field will be the Primary key for this table.
Field Size: Integer or Autonumerical
Last name and Middle name
Field Size: 15
First name
Field Size: 12
№ group
Field Size: Integer
Address
Field Size: 30
Phone
Use for this field a Input Mask: 999-99-99
Medallist
Field Size: 4
Create a combo box
Yes
No
Also make «No» - default value
Picture 9 Field Properties. Default Value.
Save this table.
Creating a table « Disciplines »
Table 8 Structure of the table «Disciplines»
Field name |
Data Type |
ID discipline |
Number |
Name of the discipline |
Text |
Term |
Number |
ID lecturer |
Number |
Exam |
Text |
ID discipline
This field will be the Primary key for this table.
Field Size: Integer or Autonumerical
Name of the discipline
Field Size: 30
Term
Field Size: Integer
ID lecturer
Field Size: Integer
You should link the table «Disciplines » and the table «Lecturers ». It is always easier to pick from a list than to remember what the choices are. In the Table Design View, in the bottom section, each field has a Lookup wizard (We used a Lookup wizard for a creating combo box). Now select «I want the lookup column to look up the valuesin a table or query».
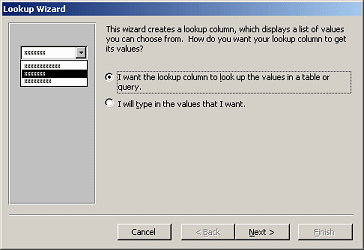
Picture 10 Lookup Wizard.
In the View box, if we select Tables, only tables defined in the database will appear. If we select Queries, only queries will appear, and if we select Both, both tables and queries will appear.
So you should select the table «Lecturers» and click-on the «Next >» button.
In this window we have in the list on the left the columns of the table or selected query, and in the list on the right we will place the columns that we wish to appear in the lookup list.
To
select a column click on it so that it stands out and then press the
![]() button to send the column selected to the right hand side.
button to send the column selected to the right hand side.
The
![]() button allows us to send all the columns from the left to the right
side in one go.
button allows us to send all the columns from the left to the right
side in one go.
The
![]() button allows us to remove a column from the list on the right.
button allows us to remove a column from the list on the right.
The
![]() button allows us to remove all the columns from the list on the right
in one go.
button allows us to remove all the columns from the list on the right
in one go.
Select ID lecturer, Last name, First Name, Middle name.
Also hide key column.
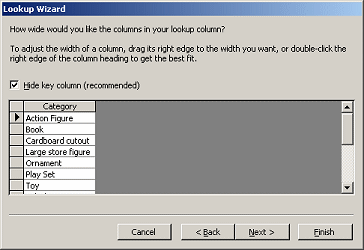

Picture 11 Lookup Wizard. Hide key column.
Exam
Field Size: 10
Create a combo box
Exam
Test