

Change the font Style of the text under p. 2.4.2.
2.4.3. Formatting Font Color
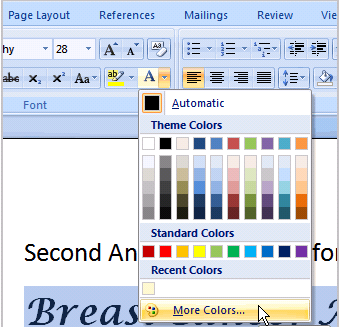
Select the text you wish to modify.
Left-click the drop-down arrow next to the font color box on the Home tab. The font color menu appears.
Move your cursor over the various font colors. A live preview of the color will appear in the document.
Left-click the font color you wish to use. The font color will change in the document.
Your color choices aren't limited to the drop-down menu that appears.
Select More Colors at the bottom of the list to access the Colors dialog box.
Choose the color that you want and click OK.
Paint the paragraphs under p.2.4.3. In different colors.
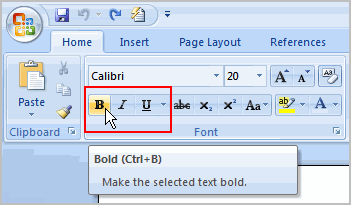
2.4.4. Using the Bold, Italic, and Underline Commands
Select the text you wish to modify.
Click the Bold, Italic, or Underline command in the Font group on the Home tab.
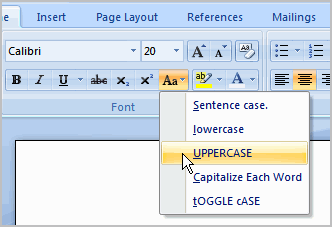
2.4.5. Changing the Text Case
Select the text you wish to modify.
Click the Change Case command in the Font group on the Home tab.
Select one of the case options from the list.
Change p.2.4.4. To uppercase.
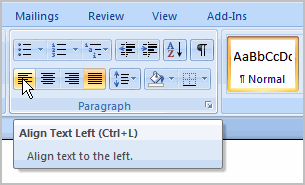
2.4.6. Changing Text Alignment
Select the text you wish to modify.
Select one of the four alignment options from the Paragraph group on the Home tab.
Align Text Left: Aligns all the selected text to the left margin.
Center: Aligns text an equal distance from the left and right margins
Align Text Right: Aligns all the selected text to the right margin.
Justify: Justified text is equal on both sides and lines up equally to the right and left margins. Traditionally many books, newsletters, and newspapers use full-justification.
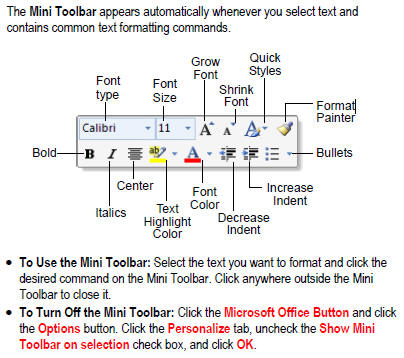
2.4.7. Exploring Mini Toolbar
2.5. Formatting Paragraphs
2.5.1. Bulleted and Numbered Lists
Bulleted and numbered lists can be used in your documents to arrange and format text to draw emphasis.
To Insert a New List:
Select the text that you want to format as a list.
Click the Bullets or Numbering commands on the Home tab.
Left-click the bullet or numbering style you would like to use. It will appear in the document.
Position your cursor at the end of a list item and press the Enter key to add an item to the list.
To remove numbers or bullets from a list, select the list and click the Bullets or Numbering commands.
To Select an Alternate Bullet or Numbering Style:
Select all of the text in an existing list.
Click the Bullets or Numbering commands on the Home tab.
Left-click to select an alternate bullet or numbering style.
To Select an Alternate Bullet or Numbering Style:
Select all of the text in an existing list.
Click the Bullets or Numbering commands on the Home tab.
Left-click to select an alternate bullet or numbering style.
To Change the Bullet Color:
Select an existing list.
Click the Bullets command.
Select Define New Bullet from the list. The Define New Bullet dialog box appears.
Click the Font button. The Font dialog box appears.
Click the Font color: drop-down box.
Left-click a color to select it.
Click OK. The bullet color will now appear in the Preview section of the Define New Bullet dialog box.
Click OK to apply the bullet color to the list in the document.
You can also change the bullet font and formatting in the Font dialog box.
Exercise: Create two-level list from the text under p. 2.5.1.
First-level bulleted list includes lines colored in dark-blue.
Second-level lists should be made from purple lines and be numbered lists.
Select a symbols and numbers styles and colors.
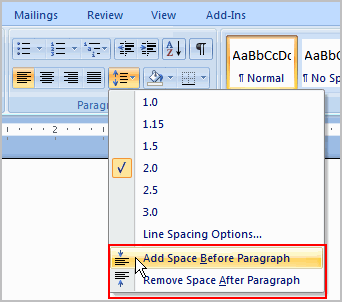
2.5.2. Line and Paragraph Spacing
Just as you can format spacing between lines in your document, you can also choose spacing options between each paragraph. Typically, extra spaces are added between paragraphs, headings, or subheadings. Extra spacing between paragraphs adds emphasis and makes a document easier to read. Line spacing is measured in lines or points, which is referred to as leading. When you reduce the leading, you automatically bring the lines of text closer together. Increasing the leading will space the lines out, allowing for improved readability.
Some people and organizations delineate the start of a new paragraph by indenting the first line.
To Format Line Spacing and First Line indent:
Select the text you want to format.
Click the Line spacing command in the Paragraph group on the Home tab.
Select a spacing option,.
OR
Select Line Spacing Options. The Paragraph dialog box appears.
Change the Before and After points in the Paragraph section.
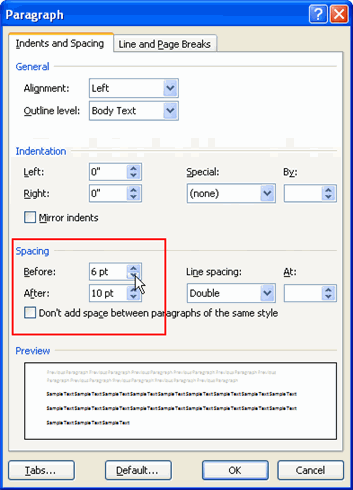
Click to open the drop-down menu on the Special field.
Click First Line.
Enter a value (about 1 – 1.5 cm) in the By field to define the first-line indent.
Click OK.