

ManualOperator
.pdfRoutes
Add Waypoints to a Route
Additional waypoints can be added to a Selected Route. Adding Waypoints to a route is depending on which part of the route you want to modify, there are several methods for adding new waypoints.
Add Waypoints at the end of the Selected Route :
1.Select the Route tool ,
2.Click on the chart wherever you want to place successive waypoints,
3.The waypoints will be added to the end of the route.
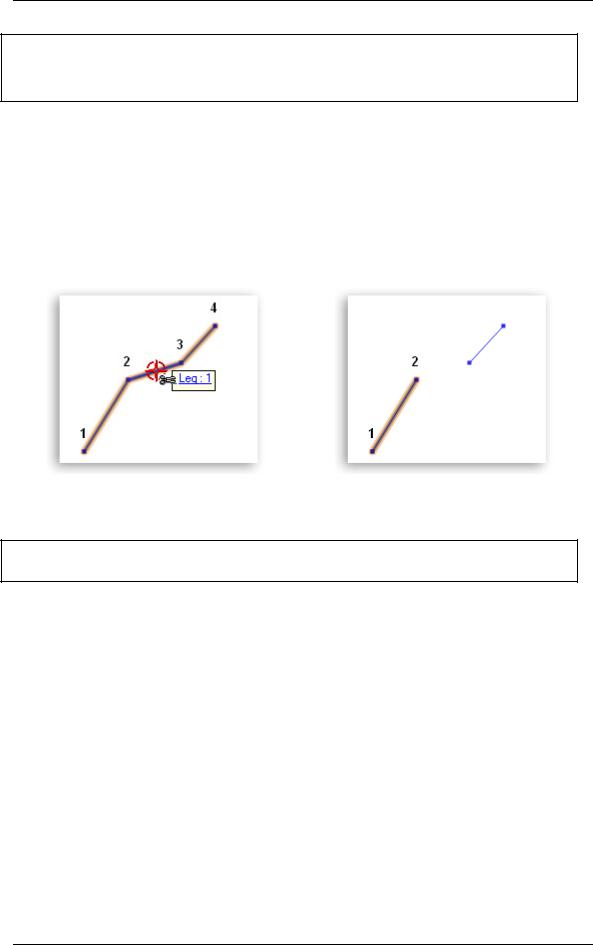
Add Waypoints anywhere between the beginning and the end of the route:
1.Select the Insert tool in the Toolbar (note that the cursor is now like this  ),
),
2.k on a Leg in the Route where you want to insert a new Waypoint and drag the cursor to the new position,
3.Waypoint and legs are created when you release the mouse button.
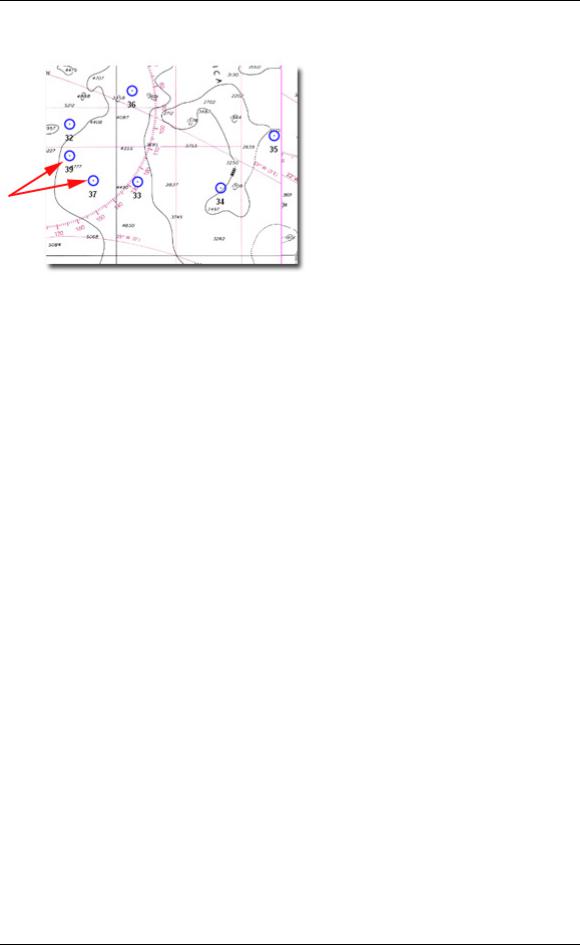
Inserting a Waypoint in the route between Waypoint (2) and (3)
Inserted waypoint takes the place of waypoint (3)
TIPS - when you click on a leg with the Insert Tool, you can also drag the cursor over an existing Waypoint (made previously with the Plotting Tool).
You can also add Waypoint to the Selected Route at the end or at beginning by choosing them under the Waypoints Center list.
Use the Right-click menu on a isolated waypoint to add it to the selected route at the end or at beginning.
Delete Waypoints and Legs in a Route
To delete Waypoints of the Selected Route, simply select the Delete Tool (Pacman  ) and click on the Waypoints you want to erase.
A dialog warns you that "This waypoint will be deleted from all routes".
Click the OK button when prompted to confirm the deletion. The Waypoint will be deleted. Repeat this operation to erase other Waypoints if necessary.
59
MaxSea Operator Manual version 12.6
TIPS - You can also delete Legs of the Selected Route by clicking on them with the Delete Tool
From the corresponding Centers select a line and press the <Del> key on the keyboard for deleting Waypoints and legs.
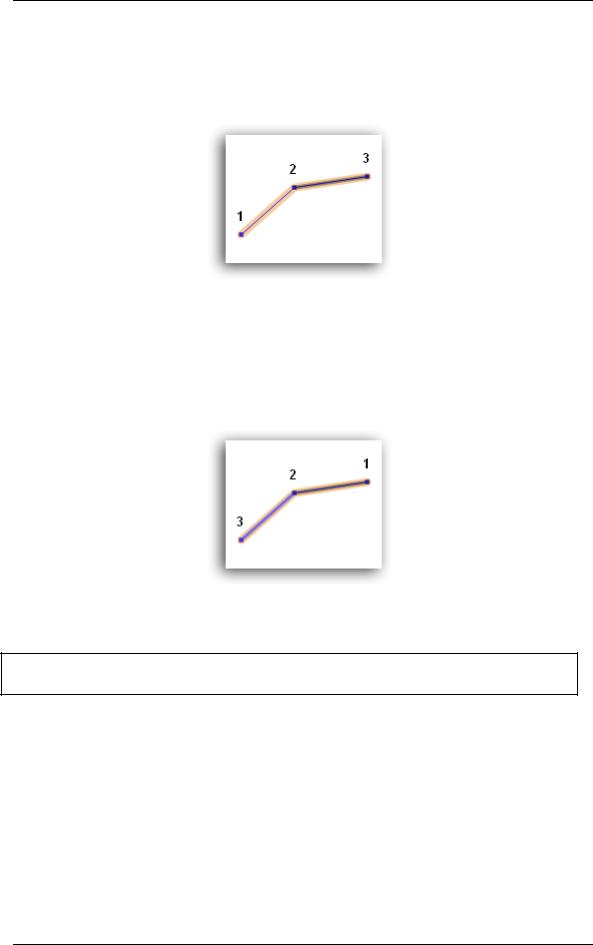
Cut the Selected Route in Two Parts
You can cut in two parts the selected route independently of the chosen mode (active route or planning mode)
1.Select the route that you will cut in two parts
2.Click a leg with the Split tool on where you want to cut the route
3.The route appears in two parts as shown in pictures Fig. 1 and Fig. 2
Fig.1 |
Fig.2 |
IMPORTANT - this command can be done only if the selected route contains at least four QuickWapoints (three legs at least)
Move Waypoints and Routes
To Move Waypoints in a Route:
1.Select the Position Modification Tool in the Toolbar
2.Click on the Waypoint you want to move, hold the mouse button down, then drag it to the new desired position
To Move Entirely The Selected Route:
1.Use the Select Tool (Finger) to drag a selection rectangle entirely around the route on the chart.
2.Select the Position Modification Tool in the Toolbar
3.Click on one of the Waypoint, hold the mouse button down, then drag it to the new desired position.
4.This action will move all the selected objects
60
Routes
Reverse the Selected Route
When a planning route is created, waypoints are automatically numbered in numerical order as it is shown in the following picture. In order to navigate a route in the opposite direction, you have to reverse the route. This action can only be done under the Routes Center window.
Route selected on the chart
To reverse the order of a route:
1.Open the Selected Route Center, select [Centers] and choose [Route] from the [Route] menu.
2.Select the Route you want to reverse (the Selected Route appears in orange)
3.Click on "Action" in the Route center toolbar and choose "Reverse Route"
The same Route on the chart after reversing
TIP - you can also use the right-click menu on a line in the Routes Center to quickly access to the reversing route function.
Duplicate Existing Routes
You can duplicate as many time as needed before setting up the Planning Route. This can be useful to plan different routes with same trip.
The easiest way is to display the Routes Center. This lists all routes stored in your database.
You can access this function directly from the Routes Center without showing graphically the route on the chart. Select [Centers] from the [Route] menu and Choose [Routes] for showing it.
1.Click on a line in the table according to a chosen route.
61
MaxSea Operator Manual version 12.6
2.Click the "Action" drop down menu in the toolbar and choose "Duplicate Route" in the list.
TIP - you can also use the right-click menu on a line in the Routes Center to quickly access to the duplication route function.
Delete Entire Route
To delete a route:
1.Display the Routes Center and click a line for choosing the route to be deleted.
2.Press <Del> on your keyboard or click the "Action" button in the center toolbar and choose the Delete option.
3.A dialog is displayed to confirm the deletion the Route with the ID number.
4.Click the Yes button when prompted to confirm the deletion.
Tips - you can also:
Right-click on a Route and select "Delete Route"
Click with the Delete Tool (Pacman) on an UNSELECTED route (display in blue)
Import Previous Routes
You can open a Route that you have already recorded with a MaxSea previous version, or save as a GPX file (format which is compatible with various software).
Importing a .wpt file :
1.Under the [file] menu, select [Open...]
2.Search and choose the required planning route (xxxxx.wpt file) and then click "Open".
or
1.Under the [Route] menu, select [Import] and click on [Import .wpt file...]
2.Choose a Route file and click "Open".
Importing a .gpx file:
1.Under the [Route] menu, select [Import] and click on [Import .gpx file...]
2.Search and choose the required "xxxxx.gpx" file on your hard disk and then click "Open".
The planning route is then displayed on the chart and added in the Routes Center.
Note: you can only display one route plan at a time on the chart. You can also open route file saved with previous software version.
IMPORTANT - If the active file and the chart are in known and different datum , you have to convert the datum. For
62
Routes
more information, refer to the related topic: Horizontal datum conflict chapter.
Export Routes and Waypoints
All Routes and Waypoints are automatically registered and stored in a database. If you want to share Routes and Waypoints with others, you can export them as a file. The file created follows the GPX standard format which is compatible with various software.
Select Data :
1.From the Routes Center: Click on the box at the beginning of a line to select a route.
2.From the Waypoints Center : Click on the box at the beginning of a line to select a Waypoint. Note that you can make multiple selections using SHIFT or CTRL key.
3.From the chart : Use the Finger Tool to select directly on the chart the data you want
Export Data :
1.Selected in Centers : Click on Action in the Center Toolbar and choose Export ...
2.Selected on the chart : Select [Export] then [Selection] from the [Route] menu (GPX is the file format selected by default)
TIPS - to export all the data, simply choose [Export] then [All] in the [Route] menu.
Note: If you want to export your Routes and Waypoints to a GPS, refer to GPS Upload/Download.
Archive Routes and Waypoints Database
All of your Routes and Waypoints are automatically saved in a database. It is recommended to regularly archive your database to prevent loss of this data.
TIPS - Before you archive your database, it is advised to create and organize folder in ( "My Documents" | "My MaxSea") to easily retrieve your backup
To archive your Database:
1.Select [ Archive Database...] in the [Route] menu
2.The Search Folder window appears
3.Select the folder where you want the backup to be stored
4.Click on OK to confirm
To restore your database, please read : "Restore Routes and Waypoints Database"
63

MaxSea Operator Manual version 12.6
Restore Routes and Waypoints Database
This function is used to restore the routes and waypoints database. Please refer to "Archive Routes and Waypoints" to learn how to make a backup.
To restore the Database:
1.Select [Restore Database...] in the [Route] menu
2.The search folder windows appears
3.Select the folder where you previously stored your backup data
4.Click on OK
5.A pop-up dialog box will appear and warn you that ALL your existing routes and waypoints will be erased and replaced by the archive
 Tips: If you want to merge your waypoint/route database with other waypoint/route data, you will have to choose [Import] then [GPX file] in the [Route] menu. Note that you can only import data that have been exported using the Export Feature
For example, if you want to share your waypoints and routes with someone, Go to ROUTE then select EXPORT. The resulting file could then be IMPORTED into another PC (or the same PC) running MaxSea by selecting ROUTE - IMPORT.
64
Waypoints
Waypoints Overview
Waypoints are georeferenced marks that can have customized attributes (like shape, color, name...). Waypoint can be an isolated point (to mark buoy, place...) or can be used as a part of a route (seaport, arrival...). A Waypoint can be shared by multiple routes.
In this section you will learn :
1.How to create Waypoints or Create Waypoints List
2.How to manage Waypoints (Waypoints Center)
3.How to edit and modify Waypoints attributes (Waypoint Properties)
4.How to create Layer of Waypoints
5.How to Show or hide Waypoints by Layers
6.How to delete Waypoints
See Also Related Topics:
1.How to go to a Waypoint
2.How to Archive Routes and Waypoints Database
3.How to Restore Routes and Waypoints Database
Note: Waypoints used in routes are not deleted when the route is erased (as opposed of QuickWaypoints)
Create Waypoints
All waypoints can be used in planning route or active route. Waypoints can be shared between several routes at the same time.
 To create Waypoints :
1.Select the color and icon symbol of your Waypoints in the toolbar
2.Select the Waypoint Tool and click wherever you want on the chart to add separate waypoints
3.All waypoints are automatically saved in the database.
TIP - You can also add Waypoints by Lat/Long. Simply double-click on the Waypoint Tool to enter coordinates.
Waypoint can also be created :
1.Saved as event at the boat's position by single-clicking on MOB.
2.When activating the MOB function, double-click on MOB and a waypoint named "Man Over Board" will appear on the chart.
65
MaxSea Operator Manual version 12.6
When waypoints are placed they are drawn in blue color on the chart (color selected by default).
Refer to related topics:
1.Show or hide Waypoints from the chart display
2.How to edit and modify details on a waypoint
Create Waypoints List
Before creating a Waypoint list, take care on that the Plotting tool is selected on Waypoint layer, the color and the icon symbol correspond to your choice.
Create a Waypoint List:
1.Double-click on the Waypoint tool or select the [Create Object List....] from the [Edit] menu.
2.The "Create Object list..." dialog appears selected to add waypoints
3.Enter geographical position (L/L) using keyboard
4.After each new position click on "Add Waypoint".
5.When you finished entering all the wanted positions, click "Close" and waypoints are simultaneously added in the waypoint database.
Waypoints Center
All Waypoints created with the Plotting Tool (Pencil) are listed in the Waypoints Center. To open it, select [Centers] then [Waypoints] in the [Route] menu. Each line in the table corresponds to a waypoint and gives details such as its identity and its location. Some fields like Name and Comments can be changed by the user.
To select a Waypoint in the Center, click on the box at the beginning of a line. Note that you can select multiple waypoints by using SHIFT or CTRL key.
The Waypoints Center has a toolbar where you can :
66

Waypoints
 access and modify the properties of the Center to add or remove a data column
 select all the Waypoints
 un-select all waypoints
 display the Waypoint Properties box. (for more details see related topic: "Edit Waypoint ".)
 center selected Waypoint on the chart. Note that you can select multiple Waypoints. MaxSea will automatically setup the scale to display all the selected waypoints in the window
 search for a specific waypoint that contains a key-word or text term.
Use the "Action" menu or the right-click to:
1.Go to this waypoint
2.Delete selected waypoint
3.Manually add waypoint to a route
4.Print List of Waypoint
5.Export selected waypoint
Note: Only Waypoints created with the Plotting Tool (Pencil) appear in the Waypoints Center. QuickWaypoint created with the Route Tool are not listed.
Edit Waypoints
You can easily move or delete waypoints with the Move Tool and the Delete tool (Pacman.) If you modify a waypoint that belongs to one or several routes, a warning will appear.
TIPS - When you select a Waypoint with the Finger Tool (on the chart) or in the Waypoints Center, you can change the shape (icon) and color by clicking on the appropriate icon in the Toolbar. For example, to change the appearance of a group of waypoints shown on the chart, drag a box with the finger tool around the waypoints that you want to change , then choose any color or select a different shape. The selected waypoints will change accordingly.
Waypoint Properties:
67

MaxSea Operator Manual version 12.6
The waypoint properties dialog gives details for each selected Waypoint. You can edit and modify waypoint properties individually. To display the Waypoint properties you can either double click on the Waypoint with the Finger Tool or click on the hyperlink that appears when you leave your mouse over a Waypoint.
The Waypoint Properties appears on screen and give you the following details:
Waypoint Attributes |
Description |
|
Display By |
|
First time |
|
|
|
(default |
|
|||
|
default |
|
|
|||
|
|
|
|
value) |
|
|
|
|
|
|
|
|
|
|
|
|
|
|
|
|
WP Lat/Lon |
The POS data gives you the actual position of the selected |
|
|
|
Software |
|
|
waypoint. To change its value at any time, left click on these |
|
|
|
||
|
|
|
|
attribute |
||
|
values; a dialog box appears on screen and allows you to |
|
|
|
||
|
|
|
|
|
|
|
|
modify Geographic coordinates and its position such as its |
|
|
|
|
|
|
latitude and longitude. |
|
|
|
|
|
|
|
|
|
|
|
|
WP Name |
This field is empty by default. When you enter the name, a |
|
|
|
User's attribute |
|
|
label will be displayed on the chart. |
|
|
|
||
|
|
|
|
|
|
|
|
For how to activate its display see related topic " Option |
|
|
|
Empty by |
|
|
|
|
|
default |
||
|
Route" |
|
|
|
||
|
|
|
|
|
|
|
|
|
|
|
|
|
|
WP Comment |
This field is empty by default. Enter comment if you want to |
|
|
|
User's attribute |
|
|
track down a place in particular. |
|
|
|
Empty by |
|
|
|
|
|
|
||
|
|
|
|
|
default |
|
|
|
|
|
|
|
|
Color |
Click on the color label to display a window that will allow you |
|
|
|
|
|
|
to change the color of the Waypoint |
|
|
|
Blue color |
|
|
|
|
|
|
selected by |
|
|
For getting more information about GPS data see related |
|
|
|
default |
|
|
topic "GPS data transfer " |
|
|
|
|
|
|
|
|
|
|
|
|
GPS / NN WPID |
Name which results from uploading waypoints from an |
|
|
|
|
|
|
external system. |
|
|
|
External |
|
|
|
|
|
|
attribute Not |
|
|
For getting more information about GPS data see related |
|
|
|
modifiable. |
|
|
topic "GPS data transfer " |
|
|
|
|
|
|
|
|
|
|
|
|
GPS / NN comment |
Comments which result from uploading waypoints from an |
|
|
|
External |
|
|
external system. |
|
|
|
|
|
|
|
|
|
attribute Not |
|
|
|
|
|
|
|
|
|
|
|
|
|
|
modifiable. |
|
|
|
|
|
|
|
|
Layer |
You can attribute a specific Layer to the Waypoint.. You need |
|
|
|
User's attribute |
|
|
first to create Layer in "File : New WP Layer" |
|
|
|
"Waypoint" |
|
|
|
|
|
|
||
|
|
|
|
|
layer by default |
|
|
|
|
|
|
|
|
Hyperlink |
You can link object (such as picture) to Waypoints. Simply |
|
|
|
User's attribute |
|
|
enter the path of the object |
|
|
|
Empty by |
|
|
|
|
|
|
||
|
|
|
|
|
default |
|
|
|
|
|
|
|
|
Quick WP |
By default the Quick WP is turned off and this means that |
|
|
|
OFF by default |
|
|
the selected Waypoint is a temporally displayed on the chart |
|
|
|
||
|
|
|
|
when you plot |
||
|
and it is not listed in the Waypoints Database. They are |
|
|
|
||
|
|
|
|
isolated |
||
|
Quick Waypoints linked to a specific route (if you delete the |
|
|
|
||
|
|
|
|
waypoint on |
||
|
route, all the Quick Waypoints will be erased). Turn on this |
|
|
|
||
|
|
|
|
the chart |
||
|
option if you want to add it in the database as a waypoint. |
|
|
|
||
|
|
|
|
|
|
|
|
|
|
|
|
|
|
Symbol |
Only available when the selected waypoint provides from |
|
|
|
External |
|
|
GPS transfer and the GPS needs specific symbol for |
|
|
|
attribute Not |
|
|
|
|
|
|
|
|
68