

1.3. THE FIRST APPLICATION |
31 |
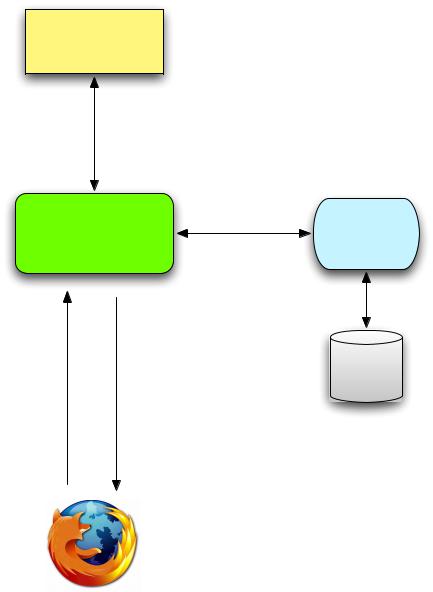
1.3.3 Model-View-Controller (MVC)
Even at this early stage, it’s helpful to get a high-level overview of how Rails applications work (Figure 1.11). You might have noticed that the standard Rails application structure (Figure 1.4) has an application directory called app/ with three subdirectories: models, views, and controllers. This is a hint that Rails follows the model-view-controller (MVC) architectural pattern, which enforces a separation between “domain logic” (also called “business logic”) from the input and presentation logic associated with a graphical user interface (GUI). In the case of web applications, the “domain logic” typically consists of data models for things like users, articles, and products, and the GUI is just a web page in a web browser.
When interacting with a Rails application, a browser sends a request, which is received by a web server and passed on to a Rails controller, which is in charge of what to do next. In some cases, the controller will immediately render a view, which is a template that gets converted to HTML and sent back to the browser. More commonly for dynamic sites, the controller interacts with a model, which is a Ruby object that represents an element of the site (such as a user) and is in charge of communicating with the database. After invoking the model, the controller then renders the view and returns the complete web page to the browser as HTML.
If this discussion seems a bit abstract right now, worry not; we’ll refer back to this section frequently. Section 1.3.4 shows a first tentative application of MVC, while Section 2.2.2 includes a more detailed discussion of MVC in the context of the toy app. Finally, the sample app will use all aspects of MVC; we’ll cover controllers and views starting in Section 3.2, models starting in Section 6.1, and we’ll see all three working together in Section 7.1.2.
1.3.4 Hello, world!
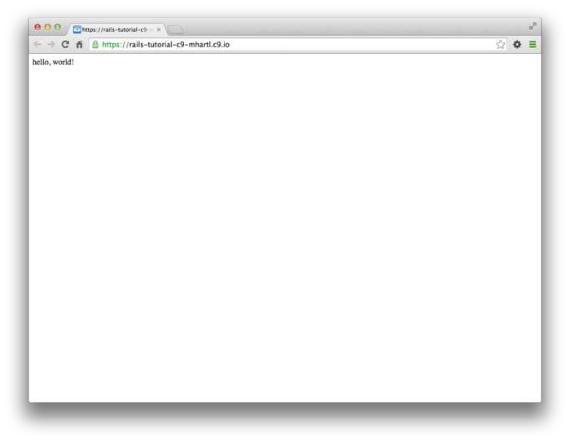
As a first application of the MVC framework, we’ll make a wafer-thin change to the first app by adding a controller action to render the string “hello, world!”. (We’ll learn more about controller actions starting in Section 2.2.2.) The result will be to replace the default Rails page from Figure 1.9 with the “hello, world”
32 |
CHAPTER 1. FROM ZERO TO DEPLOY |
VIEW
CONTROLLER |
MODEL |
DATABASE
Figure 1.11: A schematic representation of the model-view-controller (MVC) architecture.
1.3. THE FIRST APPLICATION |
33 |
page that is the goal of this section.
As implied by their name, controller actions are defined inside controllers. We’ll call our action hello and place it in the Application controller. Indeed, at this point the Application controller is the only controller we have, which you can verify by running
$ ls app/controllers/*_controller.rb
to view the current controllers. (We’ll start creating our own controllers in Chapter 2.) Listing 1.8 shows the resulting definition of hello, which uses the render function to return the text “hello, world!”. (Don’t worry about the Ruby syntax right now; it will be covered in more depth in Chapter 4.)
Listing 1.8: Adding a hello action to the Application controller.
app/controllers/application_controller.rb
class ApplicationController < ActionController::Base
#Prevent CSRF attacks by raising an exception.
#For APIs, you may want to use :null_session instead. protect_from_forgery with: :exception
def hello
render text: "hello, world!" end
end
Having defined an action that returns the desired string, we need to tell Rails to use that action instead of the default page in Figure 1.10. To do this, we’ll edit the Rails router, which sits in front of the controller in Figure 1.11 and determines where to send requests that come in from the browser. (I’ve omitted the router from Figure 1.11 for simplicity, but we’ll discuss the router in more detail starting in Section 2.2.2.) In particular, we want to change the default page, the root route, which determines the page that is served on the root URL. Because it’s the URL for an address like http://www.example.com/ (where nothing comes after the final forward slash), the root URL is often referred to as / (“slash”) for short.
34 |
CHAPTER 1. FROM ZERO TO DEPLOY |
As seen in Listing 1.9, the Rails routes file (config/routes.rb) includes a commented-out line that shows how to structure the root route. Here “welcome” is the controller name and “index” is the action within that controller. To activate the root route, uncomment this line by removing the hash character and then replace it with the code in Listing 1.10, which tells Rails to send the root route to the hello action in the Application controller. (As noted in Section 1.1.2, vertical dots indicate omitted code and should not be copied literally.)
Listing 1.9: The default (commented-out) root route.
config/routes.rb
Rails.application.routes.draw do
.
.
.
#You can have the root of your site routed with "root"
#root 'welcome#index'
.
.
.
end
Listing 1.10: Setting the root route.
config/routes.rb
Rails.application.routes.draw do
.
.
.
# You can have the root of your site routed with "root" root 'application#hello'
.
.
.
end
With the code from Listing 1.8 and Listing 1.10, the root route returns “hello, world!” as required (Figure 1.12).
1.3. THE FIRST APPLICATION |
35 |
Figure 1.12: Viewing “hello, world!” in the browser.