

Название-Сеть в Играх 2006год_Язык-Eng
.pdf194 Networking and Online Games: Understanding and Engineering Multiplayer Internet Games
etmaster.idsoftware.com:27950 |
|
|
|
|
|
|
Game Server on |
|
The Internet |
|
port 27960 |
|
|
|
|
|
|
|
192.168.10.50 |
Potential |
NAPT-enabled |
|
|
players |
router |
Private subnet 192.168.10/24 |
|
|
144.133.92.248 |
192.168.10.2 |
|
Addresses and ports are re-mapped between private network and ISP
Outbound: Source192.168.10.50:27960 becomes 144.133.92.248:47831
Inbound: Packets to144.133.92.248:47831 go to 192.168.10.50:27960
Figure 12.4 Example of game server behind a NAT router
For example, let us assume that your server is on a local LAN at 192.168.10.50:27960 and your NAT router’s external, public IP address is 144.133.92.248 (Figure 12.4). Your game server’s registration packet was re-mapped on the way to etmaster.idsoftware.com so that it appeared to originate from 144.133.92.248:47831. Your NAT router simultaneously established another internal mapping such that UDP packets coming back from etmaster.idsoftware.com:27950 to 144.133.92.248:47831 are re-mapped and forwarded on the internal LAN to 192.168.10.50:27960.
The problem is that your NAT router has no rules to handle UDP packets coming in to 144.133.92.248:47831 from anyone else on the Internet. Prospective players probing your server ‘at’ 144.133.92.248:47831 will receive no answer.
The solution is to manually configure your NAT router such that all packets coming in to 144.133.92.248:47831 from anywhere are re-mapped and forwarded on the internal LAN to 192.168.10.50:27960. In fact, the general approach is to create a bi-directional mapping rule stating (effectively) that ‘144.133.92.248:47831 on the outside is equivalent to 192.168.10.50:27960 on the inside network, regardless of who wants to talk to us’. (Every NAT-capable router has its own technique and terminology for configuring such mappings. You will need to consult the userguide for your own router for details.) With this additional rule, your game server will be playable by people located on the public side of your NAT router.
You may use any free UDP port you like on the public side of your NAT router. Players who find you through the automated server-discovery mechanisms will usually be unaware of your server’s actual port number – so long as they can probe your server and connect they will be happy.
12.2.7 Monitoring and Administration
When started from the command line the game server prints information to the screen and accepts keyboard input in real time, allowing you to monitor server state and modify server configuration parameters. For example, you could type ‘status’ to find out the names of all clients currently connected, along with their current ping time, IP address and port number.

Setting Up Online FPS Game Servers |
195 |
|
|
However, you will usually want to start the game server and then leave – returning only occasionally to monitor activities and perhaps modify parameters. For this you need to enable logging and ‘rcon’ (remote console).
To track server activity, you enable logging with ‘+set g log logfilename ’ – either on the command line or in the server.cfg file you use, to carry the server’s main configuration settings. The server log output will then be directed to the file logfilename . By default, this file will be placed under ‘/home/et/.etwolf/etmain’, but the actual location can be changed with ‘+set fs homepath newdirectory ’. So, for example, the following line:
/home/et/% etded +set g_log mylog +set fs_homepath /home/et/blah/
would force the game server’s log output to be sent to ‘/home/et/blah/etmain/mylog’. Changing fs homepath is useful when running multiple instances of WET server on
the same host – you can use a separate fs homepath for each server. The main WET server, mods and PunkBuster will create their logging and configuration subdirectories below fs homepath.
A relative fs homepath is interpreted relative to ‘/home/et/enemy-territory/’. Thus using:
+set fs_homepath blah
the logfile is /home/et/enemy-territory/blah/etmain/mylog, and using:
+set fs_homepath /home/et/blah
the logfile is /home/et/blah/etmain/mylog.
If you are using a modified game (a mod, such as ETPro [ETPRO05]) the logfile will appear under the mod’s name inside the directory pointed to by fs homepath, rather than under ‘etmain’.
Remote control of your game server is possible through the ‘rcon’ facility. Rcon is a client-side console command that passes text to the server, and prints the server’s output back onto the client’s console window. Rcon access to a server is enabled by setting an rcon password with ‘+set rconpassword password ’.
For example, to set the rcon password to ‘mypass’ you would start the server with:
+set rconpassword mypass
Then from a client you could execute the ‘status’ command on the server with:
/rconpassword mypass /rcon status
(You only need to enter the /rconpassword line once, then use multiple/rcon commands as necessary.)
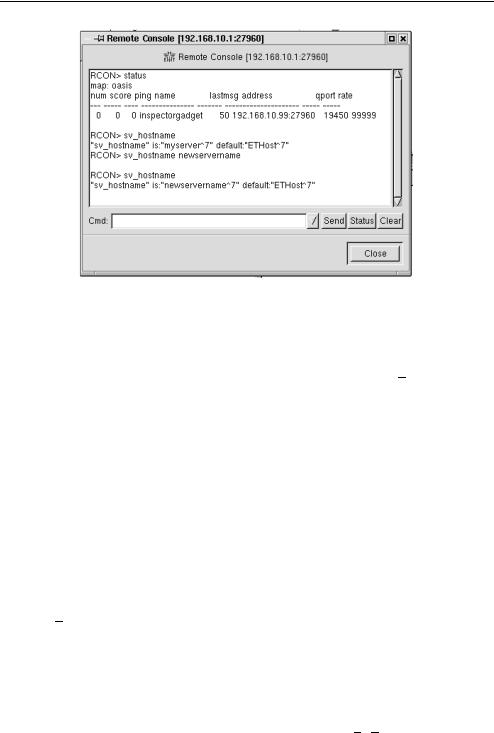
Rcon functionality is also available in tools such as the GUI-based XQF serverdiscovery tool [XQF05]. Figure 12.5 shows XQF’s Rcon console in action – in this case the number of players has been checked, the server’s name checked, then changed from ‘myserver’ to ‘newservername’ and then the change confirmed.
Unfortunately, the rcon mechanism has an important weakness. Every time an rcon command is executed, the client (or third-party application such as xqf) sends the rconpassword
196 Networking and Online Games: Understanding and Engineering Multiplayer Internet Games
Figure 12.5 Using Rcon within XQF to access a server at 192.168.10.1:27960 (client logged in from 192.168.10.99)
in clear-text over the Internet along with the requested server-side command. (The actual rcon command is sent as an ASCII text string ‘rcon rconpasswd rcon command ’ in a UDP packet to the game server’s active port.) Anyone sniffing the IP network between your client and your server will easily be able to extract your rcon password and begin remotely interfering with your server. For this reason, rcon should only be used from client machines that have direct IP connectivity to the server (or at least have connectivity over a path that can be trusted).
12.2.8 Automatic Downloading of Maps and Mods
New maps and ‘mods’ (extensions to the base game engine) are often released by thirdparty developers. If you run your server with one or more new maps, or a game mod, clients cannot connect unless they too have the same maps and mods installed at their end. Clients can manually retrieve and install the necessary maps and mods before connecting to your server, or the server itself can automatically download the necessary maps and mods when the client first connects. Server downloads of new maps and mods is controlled by the ‘sv allowdownload’ option – set it to ‘1’ (the default) to enable downloads, or ‘0’ to block downloads (the client must be manually updated).
Traditional downloading involves data being streamed out to the client by the game server itself, and is usually capped at the snapshot rate (in bytes/second) requested by the client. (And in any case some online discussion of WET suggest the maximum achievable rate is around 13 Kbyte/sec.) Although appropriate for game-play, this can be quite slow for downloading files hundreds or thousands of kilobytes long. (And if you want to further limit the impact of map downloads on the game server, set ‘sv dl maxRate’ to an even lower value.) If you are connected via a LAN or other high-speed link to the server, WET offers an alternative approach – downloads from a separate web site.

Setting Up Online FPS Game Servers |
197 |
|
|
Setting ‘sv wwwDownload’ to 1 will enable your server to redirect clients to a web site from which they can download new maps and mods. The actual web site is specified by setting ‘sv wwwBaseURL’. For example:
+set sv_wwwBaseURL ‘‘http://www.mydomain.com/mymaps’’
would cause new clients to retrieve additional maps and mods from ‘http://www. mydomain.com/mymaps/etmain/’ (in other words, the ‘mymaps/etmain/’ directory on the www.mydomain.com website). Since the webserver can be an entirely different machine to the game server (and indeed may be anywhere else on the Internet), this approach can significantly improve download speeds for clients attaching to your server for the first time.
If the redirection fails, and ‘sv wwwFallbackURL’ contains a valid URL, the client will attempt to display the webpage referred to by ‘sv wwwFallbackURL’. This backup webpage should contain instructions on how to manually retrieve the maps and/or mods used by your game server.
12.2.9 Network Performance Configuration
Table 12.2 lists a number of server-side variables and settings affecting the network traffic generated by your server.
Server-side variables can be set on the command line or in server.cfg file.
Table 12.3 lists a number of client-side variables and settings affecting the network traffic generated by your server.
The settings in Table 12.2 on the server side can override settings in Table 12.3 requested at the client side. Chapter 10 provides a discussion of the underlying principles.
12.2.10 Running a Windows Server
In principle, you can start a ‘listen server’ from within a WET client on a Windows machine. However, this is really only suitable for private, local games. To host a public
Table 12.2 Server-side settings controlling network traffic
Variable |
|
Role |
|
Default |
|||||
|
|
|
|
|
|
|
|
|
|
sv |
maxrate |
Upper bound on ‘rate’ (the maximum snapshot rate |
0 (unlimited) |
||||||
|
|
|
|
|
in bytes/second requested by the client) |
|
|
||
sv |
minping |
Clients with ping below this value will not be |
0 |
|
|||||
|
|
|
|
|
allowed to join the server |
|
|
||
sv |
maxping |
Clients with ping above this value will not be |
0 |
(unlimited) |
|||||
|
|
|
|
|
allowed to join the server |
|
|
||
sv |
lanforcerate |
1: If clients are on a local LAN, force their rate and |
1 |
|
|||||
|
|
|
|
|
snaps settings to highest possible. 0: disable this |
|
|
||
|
|
|
|
|
feature |
|
|
||
sv allowdownload |
1: Allow download of new maps and mods from |
1 |
|
||||||
|
|
|
|
|
server. 0: disable this feature |
|
|
||
sv |
dl maxrate |
Rate limit in bytes/second for downloading maps and |
42,000 (although |
||||||
|
|
|
|
|
mods to clients (if sv allowdownload is 1) |
|
in practice often |
||
|
|
|
|
|
|
|
|
|
lower) |
|
|
|
|
|
|
|
|
|
|

198 Networking and Online Games: Understanding and Engineering Multiplayer Internet Games
Table 12.3 Client-side settings controlling network traffic
Variable |
Role |
Default |
||
|
|
|
|
|
Rate |
Maximum data rate (in bytes per |
5000–25,000 |
||
|
|
|
second) the client wishes to receive |
(depends on |
|
|
|
snapshots from the server |
‘network |
|
|
|
|
speed’) |
cl maxpackets |
Rate (in packets per second) at which |
30 |
||
|
|
|
client will send command packets |
|
|
|
|
to the server |
|
Snaps |
Rate (in packets per second) at which |
20 |
||
|
|
|
client wishes to receive snapshots |
|
|
|
|
from server |
|
|
|
|
|
|
server on a Windows machine, you should launch the Windows equivalent of the dedicated Linux server described in this chapter. Most of the differences exist only in the name of the executable used to launch the server, and the syntax of filenames and pathnames.
Installation involves downloading and running the version 2.55 installer, and then downloading and running the 2.60 patch (see Table 12.1). Assuming you took the default installation locations, your WET client and server files are most likely stored under ‘C:\Program Files\Wolfenstein – Enemy Territory\’, and the dedicated server executable is ‘ETDED.exe’.
When launched from the command line, ETDED.exe uses the same command line options as previously described for the dedicated Linux server. The hierarchy of folders and sub-folders under C:\Program Files\Wolfenstein – Enemy Territory\’ replicates that of the Linux installation.
12.2.11 Further Reading
It is not really within the scope of this book to provide a tutorial on tweaking server configuration options, as most of them relate to WET game-play, in-game physics, and the PunkBuster anti-cheat system [PBUSTER]. Documentation installed along with WET itself (mentioned earlier) provides a starting point for further reading, and there are numerous sites around the Internet with suggestions on how to tweak game-play and add ‘mods’ (modifications) such as ETPro [ETPRO05].
12.3 Half-Life 2
‘Half-Life 2’ was released as a single-player FPS game in late 2004 by Valve [VALV2005], an innovative successor to the original Half-Life [HALFLIFE2004]. Included in the client software, ‘Half-Life 2: Deathmatch’ allows multiplayer, online death-match style of play. An upgraded version of Counter-Strike, the team-play modification of Half-Life, was also released as ‘Counter-Strike: Source’.
One of the most significant aspects of Half-Life 2 was Valve’s launch of Steam – an entirely revamped client authentication and software distribution system [STEAM2004]. All players must establish Steam accounts, which are then used for authentication and validation purposes (even when playing the single-player mission). A player’s legitimately
Setting Up Online FPS Game Servers |
199 |
|
|
purchased copies of Half-Life 2, Counter-Strike:Source, etc., are registered against the player’s Steam account. With their Steam account a player can also purchase additional games online without ever holding a CD or DVD again.
Installing Half-Life 2 on a home PC involves installing a Steam client that subsequently auto-launches whenever the PC restarts. By making Steam an integral part of the HalfLife 2 experience, Valve also ensure that patches to their flagship games are pushed out as uniformly and expeditiously as possible.
In this section, we will discuss the installation and set-up of a dedicated Half-Life 2 multiplayer (HL2MP) server that can be reached by players from around the Internet.
12.3.1 Obtaining and Installing the Linux Dedicated Server
Valve’s Steam service actually simplifies the steps you need to know for initially installing the dedicated server. For now, we will assume that your intended server host has a keyboard and monitor and is running at least a basic text console (the installer does not use any menus and does not require a GUI).
Create (or ask the system administrator to create) a dedicated user account for running the HL2MP server (for example, user name ‘hl 2’ and a home directory of ‘/home/hl2/’). This helps to keep all your HL2MP server activities distinct from other users on the server host. HL2MP does not need root (administrator) privileges to run. For the rest of this description you are assumed to be logged in as the ‘hl 2’ user.
Figure 12.6 shows the steps for initially retrieving the Steam client. Use the command ‘fetch’ (or a similar command ‘wget’) to retrieve hldsupdatetool.bin from the main Steam site. Make the file executable (‘chmod 755’), then execute it. This extracts a new executable called ‘steam’. Run this once without any command line parameters, and it will automatically update itself over the Internet. If you were to now re-run ‘./steam’ without parameters, you would get its usage message on the screen.
Figure 12.7 shows the command line you must now use to begin installing the HL2MP server itself. These particular options tell the Steam client to ‘update’ (and download in its entirety if necessary) the hl2mp server components and place them in directory ‘hl2mp’ (relative to the current directory, i.e. ‘/home/hl2/hl2mp’). The final line shows you what files and subdirectories have been installed. At the time of writing, the full installation takes around 671 Mbytes of disk space.
You can re-run the Steam client at any time to check for updates. Figure 12.8 shows the output when run immediately after our first installation – there is nothing to update. (Of course, by the time you read this the specific versions of each component are likely to be different.)
/home/hl2% fetch http://www.steampowered.com/download/hldsupdatetool.bin /home/hl2% chmod 755 ./hldsupdatetool.bin
/home/hl2% ./hldsupdatetool.bin /home/hl2% ./steam
Checking bootstrapper version ...
Getting version 14 of Steam HLDS Update Tool Downloading. . . . . . . . . . . .
Steam Linux Client updated, please retry the command /home/hl2%
Figure 12.6 Using the Steam installer to update itself

200 Networking and Online Games: Understanding and Engineering Multiplayer Internet Games
/home/hl2% ./steam -command update -game hl2mp -dir hl2mp
[..steam downloads roughly 671MByte of hl2 and hl2mp material..]
/home/hl2% ls -al hl2mp |
|
|
|
|
|||
total 562 |
|
|
|
|
|
|
|
drwxr-xr-x |
5 |
hl2 |
hl2 |
512 |
Oct |
24 |
21:50 . |
drwxr-xr-x |
5 |
hl2 |
hl2 |
512 |
Oct |
24 |
21:50 .. |
-rw-r--r-- |
1 |
hl2 |
hl2 |
1381 |
Oct |
24 |
21:52 InstallRecord.blob |
drwxr-x--- |
2 |
hl2 |
hl2 |
1024 |
Oct |
23 |
23:36 bin |
drwxr-x--- |
7 |
hl2 |
hl2 |
512 |
Oct |
23 |
23:36 hl2 |
drwxr-x--- |
11 |
hl2 |
hl2 |
512 |
Oct |
23 |
23:24 hl2mp |
-rwxr-xr-- |
1 |
hl2 |
hl2 |
183825 |
Oct |
23 |
23:36 srcds_amd |
-rwxr-xr-- |
1 |
hl2 |
hl2 |
183793 |
Oct |
23 |
23:36 srcds_i486 |
-rwxr-xr-- |
1 |
hl2 |
hl2 |
183793 |
Oct |
23 |
23:36 srcds_i686 |
-rwxr-xr-- |
1 |
hl2 |
hl2 |
10164 |
Oct |
23 |
23:36 srcds_run |
/home/hl2% |
|
|
|
|
|
|
|
Figure 12.7 Using the Steam installer to install a Half-Life 2 multiplayer server
/home/hl2% ./steam -command update -game hl2mp -dir hl2mp Checking bootstrapper version ...
Updating Installation
Checking/Installing ’Half-Life 2 Deathmatch’ version 11 Checking/Installing ’Base Source Shared Materials’ version 7 Checking/Installing ’Base Source Shared Models’ version 3 Checking/Installing ’Base Source Shared Sounds’ version 3 Checking/Installing ’Source Dedicated Server Linux’ version 47 HLDS installation up to date
/home/hl2%
Figure 12.8 Updating a current hl2mp installation
If you want to install Counter-Strike:Source instead (or in addition to), then replace ‘-game hl2mp’ with ‘-game “Counter-Strike Source”’ in the examples above. You must also specify an alternative directory location with the ‘-dir’ option (otherwise the CounterStrike:Source software components will likely overwrite some of your hl2mp software components).
Because the Steam installer uses a text-based interface you may also do this installation process while remotely logged into the server host from elsewhere (for example, over an ssh connection [SSH2005]). This is most convenient when your server host is already mounted in remote rackspace without a dedicated keyboard and monitor.
12.3.2 Starting the Server for Public Use
A couple of technical decisions need to be made before starting your dedicated server.
•What UDP port will it run on?
•Is this for local LAN play, or available for anyone on the Internet?
•What is the maximum number of supportable players?
(There are also some game-specific questions you need to consider, such as ‘what game type and map rotation do I want?’. In part, these are subjective decisions that

Setting Up Online FPS Game Servers |
201 |
|
|
depend largely on your motives for running a server. Detailed descriptions of how to set up various game types are outside the scope of this book.)
By default, an HL2MP server will bind itself to UDP port 27015 on the local server host. However, you can explicitly specify an alternative port if another process on the server host is already using port 27015 (for example, another HL2MP server).
Player slots should be limited based on your available network capacity and processor speed. Use the discussion in Chapter 10 to estimate your per-player network bandwidth requirements.
From within the hl2mp subdirectory, the usual way to start a dedicated server is to execute ‘srcds run’ with a number of command line options. For example:
/home/hl2/hl2mp/% ./srcds_run -game hl2mp -console +map dm_overwatch
This particular set of options instructs the server to run the hl2mp game on the default UDP port 27015 and start map ‘dm overwatch’. (If no map is specified the server initialises, but does not start operation.) Because of how srcds run is written you must run this command from within the directory in which you installed the HL2MP server.
By default, the server will look for a configuration file named ‘server.cfg’ under ‘./hl2mp/cfg’(relative to the directory in which srcds run is located, which in our example would be at ‘/home/hl2/hl2mp/hl2mp/cfg/server.cfg’). Almost everything that can be configured about the HL2MP server’s operation can be specified or overridden in server.cfg.
By default, the server will start with two player slots. Adding the ‘+maxplayers N’ option tells the server to create N player slots.
If you are running on a host with multiple IP interfaces, you may wish to explicitly identify which IP interface should be advertised by the HL2MP server. For example, the following command line specifies that the server advertises itself (and only ‘exists’ on) IP address 192.168.1.50:
/home/hl2/hl2mp/% ./srcds_run -game hl2mp -console +map dm_overwatch -ip 192.168.1.50
To run your server on a non-standard UDP port, and bind to a particular IP interface on your local server host, use both the ‘-ip’ and ‘-port’ options. For example, to use port 27085 as the port for in-game traffic in a game for 16 players:
/home/hl2/hl2mp/% ./srcds_run -game hl2mp -console +map dm_overwatch -ip 192.168.1.50 -port 27085 +maxplayers 16
By default, your server will register with Steam and become available to other players around the Internet. If you happen to be sniffing the network connected to your server, you will see server-discovery probe traffic coming in within minutes (or sometimes only seconds) of starting your server. (You may also see server-discovery probes from the Internet for some period of time after you shut down your public server. It takes time for knowledge of your server’s IP and port number to disappear from all the places it was stored when you first registered as a public server.)
If you copy the ‘./steam’ executable (used to install and update HL2MP) into the same directory as ‘srcds run’, you can use the ‘-autoupdate’ command line option to request that

202 Networking and Online Games: Understanding and Engineering Multiplayer Internet Games
srcds run updates the HL2MP server immediately prior to starting. (Internet connectivity is required for autoupdate to work. This option will not be very helpful if you are running a LAN-only server on an isolated network.)
12.3.3 Starting a LAN-only Server
Adding the ‘+sv lan 1’ option prevents your server from registering as a public server. For example:
/home/hl2/hl2mp/% ./srcds_run -game hl2mp -console +map dm_overwatch +sv_lan 1
Your server will still contact the Steam master servers, but will not register as a public server, and will not use Steam to authenticate clients and will not use Valve Anti-Cheat (VAC) to protect the server. The server may be located by players on your local LAN using the ‘LAN game’ option in their Steam clients.
Clients discover servers on their local LAN by broadcasting server-discovery probes (UDP packets sent to IP address 255.255.255.255 with the ASCII text ‘TSource Engine Query’ in their payloads). Each time a player presses their ‘refresh’ button in the Steam client’s LAN server locator window, six UDP broadcast probes are sent – one each to ports 27015, 27016, 27017, 27018, 27019 and 27020 in that order. This normally triggers a response from any of the dedicated servers on the local LAN who are listening on one of these six common HL2MP server ports. A server using, for example, port 27085 would not be visible to the Steam client’s LAN search function. A prospective player would need to explicitly name the server by IP address and port number in order to connect.
As with WET (discussed earlier in this chapter) if you run a LAN-only game using ‘+sv lan 1 and also specify the game server’s local IP address with ‘-ip w.x.y.z’ the server appears to ignore the server-discovery queries being sent to 255.255.255.255. In this case, each client will need to manually specify the server’s IP address (w.x.y.z) and port number in order to connect.
12.3.4 Ports You Need Open on Firewalls
It is entirely possible you have a firewall between your server and the outside world. If so, you must ensure that the server can send packets outbound to a range of ports. HL2MP seems to need quite a few ports open for clients and servers to operate freely. A dedicated public server has been seen to talk to remote Steam-related servers on ports 27011 (UDP), 27014 (UDP) and 27030 (TCP). UDP port 27020 is required open for Half-Life TV. Inbound access is obviously required to the server’s actual game-play port (UDP to 27015, or whatever was set with ‘-port NNN’). If remote administrative access is required (using the ‘rcon’ function, discussed later) you will also need to enable inbound TCP access to the game-play port.
12.3.5 Dealing with Network Address Translation
Running an HL2MP server behind a NAT-enabled router introduces a number of issues. These have largely been discussed earlier in this chapter in relation to WET, and will not

Setting Up Online FPS Game Servers |
203 |
|
|
be repeated here. Although HL2MP and Steam use a number of ports, only the gameplay port (‘-port NNNN’) must be visible to the outside world. For the reasons described earlier, you will need to install a special rule into your NAT-enabled router to ensure unsolicited server-discovery probes from the wider Internet are properly routed to your HL2MP server. If you plan to remotely manage your server with ‘rcon’, you will need to put in the same rule for both UDP and TCP traffic.
12.3.6 Monitoring and Administration
When started from the command line the game server prints information to the screen and accepts keyboard input in real time, allowing you to monitor server state and modify server configuration parameters. For example, you could type ‘status’ to find out the names of all clients currently connected, along with their current ping time, IP address and port number.
However, you’ll usually want to start the game server and then leave – returning only occasionally to monitor activities and perhaps modify parameters. For this you need to enable logging and ‘rcon’ (remote console).
To set up logging from your server, the following commands should be in your server.cfg file:
log on
sv_logsdir "<logdirectoryname>" sv_logfile 1
sv_logecho 1 sv_logdetail 3 sv_logmessages 1
The logdirectoryname parameter is the name of a directory within which you wish to store your logfiles. If provided as a relative pathname, it is interpreted relative to the hl2mp game directory. For example, when using the hl2 user account described above, ‘sv logsdir “logs/todayslogs”’ would result in logfiles being created inside the directory ‘/home/hl2/hl2mp/logs/todayslogs/’.
The actual logfiles will be created inside this directory with names ‘Lmmddxxx.log’, where mm is the month, dd is the day, and xxx in an integer number starting at ‘000’ and incrementing with every map change. Each logfile will contain date and time stamps of events such as players joining and leaving, their playernames, Steam IDs and the IP address:port from which the client connected.
Remote control of your game server is possible through the ‘rcon’ facility. Rcon is a client-side console command that passes text to the server, and prints the server’s output back onto the client’s console window. Rcon access to a server is enabled by setting an rcon password with the ‘+rcon password password ’ option when starting your server.
For example, to start a LAN-only server with the rcon password of ‘mypass’ you could use:
/home/hl2/hl2mp/% ./srcds_run -game hl2mp -console +map dm_overwatch +sv_lan 1 +rcon_password mypass
Figure 12.9 shows how you would then access the server from the console of an HL2 game client already connected to the server. The first use of ‘rcon status’ resulted in