

Programmers Heaven: C# School
The program will look like this when run:
Image List Control
The image list is an invisible control. It is merely used to store the images to be used in other controls, such as the tree view or list view controls. An image list (like a main menu, context menu, toolbar or standard dialog) is added in your program as a resource and it does not have any graphical presentation in your application. It is represented in .Net by the System.Windows.Forms.ImageList class.
When you select the image list control from the Visual Studio tool box and place it on the form, it is literally added as a resource and is displayed below the form in the designer as an icon. You can select it from there and change the necessary properties.
The fundamental property of the image list is its Name. An Image List has relatively few properties. The most important is the 'Images' collection, which holds the images stored in the image list. When you click the Images property of the Image List in Visual Studio's designer, it shows an image collection editor which allows you to add different .bmp, .jpg and .gif pictures to your image list collection. The 'ImageSize' property represents the size of the images in the list. The default is 16, 16 in my Visual Studio when using a screen resolution of 800 x 600.
Attaching An Image List to different controls
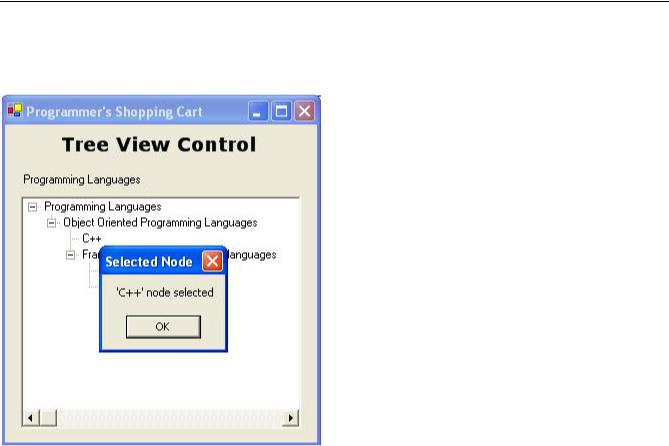
An image list is attached to different controls, e.g. a tree view, list view or toolbar. The tree view and tool bar controls have a property called ImageList which is used to attach an image list to them. The individual images are attached to individual nodes or buttons when adding these. For example, the Add() method of the Nodes collection
219
Programmers Heaven: C# School
of the tree view control has an overloaded version which accepts the text for the node and the index of the image in the attached image list.
List View Control
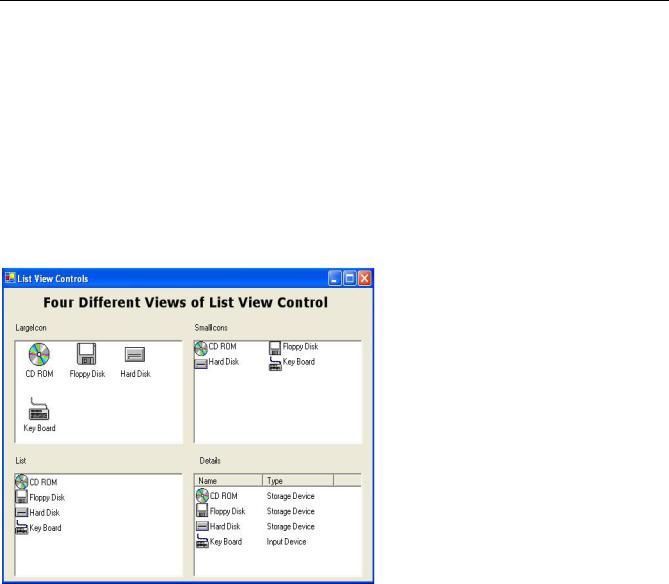
The List View control is a very important and interesting control. It is used to hold a list of items and can display them in four different views; Large Icons, Small Icons, List and Details. The all famous 'Windows Explorer' uses the list view control to show different icons. A list view is represented in .Net by the System.Windows.Forms.ListView class. The following screen shot demonstrates four different views of the list view controls. The 'View' property of the list view is used to change the view of list view control.
Two Image Lists in the List View Control
Two image lists can be added to a list view control. One is called the LargeImageList and its images are used for the icons in large icon view. The other image list is called SmallImageList and its images are used for the icons in small icon, list and detail view. Usually the two image lists are the same with the difference only in their ImageSize property. For example in the above screen shot, the size of images in the large image list is 32, 32 while the size of images in the small image list is 20, 20 and we have used the same images for the two image lists; in fact we just copy-paste one image list and changed the size of it.
Adding items to the list view control using designer
Visual studio provides an easy way to add items to the list view control. To add items to the list view control, simply click the 'Items' property of the list view in the properties window. It will open the ListView Collection Editor.
220
Programmers Heaven: C# School
Here you can use the Add button to add items to the list. Each item has a Text property which represents the text displayed with each item. Each item also has the ImageIndex property which represents the image to be attached with the item. The images are loaded from the attached image list (An image list can be attached using LargeImageList or SmallImageList property of the list view control as described earlier). If multi-column list view is used (which we will describe later in the lesson), The SubItems property can be used to add the sub items of an item. Similarly, items can be removed using the Remove Button.
Adding Items at runtime using code
The ListView control has a property called Items which stores the collection of ListViewItem to be stored in this list view control. Items can be added or removed using its Add() and Remove() methods. The Add() method has three overloaded versions. One takes only a string which is used to represent the text of the item. The second one takes a string and an image list index. The string is used to for the text label and the image index is used to attach the particular image from the attached image list to this item. The third one takes the ListViewItem object. The following code adds some items to the list view
listView1.Items.Add("Disk"); |
// |
text |
label is passed |
listView1.Items.Add("Disk", 0); |
// |
text |
label and image index is passed |
ListViewItem item = new ListViewItem("Disk", 2);// a new ListViewItem object is created |
|||
listView1.Items.Add(item); |
// and added to the list view control |
||
|
|
|
|
221
Programmers Heaven: C# School
Events for List View Control
The most frequently used event for the list view control is SelectedIndexChanged event which is triggered when the selection in the list view is changed. The following event handler prints the selected item's text in the message box whenever the selection in the list view changes.
private void listView1_SelectedIndexChanged(object sender, System.EventArgs e)
{
foreach(ListViewItem item in listView1.SelectedItems)
{
MessageBox.Show(item.Text);
}
}
Main Menu
Main menu is also added to the form as a resource. Main menu is represented in .Net by the System.Windows.Forms.MainMenu class. You can just pick and place the Main Menu control from the visual studio toolbox on to the form. As a result Visual studio will show an empty main menu at the top of the form. Change the name of the main menu and add options in the menu by clicking it.
Some important points about main menus are:
•You can change the name and text of the main menu item from the properties window while selecting it in the designer.
•You can also apply shortcut keys (like Ctrl+t or Alt+F5) for the menu items using the properties window.
•You can make a dashed line (just like the one between Save and Exit option in the above screen shot) in the menu by writing only dash - in the menu item text.
•You can add a checkbox before a menu item using its RadioCheck property.
•You can add an event handler for the menu item just by double clicking it in the designer
222