


Essential Tools
Anyone using Linux for more than a platform to browse the Internet needs to know how to administer their sys-
tems. To execute the administration successfully, they need to know how to edit files — especially through a remote connection.
This chapter covers two of the most popular text editors for Linux — vi and Emacs. These editors are simple to use, and you can employ them through a remote connection. This chapter also covers a few of the more useful commands for administrators (and everyday users).
Using Text Editors in Debian GNU
There is hardly a script, configuration, or text file that does not require a change now and then within the Linux system. These text files are generally easy to change, but you must change them with a text editor. There are a number of text editors available for Linux systems, but choosing one usually comes down to the person using the editor. These people fall in one of two categories — graphical and nongraphical users.
The people who fall in the graphical category prefer to use a graphical user interface style text editor. These people find combining mouse clicks, menus, and typing more intuitive to use. Working with these graphical interfaces can certainly have its advantages. Graphical text editors enable you to use the mouse to move the cursor, select text, and control menu items. They also make available the control commands through the menu so you don’t need to remember special commands to operate the editor. On the other hand, they don’t generally work through a remote connection.
Nongraphical text editors do have an advantage over graphical editors because they work over a remote Telnet connection. A Telnet connection is text-only, so nongraphical editors
C 9H A P T E R
In This Chapter
Using graphical text editors
Using nongraphical text editors
Learning useful administrative commands
Using tools to automate repetitive tasks

180 Part II Working with Debian
work. This advantage weighs against the long list of commands used to maneuver through the document. People who are accustomed to using a nongraphical editor prefer using them in the long run. They feel that they have more control and power using a straight text editor than using a fancy graphical editor, even in the age of GUI desktops.
Learning to use vi
Some of you computer old timers may remember the line editor for DOS called edlin. This line editor enabled you to perform basic text editing in the DOS world. This editor was very simple to use, but it didn’t offer much in the way of advanced text file editing. If you want a text editor that has many advanced editing features, then you can choose vi, which is easy to use while offering many of the advanced features of the more sophisticated editors.
The screen editor vi has its roots in the line editor ex. As a result, many of the commands used for ex also work with vi. vi enables you to view a text file in full screen; create, edit, and replace text within the file; and even execute shell commands outside of the editor.
The vi editor is a program that works within a terminal console. From a shell, simply execute the program from a prompt. When using vi while running in an X Window environment, you must open a terminal window to access the command line.
The vi editor opens any text file using one of three command syntax methods. The first syntax simply opens the specified file in the editor:
vi filename
Occasionally, when working with program files, an error may occur on a specific line. You can open that text file starting at that specific line using this syntax:
vi +n filename
Likewise, you may want to open a file to the first instance of a particular pattern, such as a variable name in a script or configuration file. You can do this by using this syntax:
vi +/pattern filename
In each of these three methods for opening a file using the vi editor, the filename reflects the name of the file you open. In the last two methods, n refers to the line number and pattern refers to the pattern you wish to find in the file.

Chapter 9 Essential Tools 181
In vi the entire screen fills with text. If the opened file only contains a few lines that don’t fill a screen, the remaining (blank) lines display a tilde (~) in the line. The bottom of the screen displays information such as mode status. This is also where you enter commands when working in command mode.
vi commands
Once you have a file open in the editor, you then need to know how to maneuver, control, and edit the file. You can use this editor through a remote connection, so you can’t employ a mouse to maneuver around the text window. However, with most modern vi implementations, you may use the keyboard arrow keys to move around your document. You must rely on the keyboard commands to maneuver the cursor through the document, change editing modes, and control the editor.
Insert mode
The first thing to discuss is inserting, appending, and editing a file. To do this, you must first enter insert mode. Table 9-1 shows a list of commands and descriptions for the various methods of adding text to a file.
|
Table 9-1 |
|
List of vi commands for adding text to a file |
|
|
Command |
Action |
|
|
a |
Append after cursor |
|
|
A |
Append at the end of the line |
|
|
c |
Begin change operation |
|
|
C |
Perform change from current cursor position to the end of the line |
|
|
i |
Insert before the cursor |
|
|
I |
Insert at the beginning of the line |
|
|
o |
Create a new line below the current line |
|
|
O |
Create a new line above the current line |
|
|
R |
Begin replacing or overwriting text |
|
|
s |
Substitute a character |
|
|
S |
Substitute the entire line |
|
|
Pressing ESC terminates insert mode. Once out of the insert mode, you can perform other commands.

182 Part II Working with Debian
Line commands
Line commands provide methods of searching through a file to execute the line editor or shell commands. You can type these commands at any time. When a user presses the command character (/, ?, :, and so on), the cursor moves to the status line where the user can enter the rest of the command (see Table 9-2).
Table 9-2
Line commands
Command Action
/pattern Searches forward for a pattern. The pattern may be a simple word or
string that you’re searching for, or a regular expression.
?pattern Searches backward for a pattern
:Invokes an ex command.
!Invokes a shell command that uses the buffer as the input and replaces it with the output from the command
Movement commands by character
Navigating through the screen (that is, moving the cursor to a specific position) requires that you not be in insert mode. Instead, you must be in command mode. Table 9-3 lists the commands used to move the cursor one character at a time when in command mode.
Table 9-3
Single-character movement commands
Command Action
hLeft one character
jDown one character
kUp one character
l, SPACEBAR |
Right one character |
Movement commands by text
The commands listed in Table 9-4 enable you to move the cursor through the text more quickly by jumping to the next word, sentence, or paragraph.

Chapter 9 Essential Tools 183
|
Table 9-4 |
|
Multi-character movement commands |
|
|
Command |
Action |
|
|
w, W |
Forward by one word |
|
|
b, B |
Backward by one word |
|
|
), ( |
Beginning of the next or previous sentence from the current sentence |
}, { |
Beginning of the next or previous paragraph from the current paragraph |
|
|
]], [[ |
Beginning of the next or previous section from the current section |
|
|
Movement commands by lines
The commands listed in Table 9-5 enable you to maneuver through the screen line by line.
|
Table 9-5 |
|
Line movement commands |
|
|
Command |
Moves to |
|
|
0 (zero) |
The first position of the current line |
|
|
$The last position of the current line
^The first nonblank character of the current line
+, RETURN |
The first nonblank character of the next line |
- (dash) |
The first nonblank character of the previous line |
|
|
HThe top line on the screen
nH |
n lines from the top line |
MThe middle line on the screen
LThe last line on the screen
nL |
n lines from the bottom line |
Movement commands by screens
You may also move through your document quickly by moving an entire screen at a time. Table 9-6 summarizes these commands.

184 Part II Working with Debian
|
Table 9-6 |
|
Screen movement commands |
|
|
Command |
Action |
|
|
CTRL+F |
Scrolls forward one screen |
|
|
CTRL+B |
Scrolls backward one screen |
|
|
CTRL+D |
Scrolls down one-half screen |
|
|
CTRL+U |
Scrolls up one-half screen |
|
|
CTRL+E |
Scrolls down one line at the bottom |
|
|
CTRL+Y |
Scrolls up one line at the top of the screen |
|
|
z, RETURN |
Repositions with the cursor at the top of the screen |
|
|
z. |
Repositions with the cursor in the middle of the screen |
|
|
z- |
Repositions with the cursor at the bottom of the screen |
|
|
CTRL+L, CTRL+R |
Redraws the screen |
|
|
Searching through files
Table 9-7 contains one of the most helpful groups of commands when working with large documents. You can search for text patterns found in the document to quickly display that section on the screen.
|
Table 9-7 |
|
Searching commands |
|
|
Command |
Action |
|
|
/pattern |
Searches forward in document for pattern |
|
|
/ |
Repeats last forward search |
|
|
/pattern/+n |
Goes to line n after finding pattern |
|
|
?pattern |
Searches backward in document for pattern |
|
|
? |
Repeats last backward search |
|
|
?pattern?-n |
Goes to line n before finding pattern |
|
|
n |
Repeats previous search |
|
|
N |
Repeats previous search in the opposite direction |
|
|
% |
Finds the match of the current parenthesis, brace, or bracket |
|
|

Chapter 9 Essential Tools 185
Saving your files and exiting the editor
There are different methods for saving documents and quitting the editor, as listed in Table 9-8. You may find that selecting a few methods serves you best.
|
Table 9-8 |
|
File commands |
|
|
Command |
Action |
|
|
ZZ, :x |
Writes the file to disk only if changes were made, then quits |
|
|
:wq |
Writes the file to disk and quits |
|
|
:w |
Writes the file to disk |
|
|
:w filename |
Writes a copy of the file to filename |
|
|
:q |
Quits only if no changes were made |
|
|
:q! |
Quits unconditionally, discarding any changes |
|
|
:e filename |
Edits filename without leaving vi |
|
|
Options used by the :set command
On occasion, you need to set options used in the editor. You can set them from within the editor (see Table 9-9).
|
Table 9-9 |
|
Options for :set |
|
|
Command |
Action |
|
|
:set all |
Shows all available options |
|
|
:set option |
Enables option |
|
|
:set nooption |
Disables option |
|
|
:set option=value |
Sets the value for option |
|
|
:set option? |
Shows the value of option |
|
|
Alternatively, you can set options in the .exrc file you create in your home directory. If the file doesn’t exist, then create it and add the settings you desire. You can put your :set commands in it, one per line.
186 Part II Working with Debian
Learning to use Emacs
Another popular editor is Emacs, which refers more to the family of editors rather than a specific editor. Most people think of GNU Emacs when you mention Emacs. GNU Emacs was developed by the Free Software Foundation and released under the General Public License (GPL) to the general public. You can install Emacs from the Debian package manager. Emacs is a large and versatile editor. This chapter gives you an overview. If you need more detailed information on a particular subject, you may access the Emacs Info documentation by pressing Ctrl+H and then i or the Emacs tutorial with Ctrl+H .
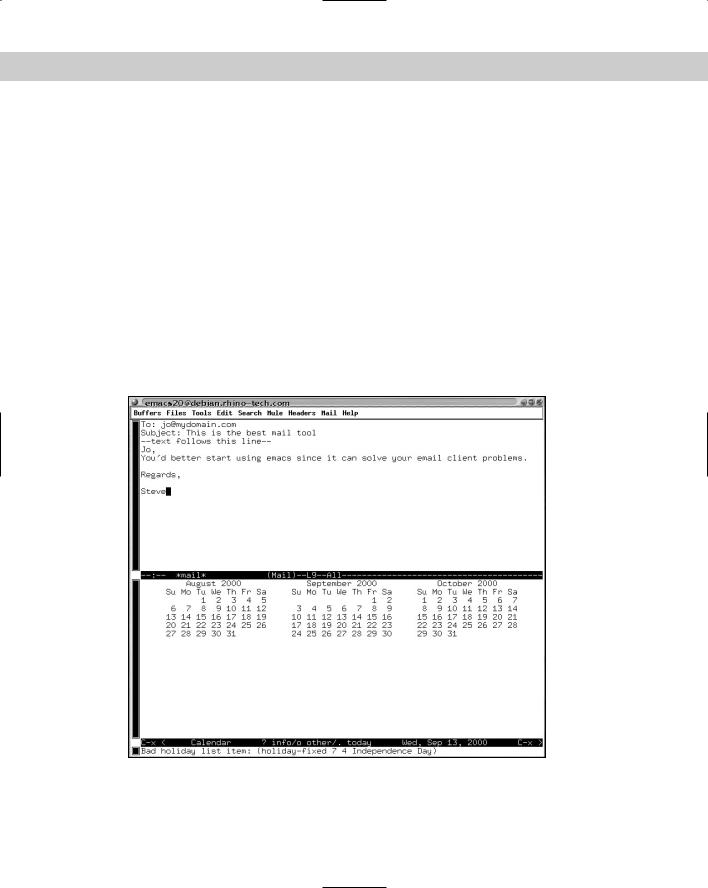
Emacs dates back to the days before graphical windows. By the time the graphical desktops were common, Emacs already incorporated many windowing features. In fact, Emacs was much more advanced than most applications. It incorporated text editing, shell command execution, and even e-mail access. The same Emacs works through a remote terminal connection or via an X server. Figure 9-1 shows Emacs running in an X Window environment.
Figure 9-1: Emacs showing two windows: an e-mail message in one and a calendar in the other

Chapter 9 Essential Tools 187
Best used for creating, modifying, and compiling source code, the Debian GNU Emacs includes many useful features such as an interface to the Concurrent Version System (CVS), source code compiling, and debugging.
The Emacs menus
The Emacs’ menus change, depending on which window buffer is active and the specific task that’s running that window. You can click each window to make it active. You can then select the Buffers menu to select the buffer displayed in the active window.
Continuing on across the top menu, you come to the Files menu. Here you can open, save, or discard the buffers and manage the windows. You can split windows or combine them into one. You can also launch additional frames, which are essentially new instances of Emacs.
The Tools menu offers a number of advanced tools, mostly for programmers. From here, you can compare buffers, read news and e-mail, or compile and debug a program. You can also open a calendar showing the current, previous, and next months.
The Edit menu option contains the standard editing features (undo, cut, copy, and paste).
The Search menu also contains many of the searching features people like to use such as search, replace, and repeat search.
One of the interesting features that Emacs offers is multilingual support. To use this feature, you’ll need to install one of the “mule” Emacs packages such as emacs20mule. Then, you can access the multilingual support through the Mule menu option. You can use this option to change the language used while working in Emacs. Finally, there is the Help menu. This menu enables you to configure Emacs, set options, and get help for the program.
These are the basic menu options available in Emacs. When using one of the many special functions, you have access to even more options because the menus dynamically change to fit the environment.
Note Other editors include vim, jed, and zed. Look through the Debian packages under the category of editors for these and other editors you can install on your system.
188 Part II Working with Debian
Using Commands and Programs
Besides the skill of using an editor, you, as an administrator or even as an end user, should know how to use a few commands and programs. Even though there are many more commands than what this chapter covers, this is a good start for your administrative tool belt.
alias
One of the complaints I’ve heard from novice users of UNIX and Linux is the use of cryptic command names. The alias program enables you to turn those cryptic commands into ones you can remember. It can also take frequently used, long strings of commands and shorten them to something easier to type. The syntax for alias is:
alias [-p] name=’command’
This is actually a shell command, making it dependent on the shell you use. See Chapter 14 for more information on shells. Most common shells use the alias command because it is very useful. The -p option prints the list of aliases. Here’s one example you might use:
alias longlist=’ls -l’
After typing this command, in the future, you may use the longlist command to get a directory listing. The shell will actually run ls -l for you, but you don’t have to remember that.
grep
Sometimes it is necessary to locate a pattern within a file. This is where grep is particularly useful. grep searches through a given file and, by default, prints the line that contains the matched pattern. The syntax for the grep command is:
grep [option] pattern [file] ...
The only required argument for grep is the pattern. It must have a pattern or it has nothing to find. Table 9-10 lists some of the options available for use with grep. As an example, if you want to scan for system errors in today’s logs, you might use the command grep -i error /var/log/syslog. The -i option asks for a caseinsensitive match. The result of this command will be each line that contains the word “error.”

Chapter 9 Essential Tools 189
|
Table 9-10 |
|
Options for grep |
|
|
Option |
Description |
|
|
-c, --count |
Prints a count of matching lines for each input file instead |
|
of the normal output |
|
|
-E, --extended-regexp |
Interprets the pattern as an extended regular expression |
|
|
-e pattern, |
Uses pattern; this is useful to protect patterns |
--regexp=pattern |
beginning with a hyphen (-) |
-F, --fixed-strings |
Interprets the pattern as a list of fixed strings, separated by |
|
new lines, any of which is to be matched |
|
|
-f file, --file=file |
Obtains the search patterns from file, containing one |
|
pattern per line. An empty file contains no patterns and |
|
therefore matches nothing. |
|
|
--help |
Outputs a brief help message |
|
|
-r, --recursive |
Reads all files under each directory, recursively |
|
|
There are two other commands related to grep — egrep and fgrep. Using egrep is the same as using grep with the -E option (from Table 9-10). Likewise, using fgrep is the same as using grep with the -F option. You can use the remainder of the options for any of these commands.
grep is very useful for programmers and coders. If you want to list all the lines of the source file that contain the variable newfile, you use the following command:
grep newfile mysource.c
grep then searches through mysource.c and displays each line that contains the text newfile. All other data in the file is ignored. In this example, the information is sent to the screen, but it can also be piped to another program or sent to a file.
find
Use find when you are looking for a file — whether you seek a file with a specific timestamp, a particular filename, or you are just looking for the location of a known file. Table 9-11 lists useful find expressions.
find [path] [expression]

190 Part II Working with Debian
|
Table 9-11 |
|
Useful find expressions |
|
|
Expression |
Description |
|
|
-empty |
The file is empty and is either a regular file or a directory. |
|
|
-follow |
Deference symbolic links. Implies -noleaf |
|
|
-help, --help |
Prints a summary of the command-line usage of find and exits |
|
|
-user uname |
The file that is owned by user uname (or the numeric user ID) |
|
|
-group groupname |
The file belongs to group groupname (the numeric group ID |
|
also allowed). |
|
|
-fstype type |
The file is on a filesystem of type type. |
|
|
-name pattern |
Searches base of the filename that matches pattern |
|
|
-newer file |
The file was modified more recently than file. |
|
|
-iname pattern |
Like -name, but the match is case-sensitive for pattern. For |
|
example, the patterns `mo*’ and `M??’ match the same |
|
filenames. |
|
|
-version, --version |
Prints the find version number and exits |
|
|
-mount |
Doesn’t descend the directories on the other filesystems. An |
|
alternate name for -xdev, for compatibility with some other |
|
versions of find |
-xdev |
Doesn’t descend directories on other filesystems |
|
|
When faced with using the find command, you may wonder how it can specifically help you. Here are some applications in which find can come in handy:
When searching for modified files to back up, use: find /home/jo -newer /home/jo/lastbackup
When looking for a file with a specific name, use: find / -name picture
When finding files belonging to a specific group, use:
find / -group users

Chapter 9 Essential Tools 191
This is only the beginning of what find can do when searching through the files on your system. You can link find with other programs, such as tar, to perform tasks on the found set of files.
locate
When all you want to do is track down a file, locate is very easy to use. locate lists the file paths of any file matching the given pattern. If no file exists, the prompt is returned. Otherwise, each file path is printed to the display. Here is the syntax for the locate command:
locate [-d path] pattern...
The -d path option enables you to search a different path database instead of using the default database; however, the need for this is extremely rare. The pattern can be any pattern, and it can include wildcards. Here is an example of finding the filenames that contain locate:
# locate locate
/usr/bin/locate
/usr/lib/locate
/usr/lib/locate/bigram
/usr/lib/locate/code
/usr/lib/locate/frcode
/usr/share/emacs/20.7/lisp/locate.elc
/usr/share/man/man1/locate.1.gz
/usr/share/man/man5/locatedb.5.gz
/usr/X11R6/man/man3/XtAllocateGC.3x.gz
/var/lib/locate
/var/lib/locate/locatedb
/var/lib/locate/locatedb.n
cat
The cat command allows one or more files to be combined (or concatenated) and printed to the screen. This is a very simple program that has many uses. Here is the syntax:
cat [options] files ...
Table 9-12 lists the cat command options.

192 Part II Working with Debian
|
Table 9-12 |
|
Options for cat |
|
|
Option |
Description |
|
|
-A, --show-all |
Shows all characters, including all nonprinting characters |
|
(equivalent to -vET) |
-b, --number-nonblank |
Prints numbers at the beginning of each nonblank output |
|
line |
|
|
-e |
Shows nonprinting characters and tabs, but does not |
|
show end of line characters (equivalent to -vE) |
-E, --show-ends |
Shows the end of line characters |
|
|
-n, --number |
Prints numbers for all output lines |
|
|
-s, --squeeze-blank |
Never prints more than a single blank line from the |
|
output where more than one consecutive blank line occur |
|
|
-t |
Prints tabs and other nonprinting characters (equivalent |
|
to -vT) |
-T, --show-tabs |
Prints the tab characters as ^I |
|
|
-v, --show-nonprinting |
Uses ^ and M- notation for nonprinting characters, except |
|
for EOL (end of line) and TAB. This notation will show |
|
you control and meta characters as such and not print |
|
them directly to the terminal |
|
|
Using the cat options helps you view a file, like the source code of a program, to check for the appropriate nonprinting characters. The main use for cat is to concatenate files together. You can use cat to take several small files and combine them into one large file. Here is how you do it:
cat file1 file2 file3 ... > newfile
top
A useful tool for administrators who need to watch the resources and activities for a system, top is a continuously running program that displays the processes and provides memory statistics and other useful information about the system. Figure 9-2 shows you what top looks like from the terminal console.

Chapter 9 Essential Tools 193
Figure 9-2: From a terminal, you can only see the highly active processes.
While top is running, you can use a few interactive tools to control it. Table 9-13 lists a few of those commands. You can find more commands by using the help options. The most important interactive command is quit. It enables you to exit the program.
|
Table 9-13 |
|
Commands for top |
|
|
Options |
Descriptions |
|
|
SPACEBAR |
Immediately updates the display screen |
|
|
^L |
Erases and redraws the display screen |
|
|
h or ? |
Prints a help screen giving a brief description of the commands You can |
|
find information on the entire set of options supported by your version of |
|
top in that screen. |
|
|
kKills a running process. You then are prompted for the PID of the process and the kill signal to send to it. A normal kill uses the signal of 15; for a sure kill, use the signal of 9.
qQuits the top program
194 Part II Working with Debian
Note Zombie processes are those processes that are stopped but not completely gone. These processes are already dead, so you cannot kill them. In most cases, a zombie goes away eventually. If a zombie does not go away, this generally means that there is a bug in the device driver or in the program from which the zombie came.
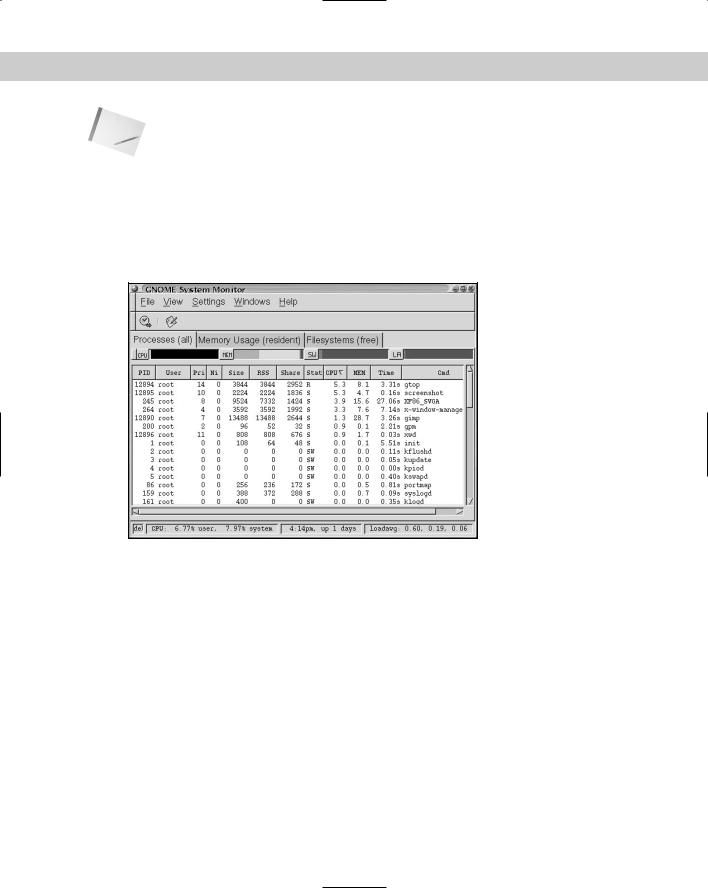
As you can see from Figure 9-2, the terminal window limits the number of visible lines. This can be a problem if you are looking for a process that shows up at the bottom of the list. If you use one of the window managers, an alternative tool to perform the same task is gtop, the GNOME System Monitor (shown in Figure 9-3).
Figure 9-3: gtop provides all the same information as top, but in a graphical presentation.
gtop has three specific views — processes, memory, and filesystems. From the File menu, you can also add more views that enable you to watch certain groups of processes. Each view maintains its settings. Pressing any of the column headings sorts the list of processes by that column. There are also configuration controls that enable you to customize the settings for the program.
The more program
Granted you can use cat to view files. However, there are a couple of programs that will let you view a file in a much more convenient way. The first view program is more. Using more enables you to view the contents of a text file one screen at a time.

Chapter 9 Essential Tools 195
Once viewing the file, you can then interactively view the document. Table 9-14 shows some of the interactive commands. Most of the commands are based on the vi commands. If you are familiar with vi, working with more will be familiar.
|
Table 9-14 |
|
Interactive control commands for more |
|
|
Command |
Description |
|
|
h or ? |
Displays a summary of the commands |
|
|
SPACEBAR |
Displays the next screen of text |
|
|
RETURN |
Displays the next line of text. That line becomes the new starting point for |
|
the next screen. |
|
|
q or Q |
Exits |
|
|
/pattern |
Searches through the text for the occurrence of pattern. |
|
|
CTRL+L |
Redraws the current screen |
|
|
. (period) |
Repeats the previous command |
|
|
You can use more to view one file or a series of files. Add each filename to the command line when executing the command to view it. For instance:
more text1 text2 text3
When text1 is finished viewing, text2 begins immediately, and so on.
The less program
The other text viewing tool, less, offers much more control while viewing the document. Whereas more only lets you scroll through the document in one direction, less lets you scroll in both directions. Table 9-15 shows only a few of the options available while viewing a document. Use less --help or view the man pages on less for more detailed descriptions of the available commands. The commands shown in Table 9-15 can get you comfortably started using less.

196 Part II Working with Debian
|
Table 9-15 |
Interactive control commands for less |
|
|
|
Command |
Description |
|
|
SPACEBAR or f |
Scrolls forward one window |
|
|
RETURN or e or j |
Scrolls forward one line |
|
|
b or ESC+v |
Scrolls backward one window |
|
|
y or k |
Scrolls backward one line |
|
|
u or CTRL+U |
Scrolls backward one half of the screen size |
|
|
r or ^R or ^L |
Repaints the screen |
|
|
/pattern |
Searches forward in the file for the line containing the pattern |
|
|
n |
Repeats the previous search from the last line containing the |
|
previous pattern |
|
|
N |
Repeats the previous search in the reverse direction |
|
|
q or Q or ZZ |
Exits less |
|
|
! shellcommand |
Invokes a shell to run the given shellcommand. A percent sign (%) |
|
in the command is replaced by the name of the current file. Two |
|
exclamation points (!!) repeats the last shell command. An |
|
exclamation point (!) with no shell command only invokes a shell. |
less works much the same as does more. You can issue the command and then |
|
give the file to view as the argument: |
|
less /usr/doc/README |
|
When you start using the less command to view your documents and files, I’m |
|
sure you will find the up and down scrolling very useful. |
|
Tip |
When using commands that produce more than one screen of output, you can use |
|
the pipe (|) directive to view the output one screen at a time by using either more |
|
or less. Here is an example of the ls command using the pipe directive with |
|
less: |
|
ls -l /etc | less |
Automating Tasks
As the administrator of the system, you need to perform certain tasks on a regular basis. Each time you have to perform one of these repetitive tasks, it takes time away from performing other duties. Also, you cannot perform some of these tasks

Chapter 9 Essential Tools 197
until later when the system is less busy. Doing this manually means either returning to the computer late at night or extremely early in the morning.
One way to solve the constant drain and demand of your time is to automate those routine activities. With the help of shell scripts (as found in Chapter 14) or by using a script language (like Perl, Python, or Tcl/Tk in Chapter 13), you can make the computer continue to work while you sleep. These scripts can then report back to you in the morning through e-mail.
Three primary automation tools initiate any programs, commands, or scripts. Each tool has its own unique method of execution.
The at command
The at command executes a specific command at a given time. at is limited to a one-time, automated execution of a given program. However, the specified time can be anytime in the future — from minutes to days. The syntax for the command comes in two forms. The first is as follows:
at [-q letter] [-f file] [-mlv] TIME at -c job [job...]
Table 9-16 explains the various at options.
|
Table 9-16 |
|
at command options |
|
|
Option |
Description |
|
|
-m |
Sends mail to the user when the job (a running program) completes, |
|
regardless of the output. Normally, a message is only sent if the command |
|
generates output or has errors. |
|
|
-f file |
Reads the job to run from a file rather than the command line |
|
|
-q letter |
Places the program in the specified queue. The queue letter |
|
determines the priority at which a job runs. A queue letter designation |
|
consists of a single letter ranging from a to z and A to Z. Queues with |
|
higher letters run with lower priority. The a queue is the default for at, |
|
and the b queue is the default for batch. |
-v |
Displays the time the job executes. Times displayed are in the format |
|
“1997-02-20 14:50” |
|
|
-l |
Creates a listing of all the jobs scheduled to run for this user (the same as |
|
using the atq command) |
-c |
Concatenates the jobs listed on the command line with the standard |
|
output, usually the screen |
|
|
198 Part II Working with Debian
Time is a mandatory component of the at command, with the exception of the -l option. Time can be in 12-hour time represented by hours:minutes (hh:mm) with the appropriate am or pm after the time. Or the time can display as a 24-hour designation of four digits (as in 1620, which is the same as 4:20 p.m.). You can also use one of the allowable keywords with the command — midnight, noon, teatime, or now. Use these keywords in place of the numerical time.
Specifying a date expands the at command functions even more. The text month and the numerical day comprise one of the allowable dates. Another option is stating the day of the week, or you can use today or tomorrow. If only a time value is given, then the command will be executed the first instance that your time is reached after the command is entered.
You can also add time. For example the time now + 2 days executes the job in two days at this time. You can also replace a +1 with next. You then have midnight next day instead of midnight +1 day.
Here are some examples of times for the at command:
at 1620 pm Nov 12
at 4:20 pm November 12 at midnight next day at midnight +1 day
at 2 am Monday at now
Once jobs are queued to run, use at -l or atq to list them. You can also use atrm to remove a job by its job number.
The batch command
The batch command works much like the at command. The difference is that batch does not complain when you do not enter a time. In this case, the job runs when the system load falls below a 1.5. You can see from the following syntax that these options are similar to those of the at command:
batch [-q letter] [-f file] [-mv] [TIME]
The syntax for time is the same as with at except that time is optional. Refer to the at command’s options to see what they do for the batch command.
The cron command
For systems that run all the time, as with servers, automatic tasks should run through cron. cron constantly runs once it gets started as a daemon when the system initializes, checking every minute to see if one of the listed jobs should run. The jobs that cron runs reside in /etc/crontab.

Chapter 9 Essential Tools 199
The jobs listed in /etc/crontab are generally for system tasks. You can see from the contents of the following file that there are only three jobs listed. Each of the jobs runs the contents of a directory containing scripts that need to run either daily, weekly, or monthly. You can still add more specific jobs falling outside of one of these times to the /etc/crontab file.
more /etc/crontab
#/etc/crontab: system-wide crontab
#Unlike any other crontab you don’t have to run the `crontab’
#command to install the new version when you edit this file.
#This file also has a username field, that none of the other crontabs do.
SHELL=/bin/sh
PATH=/usr/local/sbin:/usr/local/bin:/sbin:/bin:/usr/sbin:/usr/bin
# m h dom mon dow user command
25 6 * * * root test -e /usr/sbin/anacron || run-parts --report /etc/cron.daily 47 6 * * 7 root test -e /usr/sbin/anacron || run-parts --report /etc/cron.weekly 52 6 1 * * root test -e /usr/sbin/anacron || run-parts –-report /etc/cron.monthly
#
The asterisk (*) represents a wildcard so that any day, week, or month works. After the first five fields, the user gets listed (as root is in the preceding example). The command then follows with all the information needed to run the command. When the time of the entry matches the current time, the job executes. Table 9-17 shows the syntax for adding a job.
Caution |
If the minute or hour is set to an asterisk (*), cron executes that command every |
|
minute or hour. This can cause the system to overload with job processes. I rec- |
|
ommend that you only use the asterisk in the day of the month, month, or day of |
|
the week fields. |
|
Table 9-17 |
|
Helpful crontab fields |
|
|
Field Name |
Allowed Value |
|
|
Minute (m) |
0-59 |
|
|
Hour (h) |
0-23 |
|
|
day of month (dom) |
1-31 |
|
|
Month (mon) |
1-12 |
|
|
day of week (dow) |
0-7 (0 or 7 refers to Sunday) |
|
|

200 Part II Working with Debian
You can see by the contents of the /etc/cron.daily file that all the tasks run on a daily basis:
ls -l /etc/cron.daily |
|
|
|
|
|
||
total 52 |
|
|
|
|
|
|
|
-rwxr-xr-x |
1 |
root |
root |
311 |
May 25 |
14:13 0anacron |
|
-rwxr-xr-x |
1 |
root |
root |
3030 |
Apr 29 |
03:48 apache |
|
-rwxr-xr-x |
1 |
root |
root |
450 |
Jul 18 |
10:03 calendar |
|
-rwxr-xr-x |
1 |
root |
root |
427 |
Apr 29 |
19:07 exim |
|
-rwxr-xr-x |
1 |
root |
root |
277 |
Jul 28 |
17:46 find |
|
-rwxr-xr-x |
1 |
root |
root |
51 |
Sep 12 |
1999 |
logrotate |
-rwxr-xr-x |
1 |
root |
root |
238 |
Mar 15 |
1999 |
man-db |
-rwxr-xr-x |
1 |
root |
root |
41 |
Jul 28 |
17:46 |
modutils |
-rwxr-xr-x |
1 |
root |
root |
485 |
Jul 28 |
17:46 |
netbase |
-rwxr-xr-x |
1 |
root |
root |
383 |
Jun 20 |
21:07 |
samba |
-rwxr-xr-x |
1 |
root |
root |
2259 |
Mar 29 |
21:16 |
standard |
-rwxr-xr-x |
1 |
root |
root |
660 |
Jul 28 |
17:46 |
sysklogd |
-rwxr-xr-x |
1 |
root |
root |
157 |
May 19 |
04:26 |
tetex-bin |
cron is not meant for only the root administrators to use; normal users can also take advantage of it. Each user can create his or her crontab file using the crontab filename command. Other options include -l (which lists the users’ crontab files), -e (which edits the users’ crontab files), and -r (which removes the users’ crontab files). The contents of the files remain in the same format as found in the
/etc/crontab file.
You can also restrict the users of cron because (by default) everyone on the system can use it. Create a /etc/cron.allow file and list each account name on a separate line to grant permission to the allowed users. You can also deny permission the same way by creating a file called /etc/cron.deny that contains a list of users to deny. You only need to create one of these files to enforce the restrictions.
The anacron command
In cases in which a computer does not run 24 hours a day and still needs to perform tasks, cron does not work. anacron does not depend on a computer running all the time to run an application. If the computer is off at the time the application is to run, anacron doesn’t really care and can make sure that the job gets run anyway
anacron uses a configuration file to look up the jobs it should run. Each line in the file denotes an independent job to process. You can see from the following contents that the last three lines represent the commands needed to replace the cron command:
more /etc/anacrontab
#/etc/anacrontab: configuration file for anacron
#See anacron(8) and anacrontab(5) for details.

Chapter 9 Essential Tools 201
SHELL=/bin/sh
PATH=/usr/local/sbin:/usr/local/bin:/sbin:/bin:/usr/sbin:/usr/bin
# |
These replace |
cron’s entries |
|
1 |
5 |
cron.daily |
nice run-parts --report /etc/cron.daily |
710 cron.weekly nice run-parts --report /etc/cron.weekly
30 |
15 |
cron.monthly nice run-parts --report /etc/cron.monthly |
The first number of the job line denotes the period or number of days between runs. The second number indicates the delay before executing the command. Next comes the job identifier as indicated by cron.monthly in the last line. The job identifier can contain any nonblank character (except a slash). It identifies the job in anacron messages. The final option is the name of the command to run.
When the job runs, a timestamp is logged for that job so that anacron knows when the job was last run and knows when to run it again. The time between runs cannot be less than a day because anacron only compares the date, not the time. After a job finishes, a message is sent with the output of the job along with the job identifier.
Here is the syntax for the anacron command. Table 9-18 shows a list of options
anacron [-s] [-f] [-n] [-d] [-q] [job] ...
anacron -u [job] ...
|
Table 9-18 |
|
Helpful anacron options |
|
|
Option |
Description |
|
|
-f |
Forces the execution of the jobs and ignores the timestamps |
|
|
-u |
Updates the timestamps of the jobs to the current date only. Doesn’t run any |
|
jobs |
|
|
-s |
Serializes the execution of the jobs. The next job does not start before the |
|
current one finishes. |
|
|
-n |
Runs the jobs now without waiting for the delay period of time specified in |
|
the /etc/anacrontab file. This implies the -s option. |
|
|
-d |
Doesn’t send the job to the background. This option outputs messages to |
|
standard error, as well as to the syslog. The output of the jobs gets mailed as |
|
usual. |
|
|
-q |
Suppresses any messages to standard error. Only available with the -d |
|
option |
|
|

202 Part II Working with Debian
These options add to the flexibility of this tool. However, anacron is a service and is therefore started through the initialization (or run levels) of the system. Any modifications to anacron need to be made to /etc/init.d/anacron and should be done by someone experienced with scripts.
Cross- |
Chapter 15 discusses run levels in more detail. |
Reference |
|
Summary
As you work along using Debian, you eventually will be required to edit a text file. Convenient graphical text editors may not be available. In this case, you should have a working knowledge of one or more text editors. Most likely, once you become comfortable with one text editor, you will stick with that editor for life.
In addition to using editors, some higher-end commands help to enhance the functionality of working with the system. These commands, especially when used with other commands, can perform remarkable tasks. The commands listed in this chapter, along with the automation tools, are designed to help make your life as an administrator easier.