

PC Recording Studios for Dummies (Jeff Strong)
.pdf272 Part IV: Revving Up the Recording Process
Figure 14-1:
In Logic, you select the automation mode from the pop-up menu in the Arrange window.
Recording your mix performance
Most audio recording programs offer you several ways to record and edit your automation moves. These often include the following:
Mousing: Mousing involves using your mouse to adjust your chosen parameter (fader level, pan, send level, and so on) as your song plays. This method has the disadvantage of allowing you to make only a single automation move at a time.
Drawing: This approach is where you “draw” the automation data right in your track. As you can see in Figure 14-2, this process is as simple as drawing with the appropriate tool in the track you want to automate. (In Pro Tools, for example, you use the Pencil tool.) For this to work, you need to have the parameter you want to automate displayed in the track. (In Pro Tools, click and hold the Track Display menu and drag to your selection to have that selection displayed in your track.)
As was the case with mousing, you can adjust only one parameter at a time. This isn’t that much of a drawback, however, because it’s more than likely that you’ll want to do your automation drawing while your song isn’t playing. Here, you most likely want to draw in order to edit existing automation data. (You do this by drawing over the existing data in your track.)
Controlling: If you have an external controller, such as the Logic Control for Logic, you can use it to write your automation data. With a controller that’s well-integrated with your software, you can write a large variety of parameters by using the controller, and you can write as many at the same time as your hands and fingers (and brain) allow. This can significantly speed up the mixing process, especially if you have a lot of tracks to mix.
I tend to write my automation in stages. I start with volume and panning for all tracks, then move on to the extras such as plug-in parameters and send levels. As you work, don’t worry about how your automation looks on the screen. Use your ears instead. This seems like a logical thing, but I have to
TEAM LinG - Live, Informative, Non-cost and Genuine !
Chapter 14: Mixing and Mastering Your Music 273
tell ya, with all the fancy graphics on-screen you might end up having to put a towel over your computer’s monitor while you work (that is, if you use a controller or your mouse — it’s kind of hard to draw automation when you can’t see it).
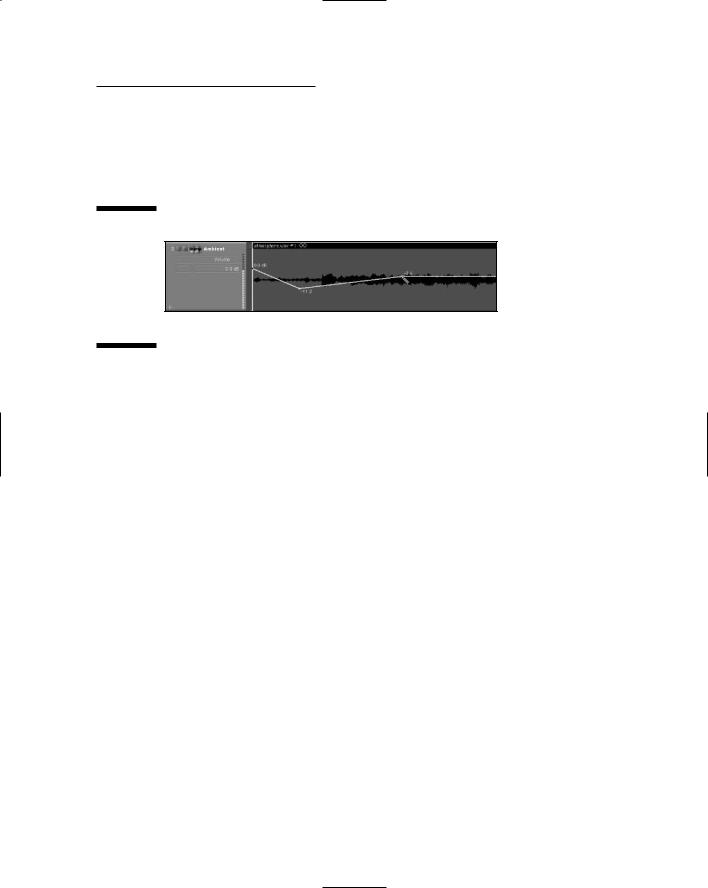
Figure 14-2:
Drawing automation is as simple as drawing with your mouse along a track.
Making Your Mix
You have a couple options when you actually create your mix with a computerbased recording system: You can mix in-the-box (within the computer) or
you can mix to an external recorder. Mixing in-the-box involves performing a bounce procedure. This is a simple process regardless of the audio recording software that you use. Mixing to an external recorder is also relatively straightforward, but it does require that you have some sort of external recording device — a tape deck, for example, or a digital recorder such as an Alesis Masterlink. This section lays out the process for making your mix either way.
Mixing in-the-box
Mixing in-the-box refers to using the Bounce feature in your audio recording program to create your final mix. (Bounce is the term Logic and many other audio recording programs use, but you’ll find that Pro Tools refers to it as “Bounce to Disk.”) The Bounce feature processes your audio tracks into one stereo track. Essentially, this means that your computer creates a new file with the settings you choose in the Bounce dialog box. This gives you a stereo file that you can then master or burn onto a CD.
When you use the Bounce feature in your recording program, all the mixing and routing instructions that you designate by using the steps I describe earlier in the chapter are followed to create your final mix. This includes any EQ or effects that you have plugged in and turned on in your tracks, any fader levels (volume) you have for each track, and all automation settings you assigned to your tracks (and have turned on).
TEAM LinG - Live, Informative, Non-cost and Genuine !
274 Part IV: Revving Up the Recording Process
Examining bounce options
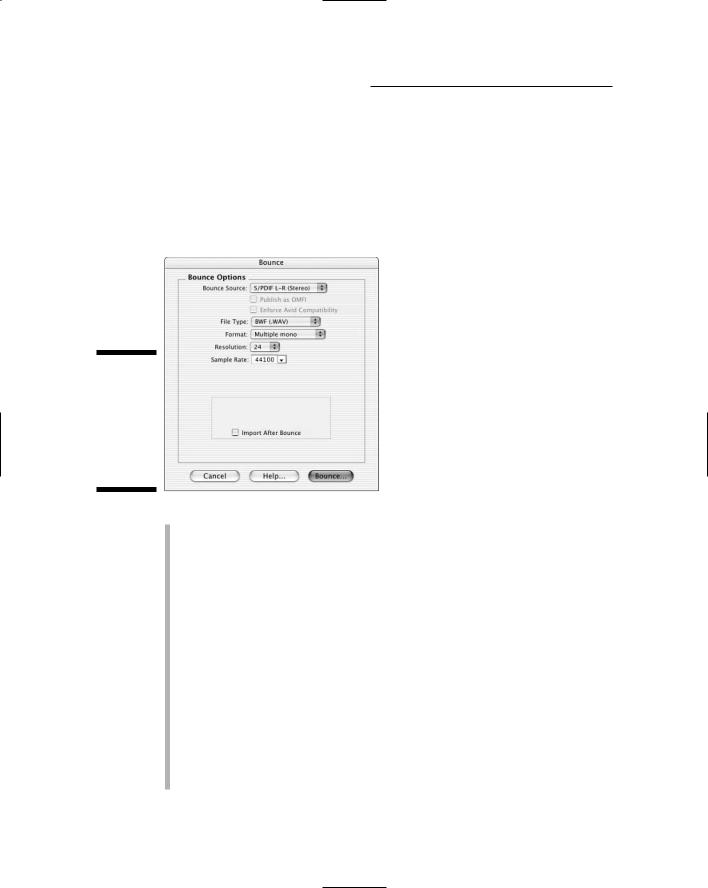
Although each program is a little different, the process of making a bounce is fairly similar and involves choosing settings such as the bounce source, file type, format, bit depth, and sample rate. For example, when you select the bounce procedure in Pro Tools (choose File Bounce), a dialog box opens so that you can make these selections. (Check out Figure 14-3.) Here’s a look at the Pro Tools options you have to choose from:
Figure 14-3:
The Bounce dialog box lets you select several bounce options.
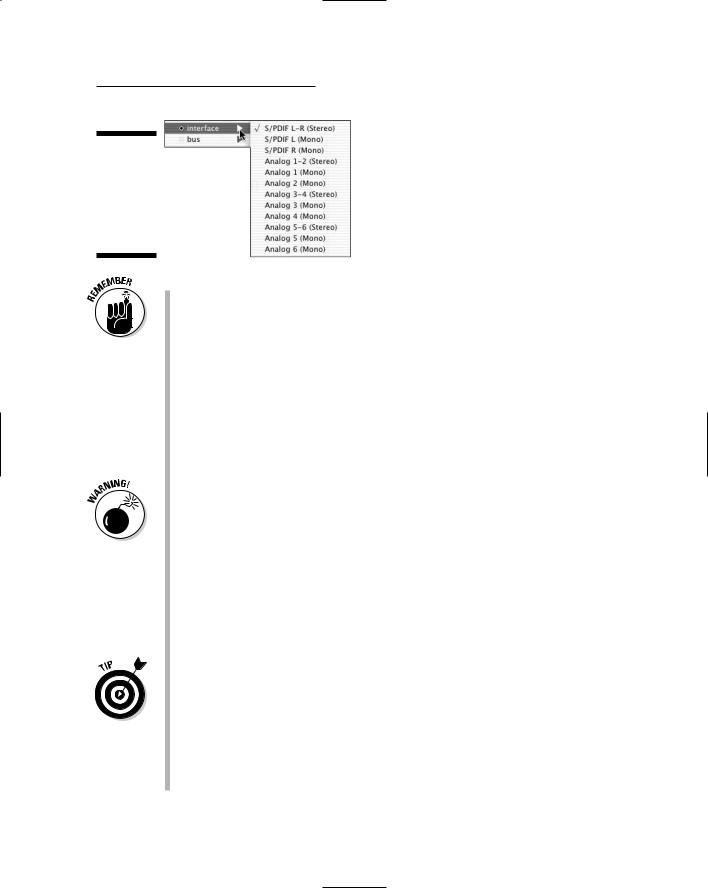
Source: You can use the Bounce Source drop-down list to select any output or bus path as your source for the bounce. (Figure 14-4 gives you a peek at some of the choices.)
File Type: This drop-down list sets the file type for the bounced file. You have many choices, but for your final mix the following common file types are the ones to choose from:
•BWF (WAV): This file type is the standard for older, PC-based Pro Tools systems — and it’s currently the most commonly used file type. (One reason: BWF files are compatible with both Macs and PCs.) This is the type I generally choose because it increases that chances that my files are compatible with other systems.
•AIFF: This stands for Audio Interchange File Format and used to be native to Macs. AIFF files can be imported into any Pro Tools session without any prior converting — including sessions on a PC — but because BWF is becoming the standard I skip this type. If you use a Mac and you plan to do your mastering on your Mac with Pro Tools, this file type is a fine choice.
TEAM LinG - Live, Informative, Non-cost and Genuine !
Chapter 14: Mixing and Mastering Your Music 275
Figure 14-4:
The Bounce Source drop-down list shows you your choices.
You get the same sound quality in BWF and AIFF files. Choose based on your computer platform and whether you intend to send your music out to a mastering house or do it yourself.
If you intend to have your music professionally mastered, make sure that you contact the folks at the mastering studio ahead of time to see what file type they prefer.
Format: This drop-down list determines whether your bounced file is in Mono, Multiple Mono, or Stereo Interleaved. These formats do have some differences that are good to know:
•Mono (Summed): Selecting this option creates a single audio file that contains all the material without any panning information.
Because any stereo information is summed when using this option, it’s easy to get too high of a combined signal. This might result in clipping (distortion) depending on your software and your overall summed levels. If you want to record with this format, I recommend that you reduce your levels so that the left and right channels peak at no more than –3dB, although –6dB is better. This reduces the chances of creating distortion. You can make this level up during the mastering stage if you feel your mix isn’t loud enough.
•Multiple Mono: This format puts the left and right channels of your stereo mix in separate files, labeling the files with (respectively) the .L and .R filename extensions.
Multiple mono is the file format supported by most audio recording programs — which makes it the one to use if you intend to master your music yourself in a different program from the one you recorded it in. If you plan to use a professional mastering engineer, call him or her to see what file format works with the mastering equipment. (It will either be multiple mono or stereo interleaved.)
•Stereo Interleaved: This format contains all stereo information in a single stereo file. Panning information is retained. Any tracks set to even-numbered outputs end up on the right side of the stereo file;
TEAM LinG - Live, Informative, Non-cost and Genuine !
276 Part IV: Revving Up the Recording Process
tracks set to odd-numbered outputs go to the left side of the stereo field. This is the file format to use when you make your final master to 16 bit because stereo interleaved files are required to burn a CD.
Resolution: This setting lets you choose one of three bit rates for your bounced files: 8, 16, or 24. (Chapter 4 has more on resolution.) For your final mix, choose 24 bit (maximum resolution). You can reduce the resolution as needed later on when you master your music yourself or when you have a professional do it for you.
Sample Rate: You can save your file with any of several sample rates, but I recommend saving it with the same rate as the files in your session. Check out Chapter 4 for all the details about sample rates.
If you intend to have your music mastered by a professional, make sure to ask her what she prefers. Some mastering engineers want the files at the highest sample rate possible, but others would rather you not change the rate.
Conversion Quality: If you select a sample rate different from the files in your session — which I don’t recommend — you’re prompted to choose a level of quality for the conversion. Choose the highest quality possible for your mix material, but keep in mind that the higher the quality you choose, the longer it takes to do the conversion process.
Performing the bounce
To use the Bounce feature in any program, first make sure that all your tracks are the way you want them. Check all routing, automation, effects, and EQ settings to make sure they’re right.
When it comes to actual bouncing in Pro Tools, do the following:
1.Choose File Bounce to Disk.
The Bounce dialog box appears. (Refer to Figure 14-3.)
2.Set your Bounce options to the settings you want.
Check out the “Examining bounce options” section earlier in this chapter for the scoop on these options.
3.Click the Bounce button.
The Save Bounce As dialog box opens.
4.In the dialog box, select a destination point for this file, enter the name of this mix, and then click Save.
The session plays while the bounce happens.
TEAM LinG - Live, Informative, Non-cost and Genuine !
Chapter 14: Mixing and Mastering Your Music 277
When bouncing in Logic, follow these steps:
1.Click the Bounce button in the lower-right corner of the channel strip of the output that you want to bounce.
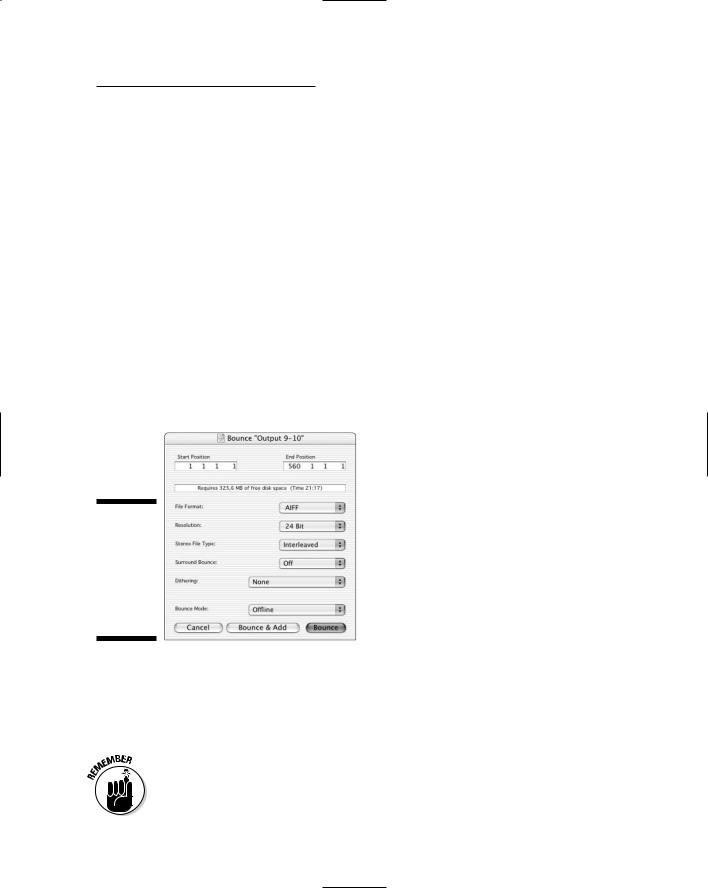
The Bounce dialog box appears, as shown in Figure 14-5.
2.Make your selections for the bounce settings you want.
For a general introduction to possible bounce settings, check out the “Examining bounce options” section earlier in this chapter.
3.Click the Bounce button.
The Save Bounce As dialog box opens.
4.Using the dialog box, select a name and destination point for this file and then click Save.
You have a choice of having the session play while the bounce happens (online) or skipping the whole playing business (offline). If you choose offline bouncing, your bounce will take less time than if you choose online, but you obviously won’t hear your song as it bounces.
Figure 14-5:
The Bounce dialog box in Logic is where you select your bounce settings.
Mixing to an external recorder
You can mix to an external device instead of mixing solely within your computer. This section explains how to mix to both analog and digital recorders.
Before you make your mix, you need to have all your mix settings created in your song. Even though you’re mixing to an external device you can still automate your mix in the same way you would for mixing in-the-box. The “Mixing with Automation” section earlier in this chapter explains the process.
TEAM LinG - Live, Informative, Non-cost and Genuine !

278 Part IV: Revving Up the Recording Process
You can mix to an external digital device such as a DAT (Digital Audio Tape) deck — or, for you classic technology fans, to an analog device such as a reel- to-reel tape recorder — by following these steps:
1.Connect your device to your audio interface.
For digital recorders, run a cable from the digital outputs of the interface to the digital inputs of your device. You need to use an optical or coaxial connection, depending on the interface.
For analog recorders, run cables from two of the analog outputs of the interface to the inputs of your device.
2.If you want to be able to monitor this device as it records, connect the device’s outputs to your monitor speakers or plug your headphones into the headphone jack (if your device has one).
3.Using the Output selectors, set the outputs of your tracks, auxiliary inputs, and master fader to the physical outputs of your interface.
These must correspond to the outputs you connected your device to.
4.Enable recording in your external device.
This usually involves clicking the Record Enable button for the track that you want to record to and then clicking the Record button.
5.Click the Play button in the Transport window of your song.
6.Adjust your input levels on your external device.
The level you set depends on your type of device. For example, if you use an analog tape deck, you can get away with a level that runs into the red if you want to fully saturate the tape. For a digital device, keep your levels from hitting digital zero (0dB); otherwise you’ll end up with digital distortion. I usually set my mix level so that it peaks at between –6dB and –3dB when I mix to an external digital recorder. You can make up the volume a little when you master your song. The following section, “Mastering Your Music,” details this process.
7.Rewind the session.
8.Start recording on the external device and immediately press the spacebar or click the Play button in the Transport window.
The session plays, and you record it into your external device.
9.Click the Stop button in the Transport window or press the spacebar when the music is done.
You now have a mix recorded into your external device.
TEAM LinG - Live, Informative, Non-cost and Genuine !

Chapter 14: Mixing and Mastering Your Music 279
Mastering Your Music
The final step in recording your music is to master it. Mastering involves taking your stereo mix and tweaking it so that it sounds the best it can. Mastering isn’t a mysterious process — it’s pretty simple, really. But it does require certain skills. That’s where this section comes in.
The mastering steps I present in this chapter use the Bounce feature in your audio recording program. You don’t necessarily have to go this route. If you want, you can also send your mastered tracks out to a digital device by following the steps in this section — and then use the steps that describe mixing to an external digital device (found earlier in this chapter).
Demystifying mastering
The mastering process of recording involves preparing your music for duplication. Five basic steps are involved in this process:
1.Optimize the dynamics.
This doesn’t mean making your music as loud as possible. Instead, this step in the mastering process consists of finding the best volume and dynamic range for your music. This is the most critical part of the mastering process and the one that is abused the most.
2.Perfect the tonal balance.
Because your songs were probably recorded and mixed over a long period of time, they’re unlikely to have the same tonal characteristics. This is a good thing, but for a group of songs to be an effective CD, you want the tones of your songs to be similar enough that your listener doesn’t have to make adjustments to his stereo’s EQ as he listens. This step involves using parametric EQs to get all your tunes to sound good together.
3.Match the volume of your songs.
Having consistent levels from song to song helps with the cohesiveness and flow of a CD and keeps your listener from having to adjust her player’s volume from song to song. You do this with simple gain adjustments, compressors, and/or limiters — and by making those processes consistent, audio recording programs give us mere mortals a crack at doing it right.
4.Select the order of your songs.
This is called sequencing and involves putting your songs in the order that you want on your duplicated CD and setting the blank space between
TEAM LinG - Live, Informative, Non-cost and Genuine !
280 Part IV: Revving Up the Recording Process
each song so that the CD flows well from one song to another. Because a CD is supposed to represent a cohesive body of work, this is one of the most important aspects of mastering.
5.Put it on CD.
This is the process of burning an audio CD so that you can listen to your song in any stereo or create multiple copies to give away or sell.
Following these steps isn’t a linear process. Most of the time you need to go back and forth between a few steps — optimizing the dynamics, matching the volume, and perfecting the tonal balance — before you get everything the way you want it. Take your time in the mastering process and take a second listen after you think you have it right to make sure it’s the best you can do.
I recommend taking a first crack at the mastering and then re-evaluating it again after a few days have passed.
If you have to do a lot to master your song to make it work, you might want to consider going back to the mixing stage and tweaking it instead. You should have to make only minor adjustments during mastering — if you do more than that, your time is best served remixing your music first. Every adjustment you make during mastering is a compromise. Adding a bit of highend (frequencies above 10 kHz) to your vocal adds high-end to everything and what might be just enough to make the vocals sound right might make the bass guitar too twangy (a highly technical term). In this case, go back to your mix and add the high-end to only your vocal track before you master the whole song.
Setting up a mastering session
The first step in mastering your music in your computer is to set up a mastering session. This involves creating a new song in your audio recording program and importing the mixed tracks from each song you want on your CD. This section details that process.
In Pro Tools, you start by creating a new session for mastering:
1.Choose File New Session.
The New Session dialog box appears.
2.Type in the name of the file in the Save As text box.
I usually call the file mastering and include the name of the CD project that I’m working on.
TEAM LinG - Live, Informative, Non-cost and Genuine !

Chapter 14: Mixing and Mastering Your Music 281
3.Using the File browser, navigate to the location where you want to place the new session, and then select the location.
I usually create a new folder called Mastered Mixes so I can easily find the files later when I burn them to CD.
4.Select the session parameters that match the mixed files for your songs.
You set audio file type, sample rate, I/O settings, and bit depth here. Chapter 10 has more on the basics of setting up a new session.
5.Click Save.
Your new session opens.
Okay, at this point you have a general “same place” to put the songs. Next, create tracks to import the mixed song files into:
1.Choose File New Track.
The New Track dialog box appears.
2.In the Create text box, enter a number corresponding to the number of songs you want on your CD.
3.Choose Stereo and Audio Track from the drop-down lists.
4.Click the Create button.
Your session now has the necessary tracks for importing your audio.
With tracks created, you can now import your mixed tracks into this session:
1.Click and hold the Audio title in the Audio Regions list located on the right side of the Edit window.
If the Audio Regions list isn’t visible, click the double arrow at the bottom-right corner of the Edit window.
2.Choose Import Audio from the menu that appears or press Shift+Ô+I
(on a Mac) or Shift+Ctrl+I (on a PC).
The Import Audio dialog box opens.
3.Using the Look In text box, navigate through your folder structure to find and select the song file you want to import.
4.Click Done.
The file appears as a region in the Audio Regions list.
5.Repeat Steps 1 through 4 for each song you want to master in this session.
TEAM LinG - Live, Informative, Non-cost and Genuine !