

PC Recording Studios for Dummies (Jeff Strong)
.pdf262 Part IV: Revving Up the Recording Process
Figure 13-1:
Creating a track for your softsynth in Logic starts in the Arrange window.
Figure 13-2:
Assign an audio instrument to your new track from the pop-up menu located under the Track name.
Chapter 11 explains the process of setting up your MIDI devices in both Windows XP and Mac OS X. If you haven’t set up a MIDI device yet, take a few minutes to do so. Then follow the steps in the rest of this section to assign the device to your track.
1.Click your soft-synth’s track in the Arrange window to highlight it.
The track’s channel strip appears on the left side of the window.
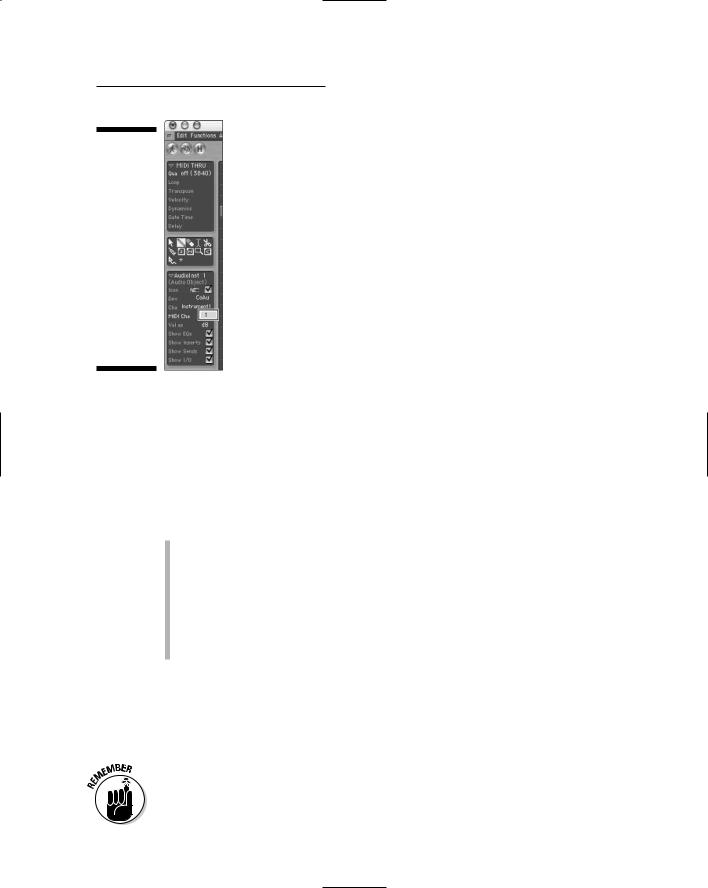
2.Within the Subchannel section of the track (located on the leftmost side of the Arrange window) double-click the MIDI Channel selector.
The MIDI Channel selector becomes highlighted, as shown in Figure 13-3.
3.Type the MIDI channel you want to use.
4.Press Return to accept this MIDI channel.
Make sure that your MIDI device is set to the same MIDI channel — or set to all MIDI channels — otherwise the MIDI device won’t trigger the track.
TEAM LinG - Live, Informative, Non-cost and Genuine !
Chapter 13: Exploring Software Synthesizers 263
Figure 13-3:
You assign a MIDI channel in Logic by clicking and holding the MIDI Channel selector in
the Arrange window’s track channel strip.
Assigning a soft-synth to your track
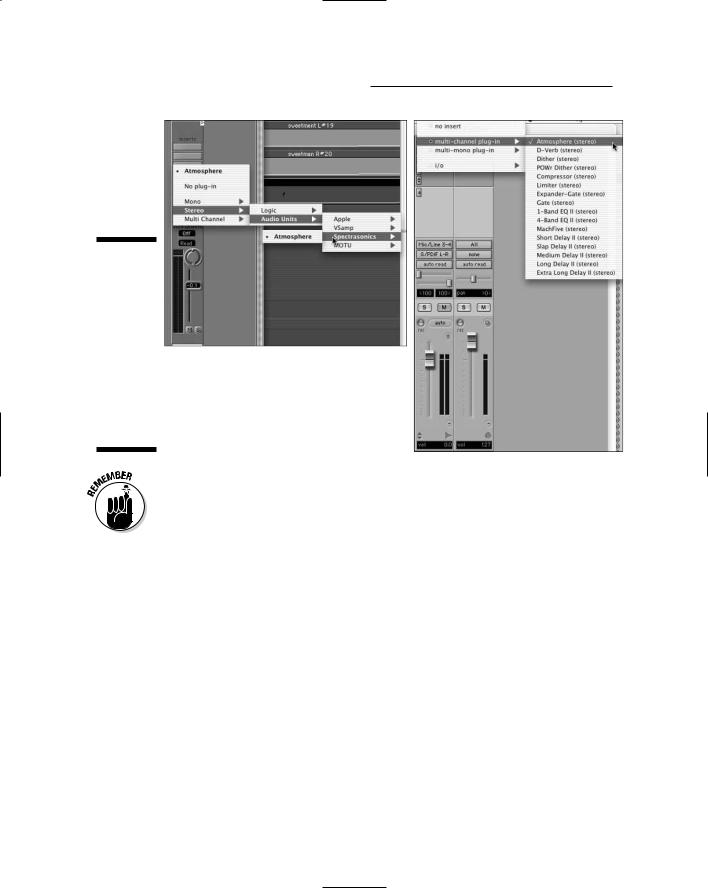
Inserting a soft-synth into a track is as simple as inserting an effect. Depending on your audio recording program, where you do the actual inserting varies. For example, in Logic, you set the input of your audio instrument track to the soft-synth, and in Pro Tools you insert the soft-synth into a MIDI track from the plug-in Insert menu.
The steps involved are as follows:
In Logic, click and hold over the track’s Input selector (see the left side of Figure 13-4) in the Arrange, Environment, or Global Mixer window and drag your cursor to the soft-synth you want from the pop-up menu. Release the mouse to accept this selection.
In Pro Tools, click and hold over the track’s Insert selector (see the right side of Figure 13-4) in either the Edit or Mix window, and then drag to the soft-synth you want from the contextual menu. Release the mouse to accept the soft-synth.
Recording your performance
With your MIDI device set up and your soft-synth assigned, recording is easy. Simply click the Record Enable button for the track and click the Record button to start the process. (At least that’s how it works in Logic; in Pro Tools you need to click Play after clicking Record.) Click Stop to stop recording.
To hear what you’re playing, all you have to do is turn up the Volume fader located at the bottom of the track’s channel strip in the Mix window (Pro Tools) or in the Environment or Global Mixer window (Logic).
TEAM LinG - Live, Informative, Non-cost and Genuine !
264 Part IV: Revving Up the Recording Process
Figure 13-4:
Choose your soft-synth from the pop-up menu of the Input selector (Logic, left) or the Insert selector (Pro Tools, right).
I explain the recording process in more detail in Chapters 10 and 11. So if you want to know the specifics of adding click tracks, doing overdubs, and punching in and out, check out those chapters.
Playing back a recorded track
When you’re done recording, you can hear your performance by following these steps:
1.Disable your track by toggling off the Record Enable button.
2.Click either Zero (Pro Tools) or Stop (Logic) in the Transport window to return your song to the Start position.
3.Click Play in the Transport window.
Your song starts playing.
4.Press Stop to stop your song when you’re done listening.
TEAM LinG - Live, Informative, Non-cost and Genuine !
Chapter 13: Exploring Software Synthesizers 265
Changing sounds
When your soft-synth is plugged in, you can edit the sound much as you would adjust the parameters of any plug-in. Because the performance data for your soft-synth is MIDI, you can make the decision for your final sound after you’ve recorded your part. (I rarely do this because the sound of the instrument dictates to a large extent the way I play my part, but you might work differently.)
Anyway, to change the parameters of your soft-synth
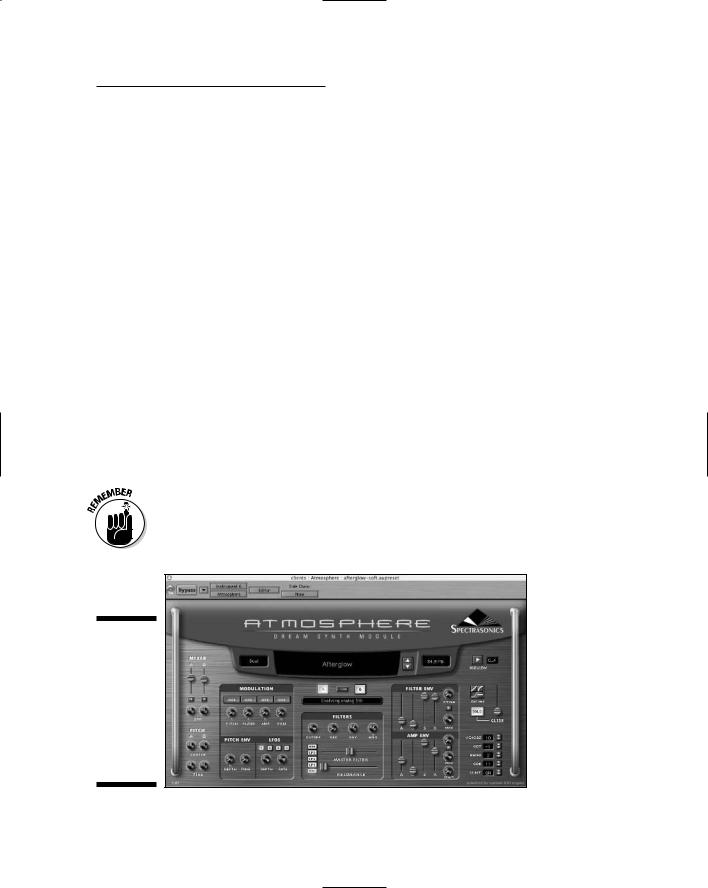
1.Double-click the name of your soft-synth in the Input section of the track that it’s plugged in to.
The soft-synth’s window opens. Figure 13-5 shows a typical soft-synth window in Logic.
2.Make your adjustments.
For example, twirl the knobs or slide the sliders or whatever to adjust the modulation pitch or the filter.
The sound change might be immediate, depending on your computer’s speed and whether your song is playing while you make the change.
3.Click OK to accept the new parameters and close the window.
If you think you’re going to make a lot of adjustments, you may want to keep the window open as the song plays and simultaneously make your adjustments. If you do this, though, keep in mind that it does put stress on your processor, so your changes might take a while to go into effect.
Figure 13-5:
You can change the sounds in your softsynth by opening the soft-synth’s interface window.
TEAM LinG - Live, Informative, Non-cost and Genuine !

266 Part IV: Revving Up the Recording Process
Finding Soft-Synths
Lots of great soft-synths are available on the market. This is one of the most exciting aspects of a computer-based recording. Instead of having to spend $2,000 on a hardware synthesizer with limited sounds, you can buy a hard drive full of soft-synths and end up with a huge variety of sounds at your disposal for about the same amount of money.
I offer a short list of free, downloadable soft-synths in Chapter 21 to get you started. The following list includes my favorite for-purchase options.
Atmosphere, by Spectrasonics: If you want ambient synthesizer pads — background sounds that create a soundscape — these are the best I’ve found. You can find them at www.spectrasonics.net/instruments/ atmosphere.html.
MachFive, by MOTU: MachFive is one of the best software samplers around. A soft-sampler lets you use pre-recorded audio sample libraries or use your own. You can find out more at www.motu.com/products/ software/machfive/body.html/en.
ReBirth, by Propellerhead: ReBirth is a soft-synth of old analog hardware devices that are used in electronic music, including the TB-303, TR808, and TR-909 synthesizers. ReBirth is great for classic bass synth lines and drum parts. You can find out more at www.propellerheads.se.
Absynth, by Native Instruments: Absynth is a fun and immensely powerful soft-synth. Absynth helps you to create some innovative sounds. Check out www.nativeinstruments.de/index.php?absynth3_us for more information.
TEAM LinG - Live, Informative, Non-cost and Genuine !

Chapter 14
Mixing and Mastering Your Music
In This Chapter
Understanding the mixing process
Setting up a mix using automation
Mixing your music
Mastering your finished song
The mixing and mastering stages are where all your tracks are finally turned into an honest-to-goodness song. This process involves blending
(mixing) all your individual musical ideas into the song that you hear in your head and then mastering that final mix — the last stage in the recording process — so that your song is transformed into something worth sharing with the world. These parts of music-making aren’t rocket science (what is, though, except maybe rocket science), but both processes do have a set of objectives and common steps that you can follow.
In this chapter, I walk you through the basics of mixing your tracks. More importantly, I show you how you can do it all by using the automation features found in computer-based recording systems. I also give a step-by-step guide through the bounce procedure — the actual process of taking all your tracks and turning them into a single stereo file. Finally, this chapter takes you into the often-misunderstood world of audio mastering. Here, I first show you what mastering is supposed to do to your music, and then I lay out the steps to do it in your audio recording program.
Mixing and mastering are art forms. As such, no one way to do them exists; you probably need to take some time to get a feel for each process. Don’t be afraid to make mistakes. One of the benefits of computer-based recording is that, as you strive for just the right mix, you can make as many mixes of your music as your hard drive space allows and not degrade the music’s sound. (This isn’t the case with tape-based recording, where you can hear the sound degrade as you make your way one more time — and then one more time — through the tape.)
TEAM LinG - Live, Informative, Non-cost and Genuine !

268 Part IV: Revving Up the Recording Process
Understanding Mixing
The goal of mixing is to make sure each instrument can be heard in the mix — the recorded whole that results from blending all your recorded parts together — without covering up something else or sounding out of place. You can pull this off in several ways:
Think about the emotion of the song. Choose the recorded parts that add to the emotional impact of the music and build intensity throughout the song. By necessity, this also means choosing not to use parts that are unnecessary, or which clash with parts that have a greater impact. This involves muting the track, dropping its level, or editing out the parts you don’t like. I cover editing in Chapter 10.
Create volume balance. Set the level (volume) of each instrument relative to the others so that nothing is buried so far back in the mix that you can’t hear it — and no instrument is so loud that it overpowers the other instruments. Be aware that your levels often change throughout the song, so settings that you’ve made for the ending of the first verse might not be appropriate for the fourth chorus. You can, however, set up your audio recording program so that it automatically deals with such variations. I discuss this process later in this chapter.
Another way to affect the levels of your tracks is to use dynamics processing to even out inconsistent performances. Essentially, dynamics processing lets you control the difference between the loudest and quietest parts of your recording so that you end up with a more interesting or even performance. I talk about dynamics processing in Chapter 18.
Create tonal clarity. Adjust the equalization (also called EQ or frequency response) of each instrument so that each one leaves room for the other instruments in the mix. This means getting rid of any frequencies of an instrument that clash with those of another, or emphasizing certain frequencies that define the sound of an instrument so it can be heard clearly in the mix. I cover equalization in detail in Chapter 16.
Put instruments in their places. Take advantage of stereo panning
(movement from left to right) to put each instrument in its proper place in the stereo field — toward the left or right — where it can either sound as natural as possible or produce a desired effect. Also, stereo panning allows you to make room for each instrument in the mix, especially those with similar frequency ranges.
Use effects effectively. Add effects (such as reverb or delay) and dynamics processors (such as compression) to the instruments in the mix to either place them “in front” or “in back” relative to other instruments or to create a desired sound. Chapter 17 covers effects in detail, and you discover dynamics processors in Chapter 18.
TEAM LinG - Live, Informative, Non-cost and Genuine !

Chapter 14: Mixing and Mastering Your Music 269
The mixing process is where you can get really creative in crafting your song. The stress of capturing great performances is over — all that’s left for you to do is to massage all the parts of your song into a cohesive whole. Don’t be afraid to try new things. Experiment with different EQ, panning, and effect settings. Take your time and have fun. The great thing about mixing is that you can make as many versions as you want — and you can always go back and try again.
Mixing with Automation
One of the great assets of computer-based recording is the ability to make a mix that you can then perform without any mistakes and repeat as many times as you want. This involves using the automation features included in
your audio-recording program. All audio recording programs have some sort of automation, so the basics I outline in this section apply to all programs even though the specific steps and vocabulary used by each program may be slightly different.
Unless you have an external controller such as a digital mixer or MIDI-based DAW controller (like the Mackie Control or the Digi 002 control surface) you have no choice but to use some automation when you mix more than a couple tracks within your computer. This is because your mouse can control only one thing at a time. So if you want to fade out your guitar lead while you bring in the backup vocals, you need to program these changes into your computer.
Knowing what you can automate
Most audio recording programs let you automate quite a few parts of your mix. For example, when working with audio tracks in Pro Tools you can automate the following:
Volume: This parameter controls the overall volume of the track.
Pan: This lets you set the left/right balance of the track in the stereo field. This allows you to place your instrument where you want on the virtual soundstage, giving your music a sense of spaciousness or dimension.
Mute: This allows you to turn the track on and off.
Send: This includes volume, mute, and panning settings for the send — the routing section that lets you send part of your track’s signal to an effect. Chapter 18 has more about Sends and effects.
Plug-in parameters: You adjust these parameters within the Plug-In window. Chapter 15 has all the details about plug-ins.
TEAM LinG - Live, Informative, Non-cost and Genuine !

270 Part IV: Revving Up the Recording Process
Automation data for each of these parameters resides in a playlist that’s separate from the regions that contain your edits for that track. This allows you to move the regions in and out of the track’s playlist without changing the automation data for that track.
MIDI tracks are equally amenable to automation. Pro Tools, for example, lets you automate the following parameters:
Volume: This parameter sets the overall volume of the MIDI data.
Pan: You can place your tracks anywhere from left to right in the stereo field to give your music a sense of dimension.
Mute: This allows you to turn the track on and off.
Controller data: This includes a number of MIDI settings, including options such as the modulation wheel, breath controller, and sustain.
Pro Tools stores the automation data for MIDI tracks — with the exception of Mute settings — within the MIDI region for that track. So when you move a region within a track’s playlist, the automation data (except for any mute settings) moves along with the region.
Getting to know automation modes
Most audio recording programs offer several different automation modes. These allow you to record, play back, and change your automation data so that you get the “performance” that you want from each track. Here’s a look at some of the typical automation modes you’ll find in most audio recording software:
Auto Off mode turns off all automation data for the selected track.
Auto Read mode plays back the automation data for the selected track.
Auto Write mode writes automation data for the selected parameter(s) while the session plays — overwriting any pre-existing automation data in the process. When you stop playback after writing automation in this mode, most programs (such as Pro Tools) automatically switch the automation mode to Auto Touch (see next bullet) so you don’t accidentally erase this data next time you play back the session.
Auto Touch mode writes automation data only when you click a parameter with your mouse; it stops writing when you release the mouse button.
TEAM LinG - Live, Informative, Non-cost and Genuine !

Chapter 14: Mixing and Mastering Your Music 271
At this point, your automated parameter returns to any previously automated position. By using Auto Touch, you can fix parts of your previously recorded automation data without erasing the stuff you want to keep.
Auto Latch mode works much like Auto Touch mode (see previous bullet) — when you touch or move a parameter, new automation data is written. The difference is that Auto Latch mode continues to write new automation data until you stop playback.
Recording your automation data
Recording your automation moves is a simple process and is the same regardless of the parameter you want to automate. This process involves selecting the parameter you want to automate, choosing the proper automation mode to record your data, and letting the song play as you record your automation data. These steps are outlined in this section.
When I work on my mixes, I always start setting up some basic level and panning settings. After I have a rough mix with these settings, I move on to adjusting EQ and then adding effects and dynamics processing. After these settings are recorded, I go back to the level and panning settings and adjust them some more. Next it’s back to the EQ, effects, and dynamics processing. This circular process continues until I have everything just the way I want it.
Enabling automation
The first steps in recording your automation moves is choosing the automation you want and enabling it for the track you want to record. This process is simple. For example, here’s how you enable automation in Logic:
1.Make sure the Arrange window is open. (If it isn’t open, choose Windows Open Arrange to open it.)
2.Click and hold over the automation mode selector in the track and drag your cursor to the mode that you want, as shown in Figure 14-1.
For a reminder of the different automation modes and how they work, check out the “Getting to know automation modes” section, earlier in this chapter.
3.Release the mouse button to make your selection.
The automation mode that you selected is listed in your track’s display.
TEAM LinG - Live, Informative, Non-cost and Genuine !