

VOC3_Manual
.pdfTempo and Beat Indicators
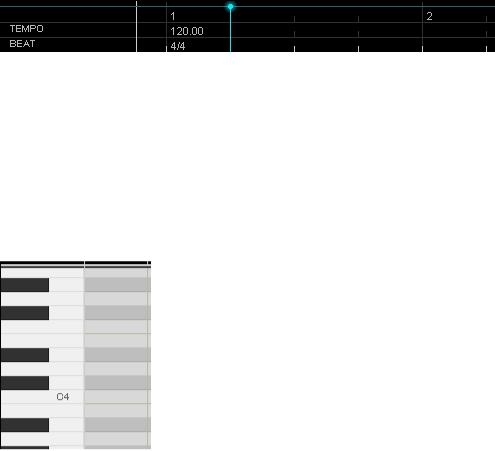
Show the current sequence tempo and beat settings. The initial and subsequent tempo and beat changes can be entered and edited in the TEMPO and BEAT rulers, respectively, described below.
2-2-3. The Measure Tool Bar
Cursor Position Indicator
The “CURSOR” values tell you exactly where your cursor is located in the
VOCALOID3 Musical Editor window piano roll (the values only change while the cursor is over an active part in the piano roll). The position is indicated by three values separated by commas – Measure : Beat : Clock. The first value is the number of the current measure, the second value is the beat as determined by the time signature set in the BEAT ruler, and the third value is the current clock position within the beat (there are 480 clocks per quarter note).
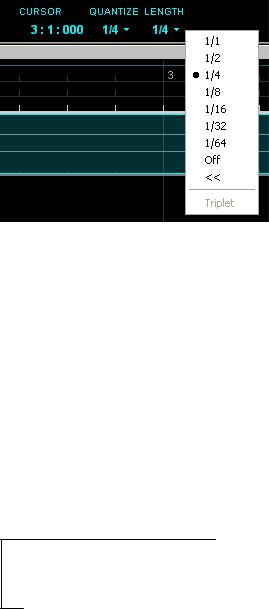
Quantize
“Quantize” makes it easy to enter notes right on the beat. You have a choice of note alignments from whole (1/1) notes to 64th notes, plus triplet variations of all available notes. Click on the QUANTIZE value to see the drop-down menu. To select triplets select a note alignment and then select “Triplet” at the bottom of the Quantize menu so that it is checked. The “Triplet” option is alternately checked (triplet note values) and unchecked (straight note values) each time it is selected. When Quantize is “OFF” you can position notes with maximum “clock” resolution (there are 480 clocks per quarter note).
You can also use “Quantize” to enter or adjust musical parts on the Track Editor in the same way as notes. Select the Track Editor or Musical Editor window and turn the grid on via the “Grid Line” command in the View menu to see a grid
61
corresponding to the current quantize setting in the Track Editor or Musical Editor. The Quantize settings are also available via the Settings menu (2-1. The Menus -> 2-1-9. Settings).
Length
While “Quantize,” above, determines alignment of note attack, “Length” determines alignment of the release of notes entered in the sequence track. It therefore determines which beats the end of notes will snap to when stretched. Click on the LENGTH value to see the menu. You have a choice of note alignments from whole (1/1) notes to 64th notes, plus triplet variations of all available notes. To select triplets select a note and then select “Triplet” at the bottom of the menu so that it is checked. The “Triplet” option is alternately checked (triplet note values) and unchecked (straight note values) each time it is selected. When
Length is “OFF” you can position the ends of notes with maximum “clock” resolution (there are 480 clocks per quarter note).
You can also use “Length” to enter or adjust musical parts on the Track Editor in the same way as notes. The Length settings are also available via the Settings menu (2-1. The Menus -> 2-1-9. Settings).
(Functions added to the V3.0.3)
Setting “LENGTH” to “<<” connects the “LENGTH” setting to “QUANTIZE”. (For example, the setting “QUANTIZE = 1/4, LENGTH = <<” acts as “LENGTH = 1/4”)
62

2-3. The Track Editor Window
2-3-1. Rulers
The three “rulers” across the top of the Track Editor window display and control the editor’s time-based functions.
Measure
The line extending down from the MEASURE ruler is the track’s song position marker. The indicator will scroll along the track during playback to indicate the current playback position. You can move the song position marker to any point in the track simply by briefly clicking in the MEASURE ruler at the desired location.
The song position marker will also jump to positions specified by operation of
the transport  ,
, ,
, or
or  controls. The start
  and end
  markers (2-2. The Tool Bars -> 2-2-2. The Transport Tool Bar -> Show/Hide Start and End Markers) used to define the repeat playback limits also appear in the MEASURE
ruler. Start markers  and end markers
  can be set by dragging along the MEASURE ruler from the song position. After this you can drag within the
MEASURE ruler to your desired position (the start marker  is usually placed
before the end marker ). In addition, performing a long click and dragging above the MEASURE ruler will allow you to designate your range of choice.
Tempo
The initial tempo and subsequent tempo changes can be entered and edited in the TEMPO ruler. To edit the initial tempo setting at the very beginning of the
TEMPO ruler (you may need to drag the track’s scroll handle all the way to the left), double click on it and then edit its value in the window that appears.
63
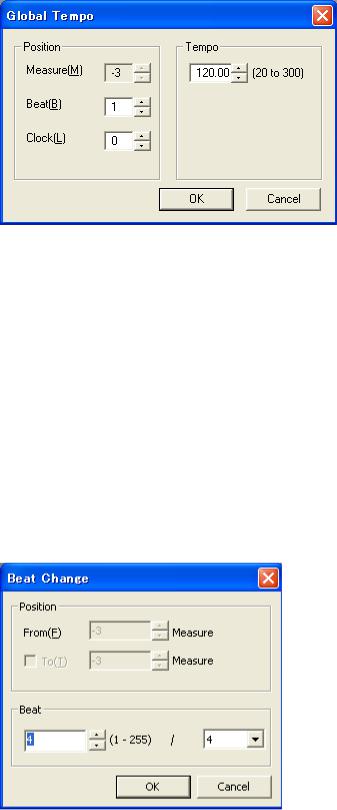
Click [OK] to confirm and enter the tempo change or [CANCEL] to abort.
To enter a tempo change later in the track, click at the appropriate location in the TEMPO ruler with the pencil tool. The tempo window will appear allowing you to enter a new tempo value which will be entered at the point at which you clicked the pencil tool when you click the window’s [OK] button. You can also set the precise position of the tempo change using the “Position” parameters in the tempo window (measure, beat, and clock).
Beat
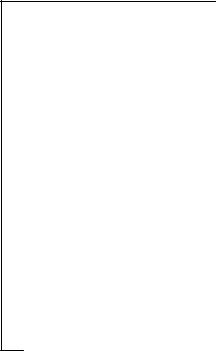
The initial time signature and subsequent time signature changes can be entered and edited in the BEAT ruler. To edit the initial time signature setting at the very beginning of the BEAT ruler (you may need to drag the track’s scroll handle all the way to the left), double click on it and then edit the upper and lower values in the window that appears. Click [OK] to confirm and enter the beat change or [CANCEL] to abort.
To enter a time signature change later in the track, click at the appropriate location in the BEAT ruler with the pencil tool. The time signature window will appear allowing you to enter new time signature values which will be entered at the point at which you clicked the pencil tool when you click the window’s [OK]
64

button. You can also set the precise position of the time signature change using the “Position” parameters in the time signature window.
2-3-2. Track Editor
The Track Editor displays three types of tracks:
• Track: The vocaloid sequence track. Up to a total of 16 sequence tracks can be created in any project. You create “parts” within the sequence tracks that function as containers for sequences of notes, lyrics, and events entered or edited via the Piano Roll (2-4. The Piano Roll). Although you can add, delete, resize, move, and copy parts in the Track Editor tracks, the notes, lyrics, and events that they contain can only be entered or edited via the Piano Roll.
The initial default name of the sequence tracks is “Track”, but you can enter more meaningful names for easy identification whenever you like (3-1. Managing Tracks & Parts in the Track Editor -> 3-1-1. Creating and Managing Tracks -> Renaming Tracks).
•WAV (MONO): A mono wave file track. Mono WAV files can be imported to the WAV (MONO) track by using the Import -> Wave command in the File menu (2-1. The Menus -> 2-1-1. File). The WAV (MONO) track is an ideal place to put sound effects such as breaths, for example, and short sound clips.
•WAV (STEREO): A stereo wave file track. Stereo WAV files can be imported to the WAV (STEREO) track by using the Import -> Wave command in the File menu (2-1. The Menus -> 2-1-1. File). The WAV (STEREO) track is ideal for musical backing or “Karaoke” tracks that the singer will perform against.
Render Buttons
In addition to the render commands in the Track and Part menus (2-1. The Menus -> 2-1-5. Track, 2-1. The Menus -> 2-1-6. Part), render buttons (they look like an “R” in a square) are provided in the track title boxes and at the lower right corner of each part. If playback becomes sluggish or intermittent when playing back a large number of tracks, for example, click a render button to prerender the corresponding track or part, thereby reducing the load on your computer’s CPU for smoother performance. A progress bar will appear while the
65
track or part is being rendered, and then when rendering is complete the render button will disappear from the corresponding track or part.
(Functions added to the V3.0.3)
Mute Button
Clicking the  button to the upper left of each track mutes the output from this track. Clicking this again releases the Mute function. This function is connected with the same function in the Mixer Window.
Solo Button
It is possible to only monitor 1 track (channel) with the Solo function. If there
are multiple channels, clicking the  button to the upper left of the Track Header of the track you want to monitor outputs only that track and automatically mutes the other tracks. Likewise, it is possible to monitor only that track with ease by muting all the tracks besides the track you want to
monitor with the Solo function. The  button is highlighted for the track set to Solo and the other tracks have the
  highlighted. To release Solo from this
track, click the  button one more time. This function is connected with the same function in the Mixer Window.
Scroll Bars
The horizontal and vertical scroll bars along the bottom and right edges of the Track Editor window perform essentially the same functions that they do in a word processor or other program: i.e. click the arrows at either end of the scroll bar to scroll in the corresponding direction, or drag the scroll handle to move to the desired location.
Zoom Sliders
The zoom slider can be used to zoom in or out on the tracks horizontally and or vertically, as required. Drag the horizontal zoom slider to the right to zoom in for fine part positioning, for example, or drag to the left to zoom out to see a broader overall view of the tracks. Drag the vertical zoom slider up to increase the height of the tracks, or down to reduce their height.
Right-click Tip: Right-click in the sequence track for conveniently accessible tool selection (2-2. The Tool Bars -> 2-2-1. The Edit Tool Bar),
quantize selection (2-1. The Menus -> 2-1-9. Settings), note length selection (2-1. The Menus -> 2-1-9. Settings), edit items (2-1. The Menus -> 2-1-2. Edit),
event selection (2-1. The Menus -> 2-1-2. Edit), singer selection(3-2. The Singer -> Selecting a Singer), and part properties(2-1. The Menus -> 2-1-6. Part).
66
2-4. The Piano Roll (The Musical Editor Window)
Rulers
The three “rulers” across the top of the Piano Roll window are exactly the same as those in the Track Editor Window (2-3. The Track Editor Window -> 2-3-1. Rulers).
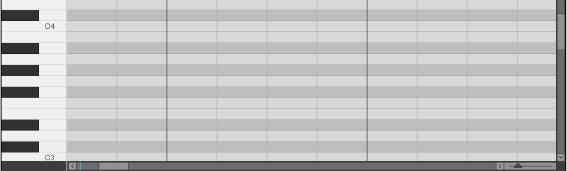
Keyboard
The graphic piano keyboard is a visual guide for note entry. Each key corresponds to a band in the piano roll to the right of the keyboard – white bands correspond to white keys and black bands correspond to black keys.
Piano Roll
This is where you actually enter the notes and lyrics to be “sung” by VOCALOID3.
You begin by entering the desired notes of the desired length. The default lyric is automatically entered for each note (“Ooh” when entering English, for example).
You can then double-click on and edit the default lyric for each note to create the desired phrase (3-4. Entering & Editing Lyrics). VOCALOID3 will be able to sing the lyrics you have entered – although you’ll have to add dynamics and phrasing control to make the resultant vocal track sound realistic (3-7. Expressive Control).
67
Scroll Bars
The horizontal and vertical scroll bars along the bottom and right edges of the sequence window perform essentially the same functions that they do in a word processor or other program: i.e. click the arrows at either end of the scroll bar to scroll in the corresponding direction, or drag the scroll handle to move to the desired location.
Zoom Slider
The zoom slider can be used to zoom in or out on the track horizontally. Drag the slider to the right to zoom in for fine note positioning, for example, or drag to the left to zoom out to see a broader overall view of the track.
Right-click Tip: Right-click in the sequence track for conveniently accessible tool selection (2-2. The Tool Bars -> 2-2-1. The Edit Tool Bar),
quantize selection (2-1. The Menus -> 2-1-9. Settings), note length selection (2-1. The Menus -> 2-1-9. Settings), edit items (2-1. The Menus -> 2-1-2. Edit),
event selection (2-1. The Menus -> 2-1-2. Edit), singer selection(3-2. The Singer -> Selecting a Singer),
lyric insertion (2-1. The Menus -> 2-1-4. Job -> Insert Lyrics), part properties (2-1. The Menus -> 2-1-6. Part), and
note properties (2-1. The Menus -> 2-1-7. Lyrics -> Note Properties).
68
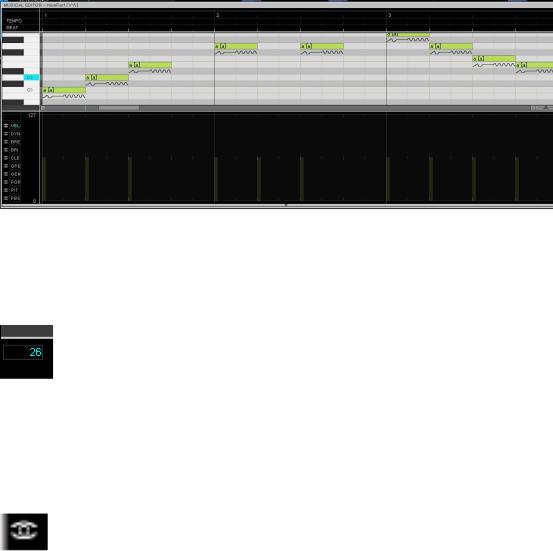
2-5. The Control Parameter (The Musical Editor Window)
The control parameter area is where you view and edit all other parameters that control the sound of the notes in the sequence track: note velocity, dynamics, and singer parameters such as breathiness, brightness, pitch bend, and more.
If the control parameter isn’t showing below the piano-roll in the Musical Editor window, click the “Control Parameters” command in the View menu so that a checkmark appears next to the command. Clicking the “Control Parameters” command toggles control parameter visibility on and off. Clicking the bar which has the arrow mark (the fold button) at the bottom of Musical Editor window toggles the control parameter visibility on and off too.
Refer to the “3-7. Expressive Control” section for details on editing in the control parameter.
Value Field
The value field above the control parameter selectors shows the value of the selected parameter at the current cursor position in the control parameter area. This facilitates precise tool positioning when editing the control parameter.
View Icons
The view (eye) icons to the left of each parameter selector indicate which parameters are showing in the control parameter area. The currently selected parameter will always show, and you can select one other parameter to view simultaneously. For example, when editing dynamics in the DYN track, it is very helpful to be able to see the velocity values as well, since these appear as vertical
69
bars at the beginning of each note, providing an accurate reference to the timing of the notes to which you are applying control.
Right-click Tip: Right-click in the control parameter editor for conveniently accessible tool selection (2-2. The Tool Bars -> 2-2-1. The Edit Tool Bar), edit items (2-1. The Menus -> 2-1-2. Edit),
event selection (2-1. The Menus -> 2-1-2. Edit), singer selection (3-2. The Singer -> Selecting a Singer), and part properties(2-1. The Menus -> 2-1-6. Part).
70