

Practical Database Programming With Java
.pdf868 Chapter 9 Developing Java Web Services to Access Databases
@WebMethod(operationName = "UpdateCourse")
public Boolean UpdateCourse(@WebParam(name = "cdata") ArrayList cdata) {
//TODO write your implementation code here:
ABoolean update = false;
Bupdate = courseFacade.setCourse(cdata);
Creturn update;
}
Figure 9.100. The codes for the Web service operation UpdateCourse().
At this point, we have finished all coding processes for the course data updating action. Now we can build and deploy our Web service to save these codes.
9.14.8.12 Build and Deploy the Web Service Project
Perform the following operations to build and deploy our Web service project:
1.Click on the Clean and Build Main Project button to build our Web service.
2.Right click on our Web application WebServiceOracleApp and select the Deploy item to deploy our Web service. If everything is fine, a successful deployment result should be displayed.
A problem arises when testing this Web service project using the tester page, which is the input parameter array cdata. As we know, the cdata has a data type of ArrayList, and it needs to (1) create an ArrayList instance, and then (2) assign a group of updated course information to that ArrayList object to call this Web service operation UpdateCourse() to perform the course data updating. However, it is difficult to do those two operations manually by using this tester page. Therefore, we need to create some Web client projects to consume and test this Web service project in the later sections.
Next, let’s discuss how to delete a course record using the Web service operations.
9.14.8.13 Create and Build Session Bean Method removeCourse()
Perform the following operations to create a new method removeCourse() in our session bean class CourseFacade.java:
1.Open our Web service application project WebServiceOracleApp and double click on our session bean class CourseFacade.java from the Projects window to open it.
2.Right click on any place inside our session bean class body, choose Insert Code item and
select the Add Business Method item to open the Add Business Method wizard.
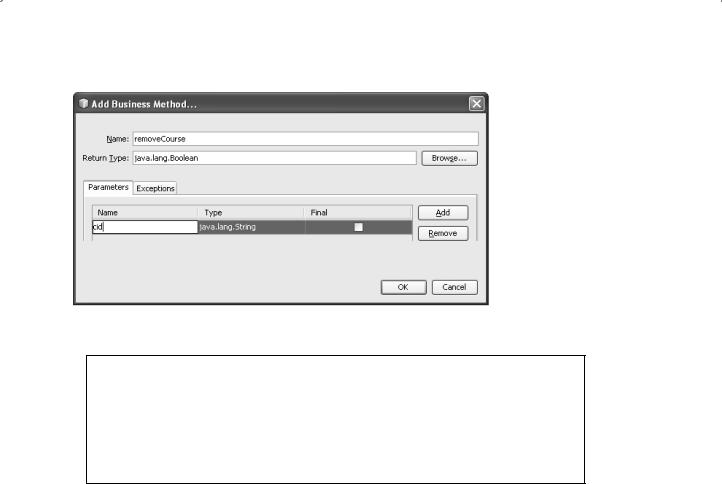
3.Enter removeCourse into the Name field and click on the Browse button that is next to the Return Type combo box. On the opened Find Type wizard, type boolean into the top field and select the Boolean (java.lang) from the list and click on the OK button.
4.Click on the Add button to add one argument for this method. Enter cid into the Name column and keep the default data type java.lang.String unchanged. Your finished Add
Business Method wizard should match the one that is shown in Figure 9.101. Click on the OK button to complete this business method creation process.
9.14 Build Java Web Service Projects to Access Oracle Databases 869
Figure 9.101. The finished Add Business Method wizard.
public void remove(Course course) { em.remove(em.merge(course));
}
public Boolean removeCourse(String cid) {
ACourse c = new Course(cid);
Bremove(c);
Creturn true;
}
Figure 9.102. The codes for the method removeCourse().
Now let’s develop the codes for this newly added method.
Click on the Source button on the top of this window to open the code window of our session bean class CourseFacade.java. Enter the codes that are shown in Figure
9.102 into this new method removeCourse(). The new added codes have been highlighted in bold.
The codes for this method is very simple since we utilized a built-in method remove() that is created and added into this session bean class automatically when this session bean is created.
Let’s have a closer look at this piece of codes to see how it works.
A.A new Course instance is created first with the course_id as the argument since we need to call a built-in method remove() to perform this course record deleting action, and that method needs a Course object as the argument.
B.The built-in method remove() is called to try to delete a course record with the course_id as the deleting criterion. The function of this built-in method is to find the target course record and remove it from the Course table in our sample database.
C.A true is returned to the associated Web operation.
To save this piece of codes, click on the Clean and Build Main Project button on the top to build our project.

870 Chapter 9 Developing Java Web Services to Access Databases
Next, let’s create and build our last Web service operation DeleteCourse() to call this session bean method removeCourse() to delete an existing course record from our Course table.
9.14.8.14 Create and Build Web Service Operation DeleteCourse()
Perform the following operations to add this new operation into our Web service:
1.Launch NetBeans IDE and open our Web service project WebServiceOracleApp, and double click on our Web service main class file WebServiceOracle.java from the Projects window to open it.
2.Click on the Design button on the top of the window to open the Design View of our Web service project WebServiceOracle.
3.Click on the Add Operation button to open the Add Operation wizard.
4.Enter DeleteCourse into the Name field and click on the Browse button that is next to
the Return Type combo box. Type boolean into the Type Name field, and select the item Boolean (java.lang) from the list, and click on the OK button.
5.Click on the Add button and enter cid into the Name parameter field. Keep the default data type java.lang.String unchanged.
Your finished Add Operation wizard should match the one that is shown in Figure 9.103. Click on the OK button to complete this new operation creation process.
Click on the Source button on the top of this window to open the code window of our Web service project. Let’s perform the coding for this new added operation.
On the opened code window, enter the codes that are shown in Figure 9.104 into this new added operation DeleteCourse().
Let’s have a closer look at this piece of newly added codes to see how it works.
A.A local Boolean variable delete is created and initialized to false. This local variable is used to hold the running result of execution of the session bean method removeCourse() that performs a course record deleting action from the Course table in our sample database.
Figure 9.103. The complete Add Operation wizard.
9.14 Build Java Web Service Projects to Access Oracle Databases 871
@WebMethod(operationName = "DeleteCourse")
public Boolean DeleteCourse(@WebParam(name = "cid") String cid) {
//TODO write your implementation code here:
ABoolean delete = false;
Bdelete = courseFacade.removeCourse(cid);
Creturn delete;
}
Figure 9.104. The codes for the Web service operation DeleteCourse().
B.The session bean method removeCourse() is called to perform a course record deleting action via Java persistence API and entity classes.
C.The running status of the session bean method is returned to the consuming project.
At this point, we have finished all coding processes for the course data deleting action. Now we can build, deploy, and test our Web service to save these codes.
9.14.8.15 Build and Test the Web Service Project
Perform the following operations to build and deploy our Web service project:
1.Click on the Clean and Build Main Project button to build our Web service.
2.Right click on our Web application WebServiceOracleApp and select the Deploy item to deploy our Web service. Enter the appropriate username and password to the Glassfish v3 server, such as admin and reback, which are used for this application, and click on the OK button to start the application server. If everything is fine, a successful deployment result should be displayed.
3.Expand the Web Services node under our Web service project and right click on our Web service target file WebServiceOracle, and choose the Test Web Service item to run our Web service project. The running status of our Web service is shown in Figure 9.105.
4.Enter a course_id to be deleted from the Course table, such as CSC-233B, into the text field and click on the deleteCourse button to test this course record deleting function. Immediately, you can find that a true is returned for this deleting action, which means that our data deleting is successful.
To confirm this course record deleting, open the Course table from the Services window in the NetBeans IDE. It can be found that the course CSC-233B has been deleted from the Course table.
The reason we selected the course CSC-233B as a deleting example is that this course has no relationship with the child table StudentCourse since no student has enrolled to that course. Recall that in Chapter 2, when we built our sample database, a one-to-many relationship has been set up between the primary table Course and the child table
StudentCourse.Also, a cascaded deleting relationship has been set up for these two tables, which means that if a course in the Course table is deleted, the same course taken by students in the StudentCourse table will also be deleted. Since CSC-233B has not been taken by any student, therefore, no cascaded deleting relationship is existed for this course, and no deleting action will be performed for the StudentCourse table.

872 Chapter 9 Developing Java Web Services to Access Databases
Figure 9.105. The running status of our Web service project.
Table 9.9. The original course record CSC-233B in the Course table
course_id |
course |
|
credit |
classroom |
schedule |
enrollment |
faculty_id |
|
|||||||
CSC-233B |
Introduction to Algorithms |
3 |
|
TC-302 |
M-W-F: 11:00-11:55 AM |
19 |
K69880 |
It is highly recommended to recover this deleted course CSC-233B from our Course table in order to keep our sample database neat and complete. Refer to Table 9.9 to add this course into our Course table. You can do this data recovery using either the Oracle Database 10 g XE or the opened Course table in the Services window in the NetBeans
IDE.
At this point, we have finished developing and building our Web service project to access and manipulate data against our Oracle database.A complete Web service application project WebServiceOracleApp can be found from the folder DBProjects\Chapter 9 that is located at the Wiley ftp site (refer to Figure 1.2 in Chapter 1).

9.15 Build a Windows-Based Web Client Project to Consume the Web Service 873
Next, let’s build some Windows-based and Web-based client projects to consume this Web service. First, let’s build a Windows-based client project WinClientOracle.
9.15 BUILD A WINDOWS-BASED WEB CLIENT PROJECT TO CONSUME THE WEB SERVICE
To save time and space, we can use some components we built in one Windows-based project SQLSelectObject in Section 6.4 in Chapter 6 to build this client project. The project can be found from the folder DBProjects\Chapter 6 that is located at the Wiley ftp site (refer to Figure 1.2 in Chapter 1).
9.15.1 Create a New Windows-Based Web Client Project
WinClientOracle
Perform the following operations to create a new Windows-based Web client project WinClientOracle to consume our Web service:
1.Launch NetBeans IDE and choose File > New Project item.
2.Select Java and Java Application from the Categories and the Projects lists, respectively. Click on the Next button.
3.Name the project as WinClientOracle and select a desired folder to save this project. Uncheck the Create Main Class checkbox. Your finished Name and Location wizard should match the one that is shown in Figure 9.106.
Click on the Finish button to create this new project.
Next, let’s copy some components from the project SQLSelectObject we built in Section 6.4 in Chapter 6, and paste them into this new project as our GUIs.
Figure 9.106. The finished Name and Location wizard.

874 Chapter 9 Developing Java Web Services to Access Databases
Figure 9.107. The finished Copy Class wizard.
9.15.2 Copy the CourseFrame and MsgDislog Components
as GUIs
Perform the following operations to complete these copy-and-paste actions:
1.Go to the Wiley ftp site (refer to Figure 1.2 in Chapter 1), load and open the project
SQLSelectObject from the folder DBProjects\Chapter 6.
2.On the opened project, right click on the Course Frame file CourseFrame.java under the project package node, and select the Refactor > Copy item to copy this form file.
3.On the opened Copy Class—CourseFrame wizard,select our new project WinClientOracle from the Project combo box and remove the 1 after the CourseFrame from the New Name field.
4.Your finished Copy Class—CourseFrame wizard is shown in Figure 9.107.
5.Click on the Refactor button to make a refactoring copy for this frame file.
6.Perform a similar operation to copy the MsgDialog.java GUI and paste it into our new project WinClientOracle.
Now return to our new project WinClientOracle; you can find that a copied
CourseFrame.java and a MsgDialog.java file have been pasted in the default package in our new project.
Next, let’s open the code window of the CourseFrame.java class file and perform some modifications to the copied codes for this file to make it as our client testing project:
1.Remove all codes from the cmdSelectActionPerformed() method.
2.Remove all codes from the CourseListValueChanged() method.
Since we need to use this form as our main GUI to interface to our Web service to perform five course data related actions, we need to modify this form by adding some buttons and fields to allow us to do those actions. Perform the following operations to modify this form:
1. Click on the Design button to open the CourseFrame form window.
2. Add a Label and a Text Field into the Course Information panel with the properties shown in Table 9.10.

9.15 Build a Windows-Based Web Client Project to Consume the Web Service 875
Table 9.10. Objects and controls added into the CourseFrame window
Type |
Variable Name |
Text |
editable |
Title |
Label |
Label1 |
Course ID |
|
|
Text Field |
CourseIDField |
|
checked |
|
Button |
cmdUpdate |
Update |
|
|
Button |
cmdDelete |
Delete |
|
|
Figure 9.108. The modified CourseFrame form window.
3.Add two buttons, Update and Delete, with the properties shown in Table 9.10. Also, rearrange these five buttons to the bottom of the CourseFrame form.
Your finished CourseFrame form window should match the one that is shown in Figure 9.108.
Click on the Clean and Build Main Project button to build and save our project. Before we can build the codes for these methods, first we need to add our Web service reference into this new client project to enable our client to recognize our Web service and its operations.
9.15.3 Create a Web Service Reference for Our Windows-Based Client Project
Perform the following operations to set up a Web service reference for our client project:
1.Right click on our client project WinClientOracle from the Projects window, and select the New > Other item to open the New File wizard.
876 Chapter 9 Developing Java Web Services to Access Databases
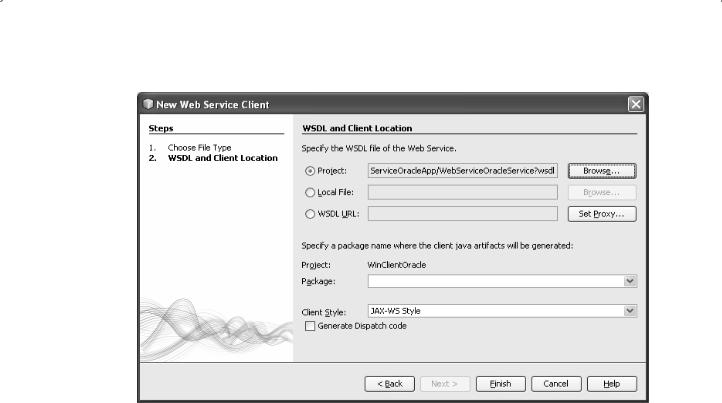
Figure 9.109. The finished New Web Service Client wizard.
2. On the opened New File wizard, select Web Services from the Categories and Web Service Client from the File Types list, respectively. Click on the Next button to continue.
3.Click on the Browse button for the Project field and expand our Web application project WebServiceOracleApp, and click on our Web service project WebServiceOracle to select it. Then click on the OK button to select this Web service. Your finished Web Service Client wizard should match the one that is shown in Figure 9.109.
4.Click on the Finish button to complete this Web service reference setup process.
Immediately, you can find a new node named Web Service References has been created and added into our client project. Expand this node and you can find the associated Web service port and our five Web service operations under that node.
Now let’s develop the codes for this project to call the Web service to perform the data query and manipulations against the Course table in our sample database.
9.15.4 Develop the Codes to Call Our Web Service Project
In our Web service project WebServiceOracle, we built five operations with five different data actions against the Course table in our sample database. We need to develop the codes for five buttons, exactly five methods related to those five buttons, in our new client project WinClientOracle to call those five operations in our Web service to perform the desired data actions to the Course table. Table 9.11 shows these relationships

9.15 Build a Windows-Based Web Client Project to Consume the Web Service 877
Table 9.11. The relationship between each button’s method and each operation
Client Button & Method |
Web Service Operation |
Function |
|
Select |
QueryCourseID() |
Query all course_id taught by the selected faculty |
|
cmdSelectActionPerformed() |
|||
|
|
||
CourseListValueChanged() |
QueryCourse() |
Query detailed information for selected course_id |
|
Insert |
InsertCourse() |
Insert a new course record into the Course table |
|
cmdInsertActionPerformed() |
|||
|
|
||
Update |
UpdateCourse() |
Update an existing course record in the Course table |
|
cmdUpdateActionPerformed() |
|||
|
|
||
Delete |
DeleteCourse() |
Delete a course record from the Course table |
|
cmdDeleteActionPerformed() |
|||
|
|
between each button’s method in our client project and each operation defined in our Web service.
Let’s start our coding process from the first button Select in our client project and its method cmdSelectActionPerformed().
9.15.4.1 Build Codes for the Select Button Method to Query CourseIDs
The function of this method is to query all course_id taught by the selected faculty member as the Select button is clicked by the user. The queried result will be added and displayed in the Course ID List box in this CourseFrame form.
On the opened Design view of the CourseFrame form window, double click on the Select button to open this method. Perform the following operations to add the Web service operation QueryCourseID() into this method:
1.Browse to the Web Service References node under our client project WinClientOracle.
2.Expand our Web service and its port until all our five Web service operations have been exposed.
3.Drag the QueryCourseID operation and place it inside the cmdSelectActionPerformed() method.
4.A piece of codes is automatically created and added into this method, as shown in Figure 9.110.
It is unnecessary to explain the function of this piece of codes line by line since all of coding lines have been illustrated by the built-in comments.
Now let’s do some modifications to this piece of codes and add some codes to meet our course_id query requirements. Enter the codes that are shown in Figure 9.111 into this method, and the modified codes have been highlighted in bold.
Let’s have a closer look at this piece of newly added codes to see how it works.
A.Two local variables, al and cResult, are created first. The first is an ArrayList instance that is used to hold the query result, and the second is a String array used to convert the query result and display it in the Course ID List.
B.The Web service operation QueryCourseID() is called to perform this course data query to collect all course_id taught by the selected faculty member that is obtained from the