

Practical Database Programming With Java
.pdf838 Chapter 9 Developing Java Web Services to Access Databases
public String Delete() {
AMsgDialog msgDlg = new MsgDialog(new javax.swing.JFrame(), true);
try { // Call Web Service Operation
org.ws.sql.WebServiceSQL port = service.getWebServiceSQLPort(); // TODO initialize WS operation arguments here
BBoolean delete = port.deleteFaculty(facultyName);
Cif (!delete) {
msgDlg.setMessage("The data deleting is failed!"); msgDlg.setVisible(true);
}
D} catch (Exception ex) {
//TODO handle custom exceptions here
msgDlg.setMessage("exception: " + ex); msgDlg.setVisible(true);
}
E return null;
}
Figure 9.66. The modified codes for the Delete() method.
9.13.4 Build and Run Our Client Project to Update and Delete Faculty Record via Web Service
Click on the Clean and Build Main Project button to build our client project. If everything is fine, right click on our Web-based client project WebClientSQL from the Projects window and choose the Deploy item to deploy our Web application. Then, right click on our JSF page FacultyPage.jsp from the Projects window and choose the Run File item to run our client project.
On the opened JSF page, first, let’s perform a faculty record query by entering a desired faculty name such as Ying Bai into the Faculty Name field, and then click on the Select button to get details for this selected faculty member. To update this faculty record, enter six pieces of updating faculty information shown below into the associated six text fields, as shown in Figure 9.67.
•Name: Susan Bai
•Title: Professor
•Office: MTC-200
•Phone: 750-378-2000
•College: Duke University
•Email: sbai@college.edu
Click on the Update button to try to call our Web service operation UpdateFaculty() to update this faculty record in the Faculty table in our sample database.
To confirm this data updating action, two methods can be used. First, we can open our Faculty table using either the Services window in the NetBeans IDE or the
SQL Server 2008 Management Studio to check whether this faculty record has been updated. The second way to confirm this data updating, which is simpler, is to use the Select button in this form to perform a query to try to retrieve the updated faculty record.

9.13 Build a Web-Based Client Project to Consume the Web Service 839
Figure 9.67. Six pieces of updated faculty information.
Figure 9.68. The confirmation of an updated faculty record.
The second way to do this checking is to, first, perform another query for the selected faculty such as Jenney King, and then go to the Faculty Name field and type the updated faculty name Susan Bai into this field. Click on the Select button to try to retrieve it. Now you can find that six pieces of updated faculty information for the updated faculty member Susan Bai have been retrieved and displayed in this page, as shown in Figure 9.68.
Now let’s test the faculty deleting action by calling our Web service operation DeleteFaculty(). First, let’s perform another faculty updating action to recover the faculty

840 |
Chapter 9 Developing Java Web Services to Access Databases |
|
|||||
Table 9.7. The original faculty record in the Faculty table |
|
|
|||||
|
|
|
|
|
|
|
|
faculty_id |
faculty_name |
office |
phone |
college |
title |
||
B78880 |
|
Ying Bai |
MTC-211 |
750-378-1148 |
Florida Atlantic University |
Associate Professor |
ybai@college.edu |
member Ying Bai’s record. Enter six pieces of original information shown in Table 9.7 into six associated fields in this page, and click on the Update button to complete this data updating.
Now type the updated faculty name Ying Bai into the Faculty Name field and click on the Select button to retrieve this updated faculty record. Then click on the Delete button to try to delete this faculty record.
To confirm this data deleting action, click on the Select button again to try to retrieve this faculty record from our sample database. An exception message is displayed to indicate that no matched faculty can be found from our sample database. Our data deleting is successful!
Sometimes, the execution of this deleting action seems to be still executed without completion. This means that an exception occurred. To watch this exception message, just minimize all current opened windows and forms, and then you can find this message.
To make our sample database clean and neat, it is highly recommended to recover this deleted faculty member and related records in our Faculty, LogIn, Course, and StudentCourse tables. An easy way to do this recovery is to use the Microsoft SQL Server 2008 Management Studio. Refer to deleted records shown in Tables 9.2–9.5 in Section 9.11.3 to add or insert them back to the related tables to complete this data recovery.
Our Web client project to consume our Web service WebServiceSQL is successful! A complete Web client project WebClientSQL can be found from the folder DBProjects\ Chapter 9 that is located at the Wiley ftp site (refer to Figure 1.2 in Chapter 1).
Next, let’s discuss how to build a Web service to access and manipulate data against our sample Oracle database.
9.14 BUILD JAVA WEB SERVICE PROJECTS TO ACCESS ORACLE DATABASES
We have provided a detailed discussion about the accessing and manipulating data in an SQL Server database via Web services using the runtime object method in the last section. In this section, we will discuss how to access and manipulate data in the Oracle database via Web services using Java beans and entity classes.
The structure and architecture of using Java beans and entity classes to access and manipulate data in an Oracle database via Web services is shown in Figure 9.69.
The advantages of using Java session beans and Java persistence APIs to access
Oracle database are (1) all database-related operations are integrated into JAPIs and managed by the entity manager via entity classes, and (2) all interfaces and operations related to the business logic and database are controlled and managed by the session beans. The role of the Web service is exactly an interface to pass all requests coming from the clients to the associated operations or methods in the session beans, and the latter

9.14 Build Java Web Service Projects to Access Oracle Databases 841
Web Server |
Oracle |
||
Win-Based |
|
Database |
|
Client |
|
Server |
|
|
Java Session |
JAPI & |
|
Web Services |
Entity |
||
Beans |
|||
|
Classes |
||
|
|
||
Web-Based
Client
Figure 9.69. Architecture of accessing Oracle database via Web services.
Figure 9.70. The finished Server and Settings wizard.
just passes those queries to the Java persistence APIs that access the Oracle database server to process those queries.
Let’s begin our discussion by creating a new Web application WebServiceOracleApp and a Web service project WebServiceOracle.
9.14.1 Create a New Java Web Application Project
WebServiceOracleApp
Perform the following operations to create our new Web application
WebServiceOracleApp:
1.Launch NetBeans IDE and choose File > New Project (Ctrl-Shift-N). Select Web Application from the Java Web category.
2.Name the project WebServiceOracleApp and click on the Browse button to select a desired location for the project. In this application, we used the C:\Chapter 9 as our project location. Click on the Next button to continue.
3.Select GlassFish v3 as our Web container and Java EE 6 Web as the Java EE version; your finished Server and Settings wizard should match the one that is shown in Figure 9.70. Click on the Next button to go to the next wizard.

842 Chapter 9 Developing Java Web Services to Access Databases
4.In the opened Frameworks wizard, you may select the JavaServer Faces as the framework for this application. Click on the Finish button to complete this new application creation process.
Now that a Web application has been created with a selected Web container, next, we can create our new Web service project WebServiceOracle.
9.14.2 Create a New Java SOAP-Based Web Service Project
WebServiceOracle
The function of this Web service is to execute related operations in this Web service, and furthermore, to call the associated methods defined in our Java session beans to perform data queries and manipulations to our sample Oracle database via Java Persistence APIs and return the results.
Perform the following operations to create this new Web service project
WebServiceOracle:
1.In the Projects window, right click on our newly created project WebServiceOracleApp and select the New > Other menu item to open the New File wizard.
2.Select Web Services from the Categories list and Web Service from the File Types list, and click on the Next button.
3.Name the Web service WebServiceOracle and type org.ws.oracle into the Package
field. Leave Create Web Service from Scratch selected.
Your finished Name and Location wizard should match the one that is shown in Figure 9.71. Click on the Finish button to complete this process.
Figure 9.71. The finished Name and Location wizard.

9.14 Build Java Web Service Projects to Access Oracle Databases 843
Before we can add any operation to this Web service project, we need first to add a JDialog class into our project, and we need to use this component to display the debug information during the testing process for our Web service project.
9.14.3 Add a JDialog Class into the Web Services Project
Now let’s handle adding a JDialog component into our Web service project.
To save time, you can copy a JDialog class MsgDialog.java from most projects we built in the previous sections. For example, you can copy this JDialog class from our Web application project, JavaWebDBJSPSQL, and paste it into our current Web service, exactly, into the org.ws.oracle node in our Web service project.
Perform the following operations to complete this copy and paste process:
1.Right click on this MsgDialog.java node from the project JavaWebDBJSPSQL and choose Refactor > Copy item.
2.Select our current project WebServiceOracleApp from the Project combo box, and select org.ws.oracle from the To Package combo box.
3. Make sure that the name of the copied JDialog is MsgDialog in the New Name field. Delete the 1 that is attached to this MsgDialog, since the default name is MsgDialog1.
4. Click on the Refactor button to paste this JDialog into our project.
The project JavaWebDBJSPSQL can be found at the folder DBProjects\Chapter 8 that is located at the Wiley ftp site (refer to Figure 1.2 in Chapter 1).
Next, let’s handle the adding new operations and coding for the newly added operations or methods in our Web service to perform data query actions from our sample Oracle database. Since we have discussed how to access and manipulate data in the Faculty table in our sample SQL Server database in the last section, in this section, we will concentrate on the data queries and actions against the Course table in our sample Oracle database.
Since we need to use JAPI to perform data operations to our Oracle database, we need first to add all required entity classes into this Web service project.
9.14.4 Add Java Persistence API and Entity Classes
from Database
Perform the following operations to add a new entity class from our sample Oracle database into this Web service project:
1.Right click on our Web application project WebServiceOracleApp and choose the
New > Other item.
2. |
On the opened New File wizard, select Persistence from the Categories list and |
|
Entity Classes from Database from the File Types list, respectively. Click on the Next |
|
button. |
3. |
Click on the drop-down arrow on the Data Source combo box, and choose the New |
|
Data Source item. |
4.Enter CSEDEPT into the JNDI Name field as the name of our Oracle data source (since we have used CSE_DEPT as the name for our SQL Server data source), and click on the
drop-down arrow of the Database Connection combo box. Then select the URL of
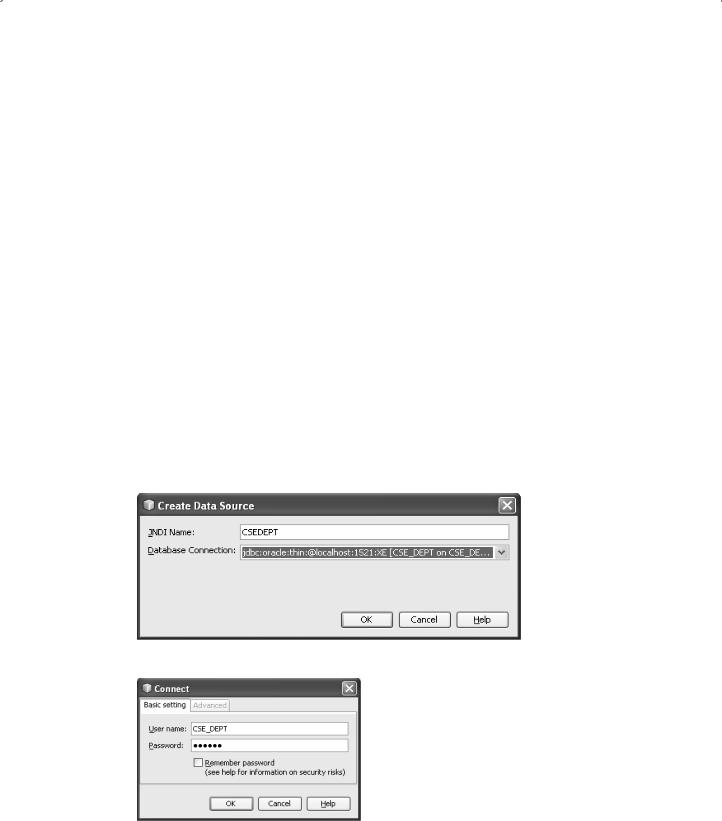
844 Chapter 9 Developing Java Web Services to Access Databases
our sample Oracle database, jdbc:oracle:thin:@localhost:1521:XE [CSE_DEPT on CSE_ DEPT], as shown in Figure 9.72. Click on the OK button to continue.
5.On the opened Connect wizard, enter the username and password for our sample Oracle database. In our application, they are CSE_DEPT and reback, which should be identical with those we used when we built this sample Oracle database in Chapter 2. Your finished Connect wizard is shown in Figure 9.73. Click on the OK button to continue.
6.In the opened New Entity Classes from Database wizard, click on the Add All button to add all our five tables into this Web service project, as shown in Figure 9.74. Then click on the Next button.
7.In the next opened wizard, click on the Create Persistence Unit button to create our Java
persistence API. The opened Create Persistence Unit wizard is shown in Figure 9.75. Keep all default settings unchanged and click on the Create button to create this Persistence API unit.
8. In the opened Entity Classes wizard, enter org.ws.entity into the Package field as the package to store these entity classes. Your finished Entity Classes wizard should match the one that is shown in Figure 9.76. Click on the Next button to continue.
9.In the opened Mapping Options wizard, click on the drop-down arrow on the Collection Type combo box and select the java.util.List item, since we need to use this kind of List as the collection type for our data.
The finished Mapping Operations wizard is shown in Figure 9.77. Click on the Finish button to complete this Entity Classes from Database creation process.
Now in our Web application project, you can find that five entity classes, LogIn.java,
Faculty.java, Course.java, Student.java, and StudentCourse.java, have been created and added into the org.ws.entity package in our project.
Figure 9.72. The Create Data Source wizard.
Figure 9.73. The finished Connect wizard.

9.14 Build Java Web Service Projects to Access Oracle Databases 845
Figure 9.74. The added five tables.
Figure 9.75. The finished Create Persistence Unit wizard.
Next, let’s handle adding the Java session beans for entity classes into our Web service, since we want to use session beans to process database related operations and business logics.
9.14.5 Add Java Session Beans for Entity Classes
Perform the following operations to add a session bean for entity classes into our Web service project:
1.Right click on our Web application project WebServiceOracleApp and choose the
New > Other item.

846 Chapter 9 Developing Java Web Services to Access Databases
Figure 9.76. The finished New Entity Classes from Database wizard.
Figure 9.77. The finished Mapping Operations wizard.
2. |
On the opened New File wizard, select Java EE from the Categories list and Session |
|
Beans for Entity Classes from the File Types list, respectively. Click on the Next |
|
button. |
3. |
In the opened Entity Classes wizard, click on the Add All button to add all five entity |
|
classes we added in the last section into our project. Your finished Entity Classes |
|
wizard is shown in Figure 9.78. Click on the Next button to continue. |
4. |
In the opened Generated Session Beans wizard, click on the drop-down arrow |
|
from the Package combo box and choose org.ws.oracle as the package to save this session |
|
bean class. Your finished Generated Session Beans wizard should match the one |

9.14 Build Java Web Service Projects to Access Oracle Databases 847
Figure 9.78. The finished Entity Classes wizard.
Figure 9.79. The finished Generated Session Beans wizard.
that is shown in Figure 9.79. Click on the Finish button to complete this session beans for entity classes creation process.
Now on our opened project, you can find that five session beans for entity classes,
LoginFacade.java, FacultyFacade.java, CourseFacade.java, StudentFacade.java, and StudentcourseFacade.java, have been created and added into the org.ws.oracle package in our Web service project.
Now that we have finished adding Java persistence API, entity classes, and Java session beans for entity classes into our project, we are now ready to build the operations