

Practical Database Programming With Java
.pdf8.6 Build Java Web Project to Access and Manipulate Oracle Database 747
Figure 8.159. The finished Name and Location wizard.
Let’s have a closer look at this piece of codes to see how it works.
A.Add a new Session object as a property to this class since we need to create a new session object to perform the course data query using the Hibernate API later.
B.Right click on any space inside this code window and select the Insert Code from the
pop-up menu. Then select the Add Business Method item to open the Add Business Method wizard. Enter getCourseID into the Name field and click on the Browse button to find the returning data type for this method. On the opened wizard, type List into the top field and select List (java.util) from the bottom list. Then click on the OK button, and OK button again to create this new method. Add a String argument fname to this method.
C.Inside the getCourseID() method, the getCurrentSession() method is executed to obtain the current opened session object, and assign it to our session property session we created at step A above.
D.Two local variables for this method, courseList, which is a java.util.List object, and a msgDlg, which is a JDialog object, are created first. The courseList object is used to hold the returned queried result from the Course table, and the msgDlg is used to display the debug information as the project runs.
E.A combining HQL query that contains a subquery is created for this course_id query action. As you know, there is no faculty_name column available in the Course table, and the only relationship between each course (course_id) and the related faculty member is the faculty_id column in the Course table. Since the user’s input is the selected faculty name, therefore, we need to perform two queries to get all course_id taught by the selected faculty member, (1) perform a query to the Faculty table to get the related faculty_id based on the input faculty name selected by the user, and (2) perform another query to

748 Chapter 8 Developing Java Web Applications to Access Databases
package JavaWebDBJSPOracle;
import cse.entity.Faculty; import cse.util.HibernateUtil; import java.util.List;
import javax.ejb.Stateless; import org.hibernate.Query; import org.hibernate.Session;
@Stateless
public class CourseSessionBean {
Apublic Session session = null;
Bpublic List getCourseID(String fname) {
Cthis.session = HibernateUtil.getSessionFactory().getCurrentSession();
DList<Course> courseList = null;
MsgDialog msgDlg = new MsgDialog(new javax.swing.JFrame(), true);
EString query = "select c.courseId from Course c where c.facultyId like " +
"(select f.facultyId from Faculty as f where f.facultyName like '"+fname+"')";
try {
Forg.hibernate.Transaction tx = session.beginTransaction(); Query c = session.createQuery (query);
GcourseList = (List<Course>) c.list();
H} catch (Exception e) {
msgDlg.setMessage("Query is failed and no matched course_id found!"); msgDlg.setVisible(true);
e.printStackTrace(); return null;
}
Ireturn courseList;
}
Jpublic List<Object[]> getCourseDetail(String cid) {
Kthis.session = HibernateUtil.getSessionFactory().getCurrentSession(); List<Object[]> courselist = null;
LString strQuery = "select c.course, c.schedule, c.classroom, c.credit, c.enrollment " +
"from Course c WHERE c.courseId = :courseid";
Morg.hibernate.Transaction tx = session.beginTransaction();
NQuery cQuery = session.createQuery(strQuery);
OcQuery.setParameter("courseid", cid);
Pcourselist = (List<Object[]>)cQuery.list();
Qreturn courselist;
}
}
Figure 8.160. The codes for the session bean class CourseSessionBean.java.
the Course table to get all course_id based on the faculty_id obtained from the first query. In order to simplify these two queries into one query, we need to use this combining query that contains a subquery that is used to perform the first query to the Faculty table to obtain the desired faculty_id based on the input faculty_name.The only point to be noted for this HQL subquery is that this subquery must be surrounded by parentheses.
F.A try…catch block is used to perform the course information query from our Course table. First, the beginTransaction() method is executed to create a new transaction object. Then

8.6 Build Java Web Project to Access and Manipulate Oracle Database 749
the createQuery() method is called to perform this data query. The combining HQL query statement works as an argument of this method and provides the query details.
G.The list() method is executed to perform this actual query operation. The queried result is returned and assigned to the local variable courseList.
H.The catch block is used to track and detect any possible exception during this query operation, and display any error if any exception occurred.A null will be returned to the calling method if any exception occurred.
I.Finally, the queried result is returned to the calling method defined in our Java managed bean for further processing.
J.The getCourseDetail() method is defined here with the course_id as the argument. The purpose of this method is to query five pieces of detailed information from the Course entity based on the selected course_id and return the result to the JSF managed bean.
K.Inside the getCourseDetail () method, the getCurrentSession() method is executed to obtain the current opened session object and assign it to our session property session. Also, a new List instance courselist is created.
L.A HQL query is created with the courseid as a named dynamic parameter.
M.The beginTransaction() method is executed to create a new transaction object to help this course information query.
N.The query object cQuery is created by calling the createQuery() method.
O.The setParameter() method is executed to set up the named dynamic parameter
:courseid.
P.The list() method is executed to run this query to get five pieces of detailed course information for the selected course_id, and the query result is assigned to the local List instance courselist.
Q.The query result is returned to the JSF managed bean CourseBean for future process.
During the coding process, you may encounter some real-time compiling errors, which are indicated with some red underscores for the error sources. Most of these errors are related to the missed packages. To fix these errors, just right click on any space in this code window, and select the Fix Imports item to open the Fix All Imports wizard.
The point to be noted is that you must select the correct packages for those real-time compiling error sources. For example, in this application, you need to select the following packages or classes for this file:
•org.hibernate.Query for the Query class
•org.hibernate.Session for the Session class
•java.util.List for the List collection class
Now we have completed the coding process for the course query operation with the Hibernate API. This piece of codes is only used for the course data query process, and the getCourseID() and getCourseDetail() methods will be called by our Java managed bean class CourseBean to execute these data query operations.We will add more methods and codes to perform other course data actions, such as data updating and deleting against our sample database later in the following sections.

750 Chapter 8 Developing Java Web Applications to Access Databases
8.6.11.3 Set Up Calling Relationship between the Managed Bean and the Session Bean
Next, let’s add this session bean object into our Java managed bean class CourseBean. java to enable the managed bean to recognize this session bean and call some methods defined in the session bean to perform the actual course data query and actions against our database.
Right click on any place inside the code window of the managed bean class
CourseBean.java and select the Insert Code item and select the Call Enterprise Bean item from the pop-up menu to open the Call Enterprise Bean wizard. Expand our project JavaWebDBJSPOracle from the opened wizard and select our session bean CourseSessionBean class, and click on the OK button to complete this session bean addition process. Immediately, you can find that our session bean class has been injected into this managed bean with the following two objects:
@EJB
private CourseSessionBean courseSessionBean;
The @EJB is an injected source and added by the Java Enterprise Bean engine, and the new instance CourseSessionBean is created as a new property in our JSF managed bean class CourseBean.
At this point, we have finished all coding jobs related to course information query for our project. Now, let’s build and run our project to test the codes we built in the previous sections for our project.
There are two ways to run our project. One way is to run and test the partial project starting from the CoursePage and only test this page. Another way is to run the whole project in a sequence: starting from the LogInPage, SelectionPage, and the CoursePage. Let’s run and test the project in the first way.
8.6.11.4 Run and Test the Single Page—CoursePage.jsp
Now click on the Clean and Build Main Project button to build our project. If everything is fine, right click on our CoursePage.jsp from the Projects window and select the Run File item from the pop-up menu to run this page.
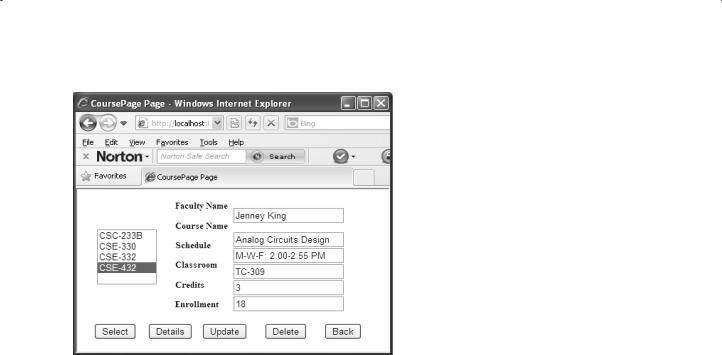
Enter a faculty name, such as Jenney King, into the Faculty Name field, and click on the Select button to retrieve all courses, exactly all course_id, taught by the selected faculty member.All four courses taught by the faculty member Jenney King are retrieved and displayed in the course listbox, as shown in Figure 8.161.
Click on one course_id, such as CSE-432, from the course listbox, and click on the Details button to query the details for that course. All five pieces of detailed course information related to the selected course_id are displayed in five fields, as shown in Figure 8.161.
Our course information query using JSF pages and Java bean is successful.
Click on the Close button that is located at the upper-right corner of this page to close this page and project.
Next, we will discuss how to run and test the project in the second way.
To run the project in the second way, we need to first set up the navigation rules between the CoursePage and the SelectionPage using the Web configuration file facesconfig.xml as we did in Section 8.6.7.
8.6 Build Java Web Project to Access and Manipulate Oracle Database 751
Figure 8.161. The queried results of the CoursePage.
8.6.11.5 Set Up the Navigation Rules for the CoursePage and the SelectionPage
As we did in Section 8.6.7, in this part, we will set up navigation relationships between the SelectionPage and the CoursePage to enable us to run and test the project in a sequential way.
To set up the correct navigation rules for these two web pages, we need to use the JSF configuration file faces-config.xml. The function of the faces-config.xml file is to allow the JSF to configure the application, managed beans, convertors, validators, and navigation rules. In Section 5.3.5.12 in Chapter 5, we have provided a detailed discussion about this configuration file. Refer to that section to get more details for this file.
The operational navigation rule is: if the login process is successful, the next page,
SelectionPage.jsp, should be displayed to allow users to select different item from that page to perform related data query operations.If the user selected the Course Information item from the listbox, the CoursePage.jsp should be displayed to enable users to perform course related information queries. When the user clicks on the Back button on the CoursePage.jsp page, the SelectionPage should be displayed to enable users to perform other data actions.
Now, let’s use this configuration file to set up the navigation rules for our SelectionPage and CoursePage pages. Perform the following operations to set up the navigation rules for these two pages:
1.Expand the Configuration Files node that is under our project node JavaWebDBJSPOracle from the Projects window and double click on the file faces-config.xml to open it.
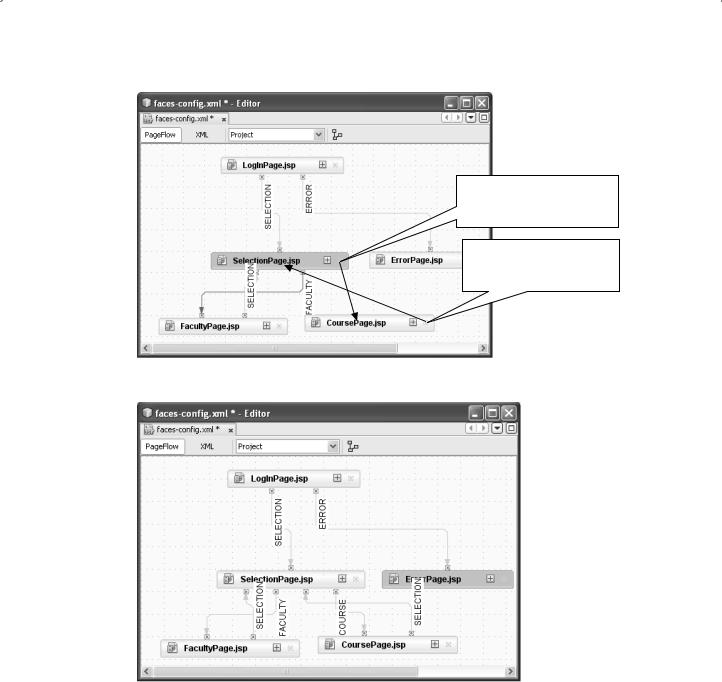
2.Click on the PageFlow button on the top of this opened file to display the flow of the web pages built in this project, as shown in Figure 8.162.
3.Move your cursor to the starting arrow location as shown in Figure 8.162 until a square appears in the SelectionPage.jsp page object. Then click on this square and drag this
752 Chapter 8 Developing Java Web Applications to Access Databases
1. Drag the starting arrow and stop at the center of the CoursePage.jsp
2. Drag the starting arrow and stop at the center of the SelectionPage.jsp
Figure 8.162. The opened PageFlow view of the faces-config.xml file.
Figure 8.163. The finished PageFlow view of the JSF page objects.
stating arrow and point to and stop at the center of the CoursePage.jsp, as shown in Figure 8.162-1. A navigation link is established with the name case1, as shown in Figure 8.162.
4.Double click on the default navigation link case1 and change its name to COURSE.
5.Perform a similar operation to create another navigation link from the CoursePage.jsp to the SelectionPage.jsp, as shown in Figure 8.162-2.
6.Double click on the new established link and change its name to SELECTION. Your finished PageFlow view of two JSF page objects should match one that is shown in Figure 8.163.
8.6 Build Java Web Project to Access and Manipulate Oracle Database 753
<?xml version='1.0' encoding='UTF-8'?>
………
<navigation-rule>
A<from-view-id>/SelectionPage.jsp</from-view-id> <navigation-case>
B<from-outcome>FACULTY</from-outcome> <to-view-id>/FacultyPage.jsp</to-view-id>
</navigation-case> <navigation-case>
C<from-outcome>COURSE</from-outcome> <to-view-id>/CoursePage.jsp</to-view-id>
</navigation-case> </navigation-rule>
<navigation-rule>
D<from-view-id>/CoursePage.jsp</from-view-id> <navigation-case>
E<from-outcome>SELECTION</from-outcome> <to-view-id>/SelectionPage.jsp</to-view-id>
</navigation-case> </navigation-rule>
</faces-config>
Figure 8.164. The XML view of the faces-config.xml file.
Now if you click on the XML button to open the XML view of this faces-config. xml file, you can find that the navigation rules shown in Figure 8.163 have been added into this file. The new added codes have been shown in steps A, C, D, and E in Figure 8.164.
Let’s have a closer look at this piece of newly created codes to see how it works.
A.Our source page, SelectionPage.jsp, is added into the <from-view-id> tag that is located under the <navigation-rule> tag to indicate that this is the starting page.
B.If the user selected the Faculty Information item from the listbox in the SelectionPage, our next page FacultyPage.jsp, which is indicated by the <to-view-id> tag and is represented by a case String FACULTY, is added into the <from-outcome> tag.
C.If the user selected the Course Information item from the listbox in the SelectionPage, our next page CoursePage.jsp, which is indicated by the <to-view-id> tag and is represented by a case String COURSE, is added into the <from-outcome> tag to indicate that this is our destination page.
D.Similarly, if the CoursePage.jsp has been opened, it then will work as a source page. Therefore, the CoursePage.jsp has been added to the <from-view-id> tag.
E.If the user clicked on the Back button on the CoursePage.jsp, our next page should be the SelectionPage. Therefore, the SelectionPage.jsp has been added to the <to-view-id>
tag, and it is represented by a case String SELECTION, which is added into the
<from-outcome> tag.
Now that we have set up the navigation rules for our pages, now we can run and test the project in a sequential way, which means starting from the LogInPasge, SelectionPage, and then either the FacultyPage or CoursePage.

754 Chapter 8 Developing Java Web Applications to Access Databases
8.6.11.6 Run and Test the Project in a Sequence Way
Now let’s run the project in a sequence way starting from the LogInPage.
Right click on the LogInPage.jsp from the Projects window and click on the Run File item to start our project from the LogInPage.
Enter the appropriate username and password, such as admin and reback, to our Web server, and click on the OK button to continue. The point to be noted is that the username and password must be identical with those you created when downloading and installing the GlassFish v3 server in your machine.
As the LogIn page opened, enter the desired username and password, such as jhenry and test, and click on the LogIn button. On the opened Selection page, select the Course Information item and click on the OK button to open the Course page.
On the opened CoursePage.jsp, you can test the course information query function as we did in Section 8.6.11.4. Click on the Close button that is located at the upper-right corner of this page to close this page when the test is done.
Our course information query using the JSF pages and Java beans are successful. Next, let’s handle the course information updating and deleting actions using the JSF pages and Java beans.
8.6.12 Update and Delete Records for the Course Table Using JSF Pages and Java Beans
First, let’s handle the course record updating action.
Because of the complexity in updating a course record with the primary key course_ id, in this section, we still want to update a course record with an existing course_id. In other words, we will update a course record by changing all columns without touching the course_id column, since one needs to update this course_id first in the child table (StudentCourse table) before he can update it in the parent table (Course) if one wants to update this course_id column.
As we did for the course information query in the last section, we can divide this course record updating action into two Java beans: the Java managed bean CourseBean. java that is used to manage and control the data updating, and the session bean CourseSessionBean.java that is used to perform the actual data updating actions.
First, let’s build the codes for the managed bean to manage this data updating action.
8.6.12.1 Add the Codes to the Java Managed Bean to Manage Data Updating
Recall that in Section 8.6.11.1, when we built our managed bean CourseBean.java; in total, we created five user-defined methods, Select(), Details(), Update(), Delete(), and Back() in that bean class. All of these five methods have been bound to the action attributes of the associated <h:commandButton> tags in our JSF page CoursePage.jsp. We have developed and built the codes for the first two methods Select() and Details() in the previous sections to perform the course information queries. Now let’s build the codes for the Update() method to perform the course information updating actions.
Open the code window of our managed bean CourseBean.java and add the codes that are shown in Figure 8.165 into this method.

8.6 Build Java Web Project to Access and Manipulate Oracle Database 755
public Boolean Update() {
Aboolean update = false;
String[] cUpdate = {courseName, schedule, classroom, credit, enrollment, selectedItem};
Bupdate = courseSessionBean.UpdateCourse(cUpdate);
Cif (!update) {
msgDlg.setMessage("The course updating is failed!"); msgDlg.setVisible(true);
}
D return null;
}
Figure 8.165. The codes for the method Update().
Let’s have a closer look at this piece of newly added codes to see how it works.
A.Some local variables are created first for this method. The update is a boolean variable used to hold the running status of the UpdateCourse() method defined in the session bean class, and we will build this method in the next section. The cUpdate[] is a string array used to hold five pieces of updating course information for an existing record in the Course table in our sample database. The point to be noted is that we used five properties defined
in this managed bean as five pieces of updating course information since those properties have been bound to the associated value attributes of the <h:inputText> tags in our JSF page CoursePage.jsp. Furthermore, those properties can be automatically updated as the users enter five pieces of updating course information into five text fields related to those tags in our JSF page CoursePage.jsp. The sixth parameter in the cUpdate[] array is the property courseID selected by the user from the course listbox, and it is used to work as a query criterion.
B.The UpdateCourse() method defined in our session bean, which will be developed in the next section, is called to perform this course record updating. The argument passed into that method is the string array cUpdate[], which contains five pieces of updated course information, and the query criterion courseID. The running result of that method is returned and assigned to the local variable update.
C.If the running result of the method UpdateCourse() is false, which means that the data updating has failed, this situation is displayed by executing the setMessage() method in the msgDlg instance.
D.A null is returned since this returning value is not important to this application.
Next, let’s develop the UpdateCourse() method in our session bean class to perform the course data updating using the Hibernate API.
8.6.12.2 Build the UpdateCourse() Method in the Session Bean to Perform Data Updating
Open the code window for our session bean class CourseSessionBean.java and enter the codes shown in Figure 8.166 into this file to create a new method UpdateCourse() and its codes.
Let’s have a closer look at this piece of new codes to see how it works.
A.Two packages are added into this session bean class. The first is used for components to configure the session factory, and the second is used for the data conversion.

756 Chapter 8 Developing Java Web Applications to Access Databases
Aimport org.hibernate.cfg.Configuration; import java.math.BigDecimal;
………
public boolean UpdateCourse(String[] nCourse) {
BMsgDialog msgDlg = new MsgDialog(new javax.swing.JFrame(), true); try {
CSessionFactory fact = new Configuration().configure().buildSessionFactory(); session = fact.openSession();
Dorg.hibernate.Transaction tx = session.beginTransaction();
Eif (!tx.isActive())
tx.begin();
FCourse cs = (Course)session.get(Course.class, nCourse[5]);
Gcs.setCourse(nCourse[0]);
cs.setSchedule(nCourse[1]);
cs.setClassroom(nCourse[2]);
HBigDecimal decCredit = new BigDecimal(nCourse[3]); cs.setCredit(decCredit);
IBigDecimal decEnroll = new BigDecimal(nCourse[4]); cs.setEnrollment(decEnroll);
Jsession.update(cs);
Ktx.commit();
Lsession.close();
Mreturn true;
}
N catch(Exception e) { msgDlg.setMessage(e.getMessage()); msgDlg.setVisible(true);
return false;
}
}
Figure 8.166. The codes for the UpdateFaculty() method in the session bean.
B.A new instance of the JDialog class msgDlg is created since we need to use it to display some debug information during the project running.
C.A try catch block is used to perform this data updating action. First, a new SessionFactory object fact is created by executing the buildSessionFactory() method. Then the session object is opened by executing the openSession() method.
D.A new Transaction object tx is created to help to perform this data updating action.
E.If this new Transaction instance has not been active, the begin() method is executed to begin this transaction instance.
F.The get() method in the session class is first executed to perform a query to retrieve an existing course record from the Course table based on the course_id that is stored in the string array nCourse[5]. The first argument of this get() method is the class type Course, and the second argument is the course_id. The returned query result is assigned to a new Course instance cs. A point to be noted is that the Course class must be casted before this method to make sure that the session object returns an appropriate object.
G.Five setter methods are executed to set up five pieces of updated course information to the new created Course entity object cs.
H.Two points to be noted for this step is the data type conversions between the Java.lang. String and the java.meth.BigDecimal. The required data type of the arguments for the setCredit() and setEnrollment() methods are java.meth.BigDecimal. However, the