

Practical Database Programming With Java
.pdf
|
8.5 Build Java Web Project to Access SQL Server Database 647 |
|
|
|
package JavaWebDBJSPSQLPackage; |
A |
import java.sql.*; |
|
public class FacultyQuery { |
B |
private static String facultyImage = null; |
|
private String facultyID; |
|
private String facultyName; |
|
private String office; |
|
private String title; |
|
private String phone; |
|
private String college; |
|
private String email; |
C |
static Connection con; |
|
MsgDialog msgDlg = new MsgDialog(new javax.swing.JFrame(), true); |
|
public FacultyQuery() { |
D |
try { |
|
Class.forName("com.microsoft.sqlserver.jdbc.SQLServerDriver"); |
|
} |
|
catch (Exception e) { |
|
msgDlg.setMessage("Class not found exception!" + e.getMessage()); |
|
msgDlg.setVisible(true); |
|
} |
EString url = "jdbc:sqlserver://localhost\\SQL2008EXPRESS:5000;databaseName=CSE_DEPT;";
Ftry {
con = DriverManager.getConnection(url,"ybai","reback1956");
|
} |
|
|
catch (SQLException e) { |
|
|
msgDlg.setMessage("Could not connect!" + e.getMessage()); |
|
|
msgDlg.setVisible(true); |
|
|
e.printStackTrace(); |
|
|
} |
|
|
} |
|
G |
public boolean QueryFaculty(String fname) { |
|
|
String query = "SELECT faculty_id, title, office, phone, college, email FROM Faculty " + |
|
|
"WHERE faculty_name = ?"; |
|
H |
try{ |
|
|
PreparedStatement pstmt = con.prepareStatement(query); |
|
I |
pstmt.setString(1, fname); |
|
J |
ResultSet rs = pstmt.executeQuery(); |
|
while (rs.next()){ |
||
K |
||
facultyID = rs.getString(1); |
||
|
||
|
title = rs.getString(2); |
|
|
office = rs.getString(3); |
|
|
phone = rs.getString(4); |
|
|
college = rs.getString(5); |
|
|
email = rs.getString(6); |
LfacultyName = fname;
}
Mreturn true;
|
} |
|
N |
catch (SQLException e) { |
|
msgDlg.setMessage("Error in Statement! " + e.getMessage()); |
||
|
||
|
msgDlg.setVisible(true); |
|
O |
return false; |
|
} |
||
|
||
|
} |
Figure 8.79. The first part of the codes for the Java help class file.

648 Chapter 8 Developing Java Web Applications to Access Databases
public String getImage(String f_name) {
Aint maxNumber = 7; String fImage = null;
String[] fname = { "Ying Bai", "Black Anderson", "Satish Bhalla", "Steve Johnson",
|
"Jenney King", "Alice Brown", "Debby Angles", "Jeff Henry"}; |
|
String[] fimage = { "Bai.jpg", "Anderson.jpg", "Satish.jpg", "Johnson.jpg", |
|
"King.jpg", "Brown.jpg", "Angles.jpg", "Henry.jpg"}; |
B |
if (facultyImage != null) |
|
return facultyImage; |
|
else { |
C |
for (int i=0; i<=maxNumber; i++){ |
|
if (fname[i].equals(f_name)){ |
|
fImage = fimage[i]; |
|
break; |
|
} |
|
} |
DfacultyImage = fImage;
Ereturn fImage;
|
} |
|
} |
F |
public void setFacultyImage(String img) { |
|
facultyImage = img; |
|
} |
Gpublic void CloseDBConnection()
{
try{
if (!con.isClosed()) con.close();
}catch (SQLException e) {
msgDlg.setMessage("Error in close the DB! " + e.getMessage()); msgDlg.setVisible(true);
}
}
Hpublic String getFacultyID() {
return this.facultyID;
}
I public String getFacultyName() { return this.facultyName;
}
J public String getOffice() { return this.office;
}
K public String getTitle() { return this.title;
}
L public String getPhone() { return this.phone;
}
M public String getCollege() { return this.college;
}
N public String getEmail() { return this.email;
}
O public String getFacultyImage() {
String result = getImage(facultyName); if (result != null)
return this.facultyImage; else
return null;
}
}
Figure 8.80. The second part of the codes for the Java help class file.

8.5 Build Java Web Project to Access SQL Server Database 649
J.The executeQuery() method is executed to perform this query, and the returned result is assigned to the ResultSet object rs.
K.A while loop is used to pick up a matched faculty record. In fact, only one row is returned, and therefore this loop can run only one time. The getString() method is used to pick up each queried column and assign the associated property defined at the beginning of this help class. The index used for this getString() method should be matched to the order of the queried columns in the SQL query statement built in step G.
L.The passed argument fname, which is a faculty name entered by the user, is assigned to the property facultyName.
M.A true is returned to the FacultyProcess.jsp page to indicate that the execution of this query method is successful.
N.The catch block is used to collect any possible exception occurred during this query process.
O.A false is returned to the FacultyProcess.jsp page to indicate that this query has failed.
Now let’s handle the second part of the codes of this help class file, which is shown in Figure 8.80. Let’s have a closer look at these codes to see how they work.
A.A local method getImage() is defined inside the class file, and it is used to select the matched faculty image and returns the name of the matched faculty image. Some local variables are defined at the beginning of this method, such as the maximum number of faculty images maxNumber, the string variable fImage that is used to return the faculty image’s name, and two string arrays, fname[] and fimage[], which contain all eight faculty members and the associated faculty images’ names.
B.If the global variable facultyImage is not null, which means that a new faculty image has been assigned to this global variable when an insertion or an updating of a new faculty record has been executed, this new image’s name will be returned.
C.Otherwise, a for loop is used to check all eight faculty members to try to find the matched faculty name and the associated faculty image’s name. If a matched faculty name were found, the loop is broken, and the associated faculty image’s name is assigned to the variable fImage.
D.Then the matched faculty image’s name is assigned to the global variable facultyImage, which is a property defined at the beginning of this class.
E.The matched faculty image’s name is returned to the calling method.
F.The setter method, setFacultyImage(), is used to assign a new faculty image’s name to the global variable facultyImage. Since we are working in the Web server environment, we need to use this global variable to keep a record for our current faculty image’s name.
G.The codes for the CloseDBConnection() method are identical with those we discussed in step Q in the last section.
H.Starting from step H, including steps I–O, all getter methods are defined, and they are used to pick up all related properties defined at the beginning of this class.A null will be returned from the method getFacultyImage() if no matched faculty image’s name can be found.
Now we have finished all coding process for the Faculty information query operations. Before we can run the project to test the function of these codes, we need to store all faculty image files to our project. You can find all faculty and student image files at the

650 Chapter 8 Developing Java Web Applications to Access Databases
folder Images that is located at the Wiley ftp site (refer to Figure 1.2 in Chapter 1). Perform the following operations to complete this image storage process:
1.Open the Windows Explorer and locate our project folder JavaWebDBJSPSQL.
2.Go to the ftp site shown above and copy all faculty and student image files from the Images folder and paste them into our current project folder JavaWebDBJSPSQL.
3.Launch the NetBeans IDE and open our project JavaWebDBJSPSQL.
4.Open the Files window and browse to our project folder where you can find all pasted faculty and student image files. Select all of them and right click on those selected image files, and select the Copy item from the pop-up menu.
5.Open the Projects window and browse to the Web Pages folder that is located under our project JavaWebDBJSPSQL. Right click on the Web Pages folder and select the Paste item from the pop-up menu to paste all faculty and student image files in this folder.
The reason we store all faculty and student image files in our Web Pages folder is that you can directly use those image’s names to access and pick up them without needing to prefix any driver or folder in which those image files are located.
Now we can build and run our project to test its functions. Click on the Clean and Build Main Project button to build our project. Then right click on the LogIn.jsp file from the Projects window and select the Run File item to run our project.
In the opened LogIn page, enter an appropriate username and password, such as jhenry and test, and click on the LogIn button to perform the login process. If the login process is successful, select the Faculty Information from the Selection.jsp page to open the Faculty.jsp page. On the opened Faculty.jsp page, enter a desired faculty name, such as Ying Bai, into the Faculty Name field, and click on the Select button to try to query the detailed information for the selected faculty member.
If a matched faculty record is found, the detailed information about that faculty with a faculty image is displayed in seven fields and the photo box, as shown in Figure 8.81.
You can try to enter other desired faculty names, such as Jenney King or Satish Bhalla, into the Faculty Name field to query the information related to those faculty members. Also you can try to use a new faculty image by entering the name of that new faculty image into the Image field before you click on the Select button.
Click on the Back and then Exit button on the Selection.jsp page to terminate our Web project.
Our Web project and faculty information query are successful!
A complete Web application project JavaWebDBJSPSQL that includes the login, selection, and faculty information query processes can be found at the folder DBProjects\ Chapter 8 at the Wiley ftp site (refer to Figure 1.2 in Chapter 1).
Next, let’s handle to insert new records into the Faculty table using JSP and Java beans technologies.
8.5.4 Insert New Records to the Faculty Table Using JSP and Java Beans
To use the JSP and Java bean techniques to perform inserting new record into the Faculty table, we need to perform the following operations:

8.5 Build Java Web Project to Access SQL Server Database 651
Figure 8.81. The running result of the Faculty.jsp page.
1.Modify the Java help class file FacultyQuery.java to make it our Java bean class file FacultyInsertBean.java to handle the new faculty record insertion actions.
2.Modify the model controller page FacultyProcess.jsp to handle the faculty data collection and insertion operations.
First, let’s modify the Java help class file FacultyQuery.java to make it our Java bean class FacultyInsertBean.java to handle the new faculty record insertion actions.
8.5.4.1 Modify the Java Help Class FacultyQuery to Make it Java Bean Class
Double click on the Java help class file FacultyQuery.java from the Projects window to open it. Then go to File > Save As menu item to save this file as our new Java bean class file named FacultyInsertBean.java.
Perform the following modifications to this file to make it our Java bean class:
1.Change the class name and the constructor’s name from the FacultyQuery to the
FacultyInsertBean.
2.Remove the QueryFaculty() method and the getImage() method.
3.Remove the getFacultyImage() method and the facultyImage property.
4.Create a new method InsertFaculty() and enter the codes shown in Figure 8.82 into this method.
Let’s have a close look at the codes for this method to see how they work.
A.A new InsertFaculty() method is created with a String array as the argument of this method. The String array contains all seven pieces of new faculty information.

652 Chapter 8 Developing Java Web Applications to Access Databases
Apublic int InsertFaculty(String[] newFaculty) {
Bint numInsert = 0;
CString InsertQuery = "INSERT INTO Faculty (faculty_id, faculty_name, office, phone, " +
"college, title, email) VALUES (?, ?, ?, ?, ?, ?, ?)";
D try{
PreparedStatement pstmt = con.prepareStatement(InsertQuery);
Epstmt.setString(1, newFaculty[0]); pstmt.setString(2, newFaculty[1]); pstmt.setString(3, newFaculty[2]); pstmt.setString(4, newFaculty[3]); pstmt.setString(5, newFaculty[4]); pstmt.setString(6, newFaculty[5]); pstmt.setString(7, newFaculty[6]);
FnumInsert = pstmt.executeUpdate();
}
Gcatch (SQLException e) {
msgDlg.setMessage("Error in Insert Statement! " + e.getMessage()); msgDlg.setVisible(true);
}
H return numInsert;
}
Figure 8.82. The codes for the new created method InsertFaculty().
B.A local integer variable numInsert is created, and it is used to hold the returned data insertion result, which is regularly equal to the number of records that have been inserted into the Faculty table.
C.The insert string is created with seven positional parameters represented by the question marks in the query string.
D.A try…catch block is used to perform this faculty record insertion action. First, a PreparedStatement object is created with the query string as the argument.
E.Then seven elements in the String array newFaculty[], which are equivalent to seven pieces of new faculty information, are assigned to seven positional parameters. The point to be noted is that the order of those seven elements must be identical with the order of columns represented in the query string.
F.The executeUpdate() method is executed to perform this new record insertion action. The running result, which equals to the number of records that have been successfully inserted into the Faculty table, is returned and assigned to the local integer variable numInsert.
G.The catch block is used to track and collect any possible exceptions during this data insertion action.
H.Finally, the running result is returned to the calling method in the FacultyProcess.jsp page.
Next let’s modify the model controller page FacultyProcess.jsp to handle the faculty data collection and insertion operations.
8.5.4.2 Modify the FacultyProcess.jsp Page to Handle Faculty Data Collection and Insertion
Double click on the FacultyProcess.jsp page from the Projects window, and perform the following modifications to this page to use Java bean FacultyInsertBean.java to perform new faculty record insertion actions:
8.5 Build Java Web Project to Access SQL Server Database 653
Figure 8.83. The finished Insert Use Bean dialog box.
1.Move to the else if (request.getParameter(“Insert”)!= null) block, then open the
Palette window by going to Window > Palette menu item. In the opened Palette window, browse to the JSP tab, drag the Use Bean icon, and place it inside the else if block.
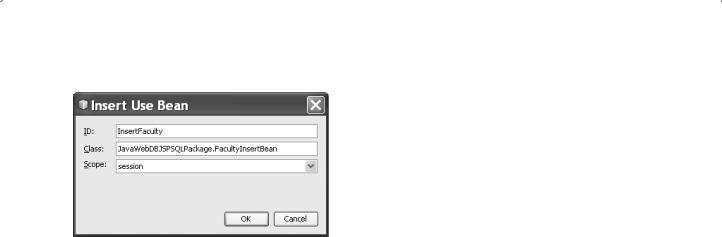
2. On the opened Insert Use Bean dialog, enter InsertFaculty into the ID field, and
JavaWebDBJSPSQLPackage.FacultyInsertBean into the Class filed. Select the session from the Scope combo box. Your finished Insert Use Bean dialog should match one that is shown in Figure 8.83. Click on the OK button to close this dialog box. A JSP directive that contains the bean id, bean scope, and class is added to this block.
3.Add a JSP directive to set up all properties on the Java bean class FacultyInsertBean.java shown below:
<jsp:setProperty name=″InsertFaculty″ property=″*″ />
4.Add the opening and ending JSP directives to enclose those two JSP directives we added above.
The codes related to steps 1–4 above are shown in the top on Figure 8.84. Add the codes shown in steps A–I in Figure 8.84 into this block.
Let’s have a closer look at these codes to see how they work.
A.A local integer variable res is created, and it is used to hold the running result of executing the InsertFaculty() method in the Java bean class FacultyInsertBean with the bean id of
InsertFaculty.
B.Seven getParameter() methods are used to pick up seven pieces of newly inserted faculty information stored in the seven fields in the Faculty.jsp page. The collected seven pieces of new faculty information are assigned to seven local String variables.
C.A new String array fnew is created, and it is used to hold seven pieces of new faculty information stored in the seven local String variables.
D.The InsertFaculty() method in our Java bean is executed to insert these seven pieces of faculty information as a new faculty record into the Faculty table. The seven pieces of new faculty information is stored in the String array fnew that works as the argument for this method. The running result of this method is returned and assigned to the local integer variable res.
E.If the running result is 0, which means that no record has been inserted into the Faculty table ,and this data insertion action has failed. In that case, we need to redisplay the Faculty.jsp page to enable users to reinsert that faculty record.

654 |
Chapter 8 Developing Java Web Applications to Access Databases |
|
|
|
|
|
|
else if (request.getParameter("Insert")!= null) { |
|
|
//process the faculty record insertion |
|
|
%> |
1 |
|
<jsp:useBean id="InsertFaculty" scope="session" |
2 |
|
class="JavaWebDBJSPSQLPackage.FacultyInsertBean" /> |
3<jsp:setProperty name="InsertFaculty" property="*" />
4<%
Aint res = 0;
BString fid = request.getParameter("FacultyIDField"); String fname = request.getParameter("NameField"); String office = request.getParameter("OfficeField"); String phone = request.getParameter("PhoneField"); String college = request.getParameter("CollegeField"); String title = request.getParameter("TitleField"); String email = request.getParameter("EmailField");
CString[] fnew = {fid, fname, office, phone, college, title, email };
Dres = InsertFaculty.InsertFaculty(fnew);
Eif (res == 0) {
|
response.sendRedirect("Faculty.jsp"); |
|
} |
F |
else { |
|
request.setAttribute("FacultyIDField", null); |
|
request.setAttribute("NameField", null); |
|
request.setAttribute("OfficeField", null); |
|
request.setAttribute("PhoneField", null); |
|
request.setAttribute("CollegeField", null); |
|
request.setAttribute("TitleField", null); |
|
request.setAttribute("EmailField", null); |
Gresponse.sendRedirect("Faculty.jsp");
HfQuery.setFacultyImage(request.getParameter("FacultyImageField"));
}
IInsertFaculty.CloseDBConnection();
}
………
Figure 8.84. The modified codes for the Insert block.
F.If the running result is nonzero, which means that at least one new faculty record has been inserted into the Faculty table. We need to clean up all seven fields that contain seven pieces of newly inserted faculty information in the Faculty.jsp page to enable users to either to test this insertion or insert the next faculty record.
G.Also, we need to redisplay the Faculty.jsp page to enable users to perform the next action.
H.We need to set the global variable facultyImage defined in the help class FacultyQuery. java, and assign the new faculty image’s name to it in order to display this new faculty image later when we confirm a new faculty record’s insertion or updating.
I.Finally, the CloseDBConnection() method is called to disconnect the connection to our database.
Now we can build and run our project to test this new faculty record insertion function. Click on the Clean and Build Main Project button to perform cleaning up and building our project. Then right click on the LogIn.jsp page from the Projects window to run our project. Enter the appropriate username and password to finish the login process, and select the Faculty Information item from the Selection.jsp page to

8.5 Build Java Web Project to Access SQL Server Database 655
Figure 8.85. The entered new faculty information.
open the Fcaulty.jsp page. Enter seven pieces of information into the associated seven fields as a new faculty record, and enter the default faculty image’s name, Default.jpg, into the Image field, since we want to use this default image as our new faculty image. The finished new faculty record is shown in Figure 8.85.
Click on the Insert button to try to insert this new faculty record into the Faculty table in our sample database. Immediately, you can find that the original faculty information is displayed, which means that this data insertion is successful.
To confirm this insertion, two ways could be used. The first way is to use the Select button in the Faculty.jsp page to retrieve this newly inserted record from the Faculty table. To do that, enter Tom Jeck to the Faculty Name field and click on the Select button. You can find that the new inserted record is retrieved and displayed in the seven fields with the default faculty image, as shown in Figure 8.86. Now click on the Back and Exit button to terminate our project.
The second way to confirm this data insertion is to open the Faculty table. Open the Services window, and expand the Databases node and our SQL Server database URL: jdbc:sqlserver://localhost\SQL2008EXPRESS:5000;databaseName=CSE_DEPT [ybai on dbo]. Right click on this URL and select the Connect item to connect to our sample database. Then expand our database CSE_DEPT, dbo, and Tables. Right click on the Faculty table and select the View Data item to open this table. You can find that the new faculty record has been inserted into this table at the last row.
Our data insertion using the JSP and Java bean is successful!
It is highly recommended to remove this newly inserted faculty record from the Faculty table, since we want to keep our database neat and clean.

656 Chapter 8 Developing Java Web Applications to Access Databases
Figure 8.86. The new inserted faculty information.
8.5.5 Update and Delete Data from the Faculty Table Using JSP and Java Beans Techniques
To use the JSP and Java bean techniques to perform data updating and deleting actions against the Faculty table, we need to perform the following operations:
1.Create a new Java Session bean class FacultyUpdateDeleteBean.java to handle the data updating and deleting actions.
2.Modify the model controller page FacultyProcess.jsp to handle the faculty data collection and manipulations.
First let’s create our Java session bean class FacultyUpdateDeleteBean.java to handle the data updating and deleting actions.
8.5.5.1 Create a New Java Session Bean Class
Perform the following operations to create a new Java session bean class:
1.Right click on our project JavaWebDBJSPSQL from the Projects window and select the New > Session Bean item to open the New Session Bean wizard.
2.Enter FacultyUpdateDeleteBean into the EJB Name field.
3.Select the JavaWebDBJSPSQLPackage from the Package combo box.
4.Keep all other default settings and click on the Finish button.
On the created FacultyUpdateDeleteBean.java class, we need to create two new methods UpdateFaculty() and DeleteFaculty(). These two methods are used to perform the data updating and deleting operations against our sample database. Figure 8.87