

Practical Database Programming With Java
.pdf8.4 Getting Started with Java Web Applications Using NetBeans IDE 617
Figure 8.50. The finished LogIn page.
8.4.3.2 Create the Selection Page
The purpose of this page is to allow users to choose other web pages to perform the related data actions with the different data tables in our sample database. Therefore, this page can be considered as a main or control page to enable users to browse to other pages to perform data actions against the related data table in our sample database.
Launch Microsoft Office Publisher 2007 and click on the Web Sites icon to open the Web Sites wizard. Scroll down to the bottom of this wizard and double click on the Web 984 × 4608px item under the Blank Sizes category as the template of this page. Perform the following operations to build this page:
1.Go to Insert > Text Box menu item to add a textbox to the top of this page. Enter Make Your Selection into this textbox as a label for this page.
2.Highlight the text of the label and select the Arial Black as the font type and 12 as the font size.
3.Go to Insert > Form Control > List Box menu item to add a listbox control. Locate this listbox just under the top label as we did in step 1 above.
4.Right click on the new added listbox and select Format Form Properties item to open
List Box Properties dialog. Enter ListSelection into the Return data with this label field as the name of this listbox.
5.In the Appearance list, click on the Remove buttons three times to delete all default items from this list.
6.Click on the Add button to add the first item to this list. On the opened dialog, enter the Faculty Information into the Item field and check the Selected radio button. Make sure
that the Item value is same as item text checkbox is checked. Your finished Add/ Modify List Box Item dialog should match one that is shown in Figure 8.51. Click on the OK button to close this dialog box.
7.Click on the Add button to add our second item into this listbox. On the opened Add/ Modify List Box Item dialog, enter Course Information into the Item field, and

618 Chapter 8 Developing Java Web Applications to Access Databases
Figure 8.51. The finished Add/Modify List Box Item dialog box.
Figure 8.52. The finished List Box Properties dialog box.
make sure that both Not selected radio button and the Item value is same as item text checkbox are checked. Click on the OK button to close this dialog box.
8.Perform the similar operations as we did in step 7 above to add the third item, Student Information, into this listbox.
9.Your finished List Box Properties dialog should match one that is shown in Figure 8.52. Click on the OK button to complete this listbox setup process.
10.Go to Insert > Form Control > Submit menu item to add a command button into this
page. Uncheck the Button text is same as button type checkbox and enter OK into the Button text field. Locate this button under the listbox we added above. Click on the OK button to close this dialog box.
11.Perform the similar operation to add another button and use Exit as the button text for this button.

8.4 Getting Started with Java Web Applications Using NetBeans IDE 619
Figure 8.53. The preview of the Selection page.
12. Go to File > Save As item to save this page as an HTML file. On the opened Save As dialog, select the Web Page, Filtered (*.htm, *.html) from the Save as type combo box and enter Selection.html to the File name field. Click on the Save button to save this HTML file to a certain location in your root driver, such as C:\Temp. Click Yes to the message box and OK to the Form Properties dialog to complete this saving process.
13.Now go to File > Web Page Preview menu item to take a look at this Selection page. Your finished Selection page should match one that is shown in Figure 8.53.
To convert this HTML page to a JSP page, open the Notepad and perform the following operations:
1.On the opened Notepad, go to File > Open menu item to open the Open dialog box. Make sure to select All Files from the Files of type combo box at the bottom of this dialog.
2.Browse to the folder where you saved the Selection.html file, such as C:\Temp, select it and click on the Open button to open this file.
3. Go to File > Save As menu item to open the Save As dialog box. Enter “Selection.jsp” into the File name field as the name of this page. The point to be noted is that you must use the double quotation marks to cover this file name to enable the Notepad to save it as a JSP file. Click on the Save button to save this JSP file to your desired folder, such as C:\ Temp.
4. Close the Notepad and we have completed creating our Selection.jsp file.
Next let’s handle to create our Faculty JSP file.
8.4.3.3 Create the Faculty Page
The purpose of this page is to allow users to access the Faculty table in our sample database to perform data actions via this page, such as data query, new faculty records

620 Chapter 8 Developing Java Web Applications to Access Databases
Figure 8.54. The preview of the Faculty page.
insertion, and faculty member updating and deleting. Because the HTML and JSP did not provide any combo box control, in this application, we have to use text box control to replace the combo box control and apply it in this page.
The preview of this Faculty page is shown in Figure 8.54.
Now let’s start to build this page using Microsoft Office Publisher 2007.
Launch Microsoft Office Publisher 2007 and click on the Web Sites icon to open the Web Sites wizard. Scroll down to the bottom of this wizard and double click on the Web 984 × 4608px item under the Blank Sizes category as the template of this page. Perform the following operations to build this page:
1.Go to Insert > Text Box menu item to insert a textbox into this page and enter Image into this textbox as an image label.
2.Go to Insert > Form Control > Textbox menu item to insert a Textbox into this page and locate this textbox just to the right of the image label we added in step 1 above.
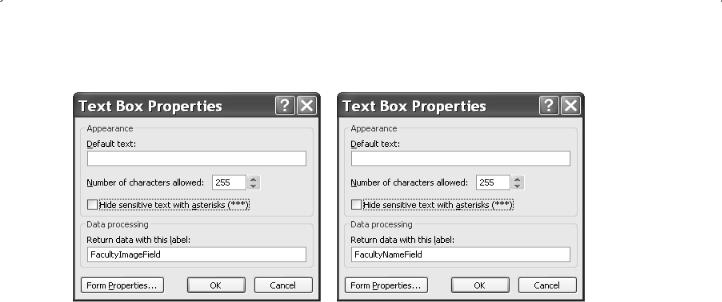
3. Right click on this inserted Textbox and select the Format Form Properties item to open the Text Box Properties dialog, as shown in Figure 8.55a. Then enter
FacultyImageField into the Return data with this label field, as shown in Figure 8.55a. Click on the OK button to close this dialog.
4.Go to Insert > Picture > Empty Picture Frame menu item to insert a blank picture to this page. Locate this picture under the FacultyImageField textbox we added in step 2.
5.Go to Insert > Text Box to insert a new TextBox and move it to the right of the picture.
Type Faculty Name in this inserted TextBox as the Faculty Name label.
6.Go to Insert > Form Control > Textbox menu item to insert a Textbox into this page and locate this textbox to the right of the Faculty Name label.
7. Right click on this inserted Textbox and select the Format Form Properties item to open the Text Box Properties dialog. Enter FacultyNameField into the Return
8.4 Getting Started with Java Web Applications Using NetBeans IDE 621
a |
b |
Figure 8.55. The FacultyImageField and FacultyNameField textboxes.
data with this label field, as shown in Figure 8.55b. Click on the OK button to close this dialog.
8.Go to Insert > Text Box menu item again to insert another TextBox and move it to the right of the picture under the Faculty Name TextBox. Type Faculty ID into this TextBox and use it as the Faculty ID label.
9.Go to Insert > Form Control > Textbox menu item to insert a Textbox into this page,
and move this Textbox to the right of the Faculty ID label.
10.Change this Textbox’s name to FacultyIDField as we did in step 7 above.
11.In a similar way, you can finish adding another six Textboxes and the associated labels, as shown in Figure 8.54. Use step 7 above to change these six Textboxes’ names to:
A.NameField
B.TitleField
C.OfficeField
D.PhoneField
E.CollegeField
F.EmailField
12.You can use Format > Paragraph > Line spacing > Between lines menu property to modify the vertical distances between each label. In this application, set this distance to 0.6 sp.
13.Go to Insert > Form Control > Submit menu item to insert five buttons at the bottom
of this page. In the opened Command Button Properties dialog, uncheck the
Button text is same as button type checkbox, and enter
A.Select
B.Insert
C.Update
D.Delete
E.Back
into the Button text field for these five buttons one by one. Click on the OK button to complete these five button creation process.

622 Chapter 8 Developing Java Web Applications to Access Databases
Figure 8.56. The finished Faculty page.
14.Your finished Faculty page in Microsoft Publisher 2007 should match one that is shown in Figure 8.56.
15. Go to File > Save As item to save this page as an HTML file. On the opened Save As dialog, select the Web Page, Filtered (*.htm, *.html) from the Save as type combo box and enter Faculty.html to the File name field. Click on the Save button to save this HTML file to a certain location in your root driver, such as C:\Temp. Click Yes to the message box and OK to the Form Properties dialog to complete this saving process.
To convert this HTML page to a JSP page, open the Notepad and perform the following operations:
1.On the opened Notepad, go to File > Open menu item to open the Open dialog box. Make sure to select All Files from the Files of type combo box at the bottom of this dialog.
2.Browse to the folder where you saved the Faculty.html file, such as C:\Temp, select it and click on the Open button to open this file.
3. Go to File > Save As menu item to open the Save As dialog box. Enter “Faculty.jsp” into the File name field as the name of this page. The point to be noted is that you must use the double quotation marks to cover this file name to enable the Notepad to save it as a JSP file. Click on the Save button to save this JSP file to your desired folder, such as C:\ Temp.
4. Close the Notepad and we have completed creating our Faculty.jsp file.
Next, let’s handle to create our Course JSP file.
8.4.3.4 Create the Course Page
The purpose of using this page is to allow users to access and manipulate data in the Course table in our sample database via the Web server, such as course query, new course

8.4 Getting Started with Java Web Applications Using NetBeans IDE 623
Figure 8.57. The preview of the Course page.
insertion, course updating and deleting, based on the selected faculty member from the Faculty Name textbox.
The preview of this Course page is shown in Figure 8.57.
Now let’s start to build this page using Microsoft Office Publisher 2007.
Launch Microsoft Office Publisher 2007 and click on the Web Sites icon to open the Web Sites wizard. Scroll down to the bottom of this wizard and double click on the Web 984 × 4608px item under the Blank Sizes category as the template of this page. Perform the following operations to build this page:
1. Go to Insert > Picture > Clip Art menu item to open the Clip Art dialog box. Make sure to select the geometry in the Search for field and click on the Go button to display all clip arts related to geometry. Click on the first one and add it into the upper left corner of this page.
2.Go to Insert > Text Box menu item to insert a textbox into this page and enter Faculty Name into this textbox as the Faculty Name label.
3.Go to Insert > Form Control > Textbox menu item to insert a Textbox into this page and locate this textbox just to the right of the Faculty Name label we added in step 1 above.
4. Right click on this inserted Textbox and select the Format Form Properties item to open the Text Box Properties dialog. Then enter FacultyNameField into the Return data with this label field. Click on the OK button to close this dialog.
5.Go to Insert > Form Control > List Box menu item to add a listbox control. Locate this listbox just under the top label as we did in step 1 above.
6.Right click on the new added listbox and select Format Form Properties item to open
List Box Properties dialog. Enter CourseList into the Return data with this label field as the name of this listbox.

624Chapter 8 Developing Java Web Applications to Access Databases
7.In the Appearance list, click on the Remove buttons three times to delete all default items from this list.
8.Right click on the newly added listbox CourseList and select Format Form Properties to open the List Box Properties dialog. Click on the Add button to open the Add/ Modify List Box Item dialog box. Enter Course ID into the Item field and check the Selected radio button, and click on the OK button.
9.Go to Insert > Text Box to insert a new TextBox and move it to the right of the listbox.
Type Course Name in this TextBox as the Course Name label.
10.Go to Insert > Form Control > Textbox menu item to insert a Textbox into this page and locate this textbox to the right of the Course Name label.
11. Right click on this inserted Textbox and select the Format Form Properties item to open the Text Box Properties dialog. Enter CourseNameField into the Return data with this label field. Click on the OK button to close this dialog.
12.In a similar way, you can finish adding another four Textboxes and the associated labels, as shown in Figure 8.57. Use step 10 above to change these four Textboxes’ names to:
A.ScheduleField
B.ClassroomField
C.CreditField
D.EnrollmentField
13.You can use Format > Paragraph > Line spacing > Between lines menu property to modify the vertical distances between each label. In this application, set this distance to 0.6 sp.
14.Go to Insert > Form Control > Submit menu item to insert five buttons at the bottom
of this page. In the opened Command Button Properties dialog, uncheck the
Button text is same as button type checkbox, and enter:
A.Select
B.Insert
C.Update
D.Delete
E.Back
into the Button text field for these five buttons one by one. Click on the OK button to complete these five button creation process.
15. Your finished Faculty page in Microsoft Publisher 2007 is shown in Figure 8.58.
To convert this HTML page to a JSP page, open the Notepad and perform the following operations:
1.On the opened Notepad, go to File > Open menu item to open the Open dialog box. Make sure to select All Files from the Files of type combo box at the bottom of this dialog.
2.Browse to the folder where you saved the Course.html file, such as C:\Temp, select it, and click on the Open button to open this file.
3. Go to File > Save As menu item to open the Save As dialog box. Enter “Course.jsp” into the File name field as the name of this page. The point to be noted is that you must use the double quotation marks to cover this file name to enable the Notepad to save it as

8.5 Build Java Web Project to Access SQL Server Database 625
Figure 8.58. The finished Course page.
a JSP file. Click on the Save button to save this JSP file to your desired folder, such as
C:\Temp.
4. Close the Notepad and we have completed creating our Course.jsp file.
Next, let’s handle to create our last page, Student JSP file.
8.4.3.5 Create the Student Page
Because of the similarity between the Student page and all other pages we discussed above, here we only provide the necessary information for the names of those controls to be added to this page. A preview of this Student page is shown in Figure 8.59.
Table 8.2 lists the name of each control in the Student page.
Refer to discussions we made in the previous sections to build this Student page and convert it to the Student.jsp page.
At this point, we have finished all five web pages design and building process. Next we will begin to coding these web pages and the associated help class or Session object to perform data queries against our database.
8.5 BUILD JAVA WEB PROJECT TO ACCESS SQL SERVER DATABASE
First, let’s use JSP and help class file to access and query data from the LogIn table in our sample SQL Server database CSE_DEPT via the LogIn.jsp page we built in Section 8.4.3.1 in this Chapter.

626 Chapter 8 Developing Java Web Applications to Access Databases
Figure 8.59. The preview of the Student page.
Table 8.2. All controls in the Student page
Control |
Name |
|
|
Student Name Textbox |
StudentNameField |
Course Selected Listbox |
CourseList |
The Item in the Course Selected Listbox |
Course ID |
Student ID Textbox |
StudentIDField |
GPA Textbox |
GPAField |
Credits Textbox |
CreditField |
Major Textbox |
MajorField |
School Year Textbox |
SchoolYearField |
Email Textbox |
EmailField |
Select Button |
Select |
Insert Button |
Insert |
Update Button |
Update |
Back Button |
Back |
We have provided a very detailed discussion about building and developing Java Web applications using JSP and Java help class file in Sections 8.1.2 and 8.1.3. Now let’s follow those discussions to coding the LogIn page and creating the Java help class file LogInQuery.java to perform data query from the LogIn table.
8.5.1 Access and Query the LogIn Table Using JSP and Help Class Files
In Section 8.4.1,we have created a new JavaWeb application project,JavaWebDBJSPSQL, and added the entity class files into this new project. Now we will use this project to build