

Practical Database Programming With Java
.pdf8.3 The Architecture and Components of Java Web Applications 607
The Java EE architecture provides a default autocommit to handle transaction commits and rollbacks. An auto commit means that any other applications that are viewing data will see the updated data after each database read or write operation. However, if your application performs two separate database access operations that depend on each other, you will want to use the JTA API to demarcate where the entire transaction, including both operations, begins, rolls back, and commits.
In Section 7.1 in Chapter 7, we have provided a very detailed discussion about the Java Persistence API on Transaction mechanism and its implementation with some data manipulations in real projects, such as data insertion, updating, and deleting, using the JPA wizard. Refer to those parts to get more information for this API.
8.3.2.7 Java Message Service API
The JavaMessage Service (JMS) API is a messaging standard that allows Java EE application components to create, send, receive, and read messages. It enables distributed communication that is loosely coupled, reliable, and asynchronous.
Now that we have a basic and clear understanding about the Java EE architecture and components, let’s take a look at the Java Web application life cycle.
8.3.3 Java Web Application Life Cycle
A Web application consists of Web components, static resource files such as images, and helper classes and libraries. The Web container provides many supporting services that enhance the capabilities of Web components and make them easier to develop. However, because a Web application must take these services into account, the process for creating and running a Web application is different from that of traditional stand-alone Java classes.
The process for creating, deploying, and executing a Web application can be summarized as follows:
1.Develop the Web component code.
2.Develop the Web application deployment descriptor.
3.Compile the Web application components and helper classes referenced by the components.
4.Optionally package the application into a deployable unit.
5.Deploy the application into a Web container.
6.Access a URL that references the Web application.
We will illustrate how to use this life cycle module to develop and build some professional Java Web applications in Section 8.4.
8.3.4 Java Web Modules
As we discussed in Section 8.2.1, four Java EE Web modules are available, and the Web module is one of them. In the Java EE architecture, Web components and static Web

608 Chapter 8 Developing Java Web Applications to Access Databases
content files such as images are called web resources. A web module is the smallest deployable and usable unit of Web resources. A Java EE Web module corresponds to a Web application as defined in the Java Servlet specification.
In addition to Web components and Web resources, a Web module can contain other files:
•Server-side utility classes (database beans, shopping carts, and so on). Often these classes conform to the JavaBeans component architecture.
•Client-side classes (applets and utility classes).
A Web module has a specific structure. The top-level directory of a Web module is the document root of the application.The document root is where XHTML pages, clientside classes and archives, and static Web resources, such as images, are stored.
The document root contains a subdirectory named WEB-INF, which contains the following files and directories:
•web.xml: The Web application deployment descriptor.
•Tag library descriptor files.
•classes: A directory that contains server-side classes: servlets, utility classes, and JavaBeans components.
•tags: A directory that contains tag files, which are implementations of tag libraries.
•lib: A directory that contains JAR archives of libraries called by server-side classes.
If your Web module does not contain any Servlets, filter, or listener components, then it does not need a Web application deployment descriptor. In other words, if your Web module only contains XHTML pages and static files, you are not required to include a web.xml file.
You can also create application-specific subdirectories (that is, package directories) in either the document root or the WEB-INF/classes/directory.
A Web module can be deployed as an unpacked file structure, or can be packaged in a JAR file known as a Web archive (WAR) file. Because the contents and use of WAR files differ from those of JAR files,WAR file names use a .war extension. The Web module just described is portable; you can deploy it into any Web container that conforms to the Java Servlet Specification.
To deploy a WAR on the Enterprise Server, the file must also contain a runtime deployment descriptor. The runtime deployment descriptor is an XML file that contains information such as the context root of the Web application and the mapping of the portable names of an application’s resources to the Enterprise Server’s resources. The Enterprise Server Web application runtime DD is named sun-web.xml, and is located in the WEB-INF directory along with the Web application DD. The structure of a Web module that can be deployed on the Enterprise Server is shown in Figure 8.42.
To successfully build and implement a Java Web application, one needs to perform the following operations to make it a distributable application:
•Packaging Web Modules
•Deploying a WAR File

8.3 The Architecture and Components of Java Web Applications 609
Assembly Root
|
JSP Pages, |
|
WEB-INF |
Static HTML Pages, |
|
Applet classes, etc. |
||
|
lib |
classes |
tags |
web.xml sun-web.xml *.tld
Library |
All service-side |
All .tag files |
archive files |
.class files for this |
for this Web |
|
Web module |
module |
Figure 8.42. A Web module structure.
•Testing Deployed Web Modules
•Listing Deployed Web Modules
•Updating Web Modules
•Undeploying Web Modules
We will discuss these operations with more detailed in the following sections with some real Java Web application projects.
8.3.5 Java Web Frameworks
A Web application framework is a software framework that is designed to support the development of dynamic websites, Web applications, and Web services. The framework aims to alleviate the overhead associated with common activities performed in Web development. For example, many frameworks provide libraries for database access, template frameworks, and session management, and they often promote code reuse, too.
As we know, all Web components such as Java Servlets, web pages, or JSP pages, are under the control of the associated Web containers. The question is: who controls those Web containers? The answer is the Web frameworks. A Web framework is a software framework that provides all supports to develop and organize dynamic sites. Some main features provided by a Web framework include:
•Provide user-friendly graphical user interfaces (GUIs) to Web applications.
•Provide managements to Web containers to coordinate requests and responses transmission between Web server and clients.

610Chapter 8 Developing Java Web Applications to Access Databases
•Provide security supports to Web servers.
•Provide supports to database accessing and mapping.
•Provide supports to URL mapping.
•Provide supports to update Web templates.
Almost all modern Web-development frameworks follow the MVC design. Business logic and presentation are separated, and a controller of logic flow coordinates requests from clients and actions taken on the server. This approach has become a popular style of Web development.
All frameworks use different techniques to coordinate the navigation within the Web application, such as the XML configuration file, java property files, or custom properties. All frameworks also differ in the way the controller module is implemented. For instance, EJBs may instantiate classes needed in each request, or Java reflection can be used to dynamically invoke an appropriate action classes. Also, frameworks may differ conceptually.
Java frameworks are similar in the way they structure data flow. After request, some action takes place on the application server, and some data-populated objects are always sent to the JSP layer with the response. Data are then extracted from those objects, which could be simple classes with setter and getter methods, java beans, value objects, or some collection objects. Modern Java frameworks also simplify a developer’s tasks by providing automatic Session tracking with easy APIs, database connection pools, and even database call wrappers. Some frameworks either provide hooks into other J2EE technologies, such as JMS (Java Messaging Service) or JMX, or have these technologies integrated. Server data persistence and logging also could be part of a framework.
The most popular Web frameworks include:
•JavaServer Faces (JSF)
•Apache Wicket
•JBoss Seam
•Spring MVC & WebFlow
•Adobe Flex
•Hibernate
•PHP
•Perl
•Ruby
•ASP.NET
•Struts 2
Two popular Java frameworks used in NetBeans IDE 6.8 are JavaServer Faces and Hibernate.
Now that we have both a historical review and detailed discussion for each part of Java Web applications, let’s concentrate on building and developing real Java Web database application projects starting from the next section.

8.4 Getting Started with Java Web Applications Using NetBeans IDE 611
8.4 GETTING STARTED WITH JAVA WEB APPLICATIONS USING NETBEANS IDE
Starting from this section, we will build some real Java Web database application projects using JSP, Java beans, and JavaServer Faces technologies we discussed in the previous sections in this chapter. We divide these discussions into the following parts:
1.First we create a new Java Web application project JavaWebDBJSPSQL to access our sample SQL Server database.
A.We discuss how to build a Web page to access and query the LogIn table using JSP and help class files.
B.Then we use JSP, JSP implicit Session object, JavaServer Faces and Java beans to develop different web pages to:
•Access and query data from the Faculty table in our sample SQL Server database.
•Insert new records to the Faculty table in our sample SQL Server database.
•Update and delete records from the Faculty table in our sample database.
C.We then discuss how to use JSP, JavaServer Faces and Java beans techniques to build different web pages to:
•Access and query data from the Course table in our sample SQL Server database.
•Insert new records to the Course table in our sample SQL Server database.
•Update and delete records from the Course table in our sample database.
D.Finally we discuss how to query data from the Student table in our sample database using JSP and Java beans techniques.
2.Then we create another new Java Web application project JavaWebDBJSPOracle to access our sample Oracle database.
A.We discuss how to use JavaServer Faces and Java beans techniques to develop different web pages to:
•Access and query data from the LogIn table in our sample Oracle database.
•Access and query data from the Faculty table in our sample Oracle database
•Insert new records to the Faculty table in our sample Oracle database.
•Update and delete records from the Faculty table in our sample Oracle database.
•Access and query data from the Course table in our sample Oracle database.
•Insert new records to the Course table in our sample Oracle database.
•Update and delete records from the Course table in our sample Oracle database
Now let’s start to build our first Java Web application project to access and manipulate data in our sample SQL Server database.
8.4.1 Create a Java Web Project
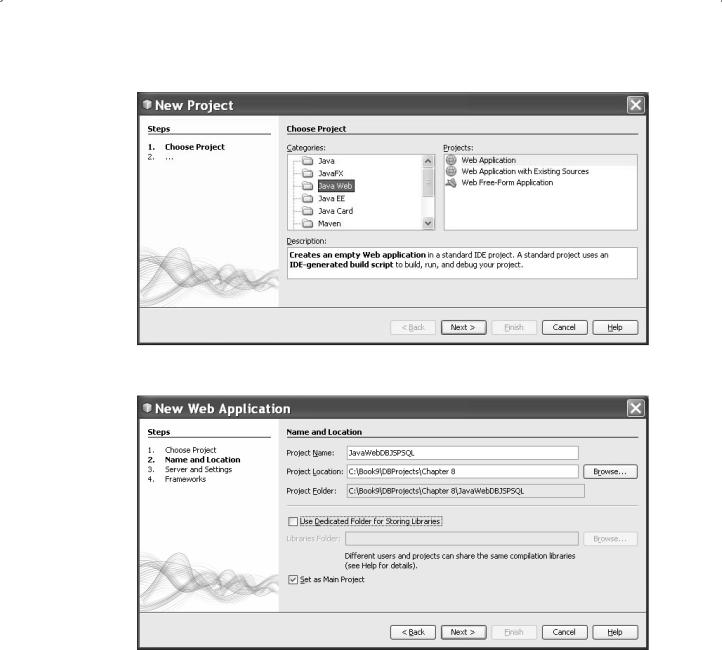
Launch NetBeans IDE and go to File > New Project item to open the New Project wizard. Select the Java Web from the Categories list and Web Application from the
Projects list, as shown in Figure 8.43. Then click o the Next button to go to the next wizard.
Enter JavaWebDBJSPSQL into the Project Name field as this new project’s name. Make sure that the desired folder in which you want to save this project is included in
612 Chapter 8 Developing Java Web Applications to Access Databases
Figure 8.43. The opened New Project wizard.
Figure 8.44. The Name and Location wizard.
the Project Location field and the Set as Main Project checkbox has been checked, as shown in Figure 8.44. Then click on the Next button.
In the opened Server and Settings wizard, you need to add the GlassFish v3 server as the Web server for this Web application. Refer to Section 5.3.5.2.2 in Chapter
5 to add this server to the NetBeans IDE if you have not done this. Your finished Server and Settings wizard should match one that is shown in Figure 8.45. Click on the Next button to continue.
Since we do not want to use any frameworks in this Web application, click on the Finish button in the next wizard to complete this new project creation process.

8.4 Getting Started with Java Web Applications Using NetBeans IDE 613
Figure 8.45. The finished Server and Settings wizard.
Because we need to use the Java Persistence API to help us to perform databaserelated queries and operations in this project, so next let’s create an entity class for our sample SQL Server database CSE_DEPT.
8.4.2 Create the Entity Classes from the Database
Perform the following operations to create our entity classes for our sample database:
1. In the Projects window, right click on the JavaWebDBJSPSQL project and select the
New > Entity Classes from Database item from the pop-up menu.
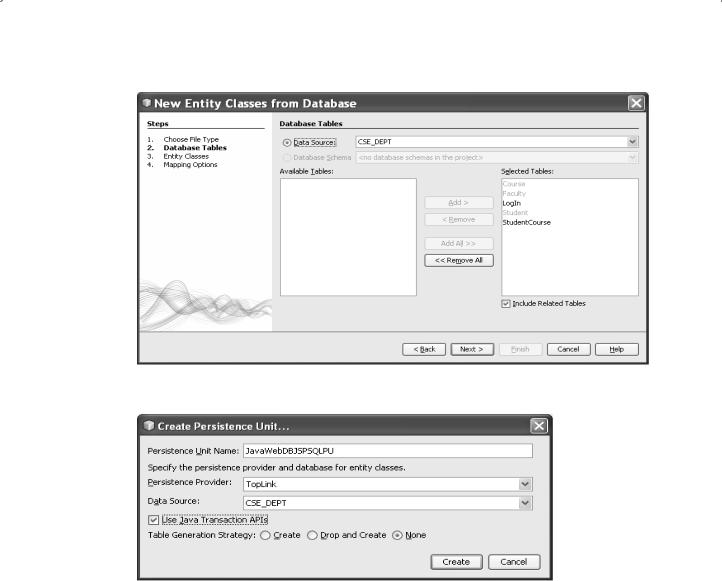
2.Click on the dropdown arrow of the Data Source combo box and select the New Data Source item. On the opened Create Data Source dialog box, enter CSE_DEPT into
the JNDI Name field. Click on the drop-down arrow at the Database Connection combo box and select our SQL Server 2008 sample database URL: jdbc:sqlserver://localhost\SQL2008EXPRESS:5000;databaseName=CSE_DEPT [ybai on dbo]. Click on the
OK button to continue.
3. Click on the Add All button to add all five tables to the Selected Tables list box. Your finished New Entity Classes from Database wizard should match one that is shown in Figure 8.46. Click on the Next button to continue.
4.In the opened Entity Classes wizard, enter JavaWebDBJSPSQLPackage into the
Package field and use this as the package’s name to store this entity class.
5.Click on the Create Persistence Unit button to create this entity class.
6.On the opened Create Persistence Unit wizard, select the TopLink item from the
Persistence Provider combo box, which is shown in Figure 8.47, and click on the Create button to create this entity class.
Your finished Entity Classes wizard should match one that is shown in Figure 8.48. Click on the Next button to go to the next wizard.
7.On the opened Mapping Options wizard, select java.util.List item from the Collection Type combo box since we need to use the List collection in this project. Your finished
614 Chapter 8 Developing Java Web Applications to Access Databases
Figure 8.46. The finished Database Tables wizard.
Figure 8.47. The finished Create Persistence Unit wizard.
Mapping Options wizard should match one this is shown in Figure 8.49. Click on the Finish button to complete this entity class creation process.
At this point, we have completed creating a new Web application project and installing the entity classes from our sample SQL Server database. Next, we will build five web pages as GUIs to query and manipulate data against our sample database via Web server and database server.
8.4.3 Create Five Web Pages Using Microsoft Office
Publisher 2007
In this section, we will create five web pages, LogIn, Selection, Faculty, Course, and Student, as the GUIs to access and manipulate our sample database via Web server.

8.4 Getting Started with Java Web Applications Using NetBeans IDE 615
Figure 8.48. The finished Entity Classes wizard.
Figure 8.49. The finished Mapping Options wizard.
When a Web application starts, the default starting page is index.jsp. However, in this application, we want to use the LogIn.jsp page as our starting page. Because of the relative complexity in our five pages, we need to use Microsoft Office Publisher 2007 as a tool to help us to do this job.
Let’s first handle the LogIn page.
8.4.3.1 Create the LogIn Page
The purpose of this page is to allow users to login to our sample SQL Server database to perform data actions to five tables in our sample database. Exactly this page is related to the LogIn table to enable users to login and enter this database.

616 Chapter 8 Developing Java Web Applications to Access Databases
Launch Microsoft Office Publisher 2007 and click on the Web Sites icon to open the Web Sites wizard. Scroll down to the bottom of this wizard and double click on the Web 984 × 4608px item under the Blank Sizes category as the template of this page. Perform the following operations to build this page:
1.Go to Insert > Text Box menu item to add a textbox to the top of this page. Enter Welcome to CSE DEPT LogIn Page into this textbox as a label for this page.
2.Highlight the text of the label and select the Arial Black as the font type and 12 as the font size.
3.Perform the similar operation as step 1 to create another two textboxes, and enter User Name and Pass Word as another two labels. Locate these two labels just under the top label as we did in step 1 above.
4.Go to Insert > Form Control > TextBox menu item to add two textboxes; align each of them after each of two labels, User Name and Pass Word, respectively.
5.Right click on the first textbox we added in step 4 above, and select the Format Form Properties item. Enter UserNameField into the text field under the Return data
with this label as the name of this textbox. Click on the OK button to complete this naming process.
6.Perform the similar operation to the second textbox we added in step 4 above and name it as PassWordField.
7.Go to Insert > Form Control > Submit menu item to add a command button into this page. Uncheck the Button text is same as button type checkbox and enter
LogIn into the Button text field. Locate this button under two textboxes we added in steps 4–6. Click on the OK button to close this dialog box.
8.Perform the similar operation to add another button, and use Cancel as the button text for this button.
9. Go to File > Save As item to save this page as an HTML file. On the opened Save As dialog, select the Web Page, Filtered (*.htm, *.html) from the Save as type combo box and enter LogIn.html to the File name field. Click on the Save button to save this HTML file to certain location in your root driver, such as C:\Temp. Click Yes to the message box and OK to the Form Properties dialog to complete this saving process.
Now go to File > Web Page Preview menu item to take a look at this LogIn page. Your finished LogIn page should match one that is shown in Figure 8.50.
To convert this HTML page to a JSP page, open the Notepad and perform the following operations:
1.On the opened Notepad, go to File > Open menu item to open the Open dialog box. Make sure to select All Files from the Files of type combo box at the bottom of this dialog.
2.Browse to the folder where you saved the LogIn.html file, such as C:\Temp; select it and click on the Open button to open this file.
3. Go to File > Save As menu item to open the Save As dialog box. Then enter “LogIn. jsp” into the File name field as the name of this page. The point to be noted is that you must use the double quotation marks to cover this file name to enable the Notepad to save it as a JSP file. Click on the Save button to save this JSP file to your desired folder, such as C:\Temp.
4. Close the Notepad and we have completed creating our LogIn.jsp file.
Next, let’s handle to create our Selection JSP file.