

gpss_manual
.pdfThe next time you start GPSS World you will be given an opportunity to enter the
16 digit numeric key you received after you sent the software registration message. The next time you start GPSS World, it will ask for your numeric
Figure 2—9. The GPSS World Key Entry Window
Enter you numeric key and CLICK OK
This is the only time you will have to deal with a numeric key, unless you install the software on another computer, or upgrade to a new Version of GPSS World with additional features. Software updates and bug fixes will not require a new key.
Next appears the Notices Reminder Window.
Figure 2—10. The Notices Reminder Window
This Window appears when a long period has elapsed since you downloaded notices from the Minuteman Software Web site. If you click Download, GPSS World opens the "Download Notices" Page on the Internet. You can go there anytime you are connected to the Internet by
SELECT File / Internet / Download Notices
When the built-in browser opens the Download Notices page, just ckick on Download Notices and place the GPSSW.ntc file in the same folder where you installed your GPSS World exe file. Just replace the existing GPSSW.ntc file.
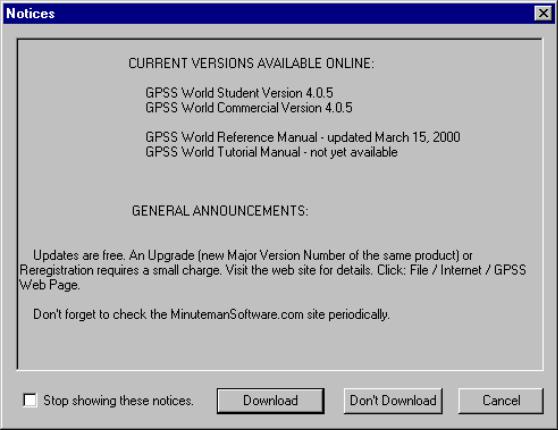
In any case, the Notices window itself appears with current information on updates, and other useful information. You can disable the Notices Window by clicking on a checkbox in its lower left corner, and you can view it at any time using the View / Notices menu command.
Figure 2—11. The GPSS World Notices Window
That ends the preliminaries. When you close the Notices Window you should see a fully operational GPSS World Main Window,
2.2.The GPSS World Environment
2.2.1.The Main Window
The GPSS World simulation environment is the collection of all the actions available to you when you open a Session. Everything is controlled from the GPSS World Main Window, an example of which is shown next.
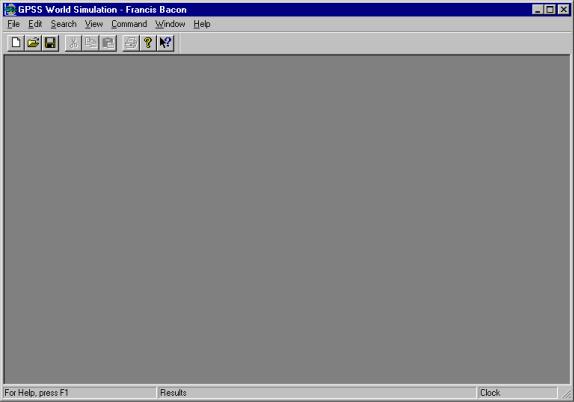
Figure 2_12. The GPSS World Main Window
The Main Window has several components. The Title bar is at the very top. Below that is the Menu, and below that the Toolbar. Most of the action occurs in the large empty client area, and at the very bottom is a Status line which is divided into three parts. The left pane of the Status Line shows Command Prompts that give you more information on the menu items you are about to use. The middle pane of the Status Line shows status and error messages send from the GPSS World Objects you are interacting with. Finally, there is a small pane at the right side of the Status Line that is used to display the changing System Clock of running simulations. You can turn this on or off for each Simulation Object by using the View / Show Clock
menu command.
2.2.2 A Quick Overview
Using the menu of the Main Window, you can create and manipulate the Objects of GPSS World: Model, Simulation, Report, and Text Objects. Each of these will have one or more views that can be opened as child windows in the GPSS World Main Window.
A typical project begins with the creation and modification of a Model Object. A Model is just a list of Model Statements, defined in Chapter 7.
Each time you select Command / Create Simulation or Command / Retranslate
from the Main Window's Menu, GPSS World Translates the Model Statements into an executable Simulation Object. If errors need to be corrected, a single keystroke (representing Search / Next Error ) cycles through the circular error list, setting
the cursor in the Text View of the Model, just before each error.
Once a Simulation Object is successfully Created, you can send any Model Statement to it to change the structure or state of the simulation. Normally, you will send Commands, such as START, but you can redefine entities or PLUS Procedures, as well.
You can send Model Statements to existing Simulation Objects using one of several methods. First, some of the most common commands are listed in the Command menu of the Main Window. Most have keyboard accelerators as well.
Second, the Custom Command dialog is invoked through Command / Custom in
the Main Window's menu. Here you can type any Model Statement -- even a PLUS
Procedure -- and send it to an existing Simulation Object.
Third, you can load the set of function keys with you own choice of Commands. This is done through the Edit / Settings menu item in the Main Window. Thereafter, pressing the function key sends the Command to the Simulation Object.
Complex Procedures and lengthy Command lists can be sent using an INCLUDE Statement associated with a previously created Text Object. You can enter INCLUDE as a custom command ( Command / Custom ) or load it into a function key. After an INCLUDE Statement is loaded into a function key ( Edit / Settings ),
a single keystroke sends the whole lot to the Simulation Object.
During the debugging phase of your project, be sure to make use of all the visualization tools at your disposal. There are 10 dynamic windows that let you view the running simulation. Most require no effort on your part except to open them. Some add point and click debugging facilities for manipulating stop conditions and for controlling the advance of the simulation.
Among the dynamic windows are the Plot and Expressions Windows which allow you to visualize the evaluation of any PLUS expression as it changes dynamically. The Tables Window can also be very enlightening, visualizing the convergence of frequency distributions.
In addition, the Commercial Version of GPSS World has 6 more advanced snapshot windows. These are intended for simulation professionals who need detailed state information from within the simulation.
GPSS World is strong in the extensiveness of its Standard Reports. Unless you choose otherwise, when a Simulation Object completes a simulation, it creates a Report Object containing a Standard Report describing the final state and/or results of the simulation. You can modify the content of Standard Reports by Editing the Settings of the Simulation Object. Interim reports can often be used effectively during the debugging/testing process. While interacting with a Simulation Object, at any time you can command it to create a Report Object describing all internal GPSS Entities.
You can extract just about any information you desire from a simulation by using Data Streams. These are associated with a set of GPSS Blocks (OPEN, CLOSE, READ, WRITE, SEEK) that allow you to trace and collect derived information from the simulation and write them to plain text files. Such traces can be used to drive photo-realistic animations, as well. Within GPSS World text files used in association with Data Streams are represented as Text Objects.
After the Model is thoroughly tested, it is time to define an Experiment to quantify results and test their statistical significance. GPSS World excels in this regard. Its built-in programming language, PLUS, supports a special kind of PROCEDURE statement, called, naturally, the EXPERIMENT Statement. Within an experiment, you can run and analyze complex experiments unattended. You can even get an automatic Analysis of Variance of the results. These features are developed in the OneWay.gps Sample Model, and further in Lesson 19 of the GPSS World Tutorial Manual.
Getting Help
GPSS World provides several Help aids to keep you on track. The most immediate
is the Online Help feature. Online Help is available throughout GPSS World. The l Function Key will bring up a Help Panel for the active window or dialog. In
additional, if you press the l key when a menu item is highlighted, a context sensitive Help Panel will appear with information pertaining to that menu item.
Within the Text View of an object, select a word and press the l key to go to the
keyword's description in the GPSS World Language reference section of the Help file. Finally, online Help can be initiated by a Help button in some dialog boxes.
The Internet offers more help on GPSS World. HTML Online documentation can be found at the Minuteman Software Internet Web site, minutemansoftware.com or
the GPSS World Web site GPSS.net. These sites offer many other support options as well. You can get to them by
SELECT File / Internet / GPSS Web Page in the Main Window's menu.
These sites contain other useful resources and ways to communicate with other users and consultants. The Student Version of GPSS World can be downloaded from the Web site free of charge.
The official documentation of GPSS World includes this manual, the GPSS World Reference Manual, and the GPSS World Tutorial Manual. Both are available on the Web site and in hardcopy, as well.
Don't overlook the extensive set of sample models. Many professionals have found that one of the fastest ways to acquire simulation skills is to examine the work of others. The sample models includes a wide variety of applications from traffic to communications.
The Main Menu
Most of the action begins at the menu of the Main Window. Each of the top level menus
File Edit Search View Window Help
have submenu items, most of which are enabled only when appropriate. When disabled, menu commands are gray and cannot be activated.
Let's look at each top level menu.
The File Menu
The leftmost menu id the File Menu. It is used to open and save Objects, print views of objects, access the internet to download notices and Web pages, and to register the software for nonstudent users.
The Edit Menu
The top items in the Edit Menu are for working with text. All GPSS World Objects have a Text View which can be modified using these menu commands. Undo is a
one level backup facility for removing the effects of the last Text View interaction. Cut, Copy and Paste move selections to and from the Windows clipboard. Insert
Line and Delete Line operate at the cursor location in a Text View. The Font command opens a dialog allowing customization of the view.
The remaining three items allow you to modify attributes of GPSS World Objects. Expression Window and Plot Window open a dialog which allow you to change
the contents of an existing dynamic Expression Window or Plot Window. Settings
allows you to view and modify the Settings of a Model, Simulation, or Report Object. These attributes are discussed in detail below.
The Search Menu
The Search Menu helps you navigate around Text Views.
The first item, Find / Replace, opens a dialog that lets you move to the next
occurrence in specific text, and optionally replace it. A Replace All option is available, as well.
The Go To Line item will jump to a line number in the text. This is useful at times when an error message mentions a line number.
The next set of items are for Bookmarks. They let you place invisible marks which get saved with the object. They form a circular list that you can traverse via the
appropriate menu commands or keystrokes. Next Bookmark jumps to that position in the text where the next Bookmark in the list was entered. Mark enters a Bookmark at the current cursor position. Unmark removes the current Bookmark. Unmark All removes all Bookmarks, Select to Bookmark selects text from the current cursor position to the current Bookmark position.
The last two items in the Search menu deal with Translation error messages. When you try to Create a Simulation Object from a Model which contains syntax errors, a circular list of error messages and locations is built in the Model Object, replacing any that was there before. This list becomes part of the Model Object and is saved with it. To traverse the list in either direction use the Next Error and Previous Error menu commands to display the error message in the Status Line at the bottom of the Main Window. At the same time the cursor is place just before the error in the Text View so you can correct it. Keyboard accelerators let you navigate the list easily from the keyboard.
The View Menu
The View menu includes menu commands for controlling what is shown in a few of the windows. You can hide or show the Main Window's Toolbar by toggling the first item Toolbar. The Second Item Entity Details lets you change the format of some of the dynamic Simulation Windows to show more or less detail onscreen. The last menu Item Show Clock toggles a switch in the current Simulation Object. If this switch is on in the current Simulation Object, changes in the System Clock of the simulation are displayed in the lower right of the Status Line of the Main Window. This is a handy way to assure yourself that a simulation is indeed running, but it slows down the simulation somewhat.
The Command Menu
The Command Menu is concerned with creating and manipulating Simulation Objects. The Create Simulation menu command invokes the high performance
Translator to create a Simulation Object based on the Model Statement in an existing Model Object. Normally you will encounter errors that must be corrected (see Search / Next Error, above). The Retranslate menu command is available to
perform the Translation again when errors have been corrected.
Next, Repeat Last Command is an easy way to do some action again on behalf of the same Object.
The remaining menu commands represent formal GPSS Commands. Most have accelerator keys for easy use and most can be loaded into a function key, as well. These menu commands are disabled unless the current Simulation Object is ready for them.
The Window Menu
The top two item in the Window Menu can be used to tidy up when many windows are open in the Client Area of the Main Window. Tile will show a small version of all windows and Cascade will stack them in a handy stack where all title bars can be seen.
The next two items have submenus themselves. They are used to open Windows and Snapshots on existing Simulation Objects. These individual windows are discussed below. They are disabled until the current Simulation Object is ready to oblige.
The Help Menu
The Help menu can be used to start the Online Help system. In addition, the bottom item About GPSS World displays software version and other information.
2.2.3. Settings
Settings are collections of values that form a common thread throughout most of the GPSS World Objects. They are used to control the simulation, the appearance of reports, and the contents of windows and loadable function keys.
Settings are inherited. When you Create a Simulation Object, it inherits its initial
Settings from its parent Model Object. So if you want to set values for all the simulations in your project, you should set them in the Model Object.
Similarly, Report Objects inherit their settings from the Simulation Object that created them. In this way, the Report contains a record of the Settings in effect when the simulation was run.
Only Text Objects do not contain a copy of Settings. They are mere representations of plaintext files. This is the reason that are the only GPSS World Objects which can be opened by external text editors. The other Objects contain Settings, Bookmarks, and in the case of Model Objects, Result Lists which are saved with the object and confound external word processors. If you need to, you can always transfer just the text to and from these programs using the Windows clipboard.
Settings are viewed or modified by selecting
Edit / Settings
after clicking on the GPSS World Object to be changed. This presents the Settings Notebook for that Object, with 5 tabbed pages.
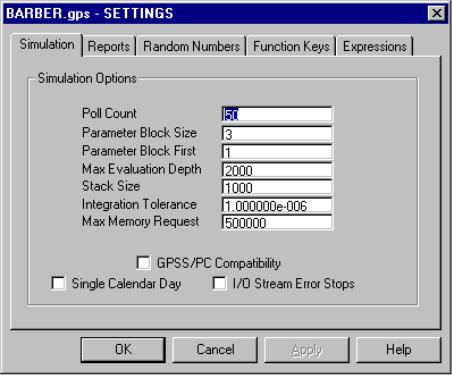
The Simulation Page
Figure 2—13. The Simulation Page of the Settings Notebook
The Simulation Page contains several values that you can change which affects the limits and behavior of running simulation.
The Poll Count Setting is the number of Block entries to be attempted before checking for any kind of interruption, such as a Command from the user.
If you use a lot of GPSS Transaction Parameters in your model, you can speed it up a little by putting them into a Parameter Block. To do this enter the number of Parameters to be blocked into the Parameter Block Size field, and the Parameter number of the first Parameter in the block in the Parameter Block First field. If
you are using Names instead of numbers to refer to these Parameters, you may need to control the values given to Parameter Names by using EQU Statements.
The Max Evaluation Depth is used to protect against circular references in sets of
PLUS Procedures. If your simulation is highly nested without circular references, you can increase this value to accommodate it.
The Stack Size is used to allocate stack space for nested PLUS Procedures and
Library Procedures. You can save space by decreasing this value, but if you get a Stack Overflow Error Stop during a simulation, you may have to increase it.
The Integration Tolerance field is used by the continuous simulation phase. If you
loosing this tolerance by making it larger, your integrations will be faster but may lose some accuracy.
The Max Memory Request places a limit on the acquisition of RAM memory for
structures such as tables and matrices. Such a limit is useful to catch errors, but you can increase it as necessary. If your RAM memory demands exceed that available in your computer, your operating system's virtual memory manager will have to increase its disk activity and perhaps its disk swap space usage significantly.
The three checkboxes at the bottom of the page control GPSS/PC Compatibility, which is available only in the Commercial Version, and how Data Stream errors are to be handled in the simulation.
CHECK the GPSS/PC Compatibility checkbox to operate the simulation in
GPSS/PC Compatibility mode as described above in Section 1.5. This option automatically invokes the Single Calenday Day option, described next.
CHECK the Single Calendar Day checkbox to cause simulations to use a
single FEC time segment list instead of multiple ones. In certain simulations this may be a little faster.
CHECK the I/O Stream Error Stops checkbox if you want any errors other
than "File Not Found" and "End of File" encountered by Data Streams in a simulation to HALT the simulation. If this box is unchecked you can handle such errors yourself within the simulation. See Section 4.16 for more information on Data Streams.
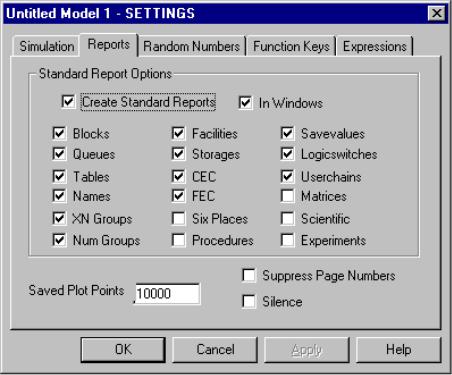
The Reports Page
Figure 2—14. The Reports Page of the Settings Notebook
The Reports Page is concerned primarily with the appearance of Reports and Plots.
CHECK the Create Standard Reports checkbox to enable the creation of
Standard Reports automatically when every simulation ends. The REPORT Command is still available even if this is left unchecked.
CHECK the In Windows checkbox to open a Text View of each Report Object
instead of just saving them in a file. This checkbox depends on the previous checkbox being checked,
The Standard Report Options groupbox contains the itemized GPSS Entity subreports to be included in each Standard Report. Check those to be included.
Check the Six Places checkbox to set the printed precision of fractional real values to 6 decimal places instead of 3 in Reports and Status Messages.
Check the Scientific checkbox to use the mantissa-exponent representation of extreme numbers in reports and in Data Streams.
The Saved Plot Points value tells GPSS World how much space to allocate to a
circular buffer for recent Plot points. If you scroll or print a Plot Window, theses values are used to rebuild the plot. If you don't have enough, the leftmost segment of the scrolled or printed plot will be missing. A value too large can waste virtual memory.
Check the Suppress Page Numbers checkbox to prevent GPSS World from inserting page number headers when printing the object's Text View.
Check the Silence checkbox if you errors to be reported silently, with no audible beep.
Check the Silence checkbox if you errors to be reported silently, with no audible beep.
The Random Numbers Page
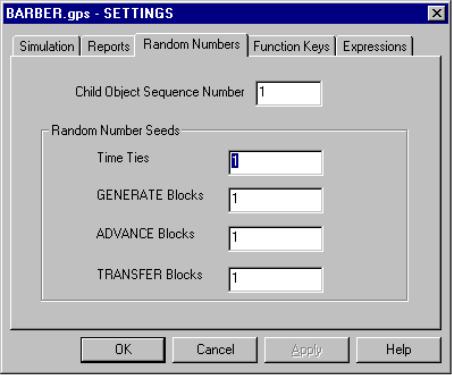
Figure 2—15. The Random Numbers Page of the Settings Notebook
The Random Numbers Page lets you control the internal Random Number Streams of the simulation and the external numbering of child objects.
To keep naming of objects unique, GPSS World adds a sequence number to the names of newly created child objects. The number to be used for the next sequence number is kept here, in the Settings of the parent object. To change it just modify the Child Object Sequence Number field.
The Random Number Streams groupbox contains the remaining settings on the page. They determine which GPSS Random Number Stream is to be used for the purpose of resolving Time Ties, time randomization in GENERATE and ADVANCE Blocks, and Next Block in TRANSFER Blocks.
The Time Ties entry field allows you to specify that when imminent events occur at the same time, the next event is to be selected randomly. To do so, place the Entity Number of the Random Number Generator to be used in the Time Ties
entry field. If you use a value of 0, time ties will not be randomized. A fuzz value of one part per billion is used in the equality criterion for real time values.
The GENERATE Blocks entry field allows you to specify which Random
Number Generator is to be used when a GENERATE Block calculates an interarrival time from Operands A and B. If you specify a nonpositive number, Random Number Generator number 1 is used.
The ADVANCE Blocks entry field allows you to specify which Random Number
Generator is to be used when an ADVANCE Block calculates a delay time from Operands A and B. If you specify a nonpositive number, Random Number Generator number 1 is used.
The TRANSFER Blocks entry field allows you to specify which Random
Number Generator is to be used when a TRANSFER Block selects a probabilistic destination Block. If you specify a nonpositive number, Random Number Generator number 1 is used.
If you set the Time Ties value to 0, you will effectively turn off the randomization of
time ties within the simulation. Otherwise, random Number Streams must be specified by a strictly positive integer.