

ScoutEngineering
.pdfHow much equipment do you need
In order to undertake all of the projects shown in this chapter you need to have the following minimum quanties of equipment in your store. The quantity listed is to complete one project at a time.
Most Units have a stock of spars and pulleys so it is only necessary to borrow them from the Unit quartermaster. Apart from the large spars you will also need a number of small poles for platforms, rungs for ladders and handrails.
Rope ladder
It is better to have a permanent rope ladder made and in your store rather than making one each time it is required.
Ropes
You will need a main hawser, 75mm rope, for footrails and for use whenever a rope is expected to hold weight. These ropes are sold in set lengths and you should not cut it. 50mm ropes and smaller will probably be provided in various lengths by the quartermaster and again you should not cut these.
Lashing ropes will also be required, again your quartermaster will probably supply these already cut into working lengths.
Pulleys
A rule of thumb for lashing ropes
1 metre of lashing rope should be used for every 25mm of thickness of the spars to be secured together.
i.e. two 75mm spars require 6 meters of lashing rope.
You will need a minimum of 1 double block either 150mm or 230mm depending on the size of the rope to be used (normally 150mm). Depending on the design and location of your project you may require two of each to cover all situations.
These large blocks can be supplemented with a number of smaller pulleys which are useful for hauling and small lifting devices.
Equipment list
4 |
No. |
5 metre spars |
6 |
No. |
4 metre spars |
10 |
No. |
3 metre spars |
10 |
No. |
2.5 metre spars |
8 |
No. |
2 metre spars |
8 |
No. |
1.5 metre spars |
Selection of poles for pickets and small spars for platforms, rungs for ladders and handrails
1 |
No. |
Rope ladder |
1 |
No. |
75mm rope - main hawser |
2 |
No. |
50mm rope - long lengths |
|
|
for handrails |
50mm reeving rope for pulleys 25mm rope for guy lines (15 metre lenghts)
Lashing rope and sisal of various lengths
Pulleys
2 single (150mm or 230mm)
2 double (150mm or 230mm)
5 small pulleys (clothes lines or sailing type)
11 |
Main page |

Getting over
One of the problems encountered when constructing a bridge is how to get members of a Patrol or construction crew to the other side of the river or stream so that the bridge can be completed on both banks of the waterway. Derricks
are a simple method of overcoming this problem and are illustrated below.
Simple Derrick
The simple derrick is constructed using two spars loosely tied together. a loop of rope is attached to both spars so that it is possible for the ‘traveller’ to balance and maneuvour the spar over the waterway. The rope should be attached on each pole using a round turn and two half hitches. Guys are fixed to the top of the derrick. The derrick is balanced by Patrol members using guys until the first Scout is across then the guy rope is passed over which will allow the structure to be supported more easily.
SCOUT ENGINEERING
An double bar A frame is constructed and a member of the Patrol sits on the frame. A forked pole is used to prop the frame and nudge it forward.
12

A double A frame is constructed. first Scout across stands on the frame and a forked pole is used to push frame over. The rest of the Patrol manning the guy ropes, control the balance and descent of the frame. The Scout on board jumps to the bank.
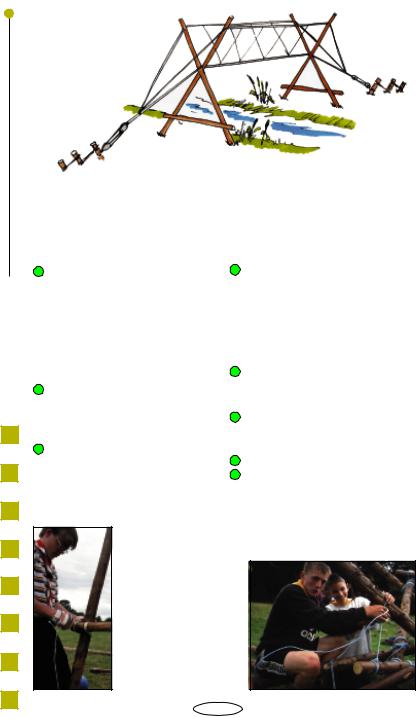
This swinging derrick is slightly more complicated to construct. A ‘slim’ double A- Frame is constructed and pulleys rigged as shown. The ‘traveller’ pulls on the pulley rope to raise themselves up. Some of the Patrol haul the A-frame into position and the other members swing the frame over the void.
Wooden seat is attached to ropes using a scaffolding hitch
13 |
Main page |

Towers
SCOUT ENGINEERING
Tripod Tower
This tower is reasonably easy to construct. All the lashings are square except the tripod lashing on the main spars.
Equipment required
3 No. 5 metre spars
3 No. 3 metre spars
3 No. 2 metre spars
3 No. 1.5 metre spars
3 No. 1 metre spars
Small poles or planks for platform Lashing ropes
Guys Rope ladder
Spade to dig butt holes for tower
How to build
Place a tripod lashing three - quarters up the 5 metre spars.
Lift the spars straight up and create tripod shape.
Fix 3 metre braces to the bottom of the tripod using square lashings.
Drop the tripod to the ground and place top braces on tripod allowing them to jut out of each side.
Build the rest of the platform structure. You can also build the top structure as one piece and place on top of the tripod. Fix guy ropes and rope ladder and raise into position.
You should dig a number of small holes for the butts of the spars to fit into. Secure guys and test rope ladder and platform before general use.
14

Hour Glass Tower
This tower is slightly more complex than the tripod tower however the principle of construction is the same. The tower is constructed by using two tripods, one inverted on top of the other. It is also necessary to brace the two tripods to prevent the top tripod swaying.
Equipment required
3 No. |
4 metre spars |
6 No. |
2.5 metre spars |
3 no. |
1.5 metre spars |
Small poles or planks for platform Lashing ropes
Guy ropes
Small spade for digging holes to butt main spars.
How to build
Create a tripod with the 3 No. 4 metre spars.
Raise the tripod and fix braces (2.5 metres)
Drop tripod to ground.
Make a second tripod using 2.5 metre spars.
The legs of the tripod should be ‘threaded’ through the base tripod.
The spars are then lashed in place using square lashings.
The top braces (2 metre spars) are fixed onto top tripod and platform base is created (1.5 metre spars). Fix small poles or planks to form platform.
A loose binding is fixed at the top of the lower tripod and base of top tripod to prevent swaying. This will need to be tighten when tower is raise to straighten tower.
 Rope ladder and guys should be fixed to platform before raising the tower.
Place butts of tower in small holes dug at base.
 Fix all guys . Test structure before general use.
15 |
Main page |

SCOUT ENGINEERING
Ten Minute Tower
In theory and with practice and the use of tournique lashings it is possible to erect this tower in ten minutes. This structure provides an ideal challenge
for a Patrol at a Troop or Patrol meeting, however, the tower tends to be used to create more complex bridges using a number of towers to bridge a wide river or lake.
Tripod, diagonal, square and tournique lashings are required to hold the structure together. The
structure is self standing and can be lifted or carried into position.
Equipment required
8 No. 3 metre spars
8 No. 2.5 metre spars Planks for platform base Lashing ropes
Small poles for tournique lashings
How to build
Place a tripod lashing on 4 sets of spars as shown in diagram. the centre pole being 2.5 metres in length. the two ouside spars being 3 metres in length.
Stand up tripod ‘sets’ and spread out legs so that the 3 metre spars act as braces, the centre spar as the corner support of the tower.
Move the sets together using tournique lashings at the bottom and diagonal lashings as the braces cross.
Place 2.5 metre spars on top to brace top section together.
Place planks on top to provide platforms if it is to be used as a single tower.
16

Figure of Eight lashing
Turnique lashing (tightening the lashing)
Tournique lashing
The tournique lashing is made using a loop of rope and a small pole. The loop is passed around the spars to be lashed and a small pole inserted in the loop. This is twisted until the binding is tight. The small pole is then secured to the nearest spar with sisal to prevent it unraveling.
Turnique lashing (starting the lashing)
17 |
Main page |
SCOUT ENGINEERING
Bridges
Monkey Bridge
The monkey bridge is constructed using two sheer legs and bridged with a hawser and handrails secured using pickets. this an easy structure to build as most of the bridge is constructed using rope.
How to build
Assuming you have access to both banks, construct two sheer legs with the crossing of the spars being a little above half way. The top portion of the spar should allow you to position the handrails at about shoulder height. The distance between the tips of the spars should be 1 metre apart.
The sheer legs are then raised into position and the base of the spars butted into the ground and guyed into position.
Old canvas or sacking should be placed in the diagonal to reduce friction and wear on main footrope. The main rope (75mm) is passed over the sheer legs and the rope
alined and hand strained so that the position of anchors can be determined.
A 3-2-1 picket anchor should be placed in a straight line to the ‘foot rope’ on each side of the river bank. If only one set of pulleys is available then a log and picket anchor is placed on one bank and a 3-2- 1 picket anchor on the other to which your pulleys are attached.
Hand rails are attached using clove hitches and are carried down to the ground like guys.
Securing ropes are tied between the handrails and footrope using clove hitches.
Test structure before using. Pulleys will need to be checked at
regular intervals to take up slackening of ropes with use.
18

Commando bridge
Single log bridges
Suspension bridge
19 |
Main page |

|
|
Trestle Bridge |
|||
|
|
The trestle can be used as a |
|||
|
|
basic building block for a whole |
|||
|
|
range of bridges. The bridge illustrated is |
|||
|
|
the locking trestle bridge which can either |
|||
|
|
have a see-saw bridging platform or a |
|||
|
|
fixed ramp on each side. |
|||
|
|
Equipment required |
|||
|
|
2 No. |
6 metre spars |
||
|
|
8 No. |
4 metre spars |
||
ENGINEERING |
|||||
2 No. |
3 metre spars |
||||
|
|
||||
|
|
3 No. |
2.5 metre spars |
||
|
|
Spars for handrail supports and rungs for |
|||
|
|
bridge |
|
||
|
|
Lashing ropes |
|||
SCOUT |
Handrail ropes |
||||
|
|
|
|||
|
|
|
|
|
|
|
|
|
|
|
|
|
|
|
|
|
|
|
|
|
|
|
|
|
|
|
|
|
|
|
|
|
|
|
|
|
|
|
|
|
|
|
|
|
|
|
|
|
|
|
|
|
|
|
|
|
|
|
|
|
|
|
|
|
|
|
|
|
|
|
|
|
|
|
|
|
|
|
|
|
|
|
|
|
|
|
|
|
|
How to build
Construct two trestles. It will be necessary to construct these according to the depth of the river and river bank.
These trestles are placed opposite each other on the banks of the river and allowed to fall together.
A ladder type construction is created using the 6 metre spars and small poles and handrail supports.
A 2.5 metre spar is placed between the diagonal created by the joined trestles.
This is not fixed as it is a rolling pivot for the ladder structure.
The ladder is fixed to this rolling spar. A large log placed on each bank will protect the bank from damage caused by the see-saw action of the bridge.
20