

|
page 300 |
max. force |
40 lbs |
• T-axis |
|
motion |
revolute |
Range |
290 degrees |
Resolution |
0.003 deg. |
Speed |
|
max. speed |
90 deg/sec |
max. torque |
358. in.lbs |
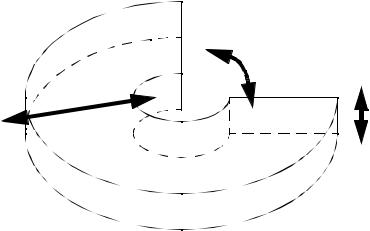
• The workspace is pictured below, |
|
A-axis (290 deg)
R-axis (300mm)
Z-axis (120mm)
10.1.1 DARL Programs
•All DARL comments follow ’ at any position on a line.
•Statements are ended with a colon, and as long as colons are used, more than one statement can be used on a line.
•Line numbering is required for DARL programs.
page 301
•Dimensions are given in millimeters in the programs.
•Commas and spaces are treated as equivalent.
•A sample program is given below with comments for explanation,
10 SPEED 250 ‘set the speed of the robot 20 T1 = 0. -350. -50. 0. ‘ first point 30 T2 = 0. -50. -350. 0. ‘second point 40 T3 = 30. -50. -350. 30. ‘third point
50 MOVE T1:MOVE T2:MOVE T3 ‘move the gripper to different points in space 60 OUTPUT +OG0 200 ‘open gripper
70 MOVE T1 + T2 ‘add two positions and move there 70 OUTPUT +OG1 200 ‘close gripper
80 STOP
10.1.1.1 - Language Examples
•First, points can be defined in programs, they can also be defined by moving the robot to the location and storing the value. This allows the robot to accurately find points without measuring. It also means that points location values don’t need to appear in programs, they are stored in memory.
•A example that uses for-next, if-then, goto and gosub-return commands is shown below. These commands are very standard in their use.
page 302
10 |
FOR A |
= 2 TO 10 ‘ start a loop that will count from 2 to 10 |
||
40 |
IF A = 4 |
THEN GOTO 100 ‘when a has a value of 4 jump to |
line 100 |
|
50 |
IF A = 6 |
THEN GOSUB 200 ‘ when a has a value of 6 go to |
subroutine |
|
60 |
NEXT A ‘ |
go back to line 10 and increase the value of a |
until it reaches 10 |
|
70 |
END ‘end |
the program |
|
|
100 MOVE |
T1 |
‘ go to point 1 |
|
|
110 NEXT |
A ‘ go back to line 10 |
|
||
200 MOVE |
T2 |
‘ go to point 2 |
|
|
210 RETURN ‘ go back to where we left line 50
• A example that uses motion is shown below. The ‘move’ command causes a motion to another point by only turning the needed joints. ‘moves’ causes a more complex motion resulting in a straight line tool motion between points. ‘movec’ allows a circular interpolation dictated by three points (the start, and the two given). The shave command forces the robot to fully complete a motion and stop before going to the next point. The sync command will move the robot, but keep the gripper in the original position relative to the real world.
10 |
T1 |
= |
30. |
10. 10. 40. |
|
20 |
T2 |
= |
15. |
5. 5. 10. |
|
30 |
T3 |
= |
0. |
0. 0. |
0. |
40 |
MOVE |
T1 |
‘ move to a start point |
||
50 |
SHAVE ‘ |
allow |
motions to “only get close” before moving to the next point |
||
60 |
MOVE |
T2: |
MOVE |
T3 ’ slows down at t2 before going to t3 |
|
70 |
NOSHAVE |
‘ make motion stop fully before going to the next point |
|||
80 |
MOVE |
T1 |
‘ return to the start |
||
90 |
MOVE |
T2: |
MOVE |
T3’ stops at t2 before going to t3 |
|
100 MOVE T1 |
‘ return to the start |
||||
110 MOVES T2: MOVES T3 ’ moves in a straight line from t1 to t2 and from t2 to t3 120 MOVE T1 ‘ back to the start again
130 MOVEC T2 T3 ‘ follows a smooth path, not slowing down at t2 140 MOVE T1 ‘ back to the start again
150 SYNC ‘ make gripper stay stationary relative to ground 160 MOVEC T2 T3 ‘ the arm moves, but the gripper stays at 0 170 NOSYNC ‘ make gripper follow robot
page 303
• A example that defines tool location offsets is shown below. This is particularly useful for a robot that has more than one tool attached. The normal tool location is on the end of the arm. With multiple tools attached we will have multiple tool center points. We can have a tool definition for each one of these. Note that the x-axis is the normal forward for the tool. The tool axis can only be changed in the x-y plane (or the plane perpendicular to the gripper rotation).
30 |
|
A = |
0.1 |
’ the tool center |
point x offset |
from the gripper |
|
40 |
|
B = |
0.2 |
’ the tool center |
point y offset |
from the gripper |
|
50 |
|
C = |
0.3 |
’ the tool center |
point z offset |
from the gripper |
|
60 |
|
D = |
1 |
’ |
define an offset for an axis |
|
|
70 |
|
E = |
0 |
’ |
define a zero offset for an axis |
|
|
80 |
|
DEF |
TL2 |
D E A B C ’ tool 2 at (0.1, 0.2, |
0.3) with the x-axis pointing forward (1,0) |
||
90 |
DEF TL3 E D C B A ’ tool 3 |
at (0.3, 0.2, 0.1) with the x-axis pointing to the left (0,1) |
|||||
100 |
TOOL |
1 |
’ indicate that you are using tool 1 |
||||
110 |
MOVE |
T1 ’ move to position 1 with the tool pointing in the normal direction |
|||||
111 |
remark |
note that the robot gripper will |
be positioned (-0.1, -0.2, -0.3) from normal |
||||
120 |
TOOL |
2 |
’ choose the tool |
on the gripper |
pointing to the left |
||
130 |
MOVE |
T1 ’ this will move |
the robot to (-0.3, -0.2, -0.1) |
||||
140 |
remark |
the robot will also move so that |
the tool is pointing to the left. |
||||
• A example that uses pallet commands is shown below. Basically a pallet allows us to create an array of points (it does the calculations). We can then give a location on a pallet and move to that point. The basic pallet definition requires that we indicate the number of rows and columns. We also need to define the physical locations of the rows and columns.We do this by giving an origin point, and then defining where the first row and column end. To use the pallet location we can simply refer to the pallet location index.