

Eilam E.Reversing.Secrets of reverse engineering.2005
.pdfReversing Tools 111
into a readable assembly language text. This process is somewhat similar to what takes place within a CPU while a program is running. The difference is that instead of actually performing the tasks specified by the code (as is done by a processor), the disassembler merely decodes each instruction and creates a textual representation for it.
Needless to say, the specific instruction encoding format and the resulting textual representation are entirely platform-specific. Each platform supports a different instruction set and has a different set of registers. Therefore a disassembler is also platform-specific (though there are disassemblers that contain specific support for more than one platform).
Figure 4.1 demonstrates how a disassembler converts a sequence of IA-32 opcode bytes into human-readable assembly language. The process typically starts with the disassembler looking up the opcode in a translation table that contains the textual name of each instructions (in this case the opcode is 8B and the instruction is MOV) along with their formats. IA-32 instructions are like functions, meaning that each instruction takes a different set of “parameters” (usually called operands). The disassembler then proceeds to analyze exactly which operands are used in this particular instruction.
DISTINGUISHING CODE FROM DATA
It might not sound like a serious problem, but it is often a significant challenge to teach a disassembler to distinguish code from data. Executable images typically have .text sections that are dedicated to code, but it turns out that for performance reasons, compilers often insert certain chunks of data into the code section. In order to properly distinguish code from data, disassemblers must use recursive traversal instead of the conventional linear sweep Benjamin Schwarz, Saumya Debray, and Gregory Andrews. Disassembly of Executable Code Revisited. Proceedings of the Ninth Working Conference on Reverse Engineering, 2002. [Schwarz]. Briefly, the difference between the two is that recursive traversal actually follows the flow of the code, so that an address is disassembled only if it is reachable from the code disassembled earlier. A linear sweep simply goes instruction by instruction, which means that any data in the middle of the code could potentially confuse the disassembler.
The most common example of such data is the jump table sometimes used by compilers for implementing switch blocks. When a disassembler reaches such an instruction, it must employ some heuristics and loop through the jump table in order to determine which instruction to disassemble next. One problematic aspect of dealing with these tables is that it’s difficult to determine their exact length. Significant research has been done on algorithms for accurately distinguishing code from data in disassemblers, including [Cifuentes1] and [Schwarz].
112 Chapter 4
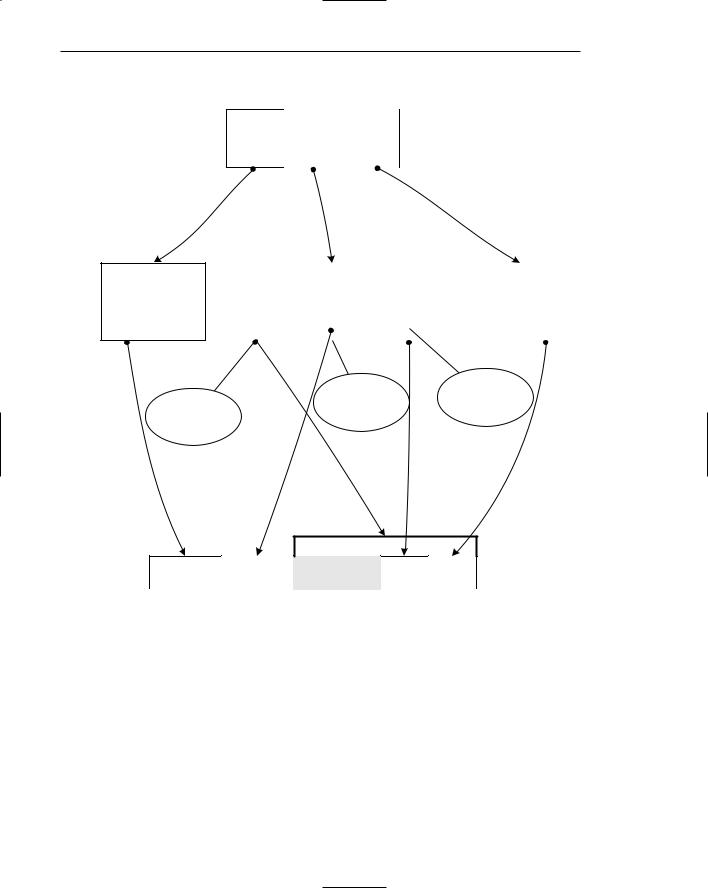
Instruction MOD/RM
Displacement
Opcode Byte
8B |
79 |
04 |
MOV Opcode
Defined as:
MOV Register,
Register/Memory
|
MOD/RM Byte: |
|
|
|
Specifies a register and memory-address pair. |
|
Displacement Byte |
||
|
|
|
|
|
|
|
|
|
|
MOD (2 bits) |
REG (3 bits) |
R/M (3 bits) |
|
|
|
|
|
|
|
|
Specifies a |
Specifies a |
|
Describes the |
register for the |
||
register |
address side |
||
format of the |
|||
|
|
||
address side |
|
|
MOV |
EDI, DWORD PTR ECX + 4 |
Figure 4.1 Translating an IA-32 instruction from machine code into human-readable assembly language.
IDA Pro
IDA (Interactive Disassembler) by DataRescue (www.datarescue.com) is an extremely powerful disassembler that supports a variety of processor architectures, including IA-32, IA-64 (Itanium), AMD64, and many others. IDA also supports a variety of executable file formats, such as PE (Portable Executable, used in Windows), ELF (Executable and Linking Format, used in Linux), and even XBE, which is used on Microsoft’s Xbox. IDA is not cheap at $399 for the

Reversing Tools 113
Standard edition (the Advanced edition is currently $795 and includes support for a larger number of processor architectures), but it’s definitely worth it if you’re going to be doing a significant amount of reversing on large programs. At the time of writing, DataRescue was offering a free time-limited trial version of IDA. If you’re serious about reversing, I’d highly recommend that you give IDA a try—it is one of the best tools available. Figure 4.2 shows a typical IDA Pro screen.
Feature wise, here’s the ground rule: Any feature you can think of that is possible to implement is probably already implemented in IDA. IDA is a remarkably flexible product, providing highly detailed disassembly, along with a plethora of side features that assist you with your reversing tasks.
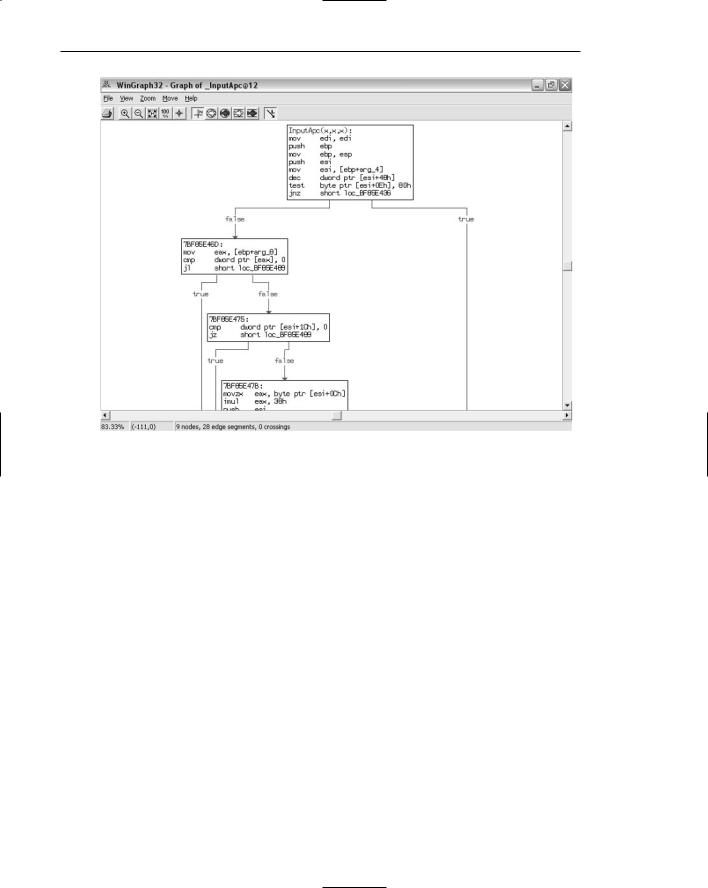
IDA is capable of producing powerful flowcharts for a given function. These are essentially logical graphs that show chunks of disassembled code and provide a visual representation of how each conditional jump in the code affects the function’s flow. Each box represents a code snippet or a stage in the function’s flow. The boxes are connected by arrows that show the flow of the code based on whether the conditional jump is satisfied or not. Figure 4.3 shows an IDA-generated function flowchart.
Figure 4.2 A typical IDA Pro screen, showing code disassembly, a function list, and a string list.
114 Chapter 4
Figure 4.3 An IDA-generated function flowchart.
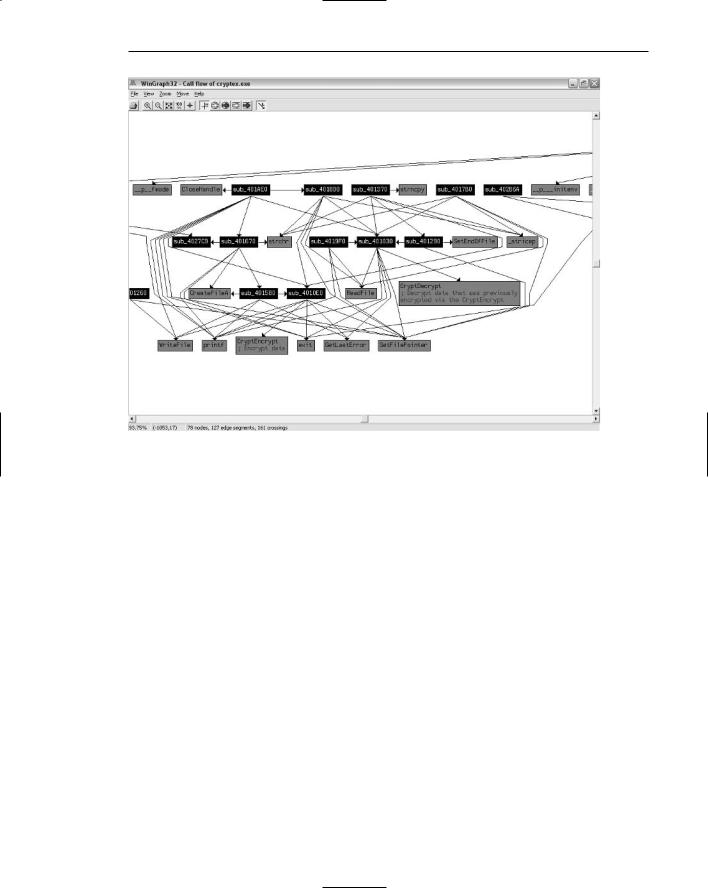
IDA can produce interfunction charts that show you which functions call into a certain API or internal function. Figure 4.4 shows a call graph that visually illustrates the flow of code within a part of the loaded program (the complete graph was just too large to fit into the page). The graph shows internal subroutines and illustrates the links between every one of those subroutines. The arrows coming out of each subroutine represents function calls made from that subroutine. Arrows that point to a subroutine show you who in the program calls that subroutine. The graph also illustrates the use of external APIs in the same manner—some of the boxes are lighter colored and have API names on them, and you can use the connecting arrows to determine who in the program is calling those APIs. You even get a brief textual description of some of the APIs!
IDA also has a variety of little features that make it very convenient to use, such as the highlighting of all instances of the currently selected operand. For example, if you click the word EAX in an instruction, all references to EAX in the current page of disassembled code will be highlighted. This makes it much easier to read disassembled listings and gain an understanding of how data flows within the code.
Reversing Tools 115
Figure 4.4 An IDA-generated intrafunction flowchart that shows how a program’s internal subroutines are connected to one another and which APIs are called by which subroutine.
ILDasm
ILDasm is a disassembler for the Microsoft Intermediate Language (MSIL), which is the low-level assembly language—like language used in .NET programs. It is listed here because this book also discusses .NET reversing, and ILDasm is a fundamental tool for .NET reversing.
Figure 4.5 shows a common ILDasm view. On the left is ILDasm’s view of the current program’s classes and their internal members. On the right is a disassembled listing for one of the functions. Of course the assembly language is different from the IA-32 assembly language that’s been described so far—it is MSIL. This language will be described in detail in Chapter 12. One thing to notice is the rather cryptic function and class names shown by ILDasm. That’s because the program being disassembled has been obfuscated by PreEmptive Solutions’ DotFuscator.

116 Chapter 4
Figure 4.5 A screenshot of ILDasm, Microsoft’s .NET IL disassembler.
Debuggers
Debuggers exist primarily to assist software developers with locating and correcting errors in their programs, but they can also be used as powerful reversing tools. Most native code debuggers have some kind of support for stepping through assembly language code when no source code is available. Debuggers that support this mode of operation make excellent reversing tools, and there are several debuggers that were designed from the ground up with assembly language–level debugging in mind.
The idea is that the debugger provides a disassembled view of the currently running function and allows the user to step through the disassembled code and see what the program does at every line. While the code is being stepped through, the debugger usually shows the state of the CPU’s registers and a memory dump, usually showing the currently active stack area. The following are the key debugger features that are required for reversers.

Reversing Tools 117
Powerful Disassembler A powerful disassembler is a mandatory feature in a good reversing debugger, for obvious reasons. Being able to view the code clearly, with cross-references that reveal which branch goes where and where a certain instruction is called from, is critical. It’s also important to be able to manually control the data/code recognition heuristics, in case they incorrectly identify code as data or vice versa (for code/data ambiguities in disassemblers refer to the section on disassemblers in this chapter).
Software and Hardware Breakpoints Breakpoints are a basic debugging feature, and no debugger can exist without them, but it’s important to be able to install both software and hardware breakpoints. Software breakpoints are instructions added into the program’s code by the debugger at runtime. These instructions make the processor pause program execution and transfer control to the debugger when they are reached during execution. Hardware breakpoints are a special CPU feature that allow the processor to pause execution when a certain memory address is accessed, and transfer control to the debugger. This is an especially powerful feature for reversers because it can greatly simplify the process of mapping and deciphering data structures in a program. All a reverser must do is locate a data structure of interest and place hardware breakpoints on specific areas of interest in that data structure. The hardware breakpoints can be used to expose the relevant code areas in the program that are responsible for manipulating the data structure in question.
View of Registers and Memory A good reversing debugger must provide a good visualization of the important CPU registers and of system memory. It is also helpful to have a constantly updated view of the stack that includes both the debugger’s interpretation of what’s in it and a raw view of its contents.
Process Information It is very helpful to have detailed process information while debugging. There is an endless list of features that could fall into this category, but the most basic ones are a list of the currently loaded executable modules and the currently running threads, along with a stack dump and register dump for each thread.
Debuggers that contain powerful disassemblers are not common, but the ones that do are usually the best reversing tools you’ll find because they provide the best of both worlds. You get both a highly readable and detailed representation of the code, and you can conveniently step through it and see what the code does at every step, what kind of data it receives as input, and what kind of data it produces as output.
In modern operating systems debuggers can be roughly divided into two very different flavors: user-mode debuggers and kernel-mode debuggers. User-mode

118Chapter 4
debuggers are the more conventional debuggers that are typically used by software developers. As the name implies, user-mode debuggers run as normal applications, in user mode, and they can only be used for debugging regular user-mode applications. Kernel-mode debuggers are far more powerful. They allow unlimited control of the target system and provide a full view of everything happening on the system, regardless of whether it is happening inside application code or inside operating system code.
The following sections describe the pros and cons of user-mode and kernelmode debuggers and provide an overview on the most popular tools in each category.
User-Mode Debuggers
If you’ve ever used a debugger, it was most likely a user-mode debugger. Usermode debuggers are conventional applications that attach to another process (the debugee) and can take full control of it. User-mode debuggers have the advantage of being very easy to set up and use, because they are just another program that’s running on the system (unlike kernel-mode debuggers).
The downside is that user-mode debuggers can only view a single process and can only view user mode code within that process. Being limited to a single process means that you have to know exactly which process you’d like to reverse. This may sound trivial, but sometimes it isn’t. For example, sometimes you’ll run into programs that have several processes that are somehow interconnected. In such cases, you may not know which process actually runs the code you’re interested in.
Being restricted to viewing user-mode code is not usually a problem unless the product you’re debugging has its own kernel-mode components (such as device drivers). When a program is implemented purely in user mode there’s usually no real need to step into operating system code that runs in the kernel.
Beyond these limitations, some user-mode debuggers are also unable to debug a program before execution reaches the main executable’s entry point (this is typically the .exe file’s WinMain callback). This can be a problem in some cases because the system runs a significant amount of user-mode code before that, including calls to the DllMain callback of each DLL that is statically linked to the executable.
The following sections present some user-mode debuggers that are well suited for reversing.
OllyDbg
For reversers, OllyDbg, written by Oleh Yuschuk, is probably the best usermode debugger out there (though the selection is admittedly quite small). The

Reversing Tools 119
beauty of Olly is that it appears to have been designed from the ground up as a reversing tool, and as such it has a very powerful built-in disassembler. I’ve seen quite a few beginners attempting their first steps in reversing with complex tools such as Numega SoftICE. The fact is that unless you’re going to be reversing kernel-mode code, or observing the system globally across multiple processes, there’s usually no need for kernel-mode debugging—OllyDbg is more than enough.
OllyDbg’s greatest strength is in its disassembler, which provides powerful code-analysis features. OllyDbg’s code analyzer can identify loops, switch blocks, and other key code structures. It shows parameter names for all known functions and APIs, and supports searching for cross-references between code and data—in all possible directions. In fact, it would be fair to say that Olly has the best disassembly capabilities of all debuggers I have worked with (except for the IDA Pro debugger), including the big guns that run in kernel mode.
Besides powerful disassembly features, OllyDbg supports a wide variety of views, including listing imports and exports in modules, showing the list of windows and other objects that are owned by the debugee, showing the current chain of exception handlers, using import libraries (.lib files) for properly naming functions that originated in such libraries, and others.
OllyDbg also includes a built-in assembling and patching engine, which makes it a cracker’s favorite. It is possible to type in assembly language code over any area in a program and then commit the changes back into the executable if you so require. Alternatively, OllyDbg can also store the list of patches performed on a specific program and apply some or all of those patches while the program is being debugged—when they are required.
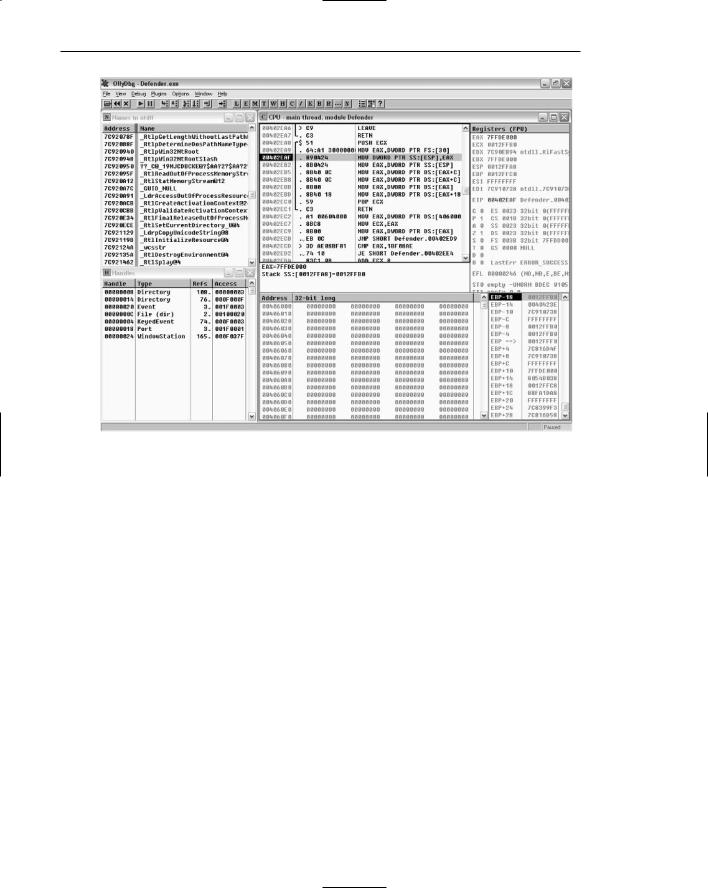
Figure 4.6 shows a typical OllyDbg screen. Notice the list of NTDLL names on the left—OllyDbg not only shows imports and exports but also internal names (if symbols are available). The bottom-left view shows a list of currently open handles in the process.
OllyDbg is an excellent reversing tool, especially considering that it is free software—it doesn’t cost a dime. For the latest version of OllyDbg go to http://home.t-online.de/home/Ollydbg.
User Debugging in WinDbg
WinDbg is a free debugger provided by Microsoft as part of the Debugging Tools for Windows package (available free of charge at www.microsoft.com/ whdc/devtools/debugging/default.mspx). While some of its features can be controlled from the GUI, WinDbg uses a somewhat inconvenient com- mand-line interface as its primary user interface. WinDbg’s disassembler is quite limited, and has some annoying anomalies (such as the inability to scroll backward in the disassembly window).
120 Chapter 4
Figure 4.6 A typical OllyDbg screen
Unsurprisingly, one place where WinDbg is unbeatable and far surpasses OllyDbg is in its integration with the operating system. WinDbg has powerful extensions that can provide a wealth of information on a variety of internal system data structures. This includes dumping currently active user-mode heaps, security tokens, the PEB (Process Environment Block) and the TEB (Thread Environment Block), the current state of the system loader (the component responsible for loading and initializing program executables), and so on. Beyond the extensions, WinDbg also supports stepping through the earliest phases of process initialization, even before statically linked DLLs are initialized. This is different from OllyDbg, where debugging starts at the primary executable’s WinMain (this is the .exe file launched by the user), after all statically linked DLLs are initialized. Figure 4.7 shows a screenshot from WinDbg. Notice how the code being debugged is a part of the NTDLL loader code that initializes DLLs while the process is coming up—not every user-mode debugger can do that.