

C H A P T E R 9
Advanced topics
In this chapter, we’ll look at some of the more advanced aspects you might want to consider in your SignalR implementation.
Authorization in SignalR
It is very common to find scenarios in which we want SignalR services to be consumed only by users who have been authenticated by the system. This affects how we build our applications, because at every possible entry point to the server, we have to check that the requestor is authorized to access, and from the client side we also have to make the credentials reach the other end.
SignalR does not include any mechanism to authenticate clients, because this is something that depends on the application and the platform. For example, in a web application, authentication will normally be performed using a credential entry form or using third parties (such as Google, Facebook, Live ID, and so on) to which this responsibility is delegated. In a desktop application, authentication perhaps will have been delegated to Active Directory Domain Services (AD DS) for the company.
What we do have in SignalR are tools to know which user is accessing these resources—basically, by examining the information available in the request—and to determine whether the user has permission to do so.
Access control in persistent connections
As we know, in all the methods of the PersistentConnection class that allow us to take control when an important event takes place (connection, disconnection, data arrival, and so on) we have an IRequest type parameter available that allows us to obtain information from the request, where, among other things, we can get the authenticated user.
Therefore, a possibility when controlling access to specific functions within a persistent connection would be to query this information and act accordingly.
protected override Task OnReceived(IRequest request,
string connectionId, string data)
{
if (request.User==null || !request.User.Identity.IsAuthenticated) throw new NotAuthorizedException();
...
}
181
www.it-ebooks.info
When this code is common to all operations relative to the PersistentConnection class that we are implementing, it is recommended that we override the AuthorizeRequest method that will be invoked by SignalR before passing control to the other events. This method receives a parameter of the IRequest type with information about the incoming request and returns a simple Boolean indicating whether access is allowed or not:
protected override bool AuthorizeRequest(IRequest request)
{
return (request.User!=null && request.User.Identity.IsAuthenticated);
}
Obviously, the access criteria can be more complex—for example, requiring the checking of other information included in the request, access times, role membership, or whatever we need for our application.
Access control in hubs
In this case, we can control access to specific actions or complete hubs by using a mechanism that is similar to the one we already have in other ASP.NET technologies: the Authorize attribute.
A hub method decorated with this attribute causes it to be accessible only to users authenticated in the application:
[Authorize]
public Task SecureBroadcast(string message)
{
return Clients.All.Message(message);
}
Likewise, if we want to apply this control to all methods of the hub, we just have to apply it at class level:
[Authorize]
public class SecureEchoHub : Hub
{
...
}
It is very important to take into account that this is a different attribute than the one we use in Web API or in ASP.NET MVC, so we must be careful not to include incorrect namespaces when we are using it. If we apply the Web API [Authorize] attribute (defined in System.Web.Http) on a hub, it will simply not take effect. In Figure 9-1, we can see that when [Authorize] is included, Visual Studio suggests the inclusion of three different namespaces, where attributes with this name are defined.
182 Chapter 9 Advanced topics
www.it-ebooks.info

FIGURE 9-1 Namespaces available when including the Authorize attribute in our applications.
If we want this check to be performed on all the hubs of our application, we can set it globally during system initialization:
// Inserts an AuthorizeModule in the pipeline GlobalHost.HubPipeline.RequireAuthentication();
When decorating our actions or hubs, we can be more explicit and not leave it at a mere check of user authentication status. The following code shows how to allow access to the method to specific users of the system:
[Authorize(Users="fmercury,mjackson,fsinatra")] public void Sing(string song)
{
// ...
}
We also have the ability to restrict it to certain application roles:
[Authorize(Roles= "greatsingers")] public void Sing(string song)
{
// ...
}
Unlike its Web API and MVC counterparts, the SignalR Authorize attribute has an additional parameter that makes sense only when applied at hub level:
[Authorize(RequireOutgoing=false, Roles="admin")] public class SecureEchoHub : Hub
{
...
public Task SecureBroadcast(string message)
{
return Clients.All.Message(message);
}
}
In the preceding example, only authenticated users belonging to the “admin” role can invoke hub methods such as SecureBroadcast(), but by setting the RequireOutgoing parameter to false, we are indicating that no authorization is required to connect to the hub and receive messages sent
Advanced topics Chapter 9 |
183 |
www.it-ebooks.info
from it. Therefore, thanks to this mechanism, we can have hubs to which anonymous clients connect in “passive mode” only to receive messages, whereas other privileged users would be able to invoke their methods.
We can also extend the Authorize attribute to implement our own authorization logic. For example, the following attribute is used to allow passage to users whose name contains the character “a”:
public class OnlyIfUsernameContainsAAttribute: AuthorizeAttribute
{
protected override bool UserAuthorized(IPrincipal user)
{
return base.UserAuthorized(user)
&& user.Identity.Name.ToLowerInvariant().Contains("a");
}
}
// Usage in a Hub method: [OnlyIfUsernameContainsA] public void DoSomething()
{
...
}
Or we could ensure that the connection is made using SSL, as in the following example:
public class OnlySslAttribute: AuthorizeAttribute
{
public override bool AuthorizeHubConnection( HubDescriptor hubDescriptor, IRequest request)
{
return request.Url.Scheme == "https"
&& base.AuthorizeHubConnection(hubDescriptor, request);
}
}
Client authentication
We have seen how to protect access to persistent connections or to methods and hubs on the server side using diverse techniques, but basically, all of them rely on the assumption that the execution context will contain information about the connected user. That is, we assume that some component previously executed in the pipeline will have correctly set the User property of the context of the request, that information such as User.Identity.Name or User.Identity.IsAuthenticated will be available, and that we will be able to determine their role membership with the familiar User.IsInRole() method.
Although at first it might seem as though the SignalR framework itself is the one in charge of establishing identity in its requests to ensure that information about the active user reaches the application, this is not the case; the ones that do this dirty work are found further down the technology stack—see Figure 9-2—at OWIN middleware level.
184 Chapter 9 Advanced topics
www.it-ebooks.info
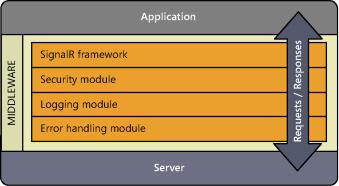
FIGURE 9-2 The architecture of OWIN systems.
This way, these modules are completely reusable across projects and systems. For example, the module responsible for managing authorization through cookies is the same one for SignalR and Web API, Nancy, or FubuMVC. In fact, the implementation of authentication and authorization management middleware modules is not even found in the SignalR project, but in Katana.
Currently, the Katana project includes the following modules, although more are expected to come in the future:
■■Microsoft.Owin.Security.ActiveDirectory Implements authentication based on AD DS— either on-premise or on Windows Azure—integrated into the OWIN pipeline.
■■Microsoft.Owin.Security.Cookies Implements cookie-based authentication, similar to standard ASP.NET mechanisms and authentication via forms.
■■Microsoft.Owin.Security.Facebook Implements the Facebook OAuth authentication process in the pipeline.
■■Microsoft.Owin.Security.Google Implements Google authentication based on OpenID.
■■Microsoft.Owin.Security.Jwt Middleware that allows you to protect and validate JSON Web Tokens.
■■Microsoft.Owin.Security.MicrosoftAccount Middleware specifically designed to support authentication with Microsoft (Windows Live) accounts.
■■Microsoft.Owin.Security.OAuth Enables an application to support any standard OAuth 2.0 workflow, both on the client side and the server.
■■Microsoft.Owin.Security.Twitter Allows supporting the Twitter OAuth 2.0 authentication protocol on an OWIN pipeline.
When we are in a pure web environment, the way authentication information reaches the server side and our hubs is quite straightforward, because we are normally in the same application.
Advanced topics Chapter 9 |
185 |
www.it-ebooks.info
For example, if we are using traditional cookie-based security and have accessed a page to log in to the website, those same cookies that it sends us upon successful authentication and which keep our session open on the server will travel in all requests to it, including those made by SignalR to open the virtual connection.
The Microsoft.Owin.Security.Cookies middleware, in charge of managing this security mechanism, will capture the requests, verify that they contain the authentication token, and set the user information obtained from said user in the context of the requests. From there, the request will continue to rise through the various modules, and when it reaches SignalR, the user information will be available and ready to be used.
However, when it comes to clients that are external to the server runtime environment, such as
.NET generic clients or WinRT applications, we need to use other alternatives based on the mechanisms that SignalR client libraries offer to append information to requests, such as cookies or HTTP headers, to send data about the user. Obviously, in this case, the server side should implement the corresponding code to obtain this information and convert it to processable authentication information. For example, the following code adds an authentication token to the connection in the form of a cookie:
var connection = new HubConnection("http://localhost:3421");
string token = GetAuthToken(); // Gets an auth token
//from anywhere
//Attach the token to the connection connection.CookieContainer = new CookieContainer(); connection.CookieContainer.Add(new Cookie("Token", token));
After we have generated the token and attached the cookie with it to the connection to the hub, all requests made in that context will be accompanied by said cookie.
In fact, a frequently implemented technique is to get the token via a previous call to the server, which returns it in a cookie. When we obtain the cookie, we would use it for the SignalR connections, as shown in Figure 9-3.
Applying this technique is quite simple, because all we need is the web service that we would invoke from the client side. This web service would check whether the supplied credentials are valid and, if so, return the cookie proving that the user was authenticated successfully.
186 Chapter 9 Advanced topics
www.it-ebooks.info

FIGURE 9-3 Getting authentication cookies via previous request.
Now we will see an example implementation of this authentication based on the cookie-based security module of the Katana project: Microsoft.Owin.Security.Cookies. Thus, the first thing we would have to do is install the package containing the module on our server:
PM> install-package Microsoft.Owin.Security.Cookies
Next we would include it in the OWIN process flow during application startup:
public class Startup
{
public void Configuration(IAppBuilder app)
{
...
var options = new CookieAuthenticationOptions()
{
CookieName = "Token"
};
app.UseCookieAuthentication(options);
...
}
}
The UseCookieAuthentication() extender enters the middleware into the OWIN pipeline, supplying it a configuration object, which, in this case, we use only to tell the module the name of the cookie where it must enter the authentication information. This name is important because we will need to recover the information from the client side.
Advanced topics Chapter 9 |
187 |
www.it-ebooks.info
At this point, our system is ready both to generate authentication cookies and to process them in every call, modifying the user of the request context based on the information in the token. Now we are going to implement the web service that will receive the user’s credentials and, based on them, return the corresponding cookie:
public class CustomLoginMiddleware : OwinMiddleware
{
public CustomLoginMiddleware(OwinMiddleware next) : base(next)
{
}
public override async Task Invoke(IOwinContext context)
{
var path = context.Request.Path.Value.ToLower(); if (context.Request.Method == "POST"
&& path.EndsWith("/account/remotelogin"))
{
var form = await context.Request.ReadFormAsync(); var userName = form["username"];
var password = form["password"]; if (validate(userName, password))
{
var identity = new ClaimsIdentity( CookieAuthenticationDefaults.AuthenticationType
);
identity.AddClaim(
new Claim(ClaimTypes.Name, userName)
);
identity.AddClaim(
new Claim(ClaimTypes.Role, "user")
);
context.Authentication.SignIn(identity); context.Response.StatusCode = 200; context.Response.ReasonPhrase = "Authorized";
}
else
{
context.Response.StatusCode = 401; context.Response.ReasonPhrase = "Unauthorized";
}
return;
}
await Next.Invoke(context);
}
private bool validate(string username, string password)
{
return true; // Just for brevity
}
}
188 Chapter 9 Advanced topics
www.it-ebooks.info
As usual in custom middleware modules, the class inherits from OwinMiddleware, which basically imposes the following two obligations on us:
■■To create a constructor that takes as a parameter the next middleware module available in the pipeline, and which we must invoke if we want to continue the process of the request.
■■To create the asynchronous method Invoke() with the processing logic of the request. This method takes request context information as an argument and can terminate the application process by managing the output directly (as it happens inside the main if block) or can continue executing the pipeline by invoking the next middleware module available.
Inside the module, the only thing that is done is the checking of the validity of the credentials (it is very simplified in this case) and, if they are valid, invoking the Authentication.SignIn() method of the context, supplying it a ClaimsIdentity object with user information, generating the cookie that will accompany the response to the request.
This module would be installed on the startup code and also in the pipeline. We already include the complete code of the Configuration() method, where you can see the SignalR mapping at the end:
public class Startup
{
public void Configuration(IAppBuilder app)
{
var options = new CookieAuthenticationOptions()
{
CookieName = "Token"
};
app.UseCookieAuthentication(options);
app.Use<CustomLoginMiddleware>();
app.MapSignalR();
}
}
After we have done this, our server will be able to respond to POST requests directed to the URL /account/remotelogin. Let’s now see how we can invoke this service from the client side to get the cookie and attach it to the SignalR connection.
First, let’s look at a possible implementation of a method that takes as arguments the URL of the authentication service and the credentials and that is used to obtain and return the value of the cookie called “Token” (note that this name is the one that we previously set on the server side):
private static async Task<Cookie> GetAuthCookie( string loginUrl, string user, string pass)
{
var postData = string.Format( "username={0}&password={1}",
user, pass
);
var httpHandler = new HttpClientHandler(); httpHandler.CookieContainer = new CookieContainer(); using (var httpClient = new HttpClient(httpHandler))
Advanced topics Chapter 9 |
189 |
www.it-ebooks.info
{
var response = await httpClient.PostAsync( loginUrl,
new StringContent(postData, Encoding.UTF8, "application/x-www-form-urlencoded"
)
);
var cookies = httpHandler.CookieContainer
.GetCookies(new Uri(loginUrl));
return cookies["Token"];
}
}
With appropriate adaptations, this method could be consumed from any type of .NET system. The following example demonstrates its use from a console application that acts as a SignalR client. In the code, you can see how the cookie is obtained with the authentication token from the server and is attached to the hub connection:
var host = "http://localhost:5432"; var loginUrl = "/account/remotelogin";
var authCookie = GetAuthCookie(loginUrl, username, password).Result; if (authCookie == null)
{
Console.WriteLine("Impossible to get the auth token."); return;
}
var connection = new HubConnection(host); connection.CookieContainer = new CookieContainer(); connection.CookieContainer.Add(authCookie);
var proxy = connection.CreateHubProxy("EchoHub");
...
connection.Start().Wait(); proxy.Invoke("SendPrivateMessage", "Hi, I'm authenticated!");
...
The same authentication middleware, being ultimately a service, can also be invoked from a web client—for example, by an AJAX call in JavaScript, or even (with some modifications in the component) as a destination for a login form. The following code shows how to deliver the cookie to the client by using AJAX. All subsequent requests to the service will include this cookie:
$("#login").click(function () { var u = $("#username").val(); var p = $("#password").val();
$.post("/account/login", { username: u, password: p })
.done(function () {
//The auth cookie will be attached
//to the following request so I'll be authenticated location.href = "/chat/index";
}); return true;
});
190 Chapter 9 Advanced topics
www.it-ebooks.info