

(ebook) Programing - Introduction to Visual Basic NET
.pdf3 8 C h a p t e r 2 : Yo u r F i r s t V B . N E T A p p l i c a t i o n
If you’re saying that this isn’t a big deal, think of the code you had to write before. You had to check the length of the string, but you also had to be aware of what font was in use. A group of characters in Arial is not the same length as the same group of characters in Courier. Therefore, resizing could be a hit-or-miss proposition. The AutoSize property removes that guesswork for you.
Anchoring Controls to the Form Edges
How many times did you create a VB form and set the border style to fixed so that people couldn’t resize it? If you placed a series of buttons along the bottom of the form, you didn’t want people to resize the form and suddenly have this bottom row of buttons in the middle of the form.
VB.NET allows you to anchor controls to one or more sides. This can allow a control to move as the form is resized, so that it appears to stay in its proper place.
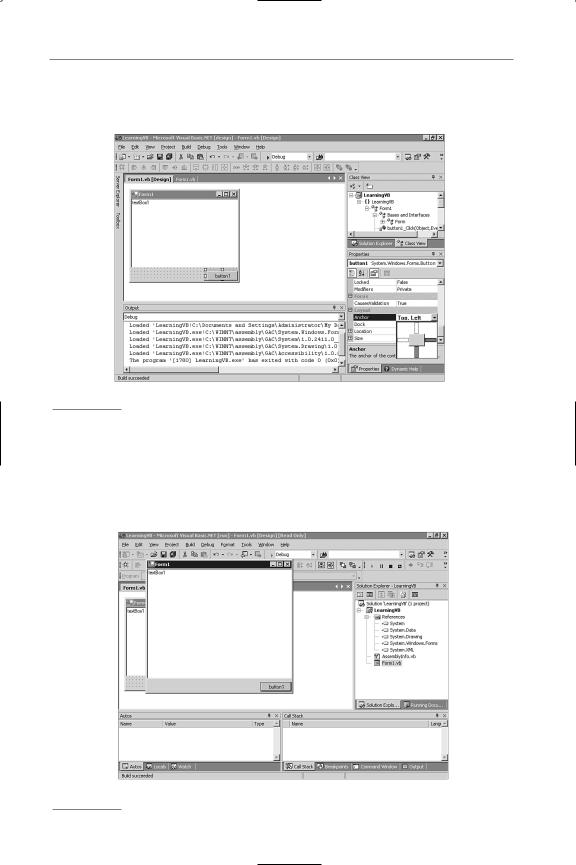
Back on Form1, delete the label you added, and remove the code inside the Button1_Click event procedure. Make the form slightly bigger and move Button1 toward the lower-right corner. Now, add a TextBox to the form. Change the TextBox’s Multiline property to True and resize the text box so that it fills up most of the form, except for the bottom portion that now contains the button. Your form should now look something like the one shown in Figure 2.15.
Figure 2.15
The form as it looks at design time.

W i n d o w s A p p l i c a t i o n E n h a n c e m e n t s 3 9
Run the project. After the window is loaded, resize it by moving the lower-right corner down and to the right. You will end up with something that looks like Figure 2.16.
Figure 2.16
The form at runtime, showing what happens when the form is resized.
Obviously, this looks pretty strange, and it is exactly what you are used to with VB6. Your answer in VB6, short of a third-party ActiveX control, is to write a lot of code that runs when the form’s Resize event is fired. You use that code to move the button and resize the text box. VB.NET has a better way of handling this, so stop the application and return to the IDE.
Make sure that you are on the Form1.vb [Design] tab and click on Button1. In the Properties window, scroll down and find the Anchor property. When you drop down this list, you get a strange box that shows a gray something in the middle, and four small rectangles around it. By default, the top and left rectangles are darkened, whereas the right and bottom rectangles are empty. The darkened rectangles indicate that right now, the button is anchored to the top and left sides of the form. As you resize the form, the button will stay the same distance from the top and left sides. That is not what you want, so click the top and left rectangles to clear them, and then click the bottom and right rectangles to select them. When you are done, the Anchor property should look like Figure 2.17. After you collapse the drop-down list, the
Anchor property should be Bottom, Right.
Next, click on TextBox1 and choose its Anchor property. Click on the bottom and right rectangles, but leave the left and top rectangles chosen. Now, the text box is tied
4 0 C h a p t e r 2 : Yo u r F i r s t V B . N E T A p p l i c a t i o n
to all borders, and it will remain the same distance from them. The Anchor property for TextBox1 should now be Top, Bottom, Left, Right.
Figure 2.17
The Anchor property tool.
Run the project again. After the form is open, resize it. Notice that the button now stays in the lower-right corner, and the text box automatically resizes with the form. You can see this behavior in Figure 2.18. The resizing and movement were accomplished without writing a line of code.
Figure 2.18
The form showing how the controls can resize or move as the form is resized.
W i n d o w s A p p l i c a t i o n E n h a n c e m e n t s 4 1
Easier Menus
If you hated building menus under previous versions of VB, you weren’t alone. The VB menu editor has never won any awards for ease of use nor for user friendliness. The new Menu Editor in VB.NET might just make you enjoy building menus.
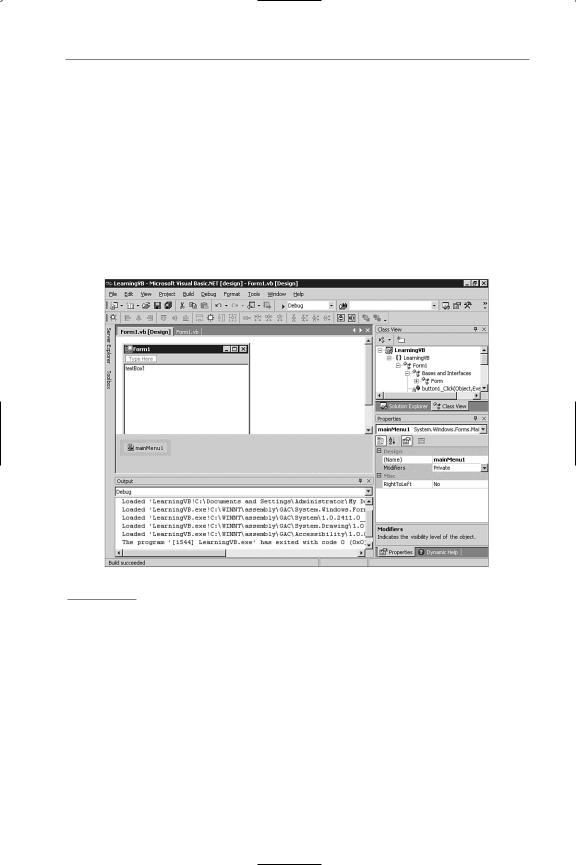
Using the same form as in the previous example, go to the Toolbox and double-click the MainMenu control. This adds a menu bar to the form (and simply pushes down the text box). The menu is also added to an area below the form, called the Component Tray, which you’ll see more of later. The menu shows one item that says Type Here, as shown in Figure 2.19.
Figure 2.19
The new Menu Editor in action.
Click once in the box that says Type Here, and type &File. This creates a new Type Here box to the right and a new Type Here box below. Click once in the Type Here below the word &File and type &Open. Just as in previous versions of VB, the ampersand (&) is used to signify an Alt+key selection. Typing &Open creates a new Type Here box to the right and a new Type Here below. As you can see, you are graphically building a menu. Click in the box below the Open and type &Close.
You can click in the Type Here box just to the right of the File menu choice to add another top-level menu. For example, you could add &Edit to the right of the File menu. Now, the Edit menu gets new blank entries, and you could add items for copying and pasting.

4 2 C h a p t e r 2 : Yo u r F i r s t V B . N E T A p p l i c a t i o n
Click on the Open menu choice under the File menu (on the menu you just created, not VB.NET’s menus). If you look in the Properties window, you will see that the actual name of the object is MenuItem2. You can change that if you want, but don’t worry about it for now. Instead, click on the drop-down for the Shortcut property. Scroll through the list until you find the Ctrl+O choice. The ShowShortcut property is set to True by default, but you won’t see the shortcut at design time. Instead, run the application. Figure 2.20 shows you roughly what you should see. Notice that the underlining of the letters (signified by the ampersand) might not appear unless you hold down the Alt key.
Figure 2.20
The new menu being displayed at runtime.
Setting Tab Order
If you disliked creating menus in previous versions of VB, it’s a safe bet that you hated setting the tab order, especially on complex forms. You had to click each control, one at a time, and make sure that the TabIndex property was correct. Take the form you’ve been working with and remove the textbox. Leave Button1 in the lowerright corner.

W i n d o w s A p p l i c a t i o n E n h a n c e m e n t s 4 3
Add three more buttons to the form. Place them in such a way as to make Button1 the last in the series. In fact, mix them up, if you prefer. If you take a look at Figure 2.21, you’ll see that the buttons have been placed in such a way that you will want the tab order to be Button2, Button4, Button3, and Button1. If you start the project and run it as is, however, the order will still be Button1, Button2, Button3, and Button4.
Figure 2.21
The form with buttons in the wrong order.
To set the tab order, click on the View menu and choose Tab Order. You now get small numbers on each control that can receive the focus, as shown in Figure 2.22. To reset the tab order, simply click on the controls in the order that you want them to receive focus. In this example, you just click on Button2, Button4, Button3, and Button1, in that order, and the tab order is set for you, as evidenced by the number in the upper-left corner of each button.

4 4 C h a p t e r 2 : Yo u r F i r s t V B . N E T A p p l i c a t i o n
Figure 2.22
The new way to set the tab order.
You can choose View, Tab Order to turn off the display of the tab order. You can run the project to verify the new tab order.
Line and Shape Controls: You’re Outta Here
If you examine the Toolbox, you might just find yourself searching and searching for the Line and Shape controls. They’re gone. Yes, no more line and shape controls.
Microsoft removed them because they were actually windowless controls in VB6; that is, they didn’t have an associated hWnd, but were painted directly on the form. In the new VB.NET forms engine, all controls must be windowed, and you no longer have control transparency.
Now that you’ve heard the technical explanation, what do you do about it? The easiest way to fake a line is to use a label. Turn on the border and then set the height (or width) to 1. This makes the label look like a line, and it works fine. For more complex shapes, Microsoft recommends that you use the GDI+ objects, which are very powerful. This is not something that will be covered in this book, but be aware of the change, and what you need to know to get around it.

W i n d o w s A p p l i c a t i o n E n h a n c e m e n t s 4 5
Form Opacity
Forms now have an Opacity property. Is it a necessary feature? Probably not, but it could be used for some useful purpose. At least while you’re working with it, you’ll look busy.
On the Form1 you’ve been working with so far, find its Opacity property and change it to 50%. Now, run the project and you’ll notice that the form is now quite see-through. The form still works fine (not that this current form is doing anything). You can click and drag the form; you can press the buttons. It works fine, but it is translucent at the moment. Close the project and you can add some code to take advantage of this new, if not quite critical, feature.
Go to the Toolbox and add a timer to your form. Unlike VB6, the timer doesn’t actually appear on the form, in the Component Tray for the form. Click on the timer in this window and then set the timer’s Enabled property to True. The interval of 100 is fine.
Now, click on the Form1.vb tab to get to the code. In the Sub New routine, add the following line of code right after the Add any initialization... comment:
Me.Opacity = 0
This merely sets the opacity to 0, which means that the form will be completely invisible when the form loads.
Next, use the Class Name and Method Name drop-down boxes at the top of the code window to choose the Tick event of the Timer1 control. This adds an event procedure for the Timer1_Tick event. Inside that event procedure, enter the following code:
Form1.Opacity = form1.Opacity + 0.01 If Me.Opacity >= 1 Then
timer1.Enabled = False beep()
End If
This code merely increments the opacity by .01 each time the Tick event fires.
When it finally reaches 1 (100%), the timer is shut off by setting its Enabled property to False, and the beep is called just to make a sound so that you know when it is finished.
If you are at all confused by the code, Listing 2.2 shows how the whole listing will look (with the Windows Form Designer generated code shown).

4 6 C h a p t e r 2 : Yo u r F i r s t V B . N E T A p p l i c a t i o n
Listing 2.2 Your First VB.NET Application, with All the Code Discussed So Far
Public Class Form1
Inherits System.Windows.Forms.Form
#Region “ Windows Form Designer generated code “
Public Sub New()
MyBase.New()
‘This call is required by the Windows Form Designer. InitializeComponent()
‘Add any initialization after the InitializeComponent() call Me.Opacity = 0
End Sub
‘Form overrides dispose to clean up the component list. Public Overrides Sub Dispose()
MyBase.Dispose()
If Not (components Is Nothing) Then components.Dispose()
End If End Sub
Private WithEvents button1 As System.Windows.Forms.Button Private WithEvents label1 As System.Windows.Forms.Label Private WithEvents menuItem1 As System.Windows.Forms.MenuItem Private WithEvents menuItem2 As System.Windows.Forms.MenuItem Private WithEvents menuItem3 As System.Windows.Forms.MenuItem Private WithEvents mainMenu1 As System.Windows.Forms.MainMenu Private WithEvents menuItem4 As System.Windows.Forms.MenuItem Private WithEvents button2 As System.Windows.Forms.Button Private WithEvents button3 As System.Windows.Forms.Button Private WithEvents button4 As System.Windows.Forms.Button Private WithEvents timer1 As System.Windows.Forms.Timer Private components As System.ComponentModel.IContainer
‘Required by the Windows Form Designer
‘NOTE: The following procedure is required by the _ Windows Form Designer
‘It can be modified using the Windows Form Designer. ‘Do not modify it using the code editor. <System.Diagnostics.DebuggerStepThrough()> _
Private Sub InitializeComponent()
Me.components = New System.ComponentModel.Container() Me.menuItem1 = New System.Windows.Forms.MenuItem() Me.menuItem2 = New System.Windows.Forms.MenuItem() Me.menuItem3 = New System.Windows.Forms.MenuItem() Me.timer1 = New System.Windows.Forms.Timer(Me.components)

W i n d o w s A p p l i c a t i o n E n h a n c e m e n t s 4 7
Me.button2 = New System.Windows.Forms.Button()
Me.button3 = New System.Windows.Forms.Button()
Me.button4 = New System.Windows.Forms.Button()
Me.button1 = New System.Windows.Forms.Button() Me.mainMenu1 = New System.Windows.Forms.MainMenu() Me.menuItem4 = New System.Windows.Forms.MenuItem() Me.menuItem1.Index = 0
Me.menuItem1.MenuItems.AddRange(New System.Windows.Forms.MenuItem() _ {Me.menuItem2, Me.menuItem3})
Me.menuItem1.Text = “&File” Me.menuItem2.Index = 0
Me.menuItem2.Shortcut = System.Windows.Forms.Shortcut.CtrlO Me.menuItem2.Text = “&Open”
Me.menuItem3.Index = 1 Me.menuItem3.Text = “&Close” Me.timer1.Enabled = True
Me.button2.Location = New System.Drawing.Point(96, 72) Me.button2.TabIndex = 0
Me.button2.Text = “button2”
Me.button3.Location = New System.Drawing.Point(96, 104) Me.button3.TabIndex = 2
Me.button3.Text = “button3”
Me.button4.Location = New System.Drawing.Point(176, 72) Me.button4.TabIndex = 1
Me.button4.Text = “button4”
Me.button1.Location = New System.Drawing.Point(176, 104) Me.button1.TabIndex = 3
Me.button1.Text = “button1”
Me.mainMenu1.MenuItems.AddRange(New System.Windows.Forms.MenuItem() _ {Me.menuItem1, Me.menuItem4})
Me.menuItem4.Index = 1 Me.menuItem4.Text = “&Edit”
Me.AutoScaleBaseSize = New System.Drawing.Size(5, 13) Me.ClientSize = New System.Drawing.Size(259, 134) Me.Controls.AddRange(New System.Windows.Forms.Control() _
{Me.button4, Me.button3, Me.button2, Me.button1}) Me.Menu = Me.mainMenu1
Me.Opacity = 0.5
Me.Text = “Form1” End Sub
#End Region
Private Sub |
button1_Click(ByVal sender As System.Object, _ |
ByVal e As |
System.EventArgs) Handles button1.Click End Sub |
Private Sub timer1_Tick(ByVal sender As System.Object, _
ByVal e As System.EventArgs) Handles timer1.Tick Me.Opacity = Me.Opacity + 0.01