

(ebook) Programing - Introduction to Visual Basic NET
.pdf7 8 C h a p t e r 4 : B u i l d i n g C l a s s e s a n d A s s e m b l i e s w i t h V B . N E T
Now, on the form in HealthcareClient, add a button. Double-click the button to get to the code window, and enter the following code for the Button1_Click event procedure:
Protected Sub button1_Click(ByVal sender As Object, _ ByVal e As System.EventArgs) Handles button1.Click
Dim Patient As New Healthcare.Patient() Patient.FirstName = “Bob” msgbox(Patient.FirstName)
End Sub
This code should look very familiar to VB6 developers. After adding a reference, you instantiate the object by setting the variable Patient to a New Healthcare.cPatient. If you are used to VB6, you might be tempted to try this shortcut and type this line of code:
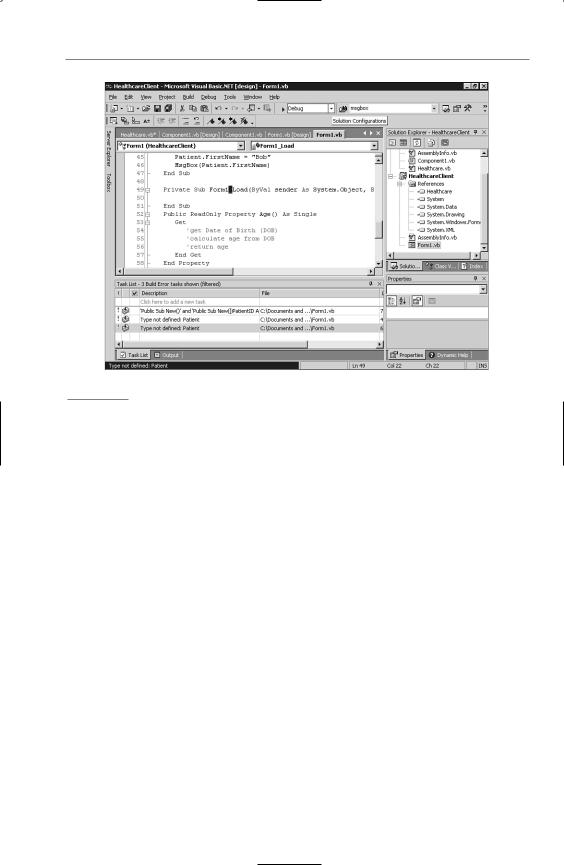
Dim Patient As New Patient()
If you type the line this way, however, you’ll get an error that says User-defined type not defined: Patient. This shows that you need to have the name of the component fully qualified. The word Healthcare in this case is not the assembly name; instead, it is the namespace.
To get around this problem, you can import the namespace containing the Patient class. Remember that all projects have a default namespace, and the default name of this default namespace is the same as the project. Therefore, if you go to the top of the code module and add an Imports statement, the “shortcut” reference to the Patient class will work. Your Imports statement must go at the top of the module, and it will look like this:
Imports Healthcare
You might have noticed in the code that you used the New keyword to create the object. In VB6, you could use the New keyword in two ways. Here is the first way:
Dim Patient as New Healthcare.Patient
In VB6, this code works, but it is not the best way to create objects. When you use this method, the object is not actually created until you call the first property or method. In fact, each call to a property or method requires a check to see whether the object has already been instantiated. To avoid this overhead, you should have been using this method in VB6:
Dim Patient as Healthcare.cPatient
Set Patient = New Healthcare.cPatient
In VB.NET, however, the following two methods are considered equivalent:

C r e a t i n g Yo u r F i r s t C l a s s L i b r a r y 7 9
Dim Patient As New cPatient()
Dim Patient As cPatient = New cPatient()
In both of these lines, the object is created in memory immediately. That means you never have to worry about the overhead of checking whether the object was instantiated on each call to a property or method that you could have in VB6.
Read-only and Write-only Properties
Returning to the class library you are creating, you should notice that the property you created, FirstName, has both a Get and Set section in the Property block. In VB6, to make a property read-only, you simply did not create a Public Property Let statement. To create a write-only property, you did not create the Public Property Get.
You might be tempted to try to create a read-only property by simply leaving out the Set...End Set block. However, VB.NET handles read-only and write-only properties differently: You must add a keyword to the property declaration. To create a readonly property named Age (you can assume that it’s calculated from the person’s date of birth), your code would look like this:
Public ReadOnly Property Age() As Single
Get
‘get Date of Birth (DOB)
‘calculate age from DOB
‘return age
End Get
End Property
Creating a write-only property is equally simple. Just put the keyword WriteOnly in the property declaration, and have only a Set...End Set block in the property procedure.
Parameterized Properties
It is possible to create a parameterized property. Using the example of a patient, consider that a patient is likely to have several physicians attending to him at any one time. Therefore, although your Healthcare class library might have a Physician class, the Patient will likely hold a collection of Physician objects. You would be able to access this collection through a parameterized property and walk through this collection.
Creating a parameterized property is fairly straightforward: You simply add a parameter to the property procedure. If you have a Physicians property that walks through a collection of Physician objects, the code would look something like this:

8 0 C h a p t e r 4 : B u i l d i n g C l a s s e s a n d A s s e m b l i e s w i t h V B . N E T
Dim PhysiciansList As New Collection()
Public ReadOnly Property Physicians(ByVal iIndex As Integer) _
As Physician
Get
Return CType(PhysiciansList(iIndex), Physician)
End Get
End Property
You might notice several unusual things in this code. First of all, the basic functionality is there, in that you pass in an index value and get back a particular object in
a collection. Notice also that even though the PhysiciansList is defined as a Collection data type, Option Strict prevents an automatic conversion from a Collection type to a Physician type. Therefore, you must run the CType function and pass both the object you want to convert and the type of the class (or object) into which it should be converted. Only then will the return actually succeed.
Default Properties
At the beginning of Chapter 3, you learned that default properties were gone, with the caveat that default properties without parameters were gone. However, if a property has one or more parameters, it can be the default property. Therefore, the Physicians property in Patient could be a default property.
Making a property the default property is as simple as adding the word Default in front of the property declaration. To make the Physicians property the default, your declaration would look like this:
Default Public ReadOnly Property _
Physicians(ByVal iIndex As Integer) As Physician
Now, in your client program, you could call the default property on the Patient object. The last two lines of this code snippet are equivalent:
Imports Healthcare
...
Dim Patient As New Patient()
Dim Phys As New Physician()
Phys = Patient.Physicians(1)
Phys = Patient(1) ‘equivalent to line above
Constructors in Your Classes
The one class you have built so far, Patient, did not come with a constructor; in other words, there was no Sub New available when you first created the class library. Constructors can be quite useful because they allow you to instantiate an object with some values already in it.

C r e a t i n g Yo u r F i r s t C l a s s L i b r a r y 8 1
For example, assume that you wanted the Patient to allow you to pass in a PatientID when you instantiated the object. That means you could write code that would create the object and, at creation time, read a database and fill in the properties for that patient. Your new definition for the Sub New would look like this:
Public Sub New(Optional ByVal iPatientID As Integer = 0)
Your client code could now instantiate the object and pass in a value at instantiation. Either of the following lines would allow you to create an instance of the object with a value already set:
Dim Patient As New Patient(1)
Dim Patient As Patient = New Patient(1) ‘equivalent to line above
Classes Without Constructors
Obviously, your classes do not have to have constructors. If you just use the Class...End Class block to create a new class, you will not be provided with a Sub New. Whether or not a class has constructors or implements System.ComponentModel.Component, the class can still have properties and methods, and can be created just like any other class. The Physicians class that has been used in previous examples could look something like this:
Public Class Physician
Dim miPhysID As Integer
Public Property PhysicianID() As Integer
Get
Return miPhysID
End Get
Set
miPhysID = Value
End Set
End Property
Public ReadOnly Property Age() As Single
Get
‘get Date of Birth (DOB)
‘calculate age from DOB
‘return age
End Get
End Property
End Class

8 2 C h a p t e r 4 : B u i l d i n g C l a s s e s a n d A s s e m b l i e s w i t h V B . N E T
Adding Methods to Classes
Adding a method to your class is done the same way it was done in VB6. If you want to create an Admit method in the Patient class, your code might look something like this:
Public Function Admit() As Boolean
‘add patient to database, notify billing, etc.
Return True
End Function
The call to this from the client is equally simple:
If Patient.Admit Then...
Before you begin thinking that there aren’t any changes in methods, understand that there are major changes in defining methods. However, the changes are specific to inheritance, and they will be covered in Chapter 5.
Adding Events
To add an event to your class, use the Event keyword. Imagine that you wanted to add an event to the class that notified you when you had pending lab results. You could create the event using code like this inside the class that needs to fire the event:
Event LabResult(ByVal LabType As String)
This just creates the event definition in your code. To actually cause the event to fire, you’ll have to add a RaiseEvent statement elsewhere in the code. For example, if you set a PatientID property, you can go check a database for any new lab results for that patient. If there are new lab results, you could raise an event. Your code would look similar to this:
Dim miPatientID As Integer
Public Property PatientID() As Integer Get
Return miPatientID End Get
Set
miPatientID = Value
‘check labs database for this patient ‘if there are new lab results RaiseEvent LabResult(“CBC”)
End Set End Property
If this were a real procedure, you wouldn’t hard-code “CBC” into the event, but would instead pull the lab type from the database.

C r e a t i n g Yo u r F i r s t C l a s s L i b r a r y 8 3
Handling the Event in the Client
You have two options for handling this event in the client. The first way to handle the events is using the WithEvents keyword. The second way is to use the AddHandler statement.
To use the WithEvents keyword, you need to declare the object and include WithEvents. Notice that if you are using the WithEvents keyword, the declaration cannot be local to a sub or function. Therefore, this code will go outside any sub or function, at the “module” level in your client:
Dim WithEvents Patient As Patient
This line assumes that you have imported the HealthCare namespace. Notice that the keyword New is not in the preceding statement. You cannot use the WithEvents keyword in a declaration inside a procedure, nor can you use the New keyword in a declaration outside a procedure to create an object that has events. Therefore, you have to declare the object using the WithEvents keyword outside of any procedure, and then you have to use the New keyword inside a procedure, as shown here:
Dim WithEvents Patient As Patient
...
Public Sub Foo()
Patient = New cPatient()
...
End Sub
Now, to add an event procedure, click on the Class Name drop-down list box at the top of the code window and choose Patient. In the Method Name drop-down list box, choose LabResult. This creates an event procedure named Patient_LabResult that looks like this:
Public Sub Patient_LabResult(ByVal LabType As System.String) _
Handles Patient.LabResult
...
End Sub
The second way to handle events is to use the AddHandler statement. You now do not have to define the class using the WithEvents keyword. Instead, you define it as you did before. You must also have a sub or function that will act as the event procedure.
Next, you use the AddHandler statement to tie a particular event from the object to the procedure you created to handle the event.
For example, assume that you wanted to create an event handler sub called LabHandler. This procedure would be defined as a standard sub. It would have to take as arguments any parameters defined in the LabResult event. In the example here, the event named LabResult passes along a lab parameter with a data type of string. Therefore, your procedure would have to accept a string as an argument.

8 4 C h a p t e r 4 : B u i l d i n g C l a s s e s a n d A s s e m b l i e s w i t h V B . N E T
When you use AddHandler, you specify the name of the event in the Patient class you want it to handle (LabResult), but you must also refer to the procedure; in this case, LabHandler. However, you don’t refer directly to LabHandler; instead, you refer to the address of LabHandler, using the AddressOf operator. Your code to set up event handling with the AddHandler statement would look like this:
Protected Sub button1_Click(ByVal sender As Object, _ ByVal e As System.EventArgs) Handles button1.Click
Dim Patient As New Patient()
AddHandler Patient.LabResult, AddressOf Me.LabHandler
...
End Sub
Private Sub LabHandler(ByVal LabType As String)
...
End Sub
Notice that in the AddHandler, you refer to the object variable (Patient) and the event name (LabResult) using the Object.Event syntax.
The advantage of this approach is that you can have one procedure handling multiple events, even if the events are from different components. You can also hook events into objects that you create at runtime. For example, you might get a collection of objects passed to you, but still be able to handle their events using this procedure.
The “Final” Code
The following code doesn’t actually do anything, and some earlier changes are undone in this code. Still, if you are trying to keep up with the code, and want to make sure that the compilation works in the next section, here is the code inside the Healthcare project:
Public Class Patient
Dim msFirstName As String
Dim PhysiciansList As New Collection()
Dim miPatientID As Integer
Public Property FirstName() As String
Get
Return msFirstName
End Get
Set(ByVal Value As String)
msFirstName = Value
End Set
End Property

T h e “ F i n a l ” C o d e 8 5
Default Public ReadOnly Property Physicians _
(ByVal iIndex As Integer) As Physician
Get
Return CType(PhysiciansList(iIndex), Physician)
End Get
End Property
Public Function Admit() As Boolean
‘add patient to database, notify billing, etc.
Return True
End Function
Event LabResult(ByVal LabType As String)
Public Property PatientID() As Integer
Get
Return miPatientID
End Get
Set(ByVal Value As Integer)
miPatientID = Value
‘check labs database for this patient
‘if there are new lab results
RaiseEvent LabResult(“CBC”)
End Set
End Property
End Class
Public Class Physician
Dim miPhysID As Integer
Public Property PhysicianID() As Integer
Get
Return miPhysID
End Get
Set(ByVal Value As Integer)
miPhysID = Value
End Set
End Property
Public ReadOnly Property Age() As Single
Get
‘get Date of Birth (DOB)
‘calculate age from DOB
‘return age
End Get
End Property
End Class

8 6 C h a p t e r 4 : B u i l d i n g C l a s s e s a n d A s s e m b l i e s w i t h V B . N E T
Compiling the Assembly
Now that you have created a class library with two classes (Patient and Physician), it is time to compile your assembly. In VB6, you would compile a COM component, but you aren’t in VB6 anymore. Instead, you are writing for the .NET Framework, and that means you will be compiling an assembly. The assembly might have a .DLL extension, but it is not a traditional DLL in the Windows API sense, nor is it a COM DLL in the VB6 sense.
Building the assembly is fairly easy. The build option is no longer on the File menu, but is now a separate menu labeled Build. If you click on the Build menu, you will see several choices. Because you have a solution in this example, with a class library (Healthcare) and Windows application (HealthcareClient), you will see options to build or rebuild the solution. You also have an option to deploy the solution. In the next section of the Build menu, you have the option to build or rebuild one of the projects in the solution, depending on which project is highlighted in the solution explorer when you click the menu. Finally, there is a choice for a batch build and one for the Configuration Manager.
In .NET, you can compile your assemblies in either Debug or Release mode, or you can create your own custom modes. Debug mode compiles in symbolic debug information and does not use any compiler optimizations. Release mode does not compile in any of the symbolic debug information, and it applies code optimizations. Obviously, you will use Debug mode while developing and debugging your application. After you have the bugs worked out and are ready to deploy the application, you switch to Release mode and recompile your assembly. Realize that you can modify these modes or add your own. For example, you could add debug information into projects compiled under Release mode, if you chose to modify Release mode in that fashion.
You can see that the Debug option is set if you look at the toolbar. The Solutions Configuration drop-down list box allows you to choose Debug or Release, and to open the Configurations Manager. You can see this in Figure 4.4.
For now, just click on the Healthcare project one time in the Solution Explorer window. This will select it as the project to build if you choose not to build the entire solution. Now, click on the Build menu and choose Build Healthcare. The Output window at the bottom of the IDE should report when the build is done, and show how many projects succeeded, how many failed, and how many were skipped. In this case, the HealthcareClient is not counted as skipped, so you should see that one project succeeded, with no failures and no projects skipped.
C o m p i l i n g t h e A s s e m b l y 8 7
Figure 4.4
The Solutions Configuration option on the toolbar.
The compilation process creates two files. The default location for the project is My Documents\Visual Studio Projects\Healthcare. If you look in that folder, you’ll see a bin folder below it. Inside the bin folder are two files: Healthcare.dll and Healthcare.pdb. The .DLL is the assembly, and the .PDB is the debug file that goes along with the .DLL because you compiled it with the Debug configuration. .PDB stands for program database.
Reusing the Assembly in Other Applications
One of the other big differences from this and VB6 is that VB.NET assemblies do not use the registry. In fact, VB.NET does not put any information about the assembly in the registry. If you search through the registry, you won’t find any mention of the Healthcare assembly. You will find information about the project and solution, but that’s just so that Visual Studio.NET can show them in the recent files list.
Given that there is nothing about the assembly in the registry, how do you reuse it in another application? If you start a new Windows Application project in VB.NET and right-click on the References node in the Solution Explorer window, the Add Reference dialog box is shown. However, the Healthcare component is not listed. This shouldn’t be too surprising; it showed up earlier because HealthcareClient was part of the same solution. Now, however, you have started a new project, which creates a new solution. This solution is in a different directory, and therefore has no knowledge of the Healthcare component.