

Pro CSharp 2008 And The .NET 3.5 Platform [eng]-1
.pdf52 CHAPTER 2 ■ BUILDING C# APPLICATIONS
Because the look and feel of Visual C# 2008 Express is so similar to that of Visual Studio 2008 (and, to some degree, SharpDevelop), I do not provide a walk-through of this particular IDE here. If you do wish to learn more about the product, look up my article “An Introduction to Programming Using Microsoft Visual C# 2005 Express Edition” online at http://msdn.microsoft.com. While this article is based on Visual C# 2005 Express, a majority of the topics are identical.
Building .NET Applications Using
Visual Studio 2008
If you are a professional .NET software engineer, the chances are extremely good that your employer has purchased Microsoft’s premier IDE, Visual Studio 2008, for your development endeavors (http://msdn.microsoft.com/vstudio). This tool is far and away the most feature-rich and enterprise-ready IDE examined in this chapter. Of course, this power comes at a price, which will vary based on the version of Visual Studio 2008 you purchase. As you might suspect, each version supplies a unique set of features.
■Note There are a staggering number of members within the Visual Studio 2008 family. My assumption during the remainder of this text is that you have chosen to make use of Visual Studio 2008 Professional as your IDE of choice.
Although I will assume you have a copy of Visual Studio 2008 Professional, understand that owning a copy of this IDE is not required to use this edition of the text. In the worst case, I may examine an option that is not provided by your IDE. However, rest assured that all of this book’s sample code will compile just fine when processed by your tool of choice.
■Note Once you download the source code for this book from the Source Code/Downloads area of the Apress website (http://www.apress.com), you may load the current example into Visual Studio 2008 (or C# 2008 Express) by double-clicking the example’s *.sln file. If you are not using Visual Studio 2008/C# 2008 Express, you will need to manually insert the provided *.cs files into your IDE’s project workspace.
Some Unique Features of Visual Studio 2008
Visual Studio 2008 ships with the expected GUI designers, code snippet support, database manipulation tools, object and project browsing utilities, and an integrated help system. Unlike many of the IDEs we have already examined, Visual Studio 2008 provides numerous additions. Here is a partial list:
•Visual XML editors/designers
•Support for mobile device development (such as Smartphones and Pocket PC devices)
•Support for Microsoft Office development
•Designer support for Windows Workflow Foundation projects
•Integrated support for code refactoring
CHAPTER 2 ■ BUILDING C# APPLICATIONS |
53 |
•Visual class design utilities
•The Object Test Bench window, which allows you to create objects and invoke their members directly within the IDE
To be completely honest, Visual Studio 2008 provides so many features that it would take an entire book (a rather large book at that) to fully describe every aspect of the IDE. This is not that book. However, I do want to point out some of the major features in the pages that follow. As you progress through the text, you’ll learn more about the Visual Studio 2008 IDE where appropriate.
Targeting the .NET Framework Using the New Project
Dialog Box
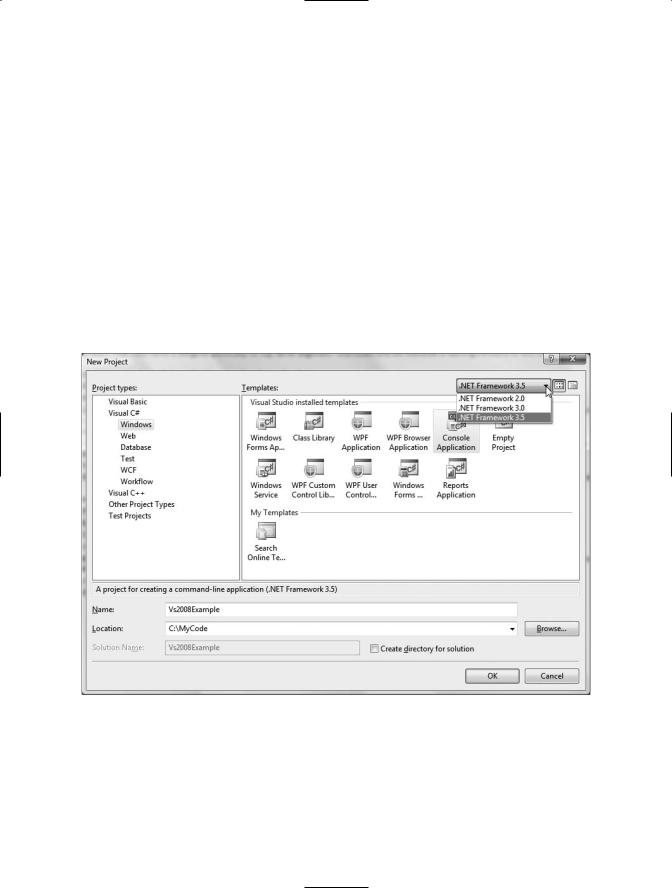
If you are following along, create a new C# Console Application (named Vs2008Example) using the File New Project menu item. As you can see in Figure 2-16, Visual Studio 2008 now (finally) supports the ability to select which version of the .NET Framework you wish to build against (2.0, 3.0, or 3.5) using the drop-down list box on the upper right of the New Project dialog box. For each project in this text, you can simply leave the default selection of .NET Framework 3.5.
Figure 2-16. Visual Studio 2008 now allows you to target a particular version of the .NET Framework.
Using the Solution Explorer Utility
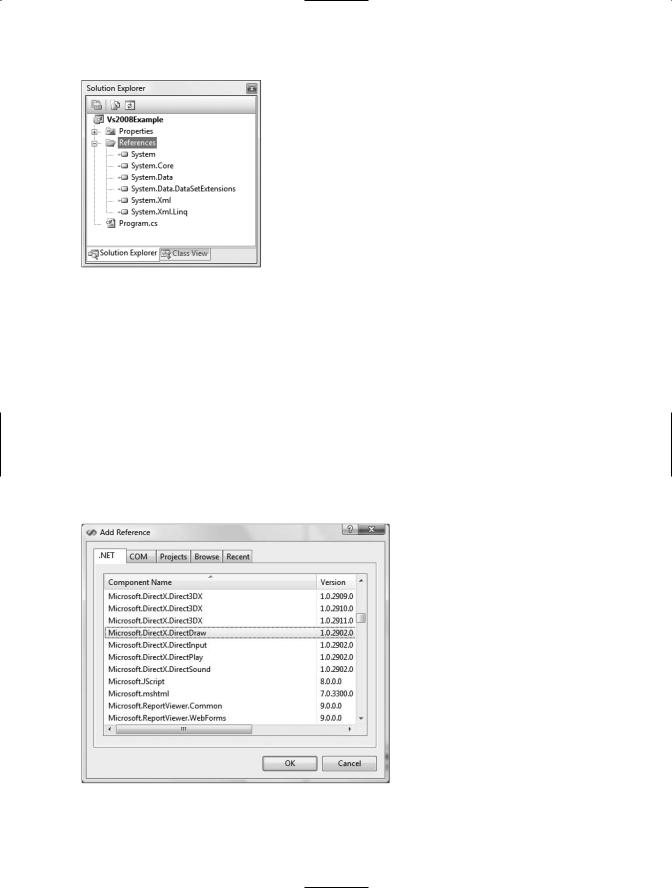
The Solution Explorer utility (accessible from the View menu) allows you to view the set of all content files and referenced assemblies that comprise the current project (see Figure 2-17).
54 CHAPTER 2 ■ BUILDING C# APPLICATIONS
Figure 2-17. The Solution Explorer utility
Notice that the References folder of Solution Explorer displays a list of each assembly you have currently referenced, which will differ based on the type of project you select and the version of the Framework you are compiling against.
Referencing External Assemblies
When you need to reference additional assemblies, right-click the References folder and select Add Reference. At this point, you can select your assembly from the resulting dialog box (this is essentially the way Visual Studio allows you to specify the /reference option of the command-line compiler). The .NET tab (see Figure 2-18) displays a number of commonly used .NET assemblies; however, the Browse tab allows you to navigate to any .NET assembly on your hard drive. As well, the very useful Recent tab keeps a running tally of frequently referenced assemblies you have used in other projects.
Figure 2-18. The Add Reference dialog box
CHAPTER 2 ■ BUILDING C# APPLICATIONS |
55 |
Viewing Project Properties
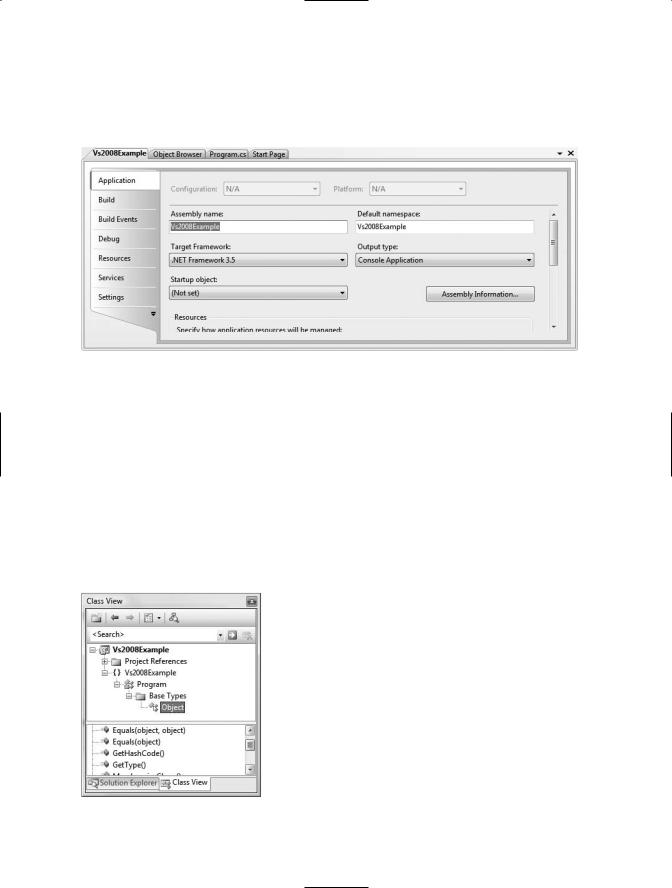
Finally, notice an icon named Properties within Solution Explorer. When you double-click this item, you are presented with a sophisticated project configuration editor (see Figure 2-19).
Figure 2-19. The Project Properties window
You will see various aspects of the Project Properties window as you progress through this book. However, if you take some time to poke around, you will see that you can establish various security settings, strongly name your assembly, deploy your application, insert application resources, and configure preand postbuild events.
The Class View Utility
The next tool to examine is the Class View utility, which you can load from the View menu. The purpose of this utility is to show all of the types in your current project from an object-oriented perspective (rather than file-based view of Solution Explorer). The top pane displays the set of namespaces and their types, while the bottom pane displays the currently selected type’s members (see Figure 2-20).
Figure 2-20. The Class View utility
56 CHAPTER 2 ■ BUILDING C# APPLICATIONS
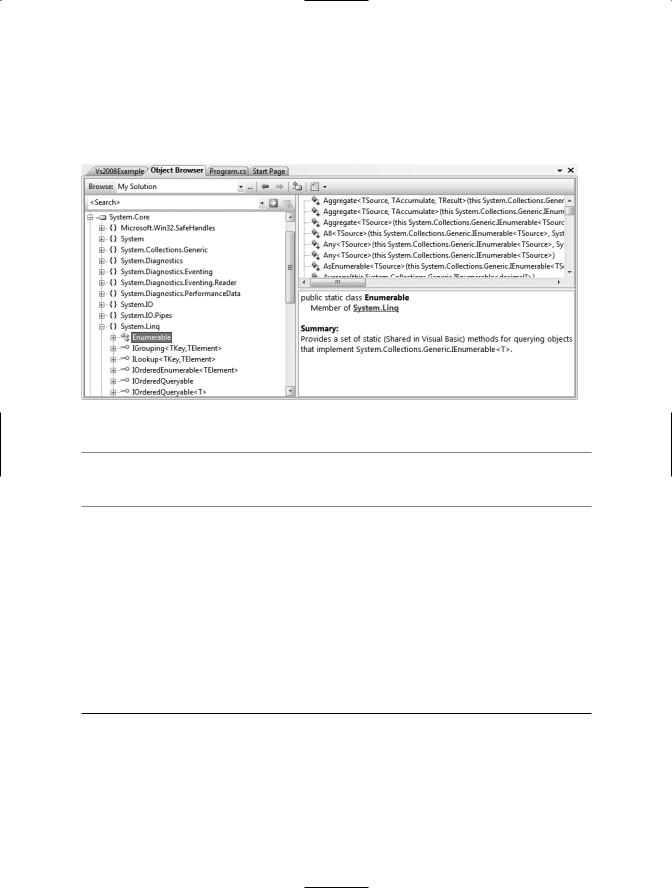
The Object Browser Utility
Visual Studio 2008 also provides a utility to investigate the set of referenced assemblies within your current project. Activate the Object Browser using the View menu, and then select the assembly you wish to investigate (see Figure 2-21).
Figure 2-21. The Object Browser utility
■Note If you double-click an assembly icon from the References folder of Solution Explorer, the Object Browser will open automatically with the selected assembly highlighted.
Integrated Support for Code Refactoring
One major feature that ships with Visual Studio 2008 is support to “refactor” existing code. Simply put, refactoring is a formal and mechanical process whereby you improve an existing code base. In the bad old days, refactoring typically involved a ton of manual labor. Luckily, Visual Studio 2008 does a great deal to automate the refactoring process.
Using the Refactor menu (which will only be available when a code file is active), related keyboard shortcuts, smart tags, and/or context-sensitive mouse clicks, you can dramatically reshape your code with minimal fuss and bother. Table 2-2 defines some common refactorings recognized by Visual Studio 2008.
Table 2-2. Visual Studio 2008 Refactorings
Refactoring Technique |
Meaning in Life |
Extract Method |
Allows you to define a new method based on a selection of code |
|
statements |
Encapsulate Field |
Turns a public field into a private field encapsulated by a C# property |
Extract Interface |
Defines a new interface type based on a set of existing type members |
Reorder Parameters |
Provides a way to reorder member arguments |
Remove Parameters |
Removes a given argument from the current list of parameters (as you |
|
would expect) |
CHAPTER 2 ■ BUILDING C# APPLICATIONS |
57 |
Refactoring Technique |
Meaning in Life |
Rename |
Allows you to rename a code token (method name, field, local variable, |
|
and so on) throughout a project |
Promote Local Variable |
Moves a local variable to the parameter set of the defining method |
to Parameter |
|
|
|
To illustrate refactoring in action, update your Main() method with the following code:
static void Main(string[] args)
{
//Set up Console UI (CUI)
Console.Title = "My Rocking App"; Console.ForegroundColor = ConsoleColor.Yellow; Console.BackgroundColor = ConsoleColor.Blue;
Console.WriteLine("*************************************"); Console.WriteLine("***** Welcome to My Rocking App *****");
Console.WriteLine("*************************************"); Console.BackgroundColor = ConsoleColor.Black;
//Wait for Enter key to be pressed.
Console.ReadLine();
}
While there is nothing wrong with the preceding code as it now stands, imagine that you want to display this welcome message at various places throughout your program. Rather than retyping the same exact console user interface logic, it would be ideal to have a helper function that could be called to do so. Given this, you will apply the Extract Method refactoring to your existing code.
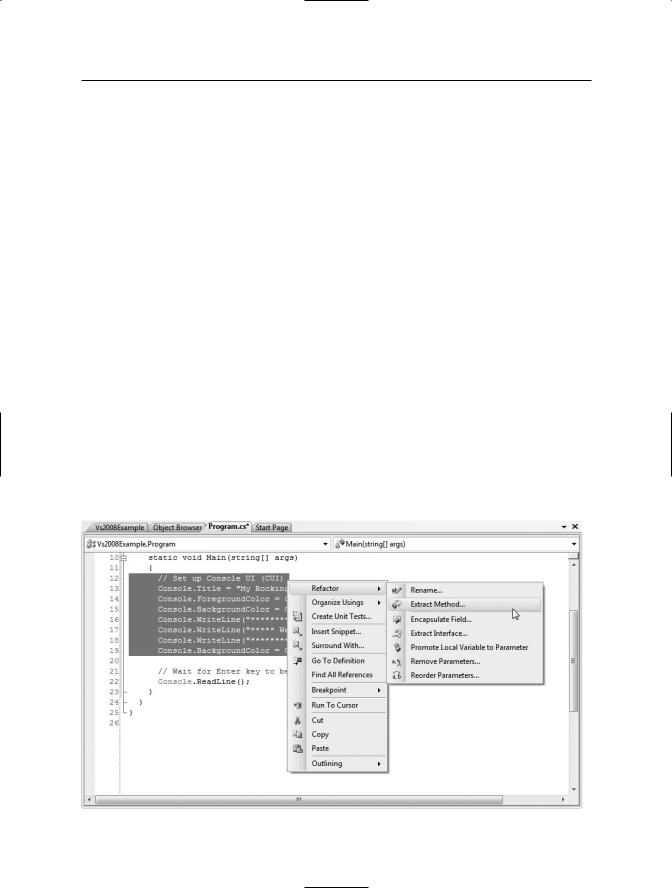
First, select each code statement within Main() (except the final call to Console.ReadLine()) using the editor. Now, right-click the selected text and select the Extract Method option within the Refactor context menu (see Figure 2-22).
Figure 2-22. Activating a code refactoring

58 CHAPTER 2 ■ BUILDING C# APPLICATIONS
Name your new method ConfigureCUI using the resulting dialog box. When you have finished, you will find that your Main() method calls the newly generated ConfigureCUI() method, which now contains the previously selected code:
class Program
{
static void Main(string[] args)
{
ConfigureCUI();
// Wait for key press to close. Console.ReadLine();
}
private static void ConfigureCUI()
{
// Set up Console UI (CUI)
Console.Title = "My Rocking App"; Console.ForegroundColor = ConsoleColor.Yellow; Console.BackgroundColor = ConsoleColor.Blue;
Console.WriteLine("*************************************"); Console.WriteLine("***** Welcome to My Rocking App *****");
Console.WriteLine("*************************************"); Console.BackgroundColor = ConsoleColor.Black;
}
}
This is a simple example of using the built-in refactorings of Visual Studio 2008, and you’ll see additional examples here and there over the course of this text. However, if you are interested in more information on the refactoring process and a detailed walk-through of each refactoring supported by Visual Studio 2008, look up my article “Refactoring C# Code Using Visual Studio 2005” online at http://msdn.microsoft.com (again, while this article was written for Visual Studio 2005, Visual Studio 2008 has the same refactoring support).
Code Expansions and Surround with Technology
Visual Studio 2008 (as well as Visual C# 2008 Express) has the capability to insert prefabricated blocks of C# code using menu selections, context-sensitive mouse clicks, and/or keyboard shortcuts. The number of available code expansions is impressive and can be broken down into two main groups:
•Snippets: These templates insert common code blocks at the location of the mouse cursor.
•Surround With: These templates wrap a block of selected statements within a relevant scope.
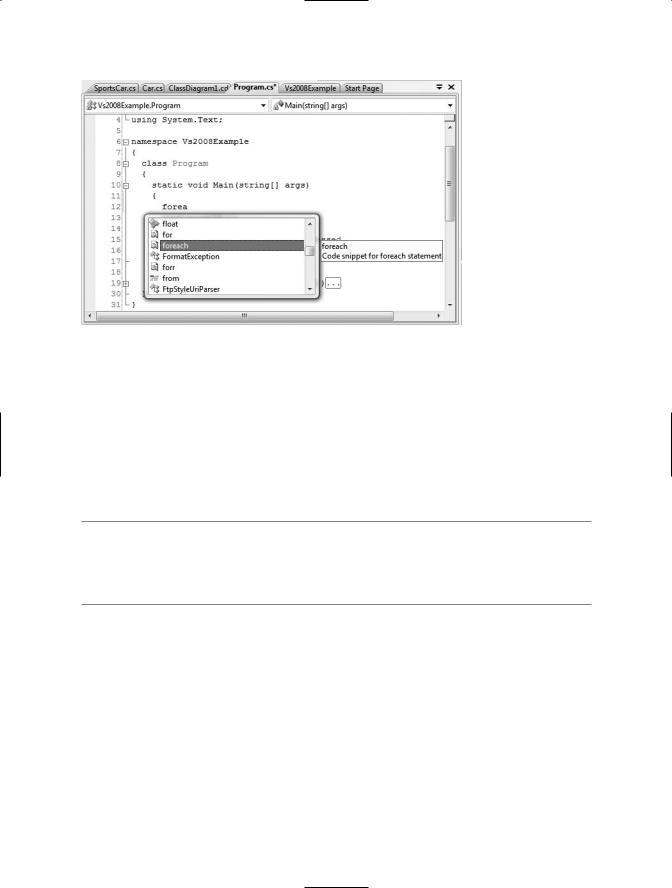
To see this functionality firsthand, assume that you wish to iterate over the incoming parameters of the Main() method using a foreach construct. Rather than typing the code in by hand, you can activate the foreach code snippet. When you have done so, the IDE will dump out a foreach code template at the current location of the mouse cursor.
To illustrate, place the mouse cursor after the initial opening curly bracket of Main(). One way to activate a code snippet is to right-click the mouse and activate the Insert Snippet (or Surround With) menu option. Here, you will find a list of all code snippets of this category (press the Esc key to dismiss the pop-up menu). As a shortcut, however, you can simply type in the name of the code snippet, “foreach” in this case. In Figure 2-23, notice how the icon for a code snippet looks a bit like a torn piece of paper.
CHAPTER 2 ■ BUILDING C# APPLICATIONS |
59 |
Figure 2-23. Activating a code snippet
Once you find the snippet you want to activate, press the Tab key twice. This will autocomplete the entire snippet and leave a set of placeholders that you can fill in to complete the snippet. If you press the Tab key, you can cycle between each placeholder and fill in the gaps (press the Esc key to exit the code snippet edit mode).
If you were to right-click and select the Surround With menu, you would likewise be presented with a list of options. Recall that when using Surround With snippets you typically first select a block of code statements to represent what should be used to wrap them (try/catch block, etc.). Be sure to take time to explore these predefined code expansion templates, as they can radically speed up the development process.
■Note All code expansion templates are XML-based descriptions of the code to generate within the IDE. Using Visual Studio 2008 (as well as Visual C# 2008 Express), you can create your own custom code templates. Details of how to do so can be found in my article “Investigating Code Snippet Technology” at http://msdn. microsoft.com.
The Visual Class Designer
Visual Studio 2008 gives us the ability to design classes visually (this capability is not included in Visual C# 2008 Express). The Class Designer utility allows you to view and modify the relationships of the types (classes, interfaces, structures, enumerations, and delegates) in your project. Using this tool, you are able to visually add (or remove) members to (or from) a type and have your modifications reflected in the corresponding C# file. As well, as you modify a given C# file, changes are reflected in the class diagram.
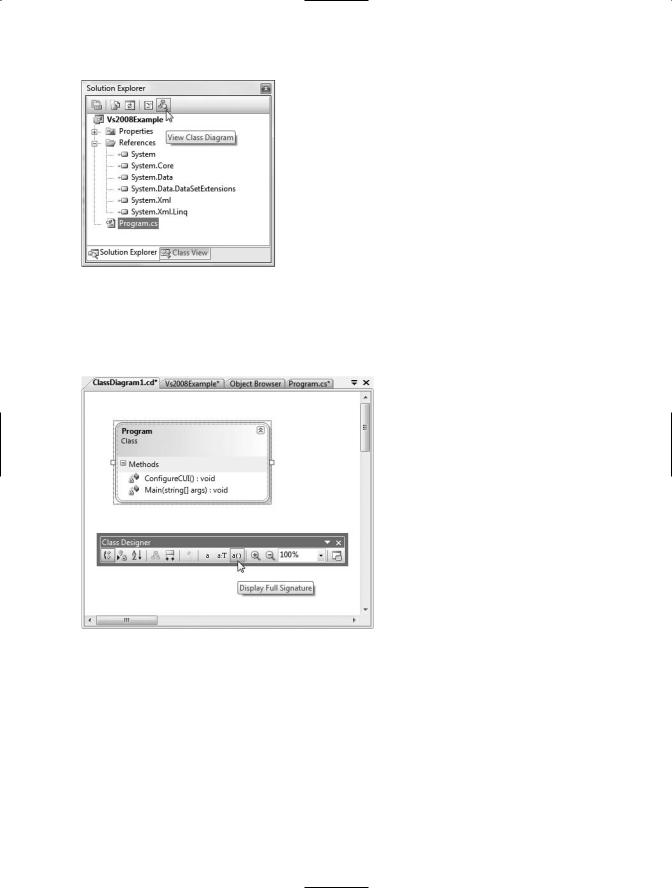
To work with this aspect of Visual Studio 2008, the first step is to insert a new class diagram file. There are many ways to do so, one of which is to click the View Class Diagram button located on Solution Explorer’s right side (see Figure 2-24).
60 CHAPTER 2 ■ BUILDING C# APPLICATIONS
Figure 2-24. Inserting a class diagram file
Once you do, you will find class icons that represent the classes in your current project. If you click the arrow icon for a given type, you can show or hide the type’s members. Using the Class Designer toolbar, you can fine-tune the display options of the designer surface (see Figure 2-25).
Figure 2-25. The Class Diagram viewer
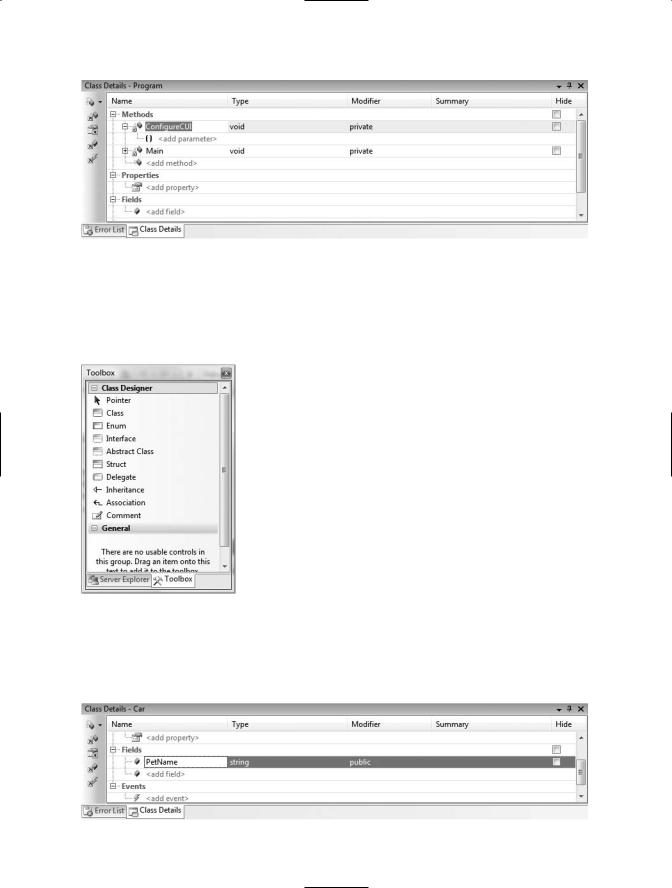
This utility works in conjunction with two other aspects of Visual Studio 2008: the Class Details window (activated using the View Other Windows menu) and the Class Designer Toolbox (activated using the View Toolbox menu item). The Class Details window not only shows you the details of the currently selected item in the diagram, but also allows you to modify existing members and insert new members on the fly (see Figure 2-26).
CHAPTER 2 ■ BUILDING C# APPLICATIONS |
61 |
Figure 2-26. The Class Details window
The Class Designer Toolbox (see Figure 2-27) allows you to insert new types into your project (and create relationships between these types) visually. (Be aware you must have a class diagram as the active window to view this toolbox.) As you do so, the IDE automatically creates new C# type definitions in the background.
Figure 2-27. The Class Designer Toolbox
By way of example, drag a new Class from the Class Designer Toolbox onto your Class Designer. Name this class Car in the resulting dialog box. Now, using the Class Details window, add a public string field named PetName (see Figure 2-28).
Figure 2-28. Adding a field with the Class Details window