

Chapter 7 in the GPSS World Reference Manual. Don’t worry about details, this exercise is just to acquaint you with the simulation power available.
In the next lesson, we will look at the GPSS World Commands. They let you manage the operation of your simulation environment. See you then.
Lesson 9 - GPSS World Commands
The GPSS World Commands are used to manage the construction and execution of your simulations as well as to define certain GPSS entities. In this lesson we will review each of the commands. Let’s start with a list of the commands and a short description of each.
The commands are:
∙BVARIABLE - Define a Boolean Variable Entity.
∙CLEAR - Reset statistics and remove Transaction.
∙CONDUCT - Conduct an Experiment.
∙CONTINUE - Resume the Simulation.
∙EQU - Assign a value to a User Variable.
∙EXIT - End the GPSS World Session.
∙FUNCTION - Define a Function Entity.
∙FVARIABLE - Define an Fvariable Entity.
∙HALT - Stop the simulation and delete all Queued Commands.
∙INCLUDE - Read and Translate a secondary Model File.
∙INITIAL - Initialize or modify a Logicswitch, Savevalue, or Matrix Entity.
∙INTEGRATE - Automatically integrate a time differential in a User Variable.
∙MATRIX - Define a Matrix Entity.
∙QTABLE - Define a Qtable Entity.
∙REPORT - Set the name of the Report File or request an immediate report.
∙RESET - Reset the statistics of the Simulation.
∙RMULT - Set the seeds of the first 7 Random Number Generators
∙SHOW - Evaluate and display Expression.
∙START - Set the Termination Count and begin a Simulation.
∙STEP - Attempt a limited number of Block entries.
∙STOP - Set a Stop Condition based on Block entry attempts.
∙STORAGE - Define a Storage Entity.
∙TABLE - Define a Table Entity.
∙VARIABLE - Define a Variable Entity.
This is an unstructured lesson. Your assignment is to use each command in the list at least once.
Start a GPSS World Session as we have before.
CHOOSE File / Open
in the dialog box
SELECT SAMPLE2
and
SELECT Open
CHOOSE Command / Create Simulation
Now you’re on your own. If you run into trouble, consult on-line help, and Chapter 6 of the
GPSS World Reference Manual, in that order.
How did you do? Did you notice that some of the commands have many options, some of which you probably have not yet used? We will not pursue the command features here, but if you want to take full advantage of the GPSS World Commands you should read the rest of Chapter 6 of the GPSS World Reference Manual. We will discuss Manual Simulation and the INCLUDE Command in more detail in the next lesson as well as the Debugging and Design lesson.
Now, Close the Sample2 Simulation and Model Windows as we have before.
Before we conclude this lesson let us consider two more ideas. The first of the two ideas is that each name is associated with a value.
Open a new model.
CHOOSE File / New
TYPE Var1 Variable 3#3/3
Save the model as TMP.GPS
CHOOSE File / Save As
and in the dialog box
TYPE TMP
You have defined a GPSS Arithmetic Variable Entity, named Var1, which returns the value of the expression as given in the variable definition. Variables can consist of constants or contain variables that change during the simulation. Now translate this one line model.
CHOOSE Command / Create Simulation
then
CHOOSE Command / SHOW
and in the dialog box
TYPE V$Var1
SELECT OK
In the Status Line of the Main Window, you should see the evaluated result of the Variable Entity named Var1. The V class SNA V$Var1 returns the value of the Variable Entity named Var1.
Here’s a common mistake.
CHOOSE Command / SHOW
and in the dialog box
TYPE Var1
SELECT OK
What happened? Why wasn’t the variable evaluated? The answer is that a name alone is resolved as its numerical value. If you want to use the name itself, you can enclose it in double quotes to form a string constant. If you have not assigned a value to the name using
an EQU statement or a PLUS assignment statement, GPSS World assigns it an integer value of 10000 or above. Further, you must assign values to names using an EQU statement before you can refer to their values in an expression. If you wish a named VARIABLE to be evaluated, don’t forget the V$ before the name of the VARIABLE.
When you use a name, GPSS World assigns a distinct system number to it. If the name is used as the name of an entity, you do not have to do anything else. However, if you want the name to have a specific value, you must use an EQU statement to assign the value before the entity is created.
In the last case, GPSS World assigned its own number to the name Var. and that’s what you see in the Status Line. Had you used Var. in an EQU statement before defining the Variable Entity, the SHOW Var. would return your number.
WARNING! If you change the value of a name after you define a named entity, you will no longer be able to use the name to refer to the old entity. Changing the value of a name does not redefine entities. Any old entity now has an entity number that is different from the new value of the name. Also, remember that Block labels are numbered by GPSS World. You should not use Block labels to name other entities. When you start your simulation, you will get an error message if you have done so.
This concludes our lesson. In the next lesson, we return to the more structured approach. We will now take a closer look at Manual Simulation, a very powerful feature of GPSS World.
Lesson 10 - Manual Simulation
In this lesson we will look at one of the most powerful interactive features of GPSS World.
Any Model Statement can be sent interactively to an existing simulation. This includes GPSS Block Statements. The GENERATE Block is the only exception.
We can end a Block Statement by using the Blank Command. When the Simulation Object receives the Block Statement, it causes the Active Transaction to attempt to enter a temporary Block described by the Block statement. This method is called Manual Simulation. Such a Block statement does not go into the program that has been translated in the Model Window, and the Block Entity does not become a permanent member of the simulation.
Let’s try it. Start up a GPSS World Session. See Lesson 1 if you have questions about doing this.
We must establish an Active Transaction before we can use manual simulation. There are several ways to do this. We could use a STOP command or we could interrupt a simulation
by pressing the o function key. We could also wait until a simulation completes. Normally, simulations end with an Active Transaction in place.
For the purpose of this lesson we will use the STOP command. This causes a Stop Condition to be registered, which will stop when any Transaction attempts to enter any Block. First we must open a model and then establish a Stop Condition
CHOOSE File / Open
in the dialog box
SELECT sample2
and
SELECT Open
; GPSS World Sample File - SAMPLE2.GPS
*************************************************************
**
*Barber Shop Simulation *
**
*************************************************************
GENERATE 300,100 ;Create next customer.
QUEUE Barber ;Begin queue time.
SEIZE Barber ;Own or wait for barber.
DEPART Barber ;End queue time.
ADVANCE 400,200 ;Haircut takes a few minutes.
RELEASE Barber ;Haircut done. Give up the barber.
TERMINATE 1 ;Customer leaves.
The Model Window should contain the model shown above. Now, let’s translate the model and then open the Blocks Window.
CHOOSE Command / Create Simulation
and
CHOOSE Window / Simulation Window / Blocks Window
Select the first GENERATE Block by positioning the mouse pointer over the Block and clicking mouse button 1 once.
CLICK ON The Place Icon in the Debug Toolbar at the Top of the Window Now we can START a simulation which will stop immediately.
CHOOSE Command / START
and in the dialog box, replace the 1,
TYPE 1000
SELECT OK
Notice that a stop message appears in the Journal Window. Before we do anything else, let’s remove all Stop Conditions, but first return to the Blocks Window by clicking anywhere on the window.
CLICK ON The GENERATE Block
CLICK ON The Remove Icon in the Debug Toolbar Top of the Window
Since we have set up an Active Transaction, we can type any Block statement we please. In the Model Window,
CHOOSE Command / Custom
then in the dialog box
TYPE Assign Price,19.95
SELECT OK
The Active Transaction now has a Transaction parameter named Price containing the value 19.95. Let’s see.
CHOOSE Window / Simulation Snapshot / CEC Snapshot
and in the Snapshot Window
CLICK ON The + Sign
in the CEC Window to see the Transactions on the chain. Transaction 1 is the only Transaction. One more click will reveal any parameters of this Transaction.
CLICK ON The + Sign
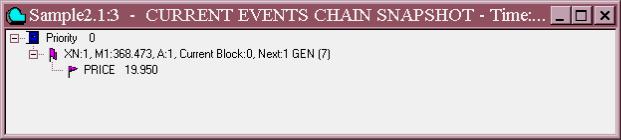
See, there’s the PRICE parameter. Your screen should look like this:
Figure 10—1. Manual Simulation ASSIGN.
Now, close the CEC Snapshot Window. Another way to view a parameter value of the Active Transaction is to use the SHOW command.
CHOOSE Command / SHOW
and
TYPE P$Price
SELECT OK
That should confirm the value of 19.95. Now, let’s check out some additional power that manual simulation gives you.
CHOOSE Command / Custom
and in the dialog box
TYPE Trace
SELECT OK
This has the same effect as if the Active Transaction had passed through a TRACE Block. The Trace Indicator for the Active Transaction is now on. Watch the Journal Window to see the trace.
PRESS m
to continue running the simulation.
Notice, that in the Journal Window, each Block entry results in a trace because the Trace Indicator of the Transaction is on. If the time changes, or a new Transaction is traced, a general message giving the time and Transaction number is written. In this case, we will only see a small number of trace messages since only one Transaction is being traced. This is how the Journal / Simulation Window will look.
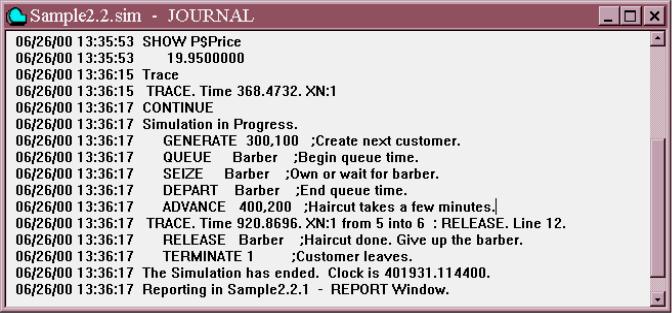
Figure 10—2. Trace Messages in the Journal Window.
If you had wanted traces of all Transactions, you could insert a TRACE Block in the model and retranslate it.
As with any statement, a Manual Simulation statement can be loaded into a function key, for later use. Function keys can be preset by changing the Function Keys Page of the
Model Settings Notebook as we did earlier when we loaded AC1 into s.
Take a moment now to consider what you can do with Manual Simulation. You can send any Block Statement, except GENERATE, to a running simulation. You can create Transactions with a SPLIT Block, reroute Transactions with a TRANSFER Block, or modify parameters with an ASSIGN Block. You can test the membership of groups with EXAMINE and SCAN Blocks. You can manually take resources out of action with FUNAVAIL and FAVAIL Blocks. You can even activate any Block in the Model by entering an EXECUTE Block in manual simulation mode. Remember though, it is always the Active Transaction that attempts to enter the Block you describe in a manual simulation statement.
Manual simulation is an extremely powerful and flexible feature. You will find that it is an excellent tool for correcting error conditions and for experimentation. It is a simple matter to introduce a sequence of Blocks to the Active Transaction by only a few keystrokes.
Next, we start to explore the interactive graphics of the GPSS World simulation environment. We will take a look at each of the Graphics Windows and the information available in them. See you then.
[Table of Contents]