- •Activity 1.1.1: Using Google Earth™ to View the World
- •Activity 1.4.5: Identifying Top Security Vulnerabilities
- •Lab 1.6.1: Using Collaboration Tools— IRC and IM
- •Lab 1.6.2: Using Collaboration Tools—Wikis and Web Logs
- •1.7.1: Skills Integration Challenge-Introduction to Packet Tracer
- •Activity 2.2.5: Using NeoTrace™ to View Internetworks
- •Lab 2.6.1: Topology Orientation and Building a Small Network
- •Lab 2.6.2: Using Wireshark™ to View Protocol Data Units
- •2.7.1: Skills Integration Challenge-Examining Packets
- •Activity 3.4.1: Data Stream Capture
- •Lab 3.4.2: Managing a Web Server
- •Lab 3.4.3: E-mail Services and Protocols
- •Lab 4.5.1: Observing TCP and UDP using Netstat
- •Lab 4.5.2: TCP/IP Transport Layer Protocols, TCP and UDP
- •Lab 4.5.3: Application and Transport Layer Protocols Examination
- •Lab 5.5.1: Examining a Device’s Gateway
- •Lab 5.5.2: Examining a Route
- •5.6.1: Skills Integration Challenge-Routing IP Packets
- •Lab 6.7.1: Ping and Traceroute
- •Lab 6.7.2: Examining ICMP Packets
- •Activity 6.7.3: IPv4 Address Subnetting Part 1
- •Activity 6.7.4: IPv4 Address Subnetting Part 2
- •Lab 6.7.5: Subnet and Router Configuration
- •Lab 7.5.2: Frame Examination
- •7.6.1: Skills Integration Challenge-Data Link Layer Issues
- •Lab 8.4.1: Media Connectors Lab Activity
- •Lab 9.8.1: Address Resolution Protocol (ARP)
- •Lab 9.8.2: Cisco Switch MAC Table Examination
- •Lab 9.8.3: Intermediary Device as an End Device
- •9.9.1: Skills Integration Challenge-Switched Ethernet
- •Lab 10.3.2: How Many Networks?
- •Lab 10.6.1: Creating a Small Lab Topology
- •Lab 10.6.2: Establishing a Console Session with HyperTerminal
- •Lab 10.6.3: Establishing a Console Session with Minicom
- •11.4.3.3: Network Latency Documentation with Ping
- •Lab 11.5.1: Basic Cisco Device Configuration
- •Lab 11.5.2: Managing Device Configuration
- •Lab 11.5.3: Configure Host Computers for IP Networking
- •Lab 11.5.4: Network Testing
- •Lab 11.5.5: Network Documentation with Utility Commands
- •Lab 11.5.6: Final Case Study - Datagram Analysis with Wireshark

11.4.3.3: Network Latency Documentation with Ping
Topology Diagram
Learning Objectives
•Use the ping command to document network latency.
•Compute various statistics on the output of a ping capture.
•Measure delay effects from larger datagrams.
Background
To obtain realistic network latency statistics, this activity must be performed on a live network. Be sure to check with your instructor for any local security restrictions against using the ping command on the network.
The destination Server Computer must return ECHO replies, otherwise delay cannot be computed. Some computers have this feature disabled through a firewall, and some private networks block transit ECHO datagrams. For this experiment to be interesting, a sufficiently distant destination should be chosen. For example, destinations on the same LAN or within a few hops may return an unrepresentative low latency. With patience, a suitable destination will be found.
The purpose of this lab is to measure and evaluate network latency over time, and during different periods of the day to capture a representative sample of typical network activity. This will be accomplished by analyzing the return delay from a distant computer with the ping command.
Statistical analysis of throughput delay will be performed with the assistance of a spreadsheet application such as Microsoft Excel. Return delay times, measured in milliseconds, will be summarized with through computation of the average latency (mean), noting the latency value at the center of the ordered range of latency points (median), and identification of the most frequently occurring delay (mode). The Appendix contains a chart that can be submitted to the instructor when finished.
Delay will also be measured when the ICMP datagram size is increased.
All contents are Copyright © 1992–2007 Cisco Systems, Inc. All rights reserved. This document is Cisco Public Information. |
Page 1 of 9 |

CCNA Exploration |
|
Network Fundamentals: |
|
Configuring and Testing Your Network |
11.4.3.3: Network Latency Documentation with Ping |
Scenario
In the topology graphic above, the network cloud represents all of the network devices and cabling between the student computer and the destination Server Computer. It is normally these devices that introduce network latency. Network engineers routinely rely on networks outside of local administration for connectivity to external networks. Monitoring path latency does provide some measure of administrative diligence, which may be used in decision-making when evaluating suitable applications for wide area network (WAN) deployment.
This activity will require five days of testing. On each day, three tests will be performed. Preferably, one test will be made in the early morning, one around mid-day, and one in the evening. The idea is to note and document latency differences that occur during the different periods of the day. When finished there will be a total of 15 sets of this data.
To understand the delay effects from larger datagrams, ICMP datagrams will be sent with increasingly larger datagrams and analyzed.
Task 1: Use the ping Command to Document Network Latency.
Step 1: Verify connectivity between Student Computer and destination Server Computer.
To verify connectivity between the Student Computer and destination Server Computer, open a terminal window by clicking on start | run. Enter cmd, and then select OK. Attempt to ping a suitably distant destination, such as www.yahoo.com:
C:\> ping -n 1 www.yahoo.com
Pinging www.yahoo-ht3.akadns.net [209.191.93.52] with 32 bytes of data: Reply from 209.191.93.52: bytes=32 time=304ms TTL=52
Ping statistics for 209.191.93.5:
Packets: Sent = 1, Received = 1, Lost = 0 (0% loss) Approximate round trip times in milli-seconds: Minimum = 304ms, Maximum = 304ms , Average = 304 ms
Use the ping /? command to answer the following questions:
What is the purpose of the –n option and argument 1?
____________________________________________________________________________________
____________________________________________________________________________________
What option and argument would change the default size to 100 bytes? _______________
Decide on a destination Server Computer, and write down the name: _____________
Use the ping command to verify connectivity with the destination, and write down the results: Packets sent Packets Received Packets Lost
If there are lost packets, use another destination and retest.
All contents are Copyright © 1992–2007 Cisco Systems, Inc. All rights reserved. This document is Cisco Public Information. |
Page 2 of 9 |

CCNA Exploration |
|
Network Fundamentals: |
|
Configuring and Testing Your Network |
11.4.3.3: Network Latency Documentation with Ping |
Step 2: Perform a delay test.
Write down the command that will send 100 ECHO requests to the destination:
____________________________________________________________________________________
Use the ping command to send 100 ECHO requests to your destination. When finished, copy the replies into Notepad. Notepad can be opened by clicking on Start | Programs | Accessories, and select Notepad. Save the file using the name format day-sample#.txt, where: day = the day the test was performed (1-5), and sample# = the sample period (1-3).
Alternately, output can be redirected to a file by appending > day-sample#.txt to the end of the ping command. NOTE: the terminal will remain blank until the command has finished.
Task 2: Compute Various Statistics on the Output of a ping Capture.
Step 1: Bring the text file into the Excel Spreadsheet Application.
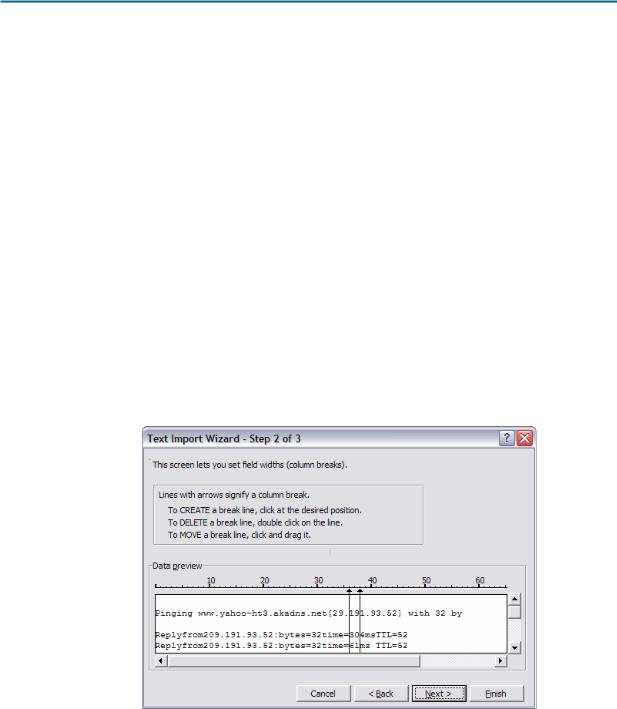
If not already opened, start Microsoft Excel. Select menu options File | Open. Use Browse to move to the directory that holds the text file. Highlight the filename and select Open. To format a text file for use within Excel, insure all numeric values are separated from text characters. In the Text Import Wizard, Step 1, select Fixed Width. In Step 2, follow instructions in the window to separate numeric values from text values. Refer to Figure 1.
Figure 1. Excel Text Import Wizard.
Step 2. Compute mean, median and mode delay values.
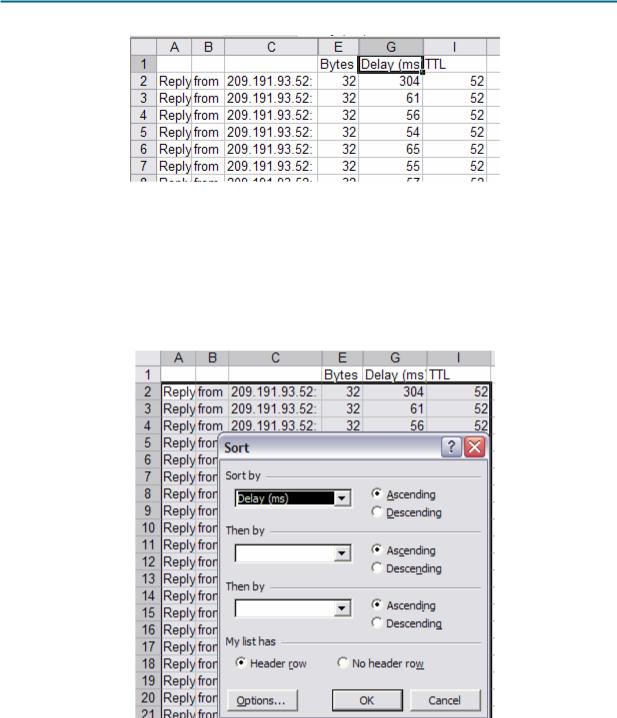
When input formatting is satisfactory, select Finish. If the spreadsheet has numbers in different fields, manually fix the numbers. After the spreadsheet has been opened, format the columns so they are more readable. When complete, you should have a spreadsheet that looks similar to Figure 2.
All contents are Copyright © 1992–2007 Cisco Systems, Inc. All rights reserved. This document is Cisco Public Information. |
Page 3 of 9 |

CCNA Exploration |
|
Network Fundamentals: |
|
Configuring and Testing Your Network |
11.4.3.3: Network Latency Documentation with Ping |
Figure 2. Partial spreadsheet correctly formatted.
Record the number of dropped packets in your chart, column Dropped Packets. Dropped packets will have a consistently large delay value.
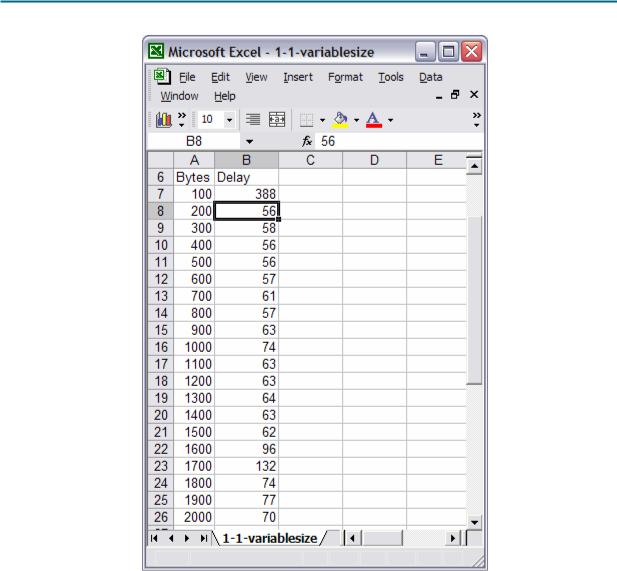
Finally, the delay values must be ordered (sorted) when computing the median and mode values. This is accomplished with the Data | Sort menu options. Highlight all of the data fields. Figure 3 shows a partial spreadsheet highlighted and the Data | Sort menu opened. If a header row was highlighted, click on the Header row radio button. Select the column that contains the Delay values, in Figure 3 it is Column G. When finished click OK.
Figure 3. Ordering on the Delay column.
The formula used to compute the mean, or average, delay is the sum of the delays, divided by number of measurements. Using the example above, this would equate to the formula in cell G102: =average(G2:G101). Perform a visual ‘sanity check’ to verify your mean value is approximately the value shown. Record this number in your chart, under column Mean.
The formula used to compute the median delay, or the delay value in the center of the ordered range, is similar to the average formula, above. For the median value, the formula in cell G103 would be
All contents are Copyright © 1992–2007 Cisco Systems, Inc. All rights reserved. This document is Cisco Public Information. |
Page 4 of 9 |

CCNA Exploration |
|
Network Fundamentals: |
|
Configuring and Testing Your Network |
11.4.3.3: Network Latency Documentation with Ping |
=median(G2:G101). Perform a visual ‘sanity check’ to verify your median value is similar to what is shown midway in the data range. Record this number in your chart, under column Median.
The formula used to compute the modal delay, or the delay value that is the most frequently occurring, is also similar. For the mode value, the formula in cell G104 would be =mode(G2:G101). Perform a visual ‘sanity check’ to verify your mode value is the most frequently occurring value in the data range. Record this number in your chart, under column Mode.
The new spreadsheet file may be saved or discarded as desired, but the data text file should be retained.
Task 3: Measure Delay Effects from Larger Datagrams.
To determine if larger datagrams affect delay, increasingly larger ECHO requests will be sent to the destination. In this analysis, 20 datagrams will be incremented by 100 bytes per ping request. A spreadsheet will be created with the reply results, and a chart that plots size vs. delay will be produced.
Step 1: Perform a variable sized delay test.
The easiest way to accomplish this task is to use the Windows built-in FOR loop command. The syntax is:
FOR /L %variable IN (start,step,end) DO command [command-parameters]
The set is a sequence of numbers from start to end, by step amount. So (1,1,5) would generate the sequence 1 2 3 4 5 and (5,-1,1) would generate the sequence (5 4 3 2 1)
In the following command, destination is the destination. Issue the command:
FOR /L %i IN (100,100,2000) DO ping -n 1 -l %i destination
Copy the output into Notepad, and save the file using the name variablesizedelay.txt.
To redirect output to a file, use the redirect append operator, >>, as shown below. The normal redirect operator, >, will clobber the file each time the ping command is executed and only the last reply will be saved. NOTE: the terminal will remain blank until the command has finished:
FOR /L %i IN (100,100,2000) DO ping -n 1 -l %i destination >> variablesizedelay.txt
The output of one line is shown below. All 20 replies are arranged similarly:
C:\> FOR /L %i IN (100,100,2000) DO ping –n 1 –l %i www.yahoo.com
C:\> ping -n 1 -l 100 www.yahoo.com
Pinging www.yahoo-ht3.akadns.net [209.191.93.52] with 100 bytes of data: Reply from 209.191.93.52: bytes=100 time=383ms TTL=52
Ping statistics for 209.191.93.52:
Packets: Sent = 1, Received = 1, Lost = 0 (0% loss),
Approximate round trip times in milli-seconds:
Minimum = 383ms, Maximum = 383ms, Average = 383ms
Step 2: Bring the text file into the Excel Spreadsheet Application.
All contents are Copyright © 1992–2007 Cisco Systems, Inc. All rights reserved. This document is Cisco Public Information. |
Page 5 of 9 |

CCNA Exploration |
|
Network Fundamentals: |
|
Configuring and Testing Your Network |
11.4.3.3: Network Latency Documentation with Ping |
Open the new text file in Excel. Refer to Figure 4.
Figure 4. Excel Text Import Wizard.
The difference between this file and the previous file is that the variable size file has much more information than is really needed.
Step 3: Format the spreadsheet.
Clean and organize the spreadsheet data into two columns, Bytes and Delay. When finished, the spreadsheet should look similar to Figure 5.
All contents are Copyright © 1992–2007 Cisco Systems, Inc. All rights reserved. This document is Cisco Public Information. |
Page 6 of 9 |

CCNA Exploration |
|
Network Fundamentals: |
|
Configuring and Testing Your Network |
11.4.3.3: Network Latency Documentation with Ping |
Figure 5. Formatted Spreadsheet.
Step 3: Create a chart of the data.
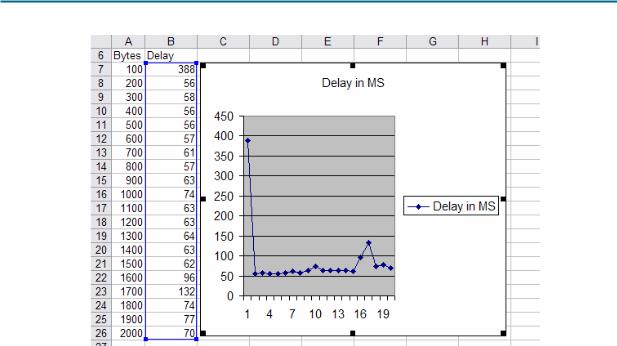
Highlight the Delay column data. Select menu options Insert | Chart. There are a number of charts that can be used to display delay data, some better than others. While a chart should be clear, there is room for individual creativity. The chart is Figure 6 is a Stacked Line chart.
All contents are Copyright © 1992–2007 Cisco Systems, Inc. All rights reserved. This document is Cisco Public Information. |
Page 7 of 9 |

CCNA Exploration |
|
Network Fundamentals: |
|
Configuring and Testing Your Network |
11.4.3.3: Network Latency Documentation with Ping |
Figure 6. Plot of Delay vs. datagram size.
When finished, save your spreadsheet and chart and submit it to your instructor with the final delay analysis.
Are there any assumptions that can be made regarding delay when larger datagrams are sent across a network?
____________________________________________________________________________________
____________________________________________________________________________________
Task 4: Reflection
The ping command can provide important network latency information. Careful delay analysis over successive days and during different periods of the day can alert the network engineer to changes in network performance. For example, network devices may become overwhelmed during certain periods of the day, and network delay will spike. In this case, routine data transfers should be scheduled during offpeak times when delay is less. Also, many users subscribe to peer-to-peer applications such as KaZaA and Napster. When these file-sharing applications are active, valuable bandwidth will be diverted from critical business applications. If delays are caused by events within the organization, network analysis tools can be used to determine the source and corrective action taken. When the source originates from external networks, not under the control of the organization, subscribing with a different or additional Internet service provider (ISP) may prove beneficial.
Task 5: Challenge
If permitted, download a large file and perform a separate delay test while the file is downloading. Write a one or two paragraph analysis that compares these delay results against a measurement made without the download.
All contents are Copyright © 1992–2007 Cisco Systems, Inc. All rights reserved. This document is Cisco Public Information. |
Page 8 of 9 |

CCNA Exploration |
|
Network Fundamentals: |
|
Configuring and Testing Your Network |
11.4.3.3: Network Latency Documentation with Ping |
Appendix
NAME: ________________________ Network Delay Documentation
Source IP Address: ______________ |
Destination IP Address:_____________ TTL: ______ |
||||||
|
|
|
|
|
|
|
|
|
Statistical Analysis of Network Latency with 32 byte datagrams |
|
|||||
|
|
|
|
|
|
|
|
Day |
Date |
Time |
|
MEAN |
MEDIAN |
MODE |
Dropped |
(1-5) |
(mm/dd/yyyy) |
(hh:mm) |
|
|
|
Packets |
|
|
|
|
|
|
|
|
|
|
|
|
|
|
|
|
|
1 |
|
|
|
|
|
|
|
|
|
|
|
|
|
|
|
|
|
|
|
|
|
|
|
|
|
|
|
|
|
|
|
2 |
|
|
|
|
|
|
|
|
|
|
|
|
|
|
|
|
|
|
|
|
|
|
|
|
|
|
|
|
|
|
|
|
|
|
|
|
|
|
|
3 |
|
|
|
|
|
|
|
|
|
|
|
|
|
|
|
|
|
|
|
|
|
|
|
4 |
|
|
|
|
|
|
|
|
|
|
|
|
|
|
|
|
|
|
|
|
|
|
|
|
|
|
|
|
|
|
|
5 |
|
|
|
|
|
|
|
|
|
|
|
|
|
|
|
|
|
|
|
|
|
|
|
|
|
|
|
|
|
|
|
All contents are Copyright © 1992–2007 Cisco Systems, Inc. All rights reserved. This document is Cisco Public Information. |
Page 9 of 9 |
