
- •Activity 1.1.1: Using Google Earth™ to View the World
- •Activity 1.4.5: Identifying Top Security Vulnerabilities
- •Lab 1.6.1: Using Collaboration Tools— IRC and IM
- •Lab 1.6.2: Using Collaboration Tools—Wikis and Web Logs
- •1.7.1: Skills Integration Challenge-Introduction to Packet Tracer
- •Activity 2.2.5: Using NeoTrace™ to View Internetworks
- •Lab 2.6.1: Topology Orientation and Building a Small Network
- •Lab 2.6.2: Using Wireshark™ to View Protocol Data Units
- •2.7.1: Skills Integration Challenge-Examining Packets
- •Activity 3.4.1: Data Stream Capture
- •Lab 3.4.2: Managing a Web Server
- •Lab 3.4.3: E-mail Services and Protocols
- •Lab 4.5.1: Observing TCP and UDP using Netstat
- •Lab 4.5.2: TCP/IP Transport Layer Protocols, TCP and UDP
- •Lab 4.5.3: Application and Transport Layer Protocols Examination
- •Lab 5.5.1: Examining a Device’s Gateway
- •Lab 5.5.2: Examining a Route
- •5.6.1: Skills Integration Challenge-Routing IP Packets
- •Lab 6.7.1: Ping and Traceroute
- •Lab 6.7.2: Examining ICMP Packets
- •Activity 6.7.3: IPv4 Address Subnetting Part 1
- •Activity 6.7.4: IPv4 Address Subnetting Part 2
- •Lab 6.7.5: Subnet and Router Configuration
- •Lab 7.5.2: Frame Examination
- •7.6.1: Skills Integration Challenge-Data Link Layer Issues
- •Lab 8.4.1: Media Connectors Lab Activity
- •Lab 9.8.1: Address Resolution Protocol (ARP)
- •Lab 9.8.2: Cisco Switch MAC Table Examination
- •Lab 9.8.3: Intermediary Device as an End Device
- •9.9.1: Skills Integration Challenge-Switched Ethernet
- •Lab 10.3.2: How Many Networks?
- •Lab 10.6.1: Creating a Small Lab Topology
- •Lab 10.6.2: Establishing a Console Session with HyperTerminal
- •Lab 10.6.3: Establishing a Console Session with Minicom
- •11.4.3.3: Network Latency Documentation with Ping
- •Lab 11.5.1: Basic Cisco Device Configuration
- •Lab 11.5.2: Managing Device Configuration
- •Lab 11.5.3: Configure Host Computers for IP Networking
- •Lab 11.5.4: Network Testing
- •Lab 11.5.5: Network Documentation with Utility Commands
- •Lab 11.5.6: Final Case Study - Datagram Analysis with Wireshark
Lab 10.6.2: Establishing a Console Session with HyperTerminal
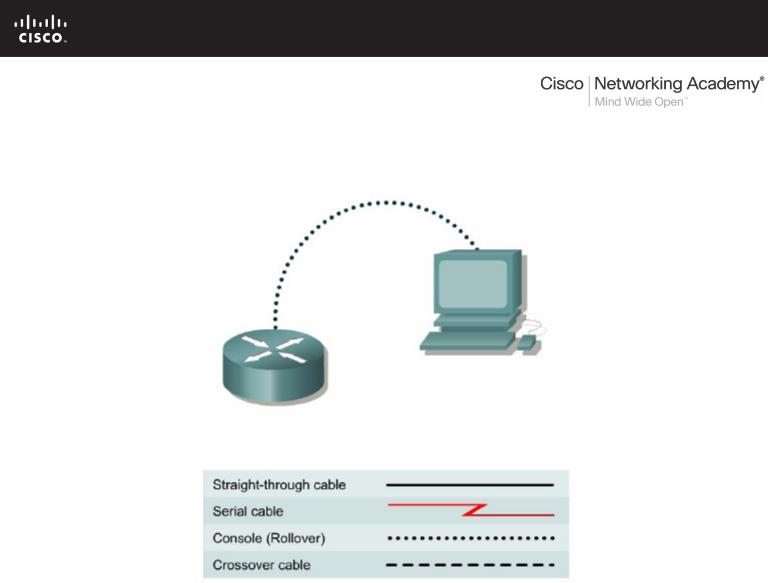
Topology Diagram
Learning Objectives
Upon completion of this lab, you will be able to:
•Connect a router and computer using a console cable.
•Configure HyperTerminal to establish a console session with a Cisco IOS router.
•Configure HyperTerminal to establish a console session with a Cisco IOS switch.
Background
HyperTerminal is a simple Windows-based terminal emulation program for serial communication that can be used to connect to the console port on Cisco IOS devices. A serial interface on a computer is connected to the Cisco device via a rollover cable. Using HyperTerminal is the most basic way to access a router for checking or changing its configuration. Another popular serial communication utility is TeraTerm Web. Instructions for TeraTerm Web use are contained in Appendix A.
All contents are Copyright © 1992–2007 Cisco Systems, Inc. All rights reserved. This document is Cisco Public Information. |
Page 1 of 8 |
CCNA Exploration |
|
Network Fundamentals: Planning and Cabling Networks |
Lab 10.6.2 Establishing a Console Session with HyperTerminal |
Scenario
Set up a network similar to the one in the Topology Diagram. Any router that meets the interface requirements may be used. Possible routers include 800, 1600, 1700, 2500, 2600 routers, or a combination. The following resources will be required:
•Computer with a serial interface and HyperTerminal loaded
•Cisco router
•Console (rollover) cable for connecting the workstation to the router
Task 1: Connect a Router and Computer with a Console Cable.
Step 1: Set up basic physical connection.
Connect the console (rollover) cable to the console port on the router. Connect the other cable end to the host computer with a DB-9 or DB-25 adapter to the COM 1 port.
Step 2: Power on devices.
If not already powered on, enable power to the computer and router.
Task 2: Configure HyperTerminal to Establish a Console Session with a Cisco IOS Router.
Step 1: Start HyperTerminal application.
From the Windows taskbar, start the HyperTerminal program by clicking Start > Programs > Accessories > Communications > HyperTerminal.
Step 2: Configure HyperTerminal.
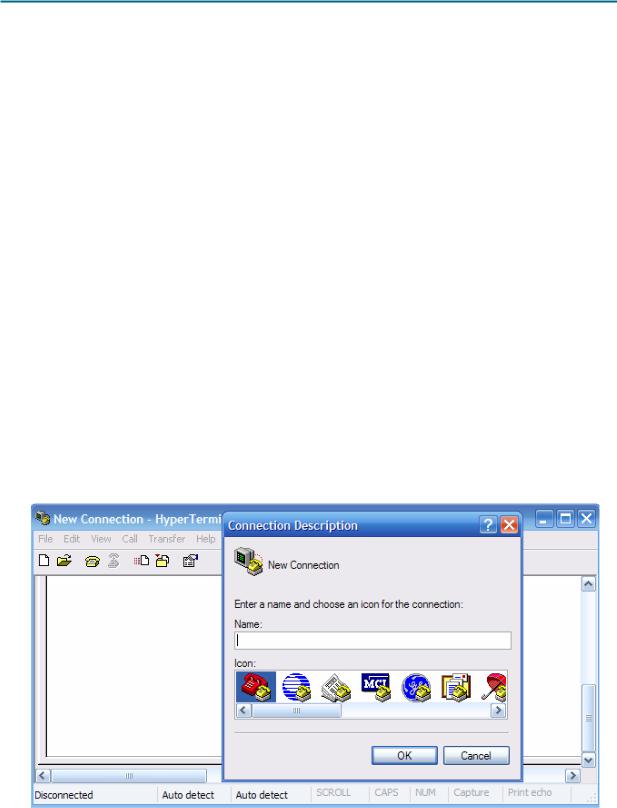
Figure 1. HyperTerminal Name Configuration Window
Refer to Figure 1 for a description of the opening HyperTerminal configuration window. At the Connection Description window, enter a session name in the Name field. Select an appropriate icon, or leave the default. Click OK.
All contents are Copyright © 1992–2007 Cisco Systems, Inc. All rights reserved. This document is Cisco Public Information. |
Page 2 of 8 |
CCNA Exploration |
|
Network Fundamentals: Planning and Cabling Networks |
Lab 10.6.2 Establishing a Console Session with HyperTerminal |
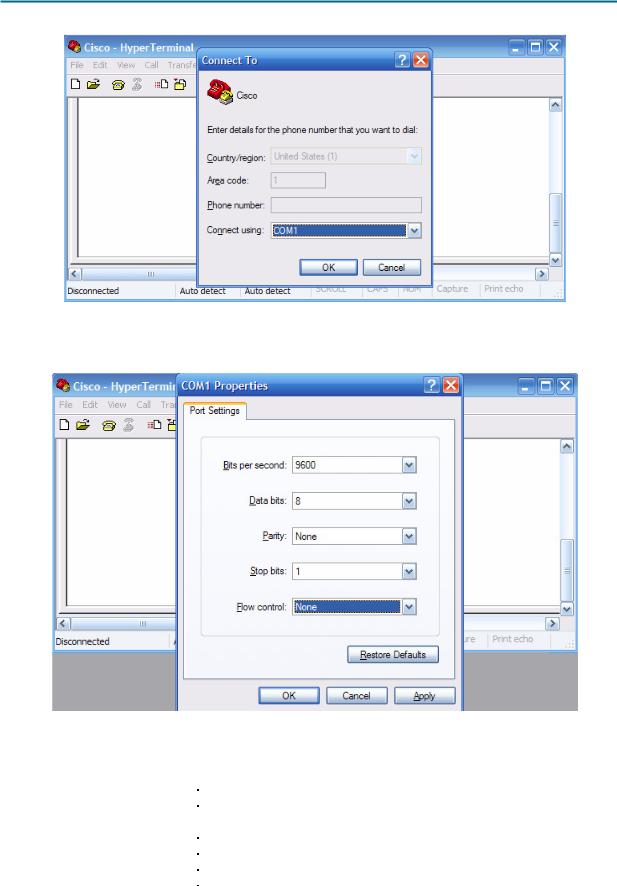
Figure 2. HyperTerminal Connection Type
Refer to Figure 2. Enter the appropriate connection type, COM 1, in the Connect using field. Click OK.
Figure 3. HyperTerminal COM1 Port Settings
Refer to Figure 3. Change port settings to the following values:
Setting |
Value |
Bits per second |
9600 |
Data bits |
8 |
Parity |
None |
Stop bits |
1 |
Flow control |
None |
All contents are Copyright © 1992–2007 Cisco Systems, Inc. All rights reserved. This document is Cisco Public Information. |
Page 3 of 8 |

CCNA Exploration |
|
Network Fundamentals: Planning and Cabling Networks |
Lab 10.6.2 Establishing a Console Session with HyperTerminal |
Click OK.
When the HyperTerminal session window comes up, press the Enter key. There should be a response from the router. This indicates that connection has been successfully completed. If there is no connection, troubleshoot as necessary. For example, verify that the router has power. Check the connection to the correct COM 1 port on the PC and the console port on the router. If there is still no connection, ask the instructor for assistance.
Step 3: Close HyperTerminal.
When finished, close the HyperTerminal session. Click File > Exit. When asked whether to save the session, click Yes. Enter a name for the session.
Step 4: Reconnect the HyperTerminal session.
Reopen the HyperTerminal session as described in Task 2, Step 1. This time, when the Connection Description window opens (see Figure 1), click Cancel.
Click File > Open. Select the saved session and then click Open. Use this technique to reconnect the HyperTerminal session to a Cisco device without reconfiguring a new session.
When finished, exit TeraTerm.
Task 3: Configure HyperTerminal to Establish a Console Session with a Cisco IOS Switch.
Serial connections between Cisco IOS routers and switches are very similar. In this task, you will make a serial connection between the host computer and a Cisco IOS switch.
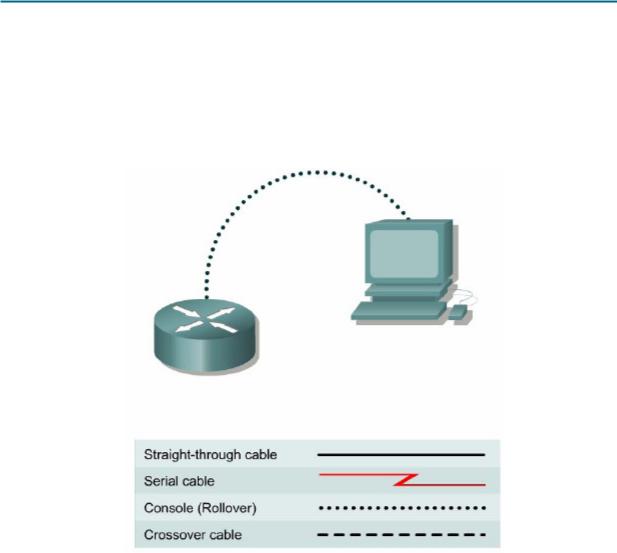
Figure 4. Serial Connection Between a Host Computer and Cisco Switch
Step 1: Set up basic physical connection.
Refer to Figure 4. Connect the console (rollover) cable to the console port on the router. Connect the other cable end to the host computer with a DB-9 or DB-25 adapter to the COM 1 port.
Step 2: Power on devices.
If not already powered on, enable power to the computer and switch.
Step 3: Start HyperTerminal application.
From the Windows taskbar, start the HyperTerminal program by clicking Start > Programs > Accessories > Communications > Hyper Terminal.
All contents are Copyright © 1992–2007 Cisco Systems, Inc. All rights reserved. This document is Cisco Public Information. |
Page 4 of 8 |

CCNA Exploration |
|
Network Fundamentals: Planning and Cabling Networks |
Lab 10.6.2 Establishing a Console Session with HyperTerminal |
Step 4: Configure HyperTerminal.
Use the procedure described in Task 2, Step 2, to configure HyperTerminal.
Refer to Figure 1 of the opening HyperTerminal configuration window. At the Connection Description window, enter a session name in the Name field. Select an appropriate icon, or leave the default. Click
OK.
Refer to Figure 2. Enter the appropriate connection type, COM 1, in the Connect using field. Click OK.
Refer to Figure 3. Change port settings to the following values:
Setting |
Value |
Bits per second |
9600 |
Data bits |
8 |
Parity |
None |
Stop bits |
1 |
Flow control |
None |
Click OK.
When the HyperTerminal session window comes up, press the Enter key. There should be a response from the switch. This indicates that connection has been successfully completed. If there is no connection, troubleshoot as necessary. For example, verify that the switch has power. Check the connection to the correct COM 1 port on the PC and the console port on the switch. If there is still no connection, ask the instructor for assistance.
Step 5: Close HyperTerminal.
When finished, close the HyperTerminal session. Click File > Exit. When asked whether to save the session, click No.
Task 3: Reflection
This lab provided information for establishing a console connection to a Cisco IOS router and switch.
Task 4: Challenge
Draw the pin connections for the rollover cable and straight-through cable. Compare the differences, and be able to identify the different cable types.
Task 5: Clean Up
Unless directed otherwise by the instructor, turn off power to the host computer and router. Remove the rollover cable.
Remove anything that was brought into the lab, and leave the room ready for the next class.
All contents are Copyright © 1992–2007 Cisco Systems, Inc. All rights reserved. This document is Cisco Public Information. |
Page 5 of 8 |
CCNA Exploration |
|
Network Fundamentals: Planning and Cabling Networks |
Lab 10.6.2 Establishing a Console Session with HyperTerminal |
Appendix A
Establishing a Console Session with TeraTerm
Topology Diagram
Learning Objectives
Upon completion of this lab, you will be able to:
•Connect a router and computer using a console cable.
•Configure TeraTerm to establish a console session with the router.
Background
TeraTerm Web is another simple Windows-based terminal emulation program for serial communication that can be used to connect to the console port on Cisco IOS devices.
Scenario
Cable a network similar to the Topology Diagram. Any router that meets the interface requirements may be used. Possible routers include 800, 1600, 1700, 2500, 2600 routers, or a combination. The following resources will be required:
•Computer with a serial interface and TeraTerm Pro loaded
•Cisco router
•Console (rollover) cable for connecting the workstation to the router
All contents are Copyright © 1992–2007 Cisco Systems, Inc. All rights reserved. This document is Cisco Public Information. |
Page 6 of 8 |
CCNA Exploration |
|
Network Fundamentals: Planning and Cabling Networks |
Lab 10.6.2 Establishing a Console Session with HyperTerminal |
Task 1: Connect a Router and Computer with a Console Cable.
Step 1: Set up basic physical connection.
Ensure that power is turned off on the computer and Cisco router. Connect the console (rollover) cable to the console port on the router. Connect the other cable end to the PC with a DB-9 or DB-25 adapter to the COM 1 port.
Step 2: Power on devices.
Enable power to the computer and router.
Task 2: Configure TeraTerm Web to Establish a Console Session with the Router.
Step 1: Start TeraTerm Web application.
From the Windows taskbar, start the TeraTerm Web program by opening the TeraTerm Web folder, and starting the TeraTerm Web application, ttermpro.
Step 2: Configure TeraTerm Web.
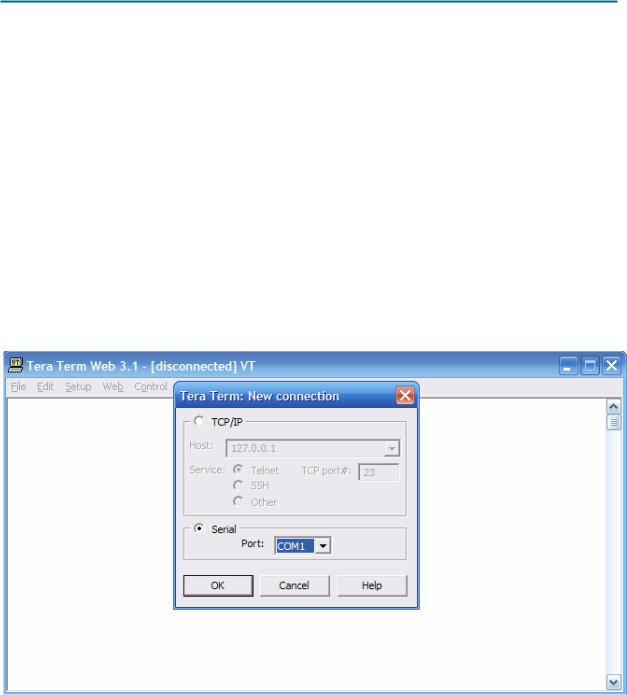
Figure 1. TeraTerm Web Connection Configuration Window
Click File > New Connection. Refer to Figure 1. Select the appropriate serial COM port. Click OK.
When the TeraTerm Web session window comes up, press the Enter key. There should be a response from the router. The connection has been successfully completed. If there is no connection, troubleshoot as necessary. For example, verify that the router has power. Check the connection to the COM 1 port on the PC and the console port on the router. If there is still no connection, ask the instructor for assistance.
Step 3: Close TeraTerm Web.
When finished, close the TeraTerm Web session. Click File | Exit. When asked whether to save the session, click Yes. Enter a name for the session.
All contents are Copyright © 1992–2007 Cisco Systems, Inc. All rights reserved. This document is Cisco Public Information. |
Page 7 of 8 |

CCNA Exploration |
|
Network Fundamentals: Planning and Cabling Networks |
Lab 10.6.2 Establishing a Console Session with HyperTerminal |
Step 4: Reconnect the TeraTerm Web session.
Reopen the TeraTerm Web session as described in Task 2, Step 1. This time, when the New Description window opens (see Figure 1), click Cancel.
Click File > Open. Select the saved session and then click Open. Use this technique to reconnect the TeraTerm Web session to a Cisco device without reconfiguring a new session.
Task 3: Reflection
This lab provided information for establishing a console connection to a Cisco router. Cisco switches are accessed in the same way.
Task 4: Challenge
Draw the pin connections for the rollover cable and straight-through cable. Compare the differences, and be able to identify the different cable types.
Task 5: Clean Up
Unless directed otherwise by the instructor, turn off power to the host computer and router. Remove the rollover cable.
Remove anything that was brought into the lab, and leave the room ready for the next class.
All contents are Copyright © 1992–2007 Cisco Systems, Inc. All rights reserved. This document is Cisco Public Information. |
Page 8 of 8 |
