

Lab 4.5.1: Observing TCP and UDP using Netstat
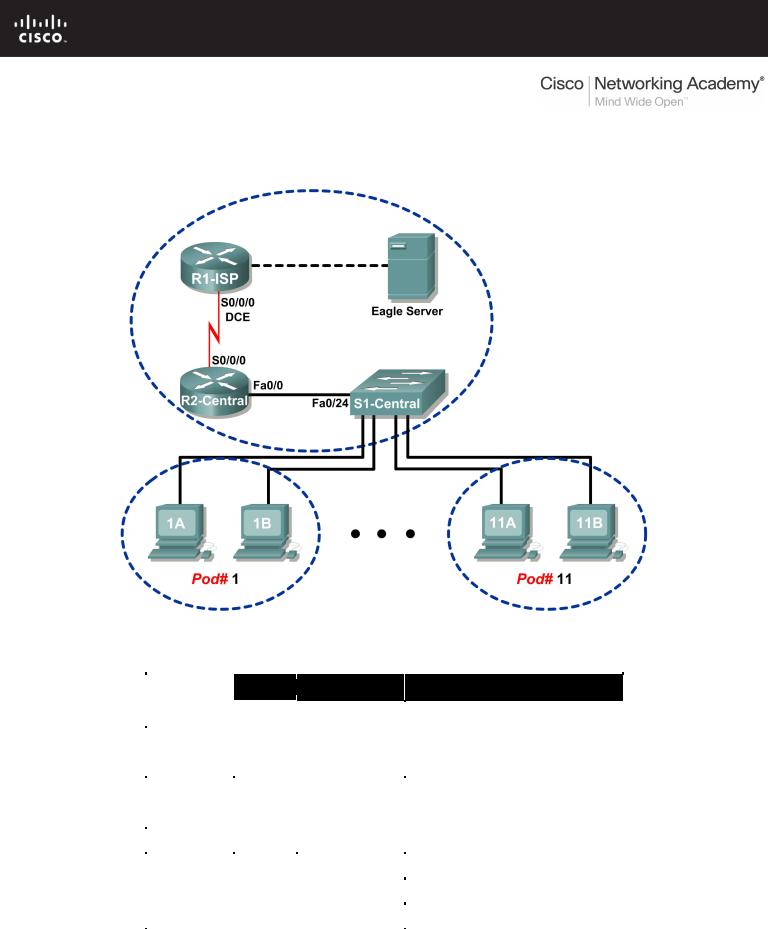
Topology Diagram
Addressing Table
Device |
Interface |
IP Address |
Subnet Mask |
Default Gateway |
|
|
|
|
|
|
|
R1-ISP |
S0/0/0 |
10.10.10.6 |
255.255.255.252 |
N/A |
|
|
|
|
|
||
Fa0/0 |
192.168.254.253 |
255.255.255.0 |
N/A |
||
|
|||||
|
|
|
|
|
|
R2-Central |
S0/0/0 |
10.10.10.5 |
255.255.255.252 |
10.10.10.6 |
|
|
|
|
|
||
Fa0/0 |
172.16.255.254 |
255.255.0.0 |
N/A |
||
|
|||||
|
|
|
|
|
|
|
N/A |
192.168.254.254 |
255.255.255.0 |
192.168.254.253 |
|
Eagle Server |
|
||||
|
|
|
|
||
N/A |
172.31.24.254 |
255.255.255.0 |
N/A |
||
|
|
||||
|
|
|
|
|
|
hostPod#A |
N/A |
172.16.Pod#.1 |
255.255.0.0 |
172.16.255.254 |
|
|
|||||
|
|
|
|
|
|
hostPod#B |
N/A |
172.16.Pod#.2 |
255.255.0.0 |
172.16.255.254 |
|
|
|||||
|
|
|
|
|
|
S1-Central |
N/A |
172.16.254.1 |
255.255.0.0 |
172.16.255.254 |
|
|
|||||
|
|
|
|
|
All contents are Copyright © 1992–2007 Cisco Systems, Inc. All rights reserved. This document is Cisco Public Information. Page 1 of 5

CCNA Exploration |
|
Network Fundamentals: OSI Transport Layer |
Lab 4.5.1: Observing TCP and UDP using Netstat |
Learning Objectives
•Explain common netstat command parameters and outputs.
•Use netstat to examine protocol information on a pod host computer.
Background
netstat is an abbreviation for the network statistics utility, available on both Windows and Unix / Linux computers. Passing optional parameters with the command will change output information. netstat displays incoming and outgoing network connections (TCP and UDP), host computer routing table information, and interface statistics.
Scenario
In this lab the student will examine the netstat command on a pod host computer, and adjust netstat output options to analyze and understand TCP/IP Transport Layer protocol status.
Task 1: Explain common netstat command parameters and outputs.
Open a terminal window by clicking on Start | Run. Type cmd, and press OK.
To display help information about the netstat command, use the /? options, as shown:
C:\> netstat /? <ENTER>
Use the output of the netstat /? command as reference to fill in the appropriate option that best matches the description:
Option |
Description |
|
Display all connections and listening ports. |
|
Display addresses and port numbers in numerical |
|
form. |
|
Redisplay statistics every five seconds. Press |
|
CTRL+C to stop redisplaying statistics. |
|
Shows connections for the protocol specified by |
|
proto; proto may be any of: TCP, UDP, TCPv6, or |
|
UDPv6. If used with the –s option to display |
|
per-protocol statistics, proto may be any of: |
|
IP, IPv6, ICMP, ICMPv6, TCP, TCPv6, UDP, or |
|
UDPv6. |
|
|
|
Redisplay all connections and listening ports |
|
every 30 seconds. |
|
|
|
Display only open connections. This is a tricky |
|
problem. |
When netstat statistics are displayed for TCP connections, the TCP state is displayed. During the life of a TCP connection, the connection passes through a series of states. The following table is a summary of TCP states, compiled from RFC 793, Transmission Control Protocol, September, 1981, as reported by netstat:
All contents are Copyright © 1992–2007 Cisco Systems, Inc. All rights reserved. This document is Cisco Public Information. |
Page 2 of 5 |
CCNA Exploration |
|
Network Fundamentals: OSI Transport Layer |
Lab 4.5.1: Observing TCP and UDP using Netstat |
State |
Connection Description |
LISTEN |
The local connection is waiting for a connection request from any remote |
|
device. |
ESTABLISHED |
The connection is open, and data may be exchanged through the |
|
connection. This is the normal state for the data transfer phase of the |
|
connection. |
TIME-WAIT |
The local connection is waiting a default period of time after sending a |
|
connection termination request before closing the connection. This is a |
|
normal condition, and will normally last between 30 - 120 seconds. |
CLOSE-WAIT |
The connection is closed, but is waiting for a termination request from the |
|
local user. |
SYN-SENT |
The local connection is waiting for a response after sending a connection |
|
request. The connection should transition quickly through this state. |
SYN_RECEIVED |
The local connection is waiting for a confirming connection request |
|
acknowledgment. The connection should transition quickly through this |
|
state. Multiple connections in SYN_RECEIVED state may indicate a TCP |
|
SYN attack. |
IP addresses displayed by netstat fall into several categories: |
|
|
|
IP Address |
Description |
127.0.0.1This address refers to the local host, or this computer.
0.0.0.0A global address, meaning “ANY”.
Remote |
The address of the remote device that has a connection with this computer. |
Address |
|
Task 2: Use netstat to Examine Protocol Information on a Pod Host Computer.
Step 1: Use netstat to view existing connections.
From the terminal window in Task 1, above, issue the command netstat –a:
C:\> netstat –a <ENTER>
A table will be displayed that lists protocol (TCP and UDP), Local address, Foreign address, and State information. Addresses and protocols that can be translated into names are displayed.
The –n option forces netstat to display output in raw format. From the terminal window, issue the command netstat –an:
C:\> netstat –an <ENTER>
Use the window vertical scroll bar to go back and forth between the outputs of the two commands. Compare outputs, noting how well-known port numbers are changed to names.
All contents are Copyright © 1992–2007 Cisco Systems, Inc. All rights reserved. This document is Cisco Public Information. |
Page 3 of 5 |
CCNA Exploration |
|
Network Fundamentals: OSI Transport Layer |
Lab 4.5.1: Observing TCP and UDP using Netstat |
Write down three TCP and three UDP connections from the netstat –a output, and the corresponding translated port numbers from the netstat –an output. If there are fewer than three connections that translate, note that in your table.
Connection |
Proto Local Address |
Foreign Address |
State |
|
|
|
|
|
|
|
|
|
|
|
|
|
|
|
|
|
|
|
|
|
|
|
|
|
|
|
|
|
|
|
|
|
|
|
|
|
|
|
|
|
|
|
|
|
|
|
|
|
|
|
|
Refer to the following netstat output. A new network engineer suspects that his host computer has been compromised by an outside attack against ports 1070 and 1071. How would you respond?
C:\> netstat –n |
|
|
|
Active |
Connections |
|
|
Proto |
Local Address |
Foreign Address |
State |
TCP |
127.0.0.1:1070 |
127.0.0.1:1071 |
ESTABLISHED |
TCP |
127.0.0.1:1071 |
127.0.0.1:1070 |
ESTABLISHED |
C:\> |
|
|
|
|
|
|
|
_______________________________________________________________________________
_______________________________________________________________________________
Step 2: Establish multiple concurrent TCP connections and record netstat output.
In this task, several simultaneous connections will be made with Eagle Server. The venerable telnet command will be used to access Eagle Server network services, thus providing several protocols to examine with netstat.
Open an additional four terminal windows. Arrange the windows so that all are visible. The four terminal windows that will be used for telnet connections to Eagle Server can be relatively small, approximately ½ screen width by ¼ screen height. The terminal windows that will be used to collect connection information should be ½ screen width by full screen height.
Several network services on Eagle Server will respond to a telnet connection. We will use:
•DNSdomain name server, port 53
•FTPFTP server, port 21
•SMTPSMTP mail server, port 25
•TELNETTelnet server, port 23
All contents are Copyright © 1992–2007 Cisco Systems, Inc. All rights reserved. This document is Cisco Public Information. |
Page 4 of 5 |

CCNA Exploration |
|
Network Fundamentals: OSI Transport Layer |
Lab 4.5.1: Observing TCP and UDP using Netstat |
Why should telnet to UDP ports fail?
_______________________________________________________________________________
_______________________________________________________________________________
To close a telnet connection, press the <CTRL> ] keys together. That will bring up the telnet prompt, Microsoft Telnet>. Type quit <ENTER> to close the session.
In the first telnet terminal window, telnet to Eagle Server on port 53. In the second terminal window, telnet on port 21. In the third terminal window, telnet on port 25. In the fourth terminal window, telnet on port 23. The command for a telnet connection on port 21 is shown below:
C:\> telnet eagle-server.example.com 53
In the large terminal window, record established connections with Eagle Server. Output should look similar to the following. If typing is slow, a connection may close before all connections have been made. Eventually, connections should terminate from inactivity.
Proto |
Local Address |
Foreign Address |
State |
TCP |
192.168.254.1:1688 |
192.168.254.254:21 |
ESTABLISHED |
TCP |
192.168.254.1:1691 |
192.168.254.254:25 |
ESTABLISHED |
TCP |
192.168.254.1:1693 |
192.168.254.254:53 |
ESTABLISHED |
TCP |
192.168.254.1:1694 |
192.168.254.254:23 |
ESTABLISHED |
|
|
|
|
Task 3: Reflection.
The netstat utility displays incoming and outgoing network connections (TCP and UDP), host computer routing table information, and interface statistics.
Task 4: Challenge.
Close Established sessions abruptly (close the terminal window), and issue the netstat –an command. Try to view connections in stages different from ESTABLISHED.
Task 5: Cleanup.
Unless directed otherwise by the instructor, turn off power to the host computers. Remove anything that was brought into the lab, and leave the room ready for the next class.
All contents are Copyright © 1992–2007 Cisco Systems, Inc. All rights reserved. This document is Cisco Public Information. |
Page 5 of 5 |