
- •Activity 1.1.1: Using Google Earth™ to View the World
- •Activity 1.4.5: Identifying Top Security Vulnerabilities
- •Lab 1.6.1: Using Collaboration Tools— IRC and IM
- •Lab 1.6.2: Using Collaboration Tools—Wikis and Web Logs
- •1.7.1: Skills Integration Challenge-Introduction to Packet Tracer
- •Activity 2.2.5: Using NeoTrace™ to View Internetworks
- •Lab 2.6.1: Topology Orientation and Building a Small Network
- •Lab 2.6.2: Using Wireshark™ to View Protocol Data Units
- •2.7.1: Skills Integration Challenge-Examining Packets
- •Activity 3.4.1: Data Stream Capture
- •Lab 3.4.2: Managing a Web Server
- •Lab 3.4.3: E-mail Services and Protocols
- •Lab 4.5.1: Observing TCP and UDP using Netstat
- •Lab 4.5.2: TCP/IP Transport Layer Protocols, TCP and UDP
- •Lab 4.5.3: Application and Transport Layer Protocols Examination
- •Lab 5.5.1: Examining a Device’s Gateway
- •Lab 5.5.2: Examining a Route
- •5.6.1: Skills Integration Challenge-Routing IP Packets
- •Lab 6.7.1: Ping and Traceroute
- •Lab 6.7.2: Examining ICMP Packets
- •Activity 6.7.3: IPv4 Address Subnetting Part 1
- •Activity 6.7.4: IPv4 Address Subnetting Part 2
- •Lab 6.7.5: Subnet and Router Configuration
- •Lab 7.5.2: Frame Examination
- •7.6.1: Skills Integration Challenge-Data Link Layer Issues
- •Lab 8.4.1: Media Connectors Lab Activity
- •Lab 9.8.1: Address Resolution Protocol (ARP)
- •Lab 9.8.2: Cisco Switch MAC Table Examination
- •Lab 9.8.3: Intermediary Device as an End Device
- •9.9.1: Skills Integration Challenge-Switched Ethernet
- •Lab 10.3.2: How Many Networks?
- •Lab 10.6.1: Creating a Small Lab Topology
- •Lab 10.6.2: Establishing a Console Session with HyperTerminal
- •Lab 10.6.3: Establishing a Console Session with Minicom
- •11.4.3.3: Network Latency Documentation with Ping
- •Lab 11.5.1: Basic Cisco Device Configuration
- •Lab 11.5.2: Managing Device Configuration
- •Lab 11.5.3: Configure Host Computers for IP Networking
- •Lab 11.5.4: Network Testing
- •Lab 11.5.5: Network Documentation with Utility Commands
- •Lab 11.5.6: Final Case Study - Datagram Analysis with Wireshark
This document is exclusive property of Cisco Systems, Inc. Permission is granted to print and copy this document for non-commercial distribution and exclusive use by instructors in the CCNA Exploration: Network Fundamentals course as part of an official Cisco Networking Academy Program.
Activity 1.1.1: Using Google Earth™ to View the World
Learning Objectives
Upon completion of this activity, you will be able to:
•Explain the purpose of Google Earth.
•Explain the different versions of Google Earth.
•Explain the hardware and software requirements needed to use Google Earth (free edition).
•Experiment with Google Earth features such as Help | Tutorial.
•Experiment with Google Earth to explore continents, countries, and places of interest.
Background
Google Earth is a popular application that executes on the desktop of most operating systems. It requires a broadband connection to the Internet and displays Earth as a manipulated 2D, or 3D image. The popular world news channel, CNN, regularly uses Google Earth to emphasize where a news story has occurred.
At the time of writing this activity, there are three versions of Google Earth. The version that fits most needs is Google's free version, Google Earth. A Google Earth Plus version includes GPS support, a spreadsheet importer, and other support features. The Google Earth Pro version is for professional and commercial use. The URL http://earth.google.com/product_comparison.html contains a description of the versions. Use this link to answer the following questions:
Which versions support Tilt and 3D rotation? __________________________
Which Google Earth version supports the highest resolution? __________________________
To use Google Earth, version 4, minimum computer hardware requirements must be met:
Operating System |
Microsoft Windows 2000 or Windows XP |
CPU |
Pentium 3 with 500 MHz |
System Memory (RAM) |
128 MB |
Hard Disk |
400 MB of free space |
Network Speed |
128 kbps |
Graphics Card |
3D-capable with 16 MB of VRAM |
Screen |
1024x768 pixels, 16-bit High Color screen |
Scenario
This activity is to be performed on a computer that has Internet access and on which you can install software.
Estimated completion time, depending on network speed, is 30 minutes.
All contents are Copyright © 1992–2007 Cisco Systems, Inc. All rights reserved. This document is Cisco Public Information. |
Page 1 of 5 |
CCNA Exploration |
|
Network Fundamentals: |
|
Living in a Network-Centric World |
Activity 1.1.1: Using Google Earth™ to View the World |
Task 1: Install Google Earth.
If Google Earth is not installed on the computer, the free application can be downloaded directly from http://earth.google.com/download-earth.html. Follow the installation instructions, and the Google Earth download should start automatically. Remember, you may have to disable any popup blockers on your browser.
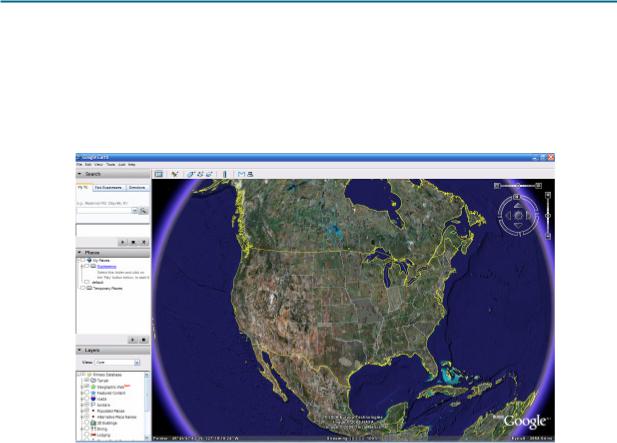
Figure 1. Google Earth Opening Screen
Task 2: Run Google Earth.
Step 1: Refer to Figure 1, the opening screen. The Menu bar is located in the upper left corner of the screen. On the Help menu, choose User Guide to launch a default web browser and bring up the Google Earth User’s Guide. http://earth.google.com/userguide/v4/. Take a few minutes to browse the User’s Guide. Before leaving the User’s Guide web site, answer the following questions:
List the three ways to move the image.
__________________________________________
__________________________________________
__________________________________________
Which mouse control will zoom in or zoom out?
__________________________________________
What is the purpose of the left mouse button?
__________________________________________
Task 3: Navigatie the Google Earth Interface.
Step 1: Use the Overview Map feature.
On the View menu, choose Overview Map. This handy feature provides a relative global position of the magnified image.
All contents are Copyright © 1992–2007 Cisco Systems, Inc. All rights reserved. This document is Cisco Public Information. |
Page 2 of 5 |
CCNA Exploration |
|
Network Fundamentals: |
|
Living in a Network-Centric World |
Activity 1.1.1: Using Google Earth™ to View the World |
Step 2: Review the navigation controls.
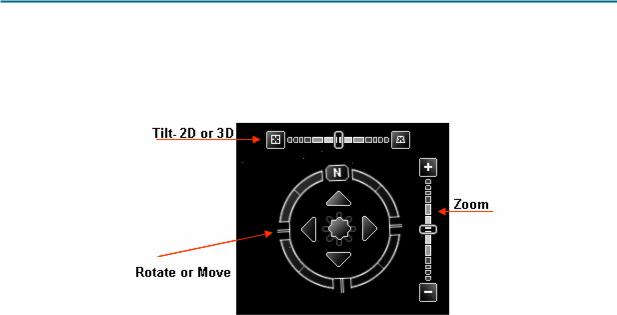
Navigation controls are located in the upper right quadrant and control the image magnification and position. The mouse pointer must be moved close to the controls, otherwise only a compass is displayed. Refer to Figure 2 for a description of the navigation controls.
Figure 2. Google Earth Screen Navigation Tools
Step 3: Use the Sightseeing feature.
On the left navigation bar, experiment with the Places > Sightseeing folder. Expand Sightseeing, choose a location that you would like to see, and double-click that location. The image will take you to that site. When the location has been reached, an image streaming indicator reports when the image resolution is complete.
Step 4: Experiment with the Search > Fly To folder.
Enter 95134, a U.S. Zip Code.
What U.S. State and City are displayed? ________________
What if you would like to "Fly To" London, UK? What data would you need to enter?
____________________________________________________________________________
____________________________________________________________________________
Step 5: Use the Fly To feature.
Some locations have better resolution than others, and some location images are older than others. For example, one user commented that he found his home, but the new home next door had not yet been built. Try to find your home using the Search > Fly To folder.
Is the resolution for your home the same quality as the Sightseeing location in Step 3? _______________
If the resolution for your neighborhood is sufficient, browse the surrounding area to see if you can determine approximately how old the image is.
All contents are Copyright © 1992–2007 Cisco Systems, Inc. All rights reserved. This document is Cisco Public Information. |
Page 3 of 5 |
CCNA Exploration |
|
Network Fundamentals: |
|
Living in a Network-Centric World |
Activity 1.1.1: Using Google Earth™ to View the World |
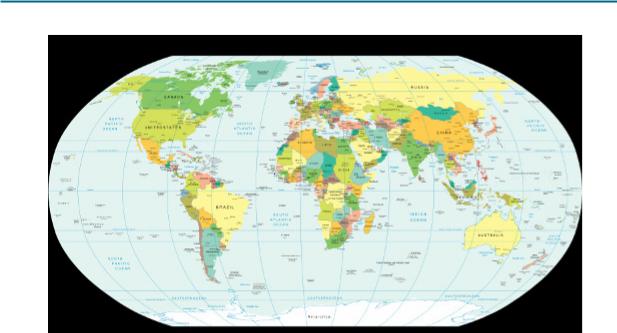
Figure 3. World Map with Latitude and Longitude Lines
Step 6: View geographic coordinates.
Geographic coordinates are displayed in the lower left quadrant of the image. The first number is called the latitude, and is the angle between a point and the equator. For example, the equator is an imaginary line dividing the globe into the Northern or Southern Hemisphere. The equator has a 0o latitude. The second number is called the longitude, and is the angle east or west of an arbitrary earth point. The Royal Observatory, United Kingdom, is the international zero-longitude point. The combined longitude and latitude is called the common graticule. The coordinate measurements are in degrees o, minutes’, seconds, and tenths". For latitude, the reference is North (N) or South (S) of the equator. For longitude, the reference is East (E) or West (W) of the Royal Observatory. Refer to Figure 3. For a layman’s definition of geographic coordinates, go to URL http://en.wikipedia.org/wiki/Geographic_coordinate_system. On the View menu, choose Grid to display Google Earth Gridlines.
Using the pointer and coordinates shown in the lower left quadrant of the image, what are the coordinates of your home? ____________________________
Task 4: Reflection
Google Earth can bring the world into the home or office. While enjoying the images, consider what digital communication resources were used. For example, satellite communication with an earth station transmitted the image of your home to a ground location. Some type of database was used to store the image. A Local Area Network (LAN) sent your image request across the Internet, probably through several Wide Area Networks (WANs) and then to another LAN with a computer that returned the image to you. The delay in retrieving the image may have been short or long, depending on the slowest speed of all network connections in the path between the database repository and your computer.
Could the image be displayed faster if data compression techniques were used?
Consider network security. Could someone eavesdrop on your network connection?
All contents are Copyright © 1992–2007 Cisco Systems, Inc. All rights reserved. This document is Cisco Public Information. |
Page 4 of 5 |

CCNA Exploration |
|
Network Fundamentals: |
|
Living in a Network-Centric World |
Activity 1.1.1: Using Google Earth™ to View the World |
Task 5: Challenge
Google Earth displays image coordinates in the lower left quadrant of the image. Use the following URL to learn about different coordinate systems: http://www.colorado.edu/geography/gcraft/notes/coordsys/coordsys.html. Wikipedia contains a useful definition of common geographical terms.
Use the geographic coordinate system to describe your home with as much accuracy and detail as possible.
Task 6: Clean Up
You may be required to remove Google Earth from the computer. If so, perform these steps:
1.Click Start > Settings > Control Panel.
2.Double-click Add or Remove Programs.
3.Locate and click Google Earth.
4.Click Remove and follow the prompts.
Additional removal information is available from URL
http://earth.google.com/support/bin/answer.py?answer=20738&ctx=sibling.
Unless instructed otherwise, turn off the computer.
All contents are Copyright © 1992–2007 Cisco Systems, Inc. All rights reserved. This document is Cisco Public Information. |
Page 5 of 5 |
